Intel Edison is capable of becoming the brain of any device from the Internet of Things. The brain can process information, but in order to receive it, it needs sensory organs. For example, how can Edison know if it’s hot or cold in the room right now? The answer is simple - using a temperature sensor.
In this article, you’ll learn how to use the Generic Attribute Profile (GATT) when Intel Edison interacts with Texas Instruments SensorTag using the Bluetooth Low Energy protocol.
Before we get started
In order for you to be able to use this manual in practice, you will need the assembled Intel Edison board, the firmware of which has been updated to the latest version. Between the board and the computer, a connection must be established that emulates a connection via a serial port, in addition, the device must have Internet access via Wi-Fi. If you need help preparing your motherboard, see the Intel Edison Getting Started Guides .
Install Gatttool
Texas Instruments SensorTag, like many other Bluetooth devices, supports GATT for communication with computers, smartphones, tablets. Gatttool is a standard set of software tools that comes with BlueZ. However, it is not installed by default on Intel Edison. In order to fix this, you need to connect to Intel Edison through the terminal emulator, then download and compile BlueZ using the following commands:
root@edison: cd ~
root@edison: wget
https://www.kernel.org/pub/linux/bluetooth/bluez-5.24.tar.xz –no-check-certificate
root@edison: tar -xf bluez-5.24.tar.xz
root@edison: cd bluez-5.24
root@edison: ./configure --disable-systemd –disable-udev
root@edison: make
root@edison: make install
In order for gatttool to be able to run from anywhere, we modify the PATH variable:
Scanning ether and detecting BLE devices using bluetoothctl
1. Turn on Bluetooth on Intel Edison.
root@edison: rfkill unblock bluetooth
2. Launch bluetoothctl
root@edison: bluetoothctl
3. Register the agent and set it to the default state.
[bluetooth]# agent KeyboardDisplay
[bluetooth]# default-agent
[bluetooth]# scan on
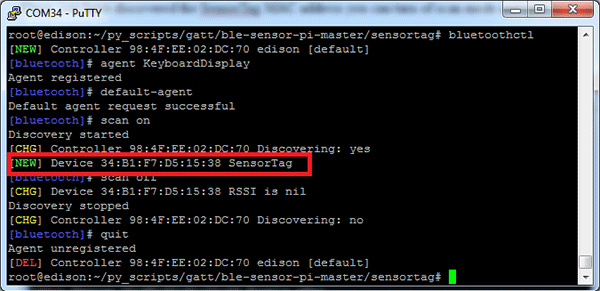
4. If the SensorTag cannot be found, press the pairing button with other devices on it. After it was possible to find out the MAC address of the SensorTag, the scanning mode can be turned off and logged out of the bluetoothctl session.
[bluetooth]# scan off
[bluetooth]# quit
Dedicated SensorTag MAC address found during a search for Bluetooth devices.
Using gatttool to read sensor readings
Now we can use gatttool to read sensor readings from the SensorTag.
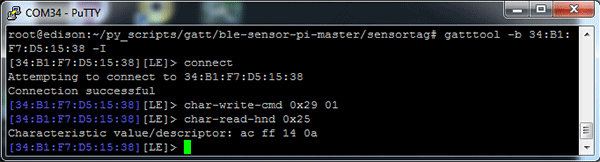
1. Run gatttool interactively using the MAC address found in the previous step.
root@edison: gatttool -b 34:B1:F7:D5:15:38 –I
2. Connect to the device and turn on the temperature sensor by writing 01 to the configure handle 0x29 identifier. After that, read the temperature readings from identifier 0x25.
The identifier code required to access the temperature sensor was taken from the SensorTag attribute table .
Temperature sensor
readings from SensorTag The temperature sensor readings look like two 16-bit unsigned numbers. In order to convert this data to its familiar form, they must be processed using a script that implements the conversion algorithm described in the SensorTag knowledge base .
Using Python to interpret sensor readings
1. In order to interpret the sensor readings, you can use a script written in the Python programming language and using the pexpect module. Let's take this script as an example and use it to read temperature readings from SensorTag.
4. After making the changes, save them and exit by pressing Escape and entering the following command:
:wq
Install pip and required Python modules
To run a Python script using pexpect, the latter must be installed. The easiest way to do this is with Pip. Pip is not installed on Intel Edison by default, it is not in the official opkg repository. However, Pip can be found in the unofficial Intel Edison repository, which was put together by Michael Hirsch. The following instructions are based on his guide on using the unofficial repository.
1. Edit the base-feeds.conf file with vi.
root@edison: vi /etc/opkg/base-feeds.conf
2. We introduce the following:
src/gz all http://repo.opkg.net/edison/repo/all
src/gz edison http://repo.opkg.net/edison/repo/edison
src/gz core2-32 http://repo.opkg.net/edison/repo/core2-32
3. Нажмём Escape и введем:
:wq
Running a Python script and reading temperature readings
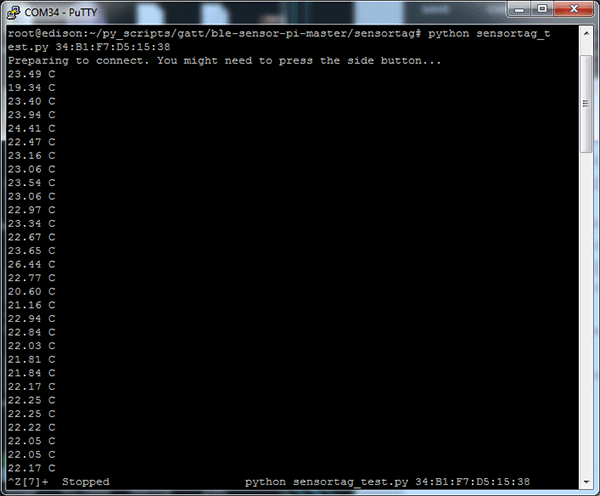
Now everything is ready to run a script that reads the temperature sensor. To do this, go to the / ble-sensor-pi-master / sensortag directory and run the following command:
Reading a temperature sensor using a Python script
Summary
Now you know how Intel Edison can receive and process temperature data from an external sensor connected via Bluetooth LE. A similar principle can be used, firstly, to connect other Bluetooth devices to Edison, and secondly, to collect readings of other TI SensorTag sensors. Have a good experiment!
 Intel Edison is capable of becoming the brain of any device from the Internet of Things. The brain can process information, but in order to receive it, it needs sensory organs. For example, how can Edison know if it’s hot or cold in the room right now? The answer is simple - using a temperature sensor.