Assistant for typing on Linux keyboard typing
I want to show and talk about a small program that has benefited.
Once at work, a friend wrote to me. The dialogue we had was approximately as follows:
- Hi, I am learning the technique of touch printing. The fact is that there is no program on Linux that could help me. In general, can you quickly write this?
Since helping a friend is a sacred affair, and the task looked interesting, I agreed to help.
The result is this:
Who cares, details below
Together with a friend, we made the statement of the problem:
The principle of its operation is as follows - after launching, a window with a schematic representation of the keyboard appears on the desktop. When buttons are pressed on a real keyboard, on a schematic image, the pressed buttons are pressed.
This helps to develop a reflex to look at the monitor while typing on the keyboard.
The main requirements for the program:
In the process of writing also added:
At the time the program appeared, there was already experience working with Tkinter, working with multiple threads. Plus, by the nature of the activity, you also have to be a system administrator, so working with the command line was not alien.
General description of the internals of the program:
To read the keys, the bash line found in google is used, which allows you to read the keys that are pressed on the keyboard through the xinput utility. This method was chosen to please clause 1 of the requirements. The process of reading characters starts in a separate thread. Reading the layout language is also implemented (again, point 1). Information about the pressed buttons is issued in a queue. Working with a queue in the main program window is done by periodically calling the periodicCall function. Thus, two threads write to the queue, one thread reads.
The program terminates in a peculiar way - through the status variables in the threads.
Program settings are loaded and stored in an instance of the ConfigManager class. Reading from the main text settings file is done using ConfigParser . This module allows you to use a configuration file similar to INI. The class constructor checks for the existence of a configuration file located along the path "~ / .key_trainer / program.conf". If it is not there, the program reads the program.conf file located in the current folder with the program.
ConfigParser is a great module. You can read the names of all sections, as well as read the keys with their values inside the sections as tuples. So, for example, reading out the names of sections and keys in the KEYBOARD SETTINGS section is implemented.
In addition to the main configuration file, there is a second equally important one - “keyboard.conf”. It is used to configure the displayed buttons, namely the button code, the text on the button (with the cipher and in the layouts), the position of the button. By removing / adding entries to this file, you can change the number and quality of buttons (and lines with buttons) in the main program window.
To read characters, the KeyboardStatus class is written, which takes the configuration class as an input parameter (see above). A thread-safe Queue is encapsulated inside this class .
Reading characters from the keyboard is performed in two streams. Why two - because in practice it turned out to be easier. One thread reads the keyboard layout, the second pressed buttons. Both threads are spawned through Thread , in each thread then through the subprocess Popen the corresponding process of reading keys or layouts will be launched. To read the output of a process, subprocess.PIPE is used . Once the text has come to process the output stream, it is read, processed, and, if necessary, put in place the Queue :
To terminate the stream, use the class variable proc_started. When you close the main window of the program, it is set to False, the reading cycle is exited, the process of reading keys through terminate is completed, and then wait - in order to wait until the process is completed.
In order to quickly make a graphical interface, Tkinter was used . This module allows you to easily work with simple graphical interfaces (windows, buttons, checkmarks, etc.). The input window class of the GuiManager, among other parameters, accepts the configuration class. Button settings are taken from it, then these buttons are created and added to the main program window.
When adding buttons to the form, dictionaries are created along with the line number keys and values - the Frame object in each of which the buttons are placed. As you can see from the code, the buttons are formed line by line; upon completion of the formation of the line, the widget is put into the window by the pack () method.
Among other things, the function added processQueue, which from the flow of the graphical interface takes out tuple queues with events of pressed buttons and changes the appearance of the buttons - “clicks” them, “switches layouts” and “clicks” the shift button:
The GuiManager class is encapsulated inside the ThreadedClient class, which receives the Tkinter main stream and calls the queue parsing function every 20 milliseconds:
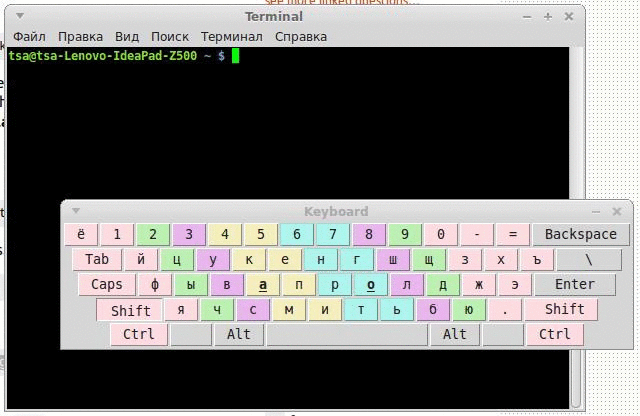
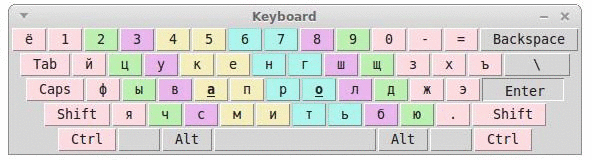
General view of the program window:
Left Alt key pressed:

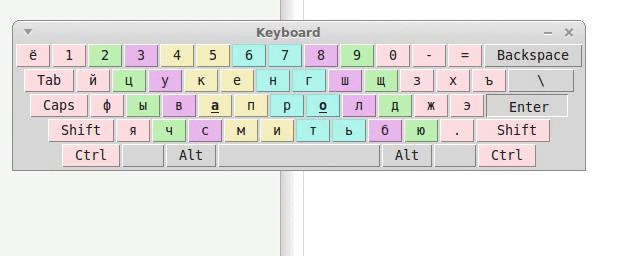
Program window after reconfiguration:
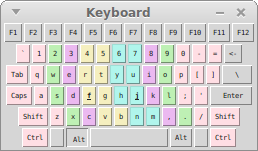
When you hover over the mouse, the program window “leaves” under the heading (colors that remain on a white background are video compression artifacts):
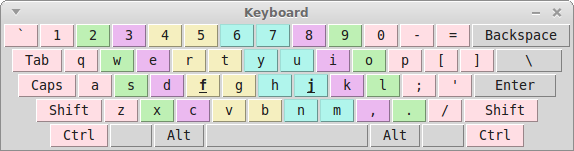
Press the shift key and switch the language:
What is the result? And it turned out to be a good program to help people learn to type blindly on the keyboard. Yes, she has disadvantages and inefficiencies, namely:
The code can be downloaded / viewed here: Link to bitbucket.
The program requires python 2.7 and Tkinter. To install the latter, you must run the command:
The program is launched by the script Start.sh from the directory with the program.
Thanks for attention!
PS There was a question: how long did it take to write the program? Time was spent in a total of 6-8 hours, after the first three there was active testing and all sorts of details were completed.
UPD: removed try / except from GUI queue processing
Once at work, a friend wrote to me. The dialogue we had was approximately as follows:
- Hi, I am learning the technique of touch printing. The fact is that there is no program on Linux that could help me. In general, can you quickly write this?
Since helping a friend is a sacred affair, and the task looked interesting, I agreed to help.
The result is this:
Who cares, details below
Warning
I do not pretend to be a python guru, so in the code (and I'm almost sure of it) there are hammering with a microscope and other absurdities.
Together with a friend, we made the statement of the problem:
The principle of its operation is as follows - after launching, a window with a schematic representation of the keyboard appears on the desktop. When buttons are pressed on a real keyboard, on a schematic image, the pressed buttons are pressed.
This helps to develop a reflex to look at the monitor while typing on the keyboard.
The main requirements for the program:
- Implement it very quickly;
- Show pressed keys in real time;
- “Switch layouts” in the window when switching the keyboard language;
- To configure the program through a text configuration file.
In the process of writing also added:
- The sticking mode of the last key pressed (helps you figure out where to press your fingers further);
- Work with the shift key;
- The ability to mark the color of the positions for the fingers on the keyboard;
- The ability to customize the font;
- Ability to adjust the width of the buttons;
- Automatically hide the contents of the window on hover.
At the time the program appeared, there was already experience working with Tkinter, working with multiple threads. Plus, by the nature of the activity, you also have to be a system administrator, so working with the command line was not alien.
General description of the internals of the program:
To read the keys, the bash line found in google is used, which allows you to read the keys that are pressed on the keyboard through the xinput utility. This method was chosen to please clause 1 of the requirements. The process of reading characters starts in a separate thread. Reading the layout language is also implemented (again, point 1). Information about the pressed buttons is issued in a queue. Working with a queue in the main program window is done by periodically calling the periodicCall function. Thus, two threads write to the queue, one thread reads.
The program terminates in a peculiar way - through the status variables in the threads.
Work with program settings
Program settings are loaded and stored in an instance of the ConfigManager class. Reading from the main text settings file is done using ConfigParser . This module allows you to use a configuration file similar to INI. The class constructor checks for the existence of a configuration file located along the path "~ / .key_trainer / program.conf". If it is not there, the program reads the program.conf file located in the current folder with the program.
Some code
import os
...
filename='program.conf'
home = os.path.expanduser("~")
if os.path.isfile(home+'/.key_trainer/'+filename):
    filename=home+'/.key_trainer/'+filename
...
ConfigParser is a great module. You can read the names of all sections, as well as read the keys with their values inside the sections as tuples. So, for example, reading out the names of sections and keys in the KEYBOARD SETTINGS section is implemented.
Some more code
from ConfigParser import RawParser
...
myParser=RawConfigParser(allow_no_value=True)
myParser.read(path_to_file)
# Получаем секции
self.sections = myParser.sections()
# Используем генератор чтобы вытащить ключи, заданные в секции KEYBOARD SETTINGS
keyboard_settings_keys=[x[0] for x in myParser.items("KEYBOARD SETTINGS")]
In addition to the main configuration file, there is a second equally important one - “keyboard.conf”. It is used to configure the displayed buttons, namely the button code, the text on the button (with the cipher and in the layouts), the position of the button. By removing / adding entries to this file, you can change the number and quality of buttons (and lines with buttons) in the main program window.
The format of entries in keyboard.conf
The file contains entries in the form:
[button code]: "[lowercase character in the English layout], [uppercase character in the English layout], [lowercase character in the Russian layout], [uppercase character in the Russian layout]": [button line number ], [button column number]
Here are a few entries for example:
24: "q, Q, d, y": 3.2
25: "w, W, q, t": 3.3
26: "e, E, y, Y ": 3.4
27:" r, R, k, K ": 3.5
Reading characters from the keyboard
To read characters, the KeyboardStatus class is written, which takes the configuration class as an input parameter (see above). A thread-safe Queue is encapsulated inside this class .
Reading characters from the keyboard is performed in two streams. Why two - because in practice it turned out to be easier. One thread reads the keyboard layout, the second pressed buttons. Both threads are spawned through Thread , in each thread then through the subprocess Popen the corresponding process of reading keys or layouts will be launched. To read the output of a process, subprocess.PIPE is used . Once the text has come to process the output stream, it is read, processed, and, if necessary, put in place the Queue :
The code
from subprocess import Popen
from subprocess import PIPE
import threading
...
def doReadingKeys(self):
    self.myProcess=Popen('xinput list '+'|'+'   grep -Po \'id=\K\d+(?=.*slave\s*keyboard)\' '+'|'+'   xargs -P0 -n1 xinput test',shell=True,stdout=PIPE)
    while self.proc_started:
        symbol=self.myProcess.stdout.read(1)
        if symbol in press_release_dict:
            symbol_pressed=press_release_dict[symbol]
            while symbol!='\n':
                symbol=self.myProcess.stdout.read(1)
                if symbol.isdigit():
                    symbol_index=symbol_index*10+int(symbol)
                self.myQueue.put((symbol_index,symbol_pressed))
                symbol_index=0
...
keysThread=threading.Thread(target=self.doReadingKeys)
keysThread.start()
...
To terminate the stream, use the class variable proc_started. When you close the main window of the program, it is set to False, the reading cycle is exited, the process of reading keys through terminate is completed, and then wait - in order to wait until the process is completed.
Comment
This approach has one drawback - unlocking (and hence further terminating the thread and the process) the read method, which inside the loop will not happen until something is counted from the output stream of the myProcess process. But in practice, there were no problems because of this, since we often press buttons.
GUI
In order to quickly make a graphical interface, Tkinter was used . This module allows you to easily work with simple graphical interfaces (windows, buttons, checkmarks, etc.). The input window class of the GuiManager, among other parameters, accepts the configuration class. Button settings are taken from it, then these buttons are created and added to the main program window.
Button Add Code
from Tkinter import *
import tkFont
...
        self.buttonFont=tkFont.Font(family=config.font_name,size=config.font_size)
        self.boldUnderscoredButtonFont=tkFont.Font(family=config.font_name,size=config.font_size,weight='bold',underline=1)
        for row_index in xrange(1,config.getNumOfRows()+1):
            self.gui_rows[int(row_index)]=Frame(master)
            self.gui_row_buttons[int(row_index)]=[]
            for button_num in xrange(1,config.getNumOfKeysInRow(row_index)+1):
                newButton=Button(self.gui_rows[int(row_index)])
                if self.config.padx!=-1:
                    newButton.config(padx=self.config.padx)
                if self.config.pady!=-1:
                    newButton.config(pady=self.config.pady)
                if (row_index,int(button_num)) in config.key_pos_to_index:
                    self.gui_all_buttons[config.key_pos_to_index[(row_index,int(button_num))]] = newButton
                self.gui_row_buttons[int(row_index)].append(newButton)
                newButton.pack(side=LEFT)
            self.gui_rows[int(row_index)].pack()
        self.reconfigure_text_on_buttons(config,shift_pressed=0,lang=0)
...
When adding buttons to the form, dictionaries are created along with the line number keys and values - the Frame object in each of which the buttons are placed. As you can see from the code, the buttons are formed line by line; upon completion of the formation of the line, the widget is put into the window by the pack () method.
Among other things, the function added processQueue, which from the flow of the graphical interface takes out tuple queues with events of pressed buttons and changes the appearance of the buttons - “clicks” them, “switches layouts” and “clicks” the shift button:
GUI queue processing
    def processQueue(self):
        while not self.queue.empty():
            msg = self.queue.get(0)
            if msg[0] == -1:                 # -1 message is for changing language
                    self.currentLang=int(msg[1])
                    if self.config.debug:
                        print "Changed lang!"
                    self.reconfigure_text_on_buttons(self.config,0,msg[1])
            if msg[0] in self.gui_all_buttons:
                if msg[0] in self.shift_key_codes:
                    self.reconfigure_text_on_buttons(self.config,msg[1],self.currentLang)
                if msg[1]==1:
                    self.gui_all_buttons[msg[0]].config(relief=SUNKEN)
                    if self.sticky_key_behaviour:
                        if self.last_sticky_button!=msg[0]:
                            self.gui_all_buttons[self.last_sticky_button].config(relief=RAISED)
                        self.last_sticky_button=msg[0]
                else:
                    if not self.sticky_key_behaviour:
                        self.gui_all_buttons[msg[0]].config(relief=RAISED)
            if self.config.debug:
                print msg
The GuiManager class is encapsulated inside the ThreadedClient class, which receives the Tkinter main stream and calls the queue parsing function every 20 milliseconds:
GuiManager Encapsulating Class
class ThreadedClient:
    def __init__(self, master):
        self.master = master
        self.config=ConfigManager()
        self.keyTrainer=keyboardStatus(self.config)
        keyTrainer=self.keyTrainer
        master.protocol('WM_DELETE_WINDOW', self.kill_and_destroy)
        self.guiManager=GuiManager(master,self.config,keyTrainer.myQueue,keyTrainer)
        keyTrainer.begin_scan()
        self.running = 1
        self.periodicCall()
    def kill_and_destroy(self):
        self.running = 0
        self.keyTrainer.stop_scan()
        if self.config.debug:
            print "Stopping scan..."
        self.master.destroy()
    def periodicCall(self):
        self.guiManager.processQueue()
        if not self.running:
            # import sys
            # sys.exit(1)
            self.kill_and_destroy()
        self.master.after(20, self.periodicCall)
Few pictures
General view of the program window:
Left Alt key pressed:
Program window after reconfiguration:
When you hover over the mouse, the program window “leaves” under the heading (colors that remain on a white background are video compression artifacts):
Press the shift key and switch the language:
Conclusion
What is the result? And it turned out to be a good program to help people learn to type blindly on the keyboard. Yes, she has disadvantages and inefficiencies, namely:
- Processes launched from the side with bash commands for reading characters;
- Hard-set languages (only Russian and English);
- Square interface;
- It works on Ubuntu and Linux Mint (MATE), on other distributions it has not been tested;
The code can be downloaded / viewed here: Link to bitbucket.
The program requires python 2.7 and Tkinter. To install the latter, you must run the command:
sudo apt-get install python-tk
The program is launched by the script Start.sh from the directory with the program.
Thanks for attention!
PS There was a question: how long did it take to write the program? Time was spent in a total of 6-8 hours, after the first three there was active testing and all sorts of details were completed.
UPD: removed try / except from GUI queue processing