Urho3D Editor (Part 2)
- Tutorial
We continue to comprehend the Urho3D editor. In this lesson we will learn how to work with physics, get acquainted with prefabs, master the particle editor and make our gun shoot. And also, as a bonus, we will learn how to pack game resources.
Urho3D supports two physical libraries: Box2D and Bullet. The principles of working with them are very similar, but the first implements the movement of nodes only in the XY plane, and the second in three-dimensional space. Box2D components are in the menu Create-> Component-> Urho2D, and Bullet in the menu Create-> Component-> Physics.
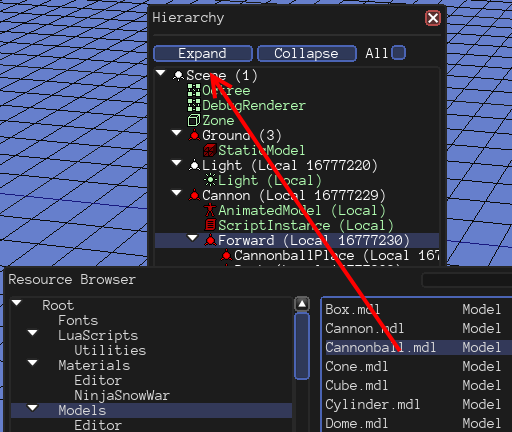
So, load the GameData \ Scenes \ Level01.xml scene from the pastlesson (File-> Open recent scene or File-> Open scene ...). We have a floor and a gun. Let's add a cannonball to the scene. In the Resource Browser, open the Models folder and drag Cannonball.mdl into the Hierarchy window on the Scene root node. To prevent the gun and the floor from interfering with work, in the Hierarchy window, right-click their nodes and select Enable / disable. At the same time, they will disappear from the scene, and the nodes will be painted red. Now double-click on the node with the kernel and it (the kernel) will be in the center of the screen.
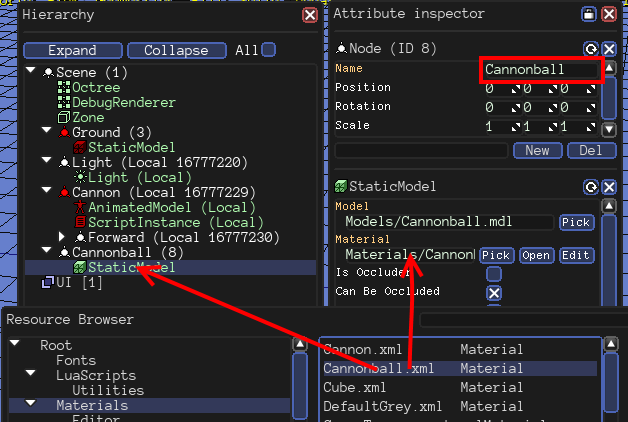
Now in the resource browser, open the Materials folder and drag the material onto the StaticModel component in the Hierarchy window or in the Material column of the Attribute inspector window. Give the node a name and enable the Cast Shadows option.
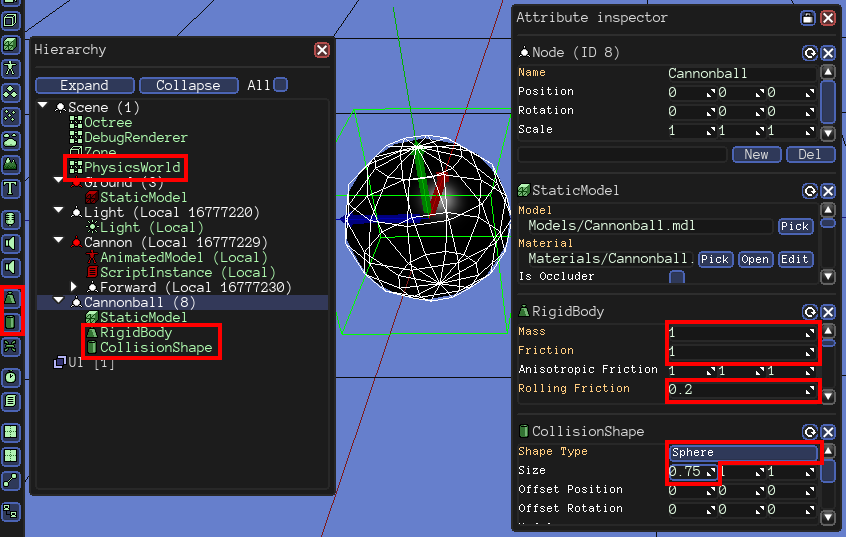
Add RigidBody and CollisionShape components (Create-> Component-> Physics) to the cannonball core. In this case, the PhysicsWorld component, which is necessary for the work of physics, will be automatically added to the scene.
RigidBody defines the physical properties of an object. Bodies are static and dynamic. Static bodies are motionless and are only obstacles, and dynamic bodies are subject to external forces (including gravity). If the body has mass - it is dynamic, if the mass is zero, then the body is static.
Set the mass, sliding friction, and rolling friction for RigidBody as in the screenshot below. I want to draw your attention to the CCD Radius and CCD Motion Threshold parameters. If small objects slip through obstacles at high speed, then setting these parameters will help you.
CollisionShape defines the shape of the object that is used in collision calculations. Why not use the 3D model itself? In order to optimize. For example, to determine the intersection with a sphere, it is enough to compare the distance to the center of the sphere and the radius of this sphere. This is much faster than calculating the intersections of many triangles. An object may contain several shapes to more accurately describe the shape.
Select the Sphere type for the CollisionShape component and set the radius close to the radius of the cannonball, as in the screenshot above.
Make sure the RevertOnPause switch is enabled and click the RunUpdatePlay button. The cannonball under the influence of gravity will begin to fall down. Press pause and the core will return to its place.
Those who have worked with Unity will be familiar with this concept. A prefab is an object template that can be repeatedly inserted into a scene. Create the Objects folder in the GameData directory. Select the Cannonball node, select the menu item File-> Save node as ... and save to the file GameData / Objects / Cannonball.xml. Now the cannonball can be removed from the scene. To add prefabs to the scene, use the menu item File-> Load node.
Turn on the gun and floor nodes to make them visible. Create RigidBody and CollisionShape components for them. For the floor, select the StaticPlane shape type (infinite plane) and set it (semi) to slip friction and rolling friction equal to unity (otherwise the bodies will move endlessly on it, as objects friction multiply upon contact). For the gun, select the shape of the Capsule shape and set the shape (not the node) to Size = (2, 4.3, 1) and Offset Offset Position = (0, 1.12, 0). For the gun, also add the AnimationController component (Create-> Component-> Logic), which will allow us to play the shot animation created in the 3D editor.
We launch and enjoy how, when you press the spacebar, the gun inflates and spits up the nucleus.
Let's make the nucleus self-destruct after ten seconds of its existence. Create a CannonBall.as file in the GameData \ Scripts folder with the text:
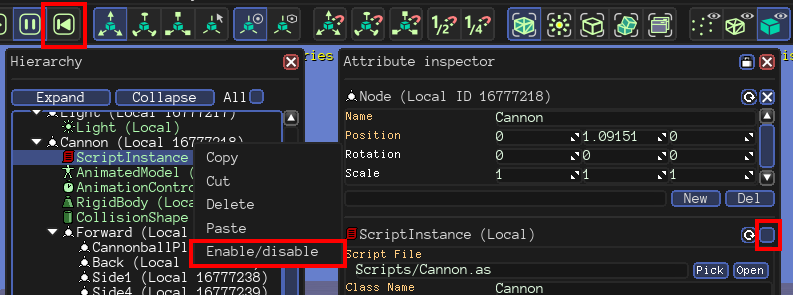
Then load the prefab GameData / Objects / Cannonball.xml into the scene (File-> Load node-> As replicated / local ...), add the ScriptInstance component to it, specify the newly created file and enter the name of the Dying class (do not forget to press Enter). Now the prefab can be saved and removed from the scene. Run and watch how the nuclei disappear.
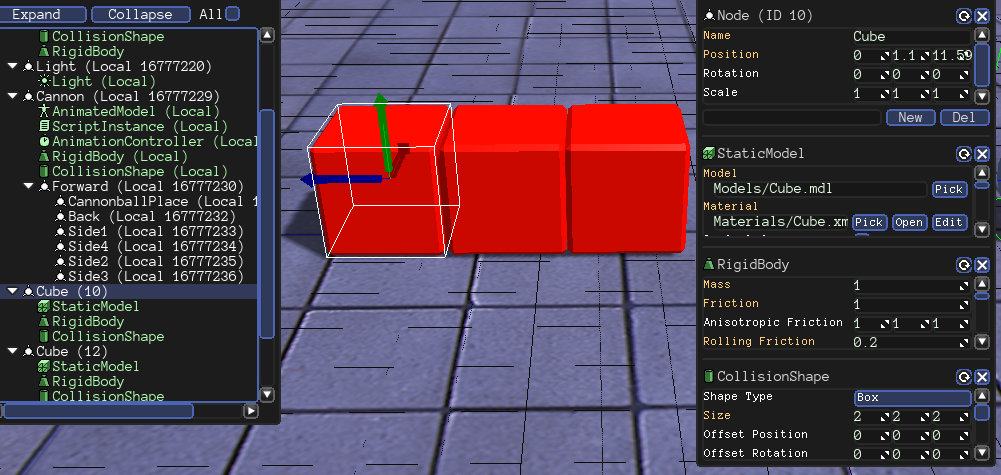
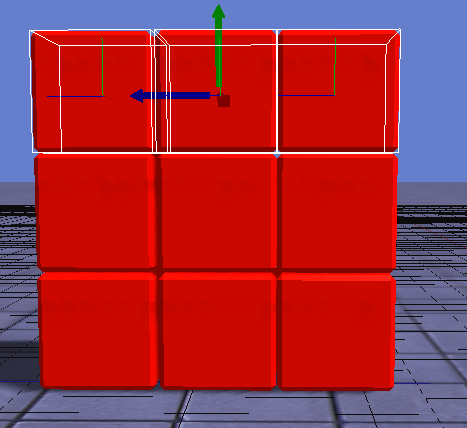
Add to the scene a building of cubes, which we will fire from a cannon. As usual, drag the GameData / Models / Cube.mdl model onto the Scene root node and set it to GameData / Materials / Cube.xml. Also enable the Cast Shadows option. Add the RigidBody component (Mass = 1, Friction = 1, Rolling Friction = 0.2) and the CollisionShape component (Shape Type = Box, Size = (2, 2, 2)). Place the cube a little above the ground (if you immerse it in the ground, it will jump out at startup). Press Ctrl + D to duplicate the cube and move the copy to the side. Create another copy.
By the way, did you notice that in the Attribute inspector window all values that differ from the default are marked in golden color?
Now select the entire row of cubes with the Ctrl button pressed and duplicate it in its entirety. Lift the copy above the first row (do not forget about the gaps). Then create another row.
Run it. We had such a problem that after launching, the cubes drop a little down, but it’s difficult to manually set them on top of each other with great accuracy. And here the RevertOnPause switch will come to our aid. Turn it off, and also disable the ScriptInstance component of the gun (just as we previously turned off the entire nodes, just now right-click on the component, not on the node; another way is to click the cross in the Attribute inspector window).
Now start playing, and when the cubes fall - stop. The scene remained in a new state. Remember to re-enable RevertOnPause and ScriptInstance.
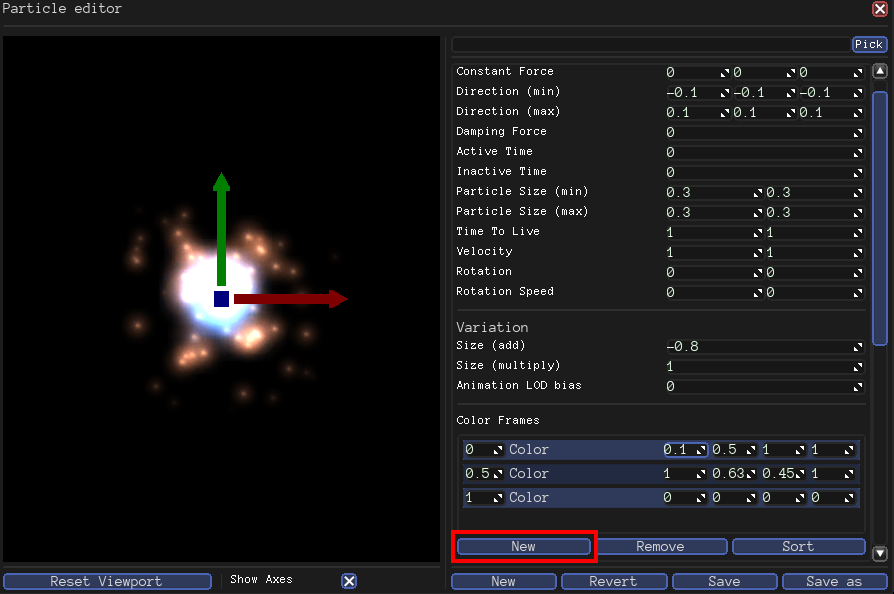
Let's create a trail of particles for cannonballs. Open the particle editor through the menu item View-> Particle editor. Set the following options:
Now add a color change over time for the particles. Double-click on the New button under the Color Frames block to create two new lines and fill in the fields as in the screenshot below. The first value is time, and then the color is in RGBA format.
Click the Save As button, save the effect to the GameData \ Particle \ Sparks.xml file and close the particle editor window. Load the prefab with the cannonball into the scene, add the ParticleEmitter component (Create-> Component-> Geometry) to it, specify the newly created effect, save the prefab to a file and remove the cannonball from the scene. The game is ready.
We did not consider all the features of the editor. For example, not a word was said about creating an interface or about a material editor. However, understanding the general principles, dealing with them will not be difficult.
Now you need to arrange the game as a separate program. The plan is very simple: create a minimal script that loads and runs the scene. But there is not enough camera in the scene, and the editor’s internal camera is used, which will be inaccessible outside of it. As usual, create a new node and add the Camera component to it (Create-> Component-> Scene). Be sure to name the node Camera so that we can access it in our script. Position and rotate the camera as you like (the view from the camera that appears in the lower right corner will help you with this). Also, attach the SoundListener component (Create-> Component-> Audio) to the node with the camera, without which you will not hear sounds positioned in space. Save the scene and create a GameData \ Scripts \ Main.as file with the following contents:
Copy the CoreData folder and the Urho3DPlayer.exe launcher to the game folder. And we already have a batch file for launching Start.bat (from the Urho3DHabrahabr02Start.zip archive). It indicates to the launcher the folders containing the game resources, window sizes and start script.
The final result can be downloaded here .
First, compile all the scripts with the “ScriptCompiler.exe GameData / Scripts / *. As” command. As a result, we get files with the .asc extensions. Recently, a patch was added , thanks to which, in the absence of the requested .as file, the .asc file is loaded, which means that now you do not need to deal with renaming. Just move the source .as files from the GameData \ Scripts folder to another location, leaving only .asc files.
For packaging, we need the utility Build \ bin \ tool \ PackageTool.exe. Run the commands:
The "-c" parameter activates file compression (using the high-speed LZ4 algorithm ).
Now CoreData and GameData folders can be removed. As a result, we have:
Well, to make it quite beautiful, you can get rid of the Start.bat batch file. But for this you need to modify the source code of the launcher (it is in the folder Urho3D \ Source \ Tools \ Urho3DPlayer). Do not be scared in advance - the launcher source is very small, because it only deals with the fact that it transfers the launch parameters to the engine. These are the parameters you need to specify. At the same time, you can make your own icon for the application.
I take this opportunity to invite those who wish to join the filling of the Russian-language Wiki . Thanks for attention!
Physics
Urho3D supports two physical libraries: Box2D and Bullet. The principles of working with them are very similar, but the first implements the movement of nodes only in the XY plane, and the second in three-dimensional space. Box2D components are in the menu Create-> Component-> Urho2D, and Bullet in the menu Create-> Component-> Physics.
So, load the GameData \ Scenes \ Level01.xml scene from the pastlesson (File-> Open recent scene or File-> Open scene ...). We have a floor and a gun. Let's add a cannonball to the scene. In the Resource Browser, open the Models folder and drag Cannonball.mdl into the Hierarchy window on the Scene root node. To prevent the gun and the floor from interfering with work, in the Hierarchy window, right-click their nodes and select Enable / disable. At the same time, they will disappear from the scene, and the nodes will be painted red. Now double-click on the node with the kernel and it (the kernel) will be in the center of the screen.
Now in the resource browser, open the Materials folder and drag the material onto the StaticModel component in the Hierarchy window or in the Material column of the Attribute inspector window. Give the node a name and enable the Cast Shadows option.
Add RigidBody and CollisionShape components (Create-> Component-> Physics) to the cannonball core. In this case, the PhysicsWorld component, which is necessary for the work of physics, will be automatically added to the scene.
RigidBody defines the physical properties of an object. Bodies are static and dynamic. Static bodies are motionless and are only obstacles, and dynamic bodies are subject to external forces (including gravity). If the body has mass - it is dynamic, if the mass is zero, then the body is static.
Set the mass, sliding friction, and rolling friction for RigidBody as in the screenshot below. I want to draw your attention to the CCD Radius and CCD Motion Threshold parameters. If small objects slip through obstacles at high speed, then setting these parameters will help you.
CollisionShape defines the shape of the object that is used in collision calculations. Why not use the 3D model itself? In order to optimize. For example, to determine the intersection with a sphere, it is enough to compare the distance to the center of the sphere and the radius of this sphere. This is much faster than calculating the intersections of many triangles. An object may contain several shapes to more accurately describe the shape.
Select the Sphere type for the CollisionShape component and set the radius close to the radius of the cannonball, as in the screenshot above.
Make sure the RevertOnPause switch is enabled and click the RunUpdatePlay button. The cannonball under the influence of gravity will begin to fall down. Press pause and the core will return to its place.
Prefabs
Those who have worked with Unity will be familiar with this concept. A prefab is an object template that can be repeatedly inserted into a scene. Create the Objects folder in the GameData directory. Select the Cannonball node, select the menu item File-> Save node as ... and save to the file GameData / Objects / Cannonball.xml. Now the cannonball can be removed from the scene. To add prefabs to the scene, use the menu item File-> Load node.
Gun, shoot!
Turn on the gun and floor nodes to make them visible. Create RigidBody and CollisionShape components for them. For the floor, select the StaticPlane shape type (infinite plane) and set it (semi) to slip friction and rolling friction equal to unity (otherwise the bodies will move endlessly on it, as objects friction multiply upon contact). For the gun, select the shape of the Capsule shape and set the shape (not the node) to Size = (2, 4.3, 1) and Offset Offset Position = (0, 1.12, 0). For the gun, also add the AnimationController component (Create-> Component-> Logic), which will allow us to play the shot animation created in the 3D editor.
Now we modify the gun script GameData \ Scripts \ Cannon.as (click to expand).
class Cannon : ScriptObject
{
    // Положительное или отрицательное направление вращения пушки.
    int direction = 1;
    // Задержка до следующего выстрела.
    float shootDelay = 0.0f;
    // Функция вызывается каждый кадр.
    void Update(float timeStep)
    {
        // Угол поворота вокруг оси x (node указывает на ноду, к которой прикреплен скрипт).
        float pitch = node.rotation.pitch;
        // Меняем направление вращения, если значение угла выходит за заданные пределы.
        if (pitch >= 70.0f)
            direction = -1;
        else if (pitch <= -10.0f)
            direction = 1;
        pitch += 30.0f * direction * timeStep;
        node.rotation = Quaternion(pitch, 0.0f, 0.0f);
        if (shootDelay > 0.0f)
            shootDelay -= timeStep;
        // Если нажат пробел и прошло достаточно времени с предыдущего выстрела,
        if (input.keyDown[KEY_SPACE] && shootDelay <= 0.0f)
        {
            Shoot();             // то стреляем
            shootDelay = 1.0f;   // и вновь устанавливаем задержку в одну секунду.
            AnimationController@ animCtrl = node.GetComponent("AnimationController");
            animCtrl.SetTime("Models/Shoot.ani", 0.0f);                 // Перематываем анимацию в начало.
            animCtrl.PlayExclusive("Models/Shoot.ani", 0, false, 0.0f); // Запускаем анимацию пушки.
            SoundSource3D@ source = node.CreateComponent("SoundSource3D"); // Создаем источник звука.
            Sound@ sound = cache.GetResource("Sound", "Sounds/Shoot.wav");
            source.autoRemove = true; // Источник звука будет автоматически уничтожен после проигрывания.
            source.Play(sound);
        }
    }
    void Shoot()
    {
        // Определяем позицию кости CannonballPlace у пушки.
        Vector3 position = node.GetChild("CannonballPlace", true).worldPosition;
        // Добавляем в сцену префаб.
        XMLFile@ xml = cache.GetResource("XMLFile", "Objects/Cannonball.xml");
        Node@ newNode = scene.InstantiateXML(xml, position, Quaternion());
        // Находим компонент RigidBody.
        RigidBody@ body = newNode.GetComponent("RigidBody");
        // Изначально у пушечного ядра уже будет импульс, так как ядро частично пересекается с пушкой
        // и стремится оттолкнуться от него. Но нам нужен импульс побольше.
        body.ApplyImpulse(node.rotation * Vector3(0.0f, 1.0f, 0.0f) * 15.0f);
    }
}
We launch and enjoy how, when you press the spacebar, the gun inflates and spits up the nucleus.
Let's make the nucleus self-destruct after ten seconds of its existence. Create a CannonBall.as file in the GameData \ Scripts folder with the text:
class Dying : ScriptObject
{
    float time = 0.0f;
    void Update(float timeStep)
    {
        time += timeStep;
        if (time > 10.0f)
            node.Remove();
    }
}
Then load the prefab GameData / Objects / Cannonball.xml into the scene (File-> Load node-> As replicated / local ...), add the ScriptInstance component to it, specify the newly created file and enter the name of the Dying class (do not forget to press Enter). Now the prefab can be saved and removed from the scene. Run and watch how the nuclei disappear.
Hare town
Add to the scene a building of cubes, which we will fire from a cannon. As usual, drag the GameData / Models / Cube.mdl model onto the Scene root node and set it to GameData / Materials / Cube.xml. Also enable the Cast Shadows option. Add the RigidBody component (Mass = 1, Friction = 1, Rolling Friction = 0.2) and the CollisionShape component (Shape Type = Box, Size = (2, 2, 2)). Place the cube a little above the ground (if you immerse it in the ground, it will jump out at startup). Press Ctrl + D to duplicate the cube and move the copy to the side. Create another copy.
By the way, did you notice that in the Attribute inspector window all values that differ from the default are marked in golden color?
Now select the entire row of cubes with the Ctrl button pressed and duplicate it in its entirety. Lift the copy above the first row (do not forget about the gaps). Then create another row.
Run it. We had such a problem that after launching, the cubes drop a little down, but it’s difficult to manually set them on top of each other with great accuracy. And here the RevertOnPause switch will come to our aid. Turn it off, and also disable the ScriptInstance component of the gun (just as we previously turned off the entire nodes, just now right-click on the component, not on the node; another way is to click the cross in the Attribute inspector window).
Now start playing, and when the cubes fall - stop. The scene remained in a new state. Remember to re-enable RevertOnPause and ScriptInstance.
Particles
Let's create a trail of particles for cannonballs. Open the particle editor through the menu item View-> Particle editor. Set the following options:
- Direction (min) = (-0.1, -0.1, -0.1)
- Direction (max) = (0.1, 0.1, 0.1) - these two values determine the speed of particles in different directions (for each particle, a random value is selected in a given range)
- Particle Size (min) = Particle Size (max) = (0.3, 0.3) - the starting particle size for all is the same
- Size Add = -0.8 - over time, the particle size decreases
- Number of Particles = 1000 - maximum number of simultaneously existing particles
- Emission Rate (min) = Emission Rate (max) = 80 - particle emission frequency
- Relative Transform = Off - so that particles move in world coordinates, regardless of the parent node
Now add a color change over time for the particles. Double-click on the New button under the Color Frames block to create two new lines and fill in the fields as in the screenshot below. The first value is time, and then the color is in RGBA format.
Click the Save As button, save the effect to the GameData \ Particle \ Sparks.xml file and close the particle editor window. Load the prefab with the cannonball into the scene, add the ParticleEmitter component (Create-> Component-> Geometry) to it, specify the newly created effect, save the prefab to a file and remove the cannonball from the scene. The game is ready.
What's next?
We did not consider all the features of the editor. For example, not a word was said about creating an interface or about a material editor. However, understanding the general principles, dealing with them will not be difficult.
Now you need to arrange the game as a separate program. The plan is very simple: create a minimal script that loads and runs the scene. But there is not enough camera in the scene, and the editor’s internal camera is used, which will be inaccessible outside of it. As usual, create a new node and add the Camera component to it (Create-> Component-> Scene). Be sure to name the node Camera so that we can access it in our script. Position and rotate the camera as you like (the view from the camera that appears in the lower right corner will help you with this). Also, attach the SoundListener component (Create-> Component-> Audio) to the node with the camera, without which you will not hear sounds positioned in space. Save the scene and create a GameData \ Scripts \ Main.as file with the following contents:
Scene@ scene_;
void Start()
{
    scene_ = Scene();
    // Загружаем сцену из файла.
    scene_.LoadXML(cache.GetFile("Scenes/Level01.xml"));
    // Находим в сцене ноду с камерой.
    Node@ cameraNode = scene_.GetChild("Camera");
    // Указываем движку, что мы хотим смотреть через эту камеру.
    Viewport@ viewport = Viewport(scene_, cameraNode.GetComponent("Camera"));
    renderer.viewports[0] = viewport;
    // Задаем большой размер теневых карт, чтобы они были более четкие.
    renderer.shadowMapSize = 2048;
    // Указываем движку приемник звука, через который мы хотим слушать.
    audio.listener = cameraNode.GetComponent("SoundListener");
}
Copy the CoreData folder and the Urho3DPlayer.exe launcher to the game folder. And we already have a batch file for launching Start.bat (from the Urho3DHabrahabr02Start.zip archive). It indicates to the launcher the folders containing the game resources, window sizes and start script.
start "" Urho3DPlayer.exe Scripts/Main.as -p "GameData;CoreData" -w -x 800 -y 600
The final result can be downloaded here .
Promised Bonus
First, compile all the scripts with the “ScriptCompiler.exe GameData / Scripts / *. As” command. As a result, we get files with the .asc extensions. Recently, a patch was added , thanks to which, in the absence of the requested .as file, the .asc file is loaded, which means that now you do not need to deal with renaming. Just move the source .as files from the GameData \ Scripts folder to another location, leaving only .asc files.
For packaging, we need the utility Build \ bin \ tool \ PackageTool.exe. Run the commands:
PackageTool.exe CoreData CoreData.pak -c
PackageTool.exe GameData GameData.pak -c
The "-c" parameter activates file compression (using the high-speed LZ4 algorithm ).
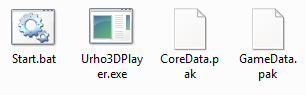
Now CoreData and GameData folders can be removed. As a result, we have:
Well, to make it quite beautiful, you can get rid of the Start.bat batch file. But for this you need to modify the source code of the launcher (it is in the folder Urho3D \ Source \ Tools \ Urho3DPlayer). Do not be scared in advance - the launcher source is very small, because it only deals with the fact that it transfers the launch parameters to the engine. These are the parameters you need to specify. At the same time, you can make your own icon for the application.
Instead of a conclusion
I take this opportunity to invite those who wish to join the filling of the Russian-language Wiki . Thanks for attention!