Working with nRF51822 using ST-Link and Clion + OpenOCD
Good afternoon, community Habra!
That time has come for students of technical universities. So it's time for home projects and conquering new peaks of microelectronic technology. Today we will talk about my research with NRF51822 based circuit boards, which is a bit outdated Bluetooth module from Nordic Semiconductor. This company is famous for its low-current radio modules and the NRF51822 chip is no exception.But we will not be distracted from the topic. Let's talk about iron.
Creating a debugging stand
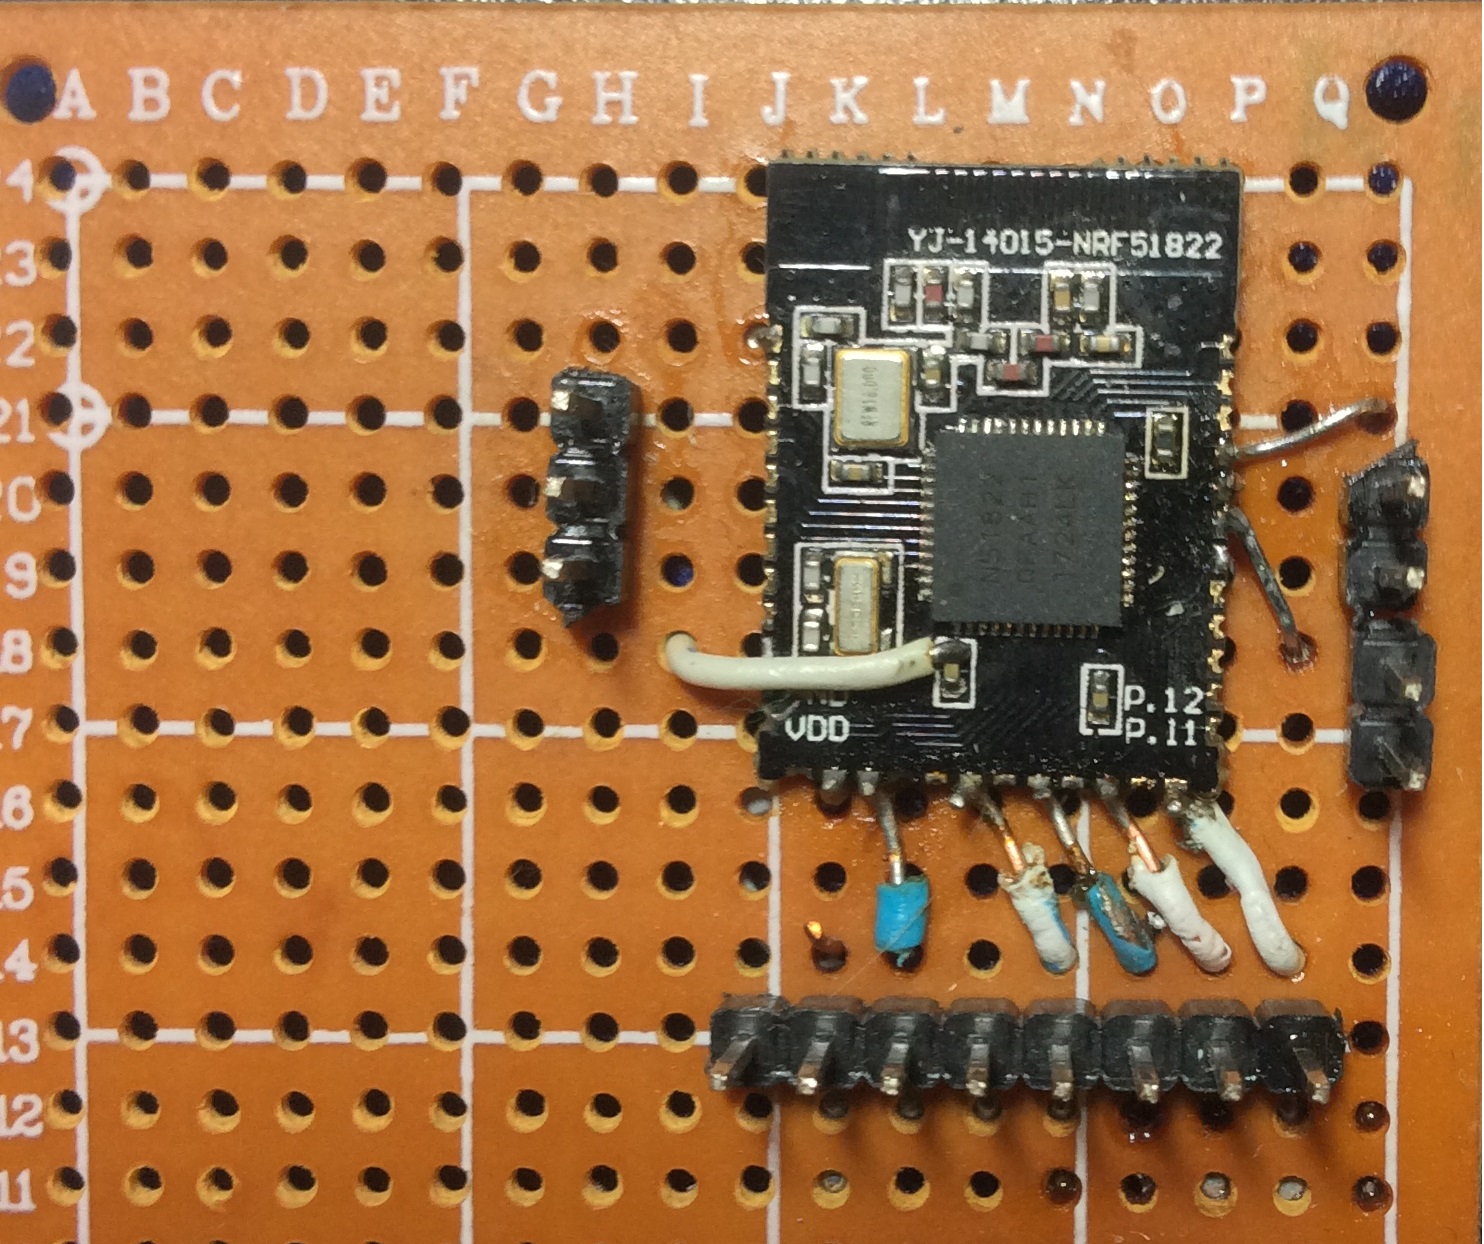
Back in October, yj-14015-nrf51822 boards were ordered for experiments with Bluetoth. It was a bad idea to buy boards without wiring to pin connectors for standard wires for electronics lovers.

The distance between contacts less than 1 mm created great difficulties for me, a person with an extremely modest soldering experience. Outputs on the board were not designed for soldering to wires and they were easy to tear off. This fate befell the only power output VDD. But with the help of a neighbor's efforts, it was possible to solder the wire to the output of a capacitor on the board. Together, the outputs GND, SWDIO, SWCLK and some other GPIO outputs were soldered. The result was something that resembles its own view of Frankenstein:
We will debug and flash our device using ST-Link V2. The connection scheme is extremely simple and logical:
| ST-Link V2 | nrf51822 |
|---|---|
| 3.3V | Vdd |
| GND | GND |
| SWDIO | SWDIO |
| SWDCLK | SCLK |
Unlike Frankenstein, a single current discharge was not enough to revive this module. First of all, I tried to read nrf51822 memory using the STM32 ST-LINK utility . With some reservations, it worked with STM32 boards, but not with nrf. On this, my work with the board temporarily stopped. A little later I found article 1 and article 2 about working with nrf51822. It contained links to the SDK and a detailed description of how to organize the nrf memory. The author of the articles used the more expensive JLink debugger unlike us. Cheap solution is very important if you are a poor student :).
Learning SDK
If you want to use bluetooth functionality, which is pretty logical for a bluetooth chip,You will need to put the so-called "softdevice" in the beginning of the programmable nrf5 memory. It comes in the form of firmware and contains bluetooth functionality. The rest of the memory is recorded your firmware. From it, you can call softdevice procedures to configure bluetooth.
There are several different softdevices. For nrf51, you can use s110 (for server applications) and s130 (for server and client applications). To understand the compatibility of SDK and softdevice versions, there is a compatibility matrix . It shows that the SDK up to version 12.3.0 is suitable for our motherboard. But we will focus on the SDK 10.0.0 . It supports s110 and s130.
OpenOCD Setup
In the examples from the SDK and in the articles, the nrfjprog utility is used for firmware via JLink, and we need to flash through ST-Link V2. Instead, we will use the cool OpenOCD program , download for Windows . It allows you to flash and debugshita huge number of different boards and chips. There is a configuration for the nrf51 chip. To force OpenOCD to flash our board, you need to execute the format command below (after adding the OpenOCD / bin folder to the Path). Read more about OpenOCD commands in the documentation .
openocd -f interface/stlink.cfg -f target/nrf51.cfg -c init -c "reset halt" ^
-c "nrf51 mass_erase 0" -c "flash write_image <PATH_TO_HEX> <OFFSET>" ^
-c reset -c exit
The devil, as always, is in the details:
- "reset halt" sends a reset chip command and stops the device. In this state, the firmware can be erased / recorded.
- "nrf51 mass_erase 0" allows writing to the bootloader section and erases the entire programmable memory of the chip (helps to avoid firmware loading errors in some cases)
- instead of <PATH_TO_HEX> you need to substitute the path to the hex file
- <OFFSET> sets the offset address of the firmware entry. The parameter is useful if you want to flash your firmware separately from the softdevice. If you want to write the firmware from the beginning of the memory (from the address 0x0), you can discard this parameter
- reset resets the microcircuit in order for it to work with the new firmware
The SDK includes hex softdevice files. To pour s130 onto the board, you can use the following sequence of commands:
set file=<nRF5_SDK>/components/softdevice/s130/hex/s130_nrf51_1.0.0_softdevice.hex
openocd -f interface/stlink.cfg -f target/nrf51.cfg -c init -c "reset halt" ^
-c "nrf51 mass_erase 0" -c "flash write_image %file%" -c reset -c exit
Then you can upload our firmware. It is important to remove the "nrf51 mass_erase 0" while the softdevice is not erased. And also do not forget about the offset. For s130, the offset is 0x1c000, and for s110 - 0x18000. These values can be found in the specifications for s130 and s110 .
set file=<PATH_TO_HEX>
openocd -f interface/stlink.cfg -f target/nrf51.cfg -c init -c "reset halt" ^
-c "flash write_image %file% 0x1c000" -c reset -c exit
Now in the programmable memory nrf51822 should lie firmware softdevice and ours. For the tests, I used an example from the <nRF5_SDK> / examples / ble_peripheral / ble_app_beacon folder and an Android application called "nRF Connect". After executing the commands, I began to see a device called nRF. This is what we wanted.
Setting up a CLion project
The nrf51 SDK contains examples based on makefiles. To work with CLion, it is necessary to describe the project build using CMake files. Googling showed that CMake project for nrf51 is already on the github. It is written for use with SDK 12.XX. Because of this, some paths to the files for our SDK 10.0.0 were not spelled out correctly. In addition, the project also uses the nrfjprog utility. Therefore I had to tinker with setting up the project and rewrite the target for the firmware using OpenOCD. The result of my work can be found on the githaba . The readme describes the project setup and debugging instructions in CLion.
PS
Many of the technical details associated with the features of nrf51822 have escaped my narration. I hope I will ever fill in the gaps by adding an article or writing a new one.