 July 14, 2015 at 10:22
DIY robotic vacuum cleaner
As the appetite wakes up during a meal, the desire to create grows with the number of completed projects. A consistent use of the studied technologies increases interest and quality. This story began with the fact that I assembled a 3D printer 3D MC3 Master v1.1 and made movable ears with a reaction to sound .
But then I wanted to not only create something entertaining, but also useful. Therefore, I began work on the creation of my robot vacuum cleaner and I urge the entire Habrasociety to connect and help somewhere with advice, and somewhere with logic and experience.

Well, since I already have a 3D printer, I will print the maximum of possible parts myself. And the Arduino Mega 2560 controllerand I successfully found actuators on the MASTER KIT website. But we will return to iron later, but first we need to deal with the logic of the movement and actions of the vacuum cleaner robot.
Empirically (not mine), the rules for creating robotic vacuum cleaners were established:
1. The robot should be round in shape, a low cylinder.
2. The wheels must be in diameter so that they can turn in place.
3. The steering wheel does not need a motor
4. The main thing is that the robot can collect garbage inside itself
5. It is impossible to have a contact bumper, it should cover at least half of the robot’s perimeter
6. The center of gravity of the robot should be next to the wheels, ideally match them - for better grip.
7. The robot must be charged from the charging station without removing the batteries
8. The bin should be easy to remove.
Algorithm of movement
There are two main ways of moving robotic vacuum cleaners and so far none of the methods have proved their complete superiority. The first is movement in a spinning spiral. The second method is to zigzag.
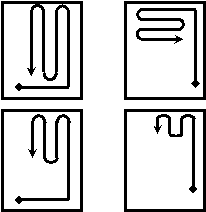
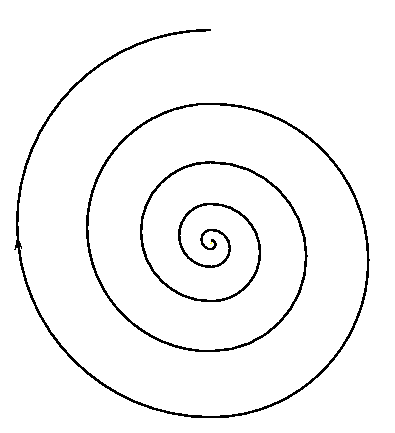
It does not take into account the construction of a room map from the pictures, and all movement occurs solely on the basis of sensor readings. Further, what needs to be considered is overcoming and avoiding obstacles. For this, it is best to use bumpers and contact sensors. Because, if along the route there will be a thin leg of a chair, then the rays of several sensors can pass by. In a collision with a large bumper, the controller understands which side the obstacle is located and goes around it.
Cleaning
If a conventional vacuum cleaner takes its toll due to a powerful pump and a large suction force, it is impossible to achieve the same power on a small vacuum cleaner with an autonomous power supply. Experience has suggested that the combination of a small brush and a suction turbine is most effective. In addition, since the device is a washer, in order to pick up debris from the corners, two rotating brushes are placed in front of it, tossing debris to the main large brush.
Driving force
The best moving speed will be 25-35 cm per second. It is not too fast to collect everything and not too slow for the battery to last for any sufficient space. Most often, spring-loaded gearboxes with motors are used. This is done in order to stop the movement if the vacuum cleaner falls, hangs or is lifted. I believe that it will be correct to use stepper motors, as this will allow you to set the speed of movement programmatically, without using gearboxes that take power. Transmission to the wheels will be direct or belt. The vacuum cleaner will have only 5 engines: 2 for wheels, one for the main brush, one for two rotating brushes on the sides, one for the retracting turbine.
Nutrition
It is planned to power the entire system from a gel battery with a voltage of 12V and a capacity of 7 Ah. That is, a standard UPS battery. Its advantage is that it has sufficient capacity to provide work, it is cheap and affordable, it has sufficient weight to press the vacuum cleaner to the floor. There are two main charging methods: induction and direct contact. Despite all the advantages of direct contact, I decided to play in favor of wireless charging: partly because it is safer (and I have curious cats), partly because I do not want to solve the problem of oxidized or loose contacts later. Fortunately, I found a great 12 Volt Wireless Charger Kit PW-WL-12. A current of 350 mA will charge the battery when fully discharged in 10 hours, which is a bit much, and the battery can’t be planted like that. Therefore, I decided to acquire two such charges and install them at the bottom and top of the case, providing a double charge current of 700 mA.
Sensors
So that the robot can navigate in space, does not fall from the stairs and does not rest against the walls, feedback is required. It will be implemented with a large number of sensors. For example, infrared distance sensors will not allow you to get close to the wall and scratch it. In the event that some small object that does not fall into the field of view of the sensors gets in the way, contact sensors in the bumpers are triggered. In addition, infrared sensors on the lower edge will prevent the robot from falling if there is empty space under the front edge. Also, a pair of sensors will need to be put on wheels, so that when the device breaks off the floor, it stops working.
The sensors will be used as follows: IR - for measuring distance, contact - for bumpers and wheels.
Return to base
One of the most difficult tasks that all the creators of robots are trying to implement is a return to their own base for charging. And it’s good when the room is strictly square or rectangular. In this case, it is enough to install the base in the corner or move it to the wall and the mechanism for returning to the base becomes extremely simple: one side to go along the wall until the robot rests against the base. But it’s worth adding furniture or having several openings to other rooms and the task is immediately complicated. I decided to use a beacon to determine the distance to the base. As you move farther away, the signal fades, and when you approach it becomes louder. My base search method will be based on this.
Programming and soldering
Initially, I did not want to solder and independently assemble the controller bindings. Since the Arduino platform already has a lot of standard shields for connecting sensors and actuators, I will use them and try to make the project as simple and affordable as possible. Only the contacts of the sensors will be soldered in case they do not have standard connection wires. I will program in the standard version for Arduino, because it is: 1 - simple, 2 - easy to repeat. Even I, familiar with the basics of programming, was able to cope with language learning and program the controller to automate the heating and ventilation system. Therefore, the calculation is precisely on the simplicity of repetition and execution.
Stages
All work on the robot vacuum cleaner will be divided into several stages:
1. Creating a housing, chassis, dust collection unit and creating a normal dust collector with a turbine
2. Distributing sensors along the body contour and coordinating their work
3. Programming the simplest functions of movement and cleaning
4. Bypass obstacles and the logic of movement during cleaning
5. Search for a base and the correct approach to it for a full charge
Standard and follower
As in any experiment, there should be an experimental group and a reference group to compare the results. As a reference, it was decided to take iClebo Arte. During the construction process, I will rely on ready-made engineering solutions of the factory robot vacuum cleaner and try to simplify / reduce the cost of the existing model. As a result, a comparative test of two vacuum cleaners should be passed: a home-made and factory-made.
Invitation
Everyone who wants to participate in such a project can safely write in the comments and join the development. All tips and desires will be taken into account and, I am sure, the work on creating your own robot vacuum cleaner will significantly accelerate.
But then I wanted to not only create something entertaining, but also useful. Therefore, I began work on the creation of my robot vacuum cleaner and I urge the entire Habrasociety to connect and help somewhere with advice, and somewhere with logic and experience.
Well, since I already have a 3D printer, I will print the maximum of possible parts myself. And the Arduino Mega 2560 controllerand I successfully found actuators on the MASTER KIT website. But we will return to iron later, but first we need to deal with the logic of the movement and actions of the vacuum cleaner robot.
Empirically (not mine), the rules for creating robotic vacuum cleaners were established:
1. The robot should be round in shape, a low cylinder.
2. The wheels must be in diameter so that they can turn in place.
3. The steering wheel does not need a motor
4. The main thing is that the robot can collect garbage inside itself
5. It is impossible to have a contact bumper, it should cover at least half of the robot’s perimeter
6. The center of gravity of the robot should be next to the wheels, ideally match them - for better grip.
7. The robot must be charged from the charging station without removing the batteries
8. The bin should be easy to remove.
Algorithm of movement
There are two main ways of moving robotic vacuum cleaners and so far none of the methods have proved their complete superiority. The first is movement in a spinning spiral. The second method is to zigzag.
It does not take into account the construction of a room map from the pictures, and all movement occurs solely on the basis of sensor readings. Further, what needs to be considered is overcoming and avoiding obstacles. For this, it is best to use bumpers and contact sensors. Because, if along the route there will be a thin leg of a chair, then the rays of several sensors can pass by. In a collision with a large bumper, the controller understands which side the obstacle is located and goes around it.
Cleaning
If a conventional vacuum cleaner takes its toll due to a powerful pump and a large suction force, it is impossible to achieve the same power on a small vacuum cleaner with an autonomous power supply. Experience has suggested that the combination of a small brush and a suction turbine is most effective. In addition, since the device is a washer, in order to pick up debris from the corners, two rotating brushes are placed in front of it, tossing debris to the main large brush.
Driving force
The best moving speed will be 25-35 cm per second. It is not too fast to collect everything and not too slow for the battery to last for any sufficient space. Most often, spring-loaded gearboxes with motors are used. This is done in order to stop the movement if the vacuum cleaner falls, hangs or is lifted. I believe that it will be correct to use stepper motors, as this will allow you to set the speed of movement programmatically, without using gearboxes that take power. Transmission to the wheels will be direct or belt. The vacuum cleaner will have only 5 engines: 2 for wheels, one for the main brush, one for two rotating brushes on the sides, one for the retracting turbine.
Nutrition
It is planned to power the entire system from a gel battery with a voltage of 12V and a capacity of 7 Ah. That is, a standard UPS battery. Its advantage is that it has sufficient capacity to provide work, it is cheap and affordable, it has sufficient weight to press the vacuum cleaner to the floor. There are two main charging methods: induction and direct contact. Despite all the advantages of direct contact, I decided to play in favor of wireless charging: partly because it is safer (and I have curious cats), partly because I do not want to solve the problem of oxidized or loose contacts later. Fortunately, I found a great 12 Volt Wireless Charger Kit PW-WL-12. A current of 350 mA will charge the battery when fully discharged in 10 hours, which is a bit much, and the battery can’t be planted like that. Therefore, I decided to acquire two such charges and install them at the bottom and top of the case, providing a double charge current of 700 mA.
Sensors
So that the robot can navigate in space, does not fall from the stairs and does not rest against the walls, feedback is required. It will be implemented with a large number of sensors. For example, infrared distance sensors will not allow you to get close to the wall and scratch it. In the event that some small object that does not fall into the field of view of the sensors gets in the way, contact sensors in the bumpers are triggered. In addition, infrared sensors on the lower edge will prevent the robot from falling if there is empty space under the front edge. Also, a pair of sensors will need to be put on wheels, so that when the device breaks off the floor, it stops working.
The sensors will be used as follows: IR - for measuring distance, contact - for bumpers and wheels.
Return to base
One of the most difficult tasks that all the creators of robots are trying to implement is a return to their own base for charging. And it’s good when the room is strictly square or rectangular. In this case, it is enough to install the base in the corner or move it to the wall and the mechanism for returning to the base becomes extremely simple: one side to go along the wall until the robot rests against the base. But it’s worth adding furniture or having several openings to other rooms and the task is immediately complicated. I decided to use a beacon to determine the distance to the base. As you move farther away, the signal fades, and when you approach it becomes louder. My base search method will be based on this.
Programming and soldering
Initially, I did not want to solder and independently assemble the controller bindings. Since the Arduino platform already has a lot of standard shields for connecting sensors and actuators, I will use them and try to make the project as simple and affordable as possible. Only the contacts of the sensors will be soldered in case they do not have standard connection wires. I will program in the standard version for Arduino, because it is: 1 - simple, 2 - easy to repeat. Even I, familiar with the basics of programming, was able to cope with language learning and program the controller to automate the heating and ventilation system. Therefore, the calculation is precisely on the simplicity of repetition and execution.
Stages
All work on the robot vacuum cleaner will be divided into several stages:
1. Creating a housing, chassis, dust collection unit and creating a normal dust collector with a turbine
2. Distributing sensors along the body contour and coordinating their work
3. Programming the simplest functions of movement and cleaning
4. Bypass obstacles and the logic of movement during cleaning
5. Search for a base and the correct approach to it for a full charge
Standard and follower
As in any experiment, there should be an experimental group and a reference group to compare the results. As a reference, it was decided to take iClebo Arte. During the construction process, I will rely on ready-made engineering solutions of the factory robot vacuum cleaner and try to simplify / reduce the cost of the existing model. As a result, a comparative test of two vacuum cleaners should be passed: a home-made and factory-made.
Invitation
Everyone who wants to participate in such a project can safely write in the comments and join the development. All tips and desires will be taken into account and, I am sure, the work on creating your own robot vacuum cleaner will significantly accelerate.









