We write our simplified OpenGL in Rust - part 1 (draw a line)
Continuation :
We write our simplified OpenGL in Rust - part 2 (wire rendering) .
We write our simplified OpenGL in Rust - part 3 (rasterizer)
Probably, few people in the Habr are not aware of what Rust is - a new programming language from Mozilla. Already, it attracts a lot of interest, and recently the first stable version of Rust 1.0 has finally been released, which marks the stabilization of language capabilities. I have always been impressed with systemic PLs, and even the idea of a system language offering security superior to high-level languages was even more interesting. I wanted to try a new language in business and, at the same time, it was interesting to spend time programming something exciting. While I thought that I would write such a thing on the rast, I recalled a recent series of articlesabout computer graphics, which I just skimmed through. But it would be very interesting to try to write all these prettiness all the same yourself. And so the idea of this hobby project, as well as this article, was born.
Since in the original article all the nuances relating to programming the graphic component itself are thoroughly chewed, in my series of articles I will focus mainly on what directly concerns Rust. I will try to describe the rake that I came across, as well as how to solve the problems that arise. I’ll tell you about my personal impressions of getting to know the language. And, of course, I’ll mention a list of resources that I used during development. So who are interested, welcome to cat.
Warning: this article is written from a novice’s perspective and describes the stupid mistakes of a novice. If you are a Rasta pro, perhaps looking at my attempts, you will want to painfully hurt me with something heavy. In this case, I recommend that you refrain from reading it.

Here is the Rust, which i hope to get at the end. (pun, Rust in English "rust")
I will not describe the installation of the compiler, everything is pretty obvious there. The installation package from the official site was installed on my Ubuntu 14.04 with a couple of commands. It should only be noted that there is a repository for Ubuntu, using which you can also theoretically install Rust. However, I did not cope with this repository. For some reason, Rust was installed, but without Cargo. Synaptic did not even show Cargo in the list of available packages. Rust without Cargo is a pretty pointless thing, so I didn’t use the specified PPA.
So, as always, we begin our introduction to the new language with Hello World. Create the main.rs file:
Code can be written using Gedit. The Rust syntax coloring for this editor can be found at the following link . It didn’t work right away , but there was a bug report in the tracker that explained the cause of the problem. A simple pull request solved the problem, so now you should be able to earn colors without extra dancing with a tambourine.
Usually a new project is created using the command
To display the image, I decided not to rewrite TGAImage, which is provided by the author of the original article. I wanted to output the result using the SDL. In fact, we only need to create a window from this library and display a point with a given color at the given coordinates. We draw all other graphic primitives on our own, so if you want, the backend for the image output can be changed very simply, just by implementing 2 functions:
The very first link on Google led me to the Rust-SDL2 project site- SDL2 bindings for Rust. To use this library, add the following dependency declaration to the end of cargo.toml:
This adds to the project the so-called. container (crate) sdl2. For compilation, the library uses SDL header files, so do not forget to install them. In Ubuntu 14.04, the command does this:
After that, the team
All the functionality associated with interacting with SDL (or another graphics library in the future), I decided to put in a separate class - canvas.rs. At first, just to test the library, I copied the contents of the test from the Rust-SDL2 repository there, going to write a finished class based on it later.
Here I had the first rake. It turned out that any declaration
As a result, the canvas.rs file had the following code:
This code displays such a wonderful window:
If you look at the code itself, there are obvious 3 parts: initialization, drawing, waiting for input. The next paragraph, we are processing the specified code in order to obtain a Canvas object that has:
I know that keyboard input is not the most suitable function for the Canvas class, but the problem turned out to be that sdl_context is used to wait for input, which would become the Canvas field after such a change. Which in any case leads to the fact that either the Keyboard object will depend on the Canvas or both of them will have to depend on some 3rd class. In order not to complicate everything beyond measure, while I settled on leaving everything in one class. If the load on Canvas increases, then I will remove some of the functions from it and still do the above work.
It is worth noting that before that, my development process was well characterized by the words “Stack Overflow Driven Development”. I just pulled different pieces of code from different places and put them together without even knowing the syntax of the language. This is a typical way for me to learn a new language or technology - just start writing code. I turn to various resources as a reference to understand how to make a specific piece I need. Need a loop, read an article about loops in a language. Need IoC, google a good answer on Stackoverflow. Well, you get the point. Most languages and technologies are quite similar, so there are no problems with this approach. You can start programming right away, even without really knowing the language. With Rust, such a number did not work. The language is quite peculiar and already at the attempt to understand how to make a class or an object, there was a gag. INRasta’s book didn’t have articles with the name Classes / Objects / Constructors, etc. It became clear that at first you would have to learn a little bit of materiel. Therefore, to give a general impression of the syntax of the language, the lessons of the Guessing Game and Dining Philosophers from the official documentation of Rust were passed . It is in English, it is worth noting the existence of a translation into Russian . True, then I did not know this yet, I read it in the original language.
In general, after that, the work went. Although I still had to fight the Rust ownership and borrowing system. The official documentation notes that every beginner goes through this stage, but it encourages us that, with practice, the code can be written easily and naturally, getting used to the restrictions imposed by the compiler. The introduction states that the complexity of training is the price you have to pay for security without overhead. Specifically, the problem was that in the new () method that creates the structure, the fields of the newly created structure must be initialized with several objects from the SDL in order to use them later in the structure methods. If I tried to initialize the field with a link, the compiler cursed that it could not make mutable borrowing (
By the way, Rust syntax highlighting is broken on Habr, because of which the code above does not color, although it should. The problem in this piece:
It’s just
The compiler complained that it could not borrow the immutable renderer field as mutable (
As you can see, here I changed the signature of the point method.
Now a little more about the rake:
There were great difficulties in working with code that interacts with the Rust-SDL2 library. She has documentation, but so far little has been said there, and the existence of some methods is generally silent. For example, there is nothing about the sdl2 :: init () method in the documentation. As if it does not exist. Rust's automatic type inference system simplifies and speeds up code writing, but it also played a trick on me when I needed to figure out which type returned the sdl2 :: init (). Video (). Unwrap () call, because this the result had to be stored in the field in the structure, and there the type is always indicated explicitly. I had to read the sources of the library, although a little later I found a less time-consuming solution. You simply indicate any arbitrary type of the field, Rust, when compiling, swears at the type mismatch, displaying the type that should be in the error message. Voila!
Special mention deserves such a thing as the lifetime in Rust. I fought with her for a long time. Generally speaking, in Rust, each variable and reference has its own lifetime. It is simply output by the compiler automatically based on certain rules. However, sometimes it needs to be specified explicitly. Reading an article about a lifetime from a rast book didn’t clarify anything for me. (although I re-read it 3 times) I still did not understand why, in my case, Rust asked me to indicate lifetime. Essentially I just added these weird
In other sections of the code, all references to lifetime can be removed.

I think, to someone my ordeals may seem like experiments with monkeys with a grenade. But I warned you.
In general, after solving all the above problems, the result of my work was what you can see in the slice of the repository . Oh, that feeling of delight when I finally saw a black window on the screen with a small white dot in the center ...
The rest went simpler, because serious interaction with the Rust-SDL2 library was no longer required. Its non-obvious and undocumented, sometimes even unfinished API was a constant source of difficulties. All arithmetic and control structures in Rust are not too different from other PLs. Therefore, the line was written in just a few hours (as opposed to a few days in the previous stages). And then most of the work was due to the fact that I decided not to implement the ready-made algorithm, but write my own, using the equation of the straight line y = kx + b , as a basis, and deriving all the other formulas myself. Here is the function I got in the end:
I know that she’s ugly, long, ineffective. But its own - native. :) Almost immediately, I came to writing an integer version without using real arithmetic. There are no implicit type conversions in Rust, and explicit ones are very verbose. Therefore, I refused the idea to write a real version first. A lot of code, and then all the same, as a result, rewrite it so that it does not slow down.
During the writing of this foot, I needed logging, since there is no time-tested IDE for Rust yet. There are some fresh ones, but I did not want to stick to their beta (alpha?) Test. If someone used it and saw that it is stable and working well, please unsubscribe in the comments. Using the debugger from the console is not a joy to me. Anyway, logging is a useful thing. I try to accustom myself to use logs instead of the debugger, because it helps to write logs, which then really figure out what the end user had a problem (at least if he can run debug in logging mode).
So, logging. For logging, the Rust distribution has a log library. But this is just an abstract API, and you need to choose its specific implementation yourself. I used env_logger, which is suggested in the documentation for log. We write the following in cargo.toml:
Using this kit is very simple:
Just remember that the container (crate) env_logger is configured using environment variables. I use the following command before starting the project:
This sets the rust_project module to the debug logging level. All other modules remain at the default level, so the log when the program starts does not become clogged with any debugging garbage from cargo or sdl. The result of work at this stage can be seen in the slice of the repository . When launched, our program displays just such a beauty:
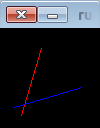
Just what was needed in accordance with the original article. Only the color of the second line I changed to blue. The article has already turned out to be quite long, so for today I am finishing. Future plans:
Finally, a small portion of personal impressions of the language.
All these are my subjective pros and cons. I am not writing what I read about somewhere. And only that which he personally encountered during development. For example, I know that Rust is safe, but so far this chip of mine from a shot in the leg has not saved me anywhere (as far as I can tell), so I can’t evaluate it yet.
Cons of programming in Rust:
Pros:
If I do not weaken, do not fall off, do not go wild, I will write a sequel. :) Well, of course, if they don’t send me for this article in Read-only.
We write our simplified OpenGL in Rust - part 2 (wire rendering) .
We write our simplified OpenGL in Rust - part 3 (rasterizer)
Probably, few people in the Habr are not aware of what Rust is - a new programming language from Mozilla. Already, it attracts a lot of interest, and recently the first stable version of Rust 1.0 has finally been released, which marks the stabilization of language capabilities. I have always been impressed with systemic PLs, and even the idea of a system language offering security superior to high-level languages was even more interesting. I wanted to try a new language in business and, at the same time, it was interesting to spend time programming something exciting. While I thought that I would write such a thing on the rast, I recalled a recent series of articlesabout computer graphics, which I just skimmed through. But it would be very interesting to try to write all these prettiness all the same yourself. And so the idea of this hobby project, as well as this article, was born.
Since in the original article all the nuances relating to programming the graphic component itself are thoroughly chewed, in my series of articles I will focus mainly on what directly concerns Rust. I will try to describe the rake that I came across, as well as how to solve the problems that arise. I’ll tell you about my personal impressions of getting to know the language. And, of course, I’ll mention a list of resources that I used during development. So who are interested, welcome to cat.
Warning: this article is written from a novice’s perspective and describes the stupid mistakes of a novice. If you are a Rasta pro, perhaps looking at my attempts, you will want to painfully hurt me with something heavy. In this case, I recommend that you refrain from reading it.
Here is the Rust, which i hope to get at the end. (pun, Rust in English "rust")
Training
I will not describe the installation of the compiler, everything is pretty obvious there. The installation package from the official site was installed on my Ubuntu 14.04 with a couple of commands. It should only be noted that there is a repository for Ubuntu, using which you can also theoretically install Rust. However, I did not cope with this repository. For some reason, Rust was installed, but without Cargo. Synaptic did not even show Cargo in the list of available packages. Rust without Cargo is a pretty pointless thing, so I didn’t use the specified PPA.
So, as always, we begin our introduction to the new language with Hello World. Create the main.rs file:
Hello world
The result of running this in the console is obvious:
fn main() {
    println!("Hello World!");
}
The result of running this in the console is obvious:
user@user-All-Series:~$ rustc main.rs
user@user-All-Series:~$ ./main
Hello World!
user@user-All-Series:~$
Code can be written using Gedit. The Rust syntax coloring for this editor can be found at the following link . It didn’t work right away , but there was a bug report in the tracker that explained the cause of the problem. A simple pull request solved the problem, so now you should be able to earn colors without extra dancing with a tambourine.
Usually a new project is created using the command
cargo new rust_project --bin , but I didn’t know about it then, so I created the entire structure manually, since it’s not complicated:The structure of the new project
Cargo.toml Content:
This project is launched by the team
Cargo.toml
src/main.rs
Cargo.toml Content:
[package]
name = "rust_project"
version = "0.0.1"
authors = [ "Cepreu " ]
This project is launched by the team
cargo run .To display the image, I decided not to rewrite TGAImage, which is provided by the author of the original article. I wanted to output the result using the SDL. In fact, we only need to create a window from this library and display a point with a given color at the given coordinates. We draw all other graphic primitives on our own, so if you want, the backend for the image output can be changed very simply, just by implementing 2 functions:
set(x, y, color); and new(xsize, ysize) . Why exactly SDL? In the future, I would like to be able to change the viewpoint from the keyboard. Maybe even a simple toy to write ... TGA will not allow this to be done. The very first link on Google led me to the Rust-SDL2 project site- SDL2 bindings for Rust. To use this library, add the following dependency declaration to the end of cargo.toml:
[dependencies]
sdl2 = "0.5.0"
This adds to the project the so-called. container (crate) sdl2. For compilation, the library uses SDL header files, so do not forget to install them. In Ubuntu 14.04, the command does this:
sudo apt-get install libsdl2-dev
After that, the team
cargo build will successfully assemble us a project with all the necessary dependencies.user@user-All-Series:~/temp/rust_project$ cargo build
Updating registry `https://github.com/rust-lang/crates.io-index`
Downloading num v0.1.25
Downloading rustc-serialize v0.3.15
Compiling sdl2-sys v0.5.0
Compiling rustc-serialize v0.3.15
Compiling libc v0.1.8
Compiling bitflags v0.2.1
Compiling rand v0.3.8
Compiling num v0.1.25
Compiling sdl2 v0.5.0
Compiling rust_project v0.1.0 (file:///home/user/temp/rust_project)
user@user-All-Series:~/temp/rust_project$
SDL experiments
All the functionality associated with interacting with SDL (or another graphics library in the future), I decided to put in a separate class - canvas.rs. At first, just to test the library, I copied the contents of the test from the Rust-SDL2 repository there, going to write a finished class based on it later.
Here I had the first rake. It turned out that any declaration
extern crate package_name in the library should also be duplicated in the main.rs application. It took a while to figure this out, but after all the torment, I finally got a project that you can see in the snapshot on github . As a result, the canvas.rs file had the following code:
// Copyright (C) Cepreu  under GPLv2 and higher
extern crate sdl2;
use sdl2::pixels::PixelFormatEnum;
use sdl2::rect::Rect;
use sdl2::keyboard::Keycode;
pub fn test() {
    let mut sdl_context = sdl2::init().video().unwrap();
    let window = sdl_context.window("rust-sdl2 demo: Video", 800, 600)
        .position_centered()
        .opengl()
        .build()
        .unwrap();
    let mut renderer = window.renderer().build().unwrap();
    // FIXME: rework it
    let mut texture = renderer.create_texture_streaming(PixelFormatEnum::RGB24, (256, 256)).unwrap();
    // Create a red-green gradient
    texture.with_lock(None, |buffer: &mut [u8], pitch: usize| {
        for y in (0..256) {
            for x in (0..256) {
                let offset = y*pitch + x*3;
                buffer[offset + 0] = x as u8;
                buffer[offset + 1] = y as u8;
                buffer[offset + 2] = 0;
            }
        }
    }).unwrap();
    renderer.clear();
    renderer.copy(&texture, None, Some(Rect::new_unwrap(100, 100, 256, 256)));
    renderer.copy_ex(&texture, None, Some(Rect::new_unwrap(450, 100, 256, 256)), 30.0, None, (false, false));
    renderer.present();
    let mut running = true;
    while running {
        for event in sdl_context.event_pump().poll_iter() {
            use sdl2::event::Event;
            match event {
                Event::Quit {..} | Event::KeyDown { keycode: Some(Keycode::Escape), .. } => {
                    running = false
                },
                _ => {}
            }
        }
    }
}
This code displays such a wonderful window:
Screenshot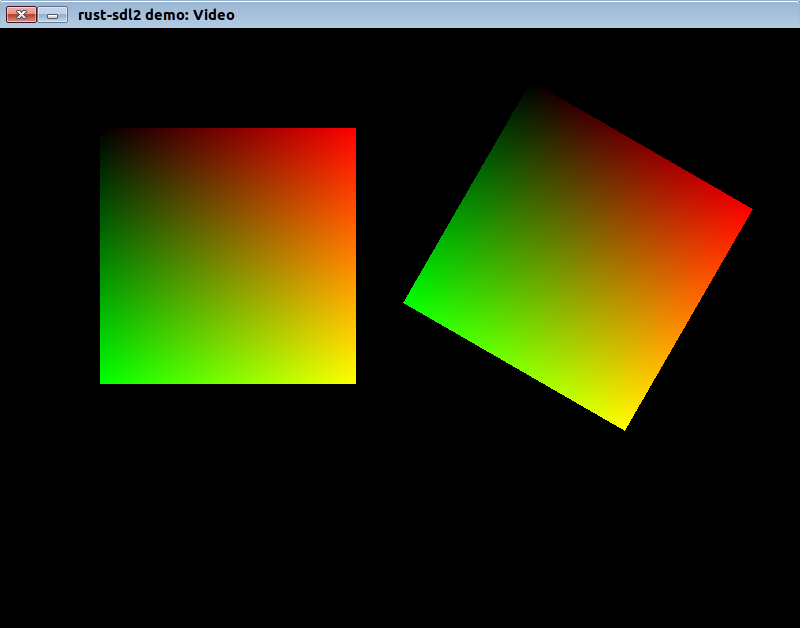
Writing a code
If you look at the code itself, there are obvious 3 parts: initialization, drawing, waiting for input. The next paragraph, we are processing the specified code in order to obtain a Canvas object that has:
- initialization constructor
- point output function (instead of the current texture output)
- Keyboard Esc Escape
I know that keyboard input is not the most suitable function for the Canvas class, but the problem turned out to be that sdl_context is used to wait for input, which would become the Canvas field after such a change. Which in any case leads to the fact that either the Keyboard object will depend on the Canvas or both of them will have to depend on some 3rd class. In order not to complicate everything beyond measure, while I settled on leaving everything in one class. If the load on Canvas increases, then I will remove some of the functions from it and still do the above work.
It is worth noting that before that, my development process was well characterized by the words “Stack Overflow Driven Development”. I just pulled different pieces of code from different places and put them together without even knowing the syntax of the language. This is a typical way for me to learn a new language or technology - just start writing code. I turn to various resources as a reference to understand how to make a specific piece I need. Need a loop, read an article about loops in a language. Need IoC, google a good answer on Stackoverflow. Well, you get the point. Most languages and technologies are quite similar, so there are no problems with this approach. You can start programming right away, even without really knowing the language. With Rust, such a number did not work. The language is quite peculiar and already at the attempt to understand how to make a class or an object, there was a gag. INRasta’s book didn’t have articles with the name Classes / Objects / Constructors, etc. It became clear that at first you would have to learn a little bit of materiel. Therefore, to give a general impression of the syntax of the language, the lessons of the Guessing Game and Dining Philosophers from the official documentation of Rust were passed . It is in English, it is worth noting the existence of a translation into Russian . True, then I did not know this yet, I read it in the original language.
In general, after that, the work went. Although I still had to fight the Rust ownership and borrowing system. The official documentation notes that every beginner goes through this stage, but it encourages us that, with practice, the code can be written easily and naturally, getting used to the restrictions imposed by the compiler. The introduction states that the complexity of training is the price you have to pay for security without overhead. Specifically, the problem was that in the new () method that creates the structure, the fields of the newly created structure must be initialized with several objects from the SDL in order to use them later in the structure methods. If I tried to initialize the field with a link, the compiler cursed that it could not make mutable borrowing (
error: cannot borrow data mutably in a `&` reference ). Here in this code:pub struct Canvas<'_> {
renderer: &'_ mut Renderer<'_>,
}
...
pub fn new(x: u32, y: u32) -> Canvas<'_> {
...
let mut renderer = window.renderer().build().unwrap();
Canvas { renderer: &mut renderer }
}
By the way, Rust syntax highlighting is broken on Habr, because of which the code above does not color, although it should. The problem in this piece:
<'_> . If you remove it, then everything is colored normally. But it’s just impossible to remove it here. This lifetime designation is the proper syntax for Rust. I don’t know where to write it, so I wrote it here. I hope they fix it. It’s just
name: mut type that you can’t write in structures. Then I tried to make the variable immutable, but another code broke from this:pub struct Canvas<'_> {
renderer: Renderer<'_>,
}
...
pub fn new(x: u32, y: u32) -> Canvas<'_> {
...
let renderer = window.renderer().build().unwrap();
Canvas { renderer: renderer }
}
pub fn point(&self, x: u32, y: u32) {
...
self.renderer.clear();
...
}
The compiler complained that it could not borrow the immutable renderer field as mutable (
error: cannot borrow immutable field `self.renderer` as mutable ). The casket opened simply. It turns out in Rust that all fields in the structure are considered as mutable or immutable, depending on whether the structure itself was passed to the method as mutable or immutable. So the correct code is this:pub struct Canvas<'_> {
renderer: Renderer<'_>,
}
...
pub fn new(x: u32, y: u32) -> Canvas<'_> {
...
let renderer = window.renderer().build().unwrap();
Canvas { renderer: renderer }
}
pub fn point(&mut self, x: u32, y: u32) {
...
self.renderer.clear();
...
}
As you can see, here I changed the signature of the point method.
Now a little more about the rake:
There were great difficulties in working with code that interacts with the Rust-SDL2 library. She has documentation, but so far little has been said there, and the existence of some methods is generally silent. For example, there is nothing about the sdl2 :: init () method in the documentation. As if it does not exist. Rust's automatic type inference system simplifies and speeds up code writing, but it also played a trick on me when I needed to figure out which type returned the sdl2 :: init (). Video (). Unwrap () call, because this the result had to be stored in the field in the structure, and there the type is always indicated explicitly. I had to read the sources of the library, although a little later I found a less time-consuming solution. You simply indicate any arbitrary type of the field, Rust, when compiling, swears at the type mismatch, displaying the type that should be in the error message. Voila!
Special mention deserves such a thing as the lifetime in Rust. I fought with her for a long time. Generally speaking, in Rust, each variable and reference has its own lifetime. It is simply output by the compiler automatically based on certain rules. However, sometimes it needs to be specified explicitly. Reading an article about a lifetime from a rast book didn’t clarify anything for me. (although I re-read it 3 times) I still did not understand why, in my case, Rust asked me to indicate lifetime. Essentially I just added these weird
<'_> wherever the compiler pointed out an error with an unspecified lifetime, without even understanding why he needed it from me. If there are knowledgeable people, I will be glad if enlighten in the comments. Why just emphasizing, and not some other sign after the apostrophe? Just in the error message about type mismatch was sdl2::render::Renderer<'_> . At first I tried to designate a field as a simple renderer: Renderer , but the compiler scolded me: error: wrong number of lifetime parameters: expected 1, found 0 . UPD: User Googolplex in its comments to clarify this point. The call window.renderer().build().unwrap() returns sdl2::video::Renderer<'static> . Attention to the lifetime parameter - it is equal to 'static. This is a special lifetime, meaning something that can live until the end of the entire program. Thus, the correct structure declaration looks like this:pub struct Canvas {
renderer: Renderer<'static>,
...
}
In other sections of the code, all references to lifetime can be removed.
I think, to someone my ordeals may seem like experiments with monkeys with a grenade. But I warned you.
Writing a line
In general, after solving all the above problems, the result of my work was what you can see in the slice of the repository . Oh, that feeling of delight when I finally saw a black window on the screen with a small white dot in the center ...
Point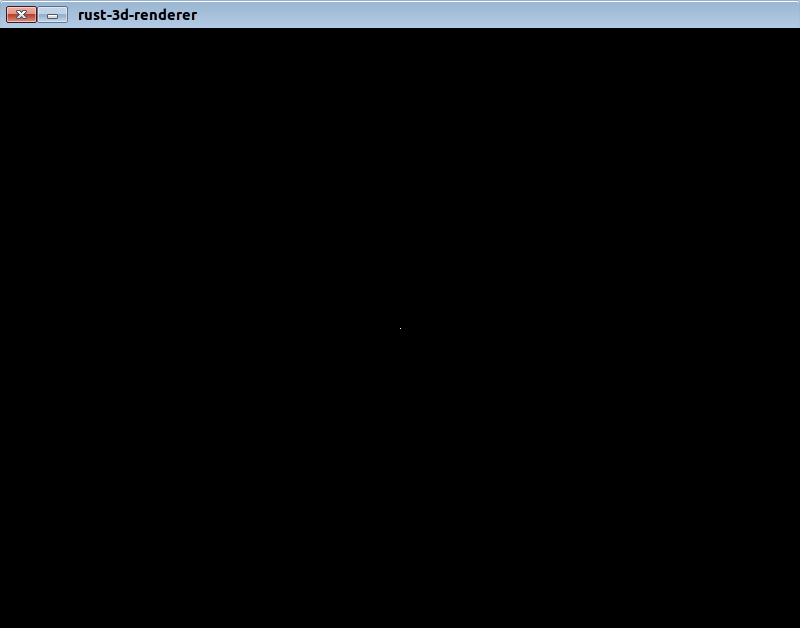
The rest went simpler, because serious interaction with the Rust-SDL2 library was no longer required. Its non-obvious and undocumented, sometimes even unfinished API was a constant source of difficulties. All arithmetic and control structures in Rust are not too different from other PLs. Therefore, the line was written in just a few hours (as opposed to a few days in the previous stages). And then most of the work was due to the fact that I decided not to implement the ready-made algorithm, but write my own, using the equation of the straight line y = kx + b , as a basis, and deriving all the other formulas myself. Here is the function I got in the end:
    pub fn line(&mut self, x1: i32, y1: i32, x2: i32, y2: i32, color: u32) {
        if (x1 == x2) && (y1 == y2) {
            self.set(x1, y1, color);
        }
        if (x1-x2).abs() > (y1-y2).abs() {
            if x1 < x2 {
                let mut yi = y1;
                for xi in x1..x2+1 {
                    let p = (y2-y1)*xi + x2*y1 - x1*y2;
                    if yi*(x2-x1) < p + (y2-y1)/2 {
                        yi = yi+1;
                    }
                    self.set(xi, yi, color);
                }
            } else {
                let mut yi = y2;
                for xi in x2..x1+1 {
                    let p = (y1-y2)*xi + x1*y2 - x2*y1;
                    if yi*(x1-x2) < p + (y1-y2)/2 {
                        yi = yi+1;
                    }
                    self.set(xi, yi, color);
                }
            }
        } else {
            if y1 < y2 {
                let mut xi = x1;
                for yi in y1..y2+1 {
                    let p = yi*(x2-x1) - x2*y1 + x1*y2;
                    if xi*(y2-y1) < p + (y2-y1)/2 {
                        xi = xi+1;
                    }
                    self.set(xi, yi, color);
                }
            } else {
                let mut xi = x2;
                for yi in y2..y1+1 {
                    let p = yi*(x1-x2) - x1*y2 + x2*y1;
                    if xi*(y1-y2) < p + (y1-y2)/2 {
                        xi = xi+1;
                    }
                    self.set(xi, yi, color);
                }
            }
        }
    }
I know that she’s ugly, long, ineffective. But its own - native. :) Almost immediately, I came to writing an integer version without using real arithmetic. There are no implicit type conversions in Rust, and explicit ones are very verbose. Therefore, I refused the idea to write a real version first. A lot of code, and then all the same, as a result, rewrite it so that it does not slow down.
And here is a photo of my calculations on a piece of paper (for history)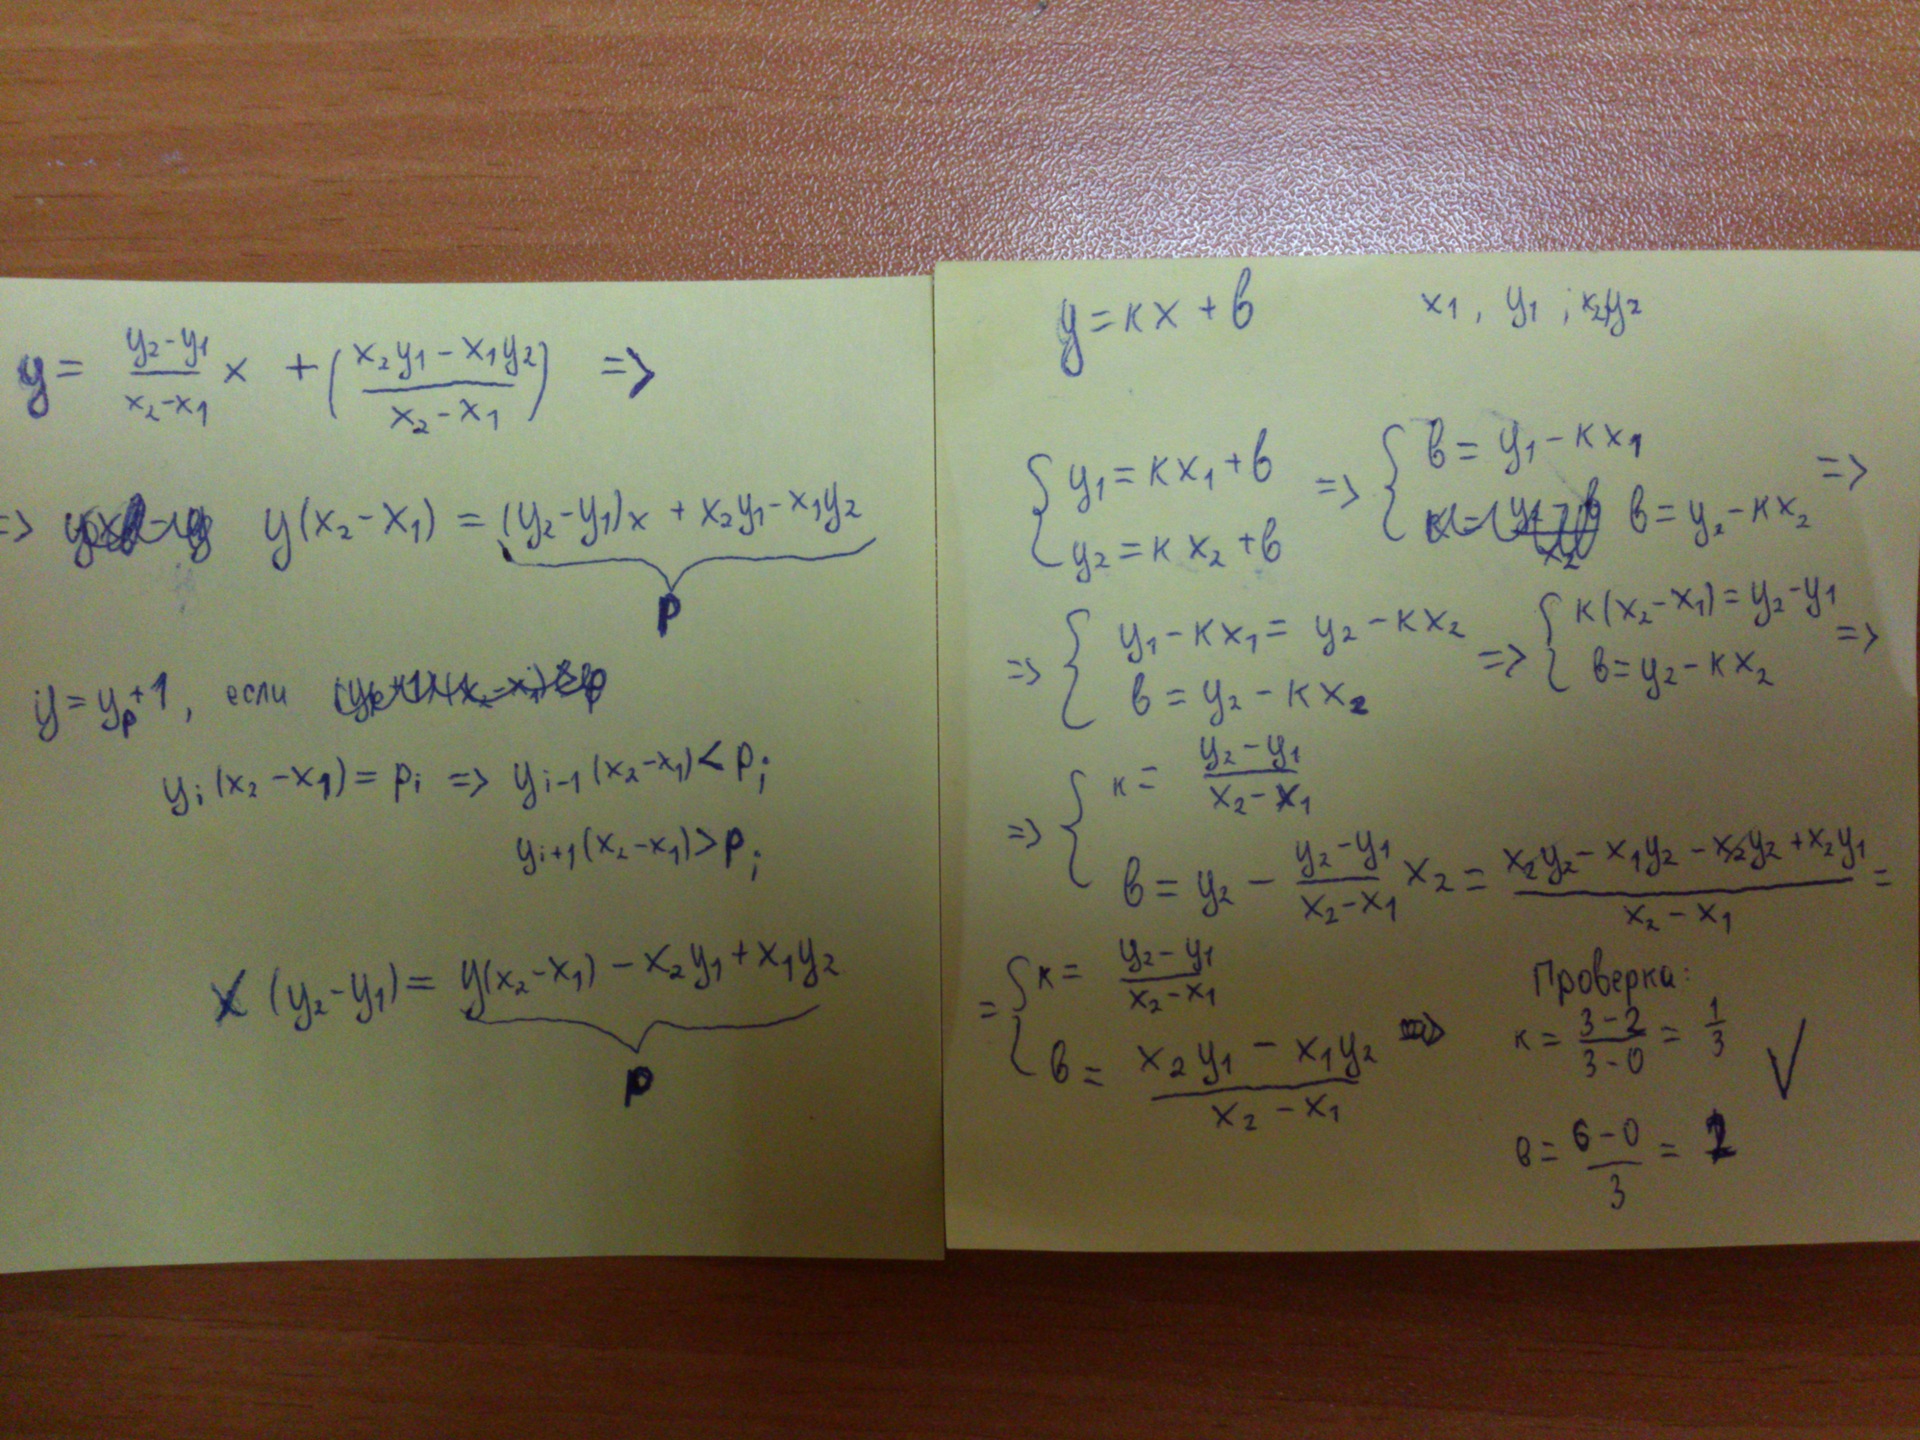
Experts in mathematics, please do not kick. Everything was done just for fun.
Experts in mathematics, please do not kick. Everything was done just for fun.
During the writing of this foot, I needed logging, since there is no time-tested IDE for Rust yet. There are some fresh ones, but I did not want to stick to their beta (alpha?) Test. If someone used it and saw that it is stable and working well, please unsubscribe in the comments. Using the debugger from the console is not a joy to me. Anyway, logging is a useful thing. I try to accustom myself to use logs instead of the debugger, because it helps to write logs, which then really figure out what the end user had a problem (at least if he can run debug in logging mode).
So, logging. For logging, the Rust distribution has a log library. But this is just an abstract API, and you need to choose its specific implementation yourself. I used env_logger, which is suggested in the documentation for log. We write the following in cargo.toml:
[dependencies]
sdl2 = "0.5.0"
log = "0.3"
env_logger = "0.3"
Using this kit is very simple:
#[macro_use]
extern crate log;
extern crate env_logger;
fn main() {
    env_logger::init().unwrap();
    info!("starting up");
Just remember that the container (crate) env_logger is configured using environment variables. I use the following command before starting the project:
set RUST_LOG=rust_project=debug
This sets the rust_project module to the debug logging level. All other modules remain at the default level, so the log when the program starts does not become clogged with any debugging garbage from cargo or sdl. The result of work at this stage can be seen in the slice of the repository . When launched, our program displays just such a beauty:
Just what was needed in accordance with the original article. Only the color of the second line I changed to blue. The article has already turned out to be quite long, so for today I am finishing. Future plans:
- rewrite your scary line () function to the one proposed in the original article as the final result
- write wire render
- Continue on the lessons of the Short course in computer graphics
Finally, a small portion of personal impressions of the language.
Impressions
All these are my subjective pros and cons. I am not writing what I read about somewhere. And only that which he personally encountered during development. For example, I know that Rust is safe, but so far this chip of mine from a shot in the leg has not saved me anywhere (as far as I can tell), so I can’t evaluate it yet.
Cons of programming in Rust:
- Hard to learn.
- There is still little easy-to-understand documentation, third-party libraries are generally documented anyhow.
Pros:
- The compiler will check the stylistic characteristics of the code and display a warning if the style differs from that proposed by the developers. To me, as a lover of maintaining one style in the project, this is very impressive.
- Many things are also easy to write, as in high-level languages, but the language is compiled and systemic.
- Love for good practices in the standard library. For example, env_logger is configured from environment variables, which corresponds to one of the 12 factors from Heroku .
- Cargo Here you are managing the project life cycle and resolving dependencies and testing. All these are relatively new, but already universally recognized utilities. And this is in the standard language supply. Not bad meets the definition of "System language of the 21st century."
In the end
If I do not weaken, do not fall off, do not go wild, I will write a sequel. :) Well, of course, if they don’t send me for this article in Read-only.