Flutter - a new look at cross-platform development
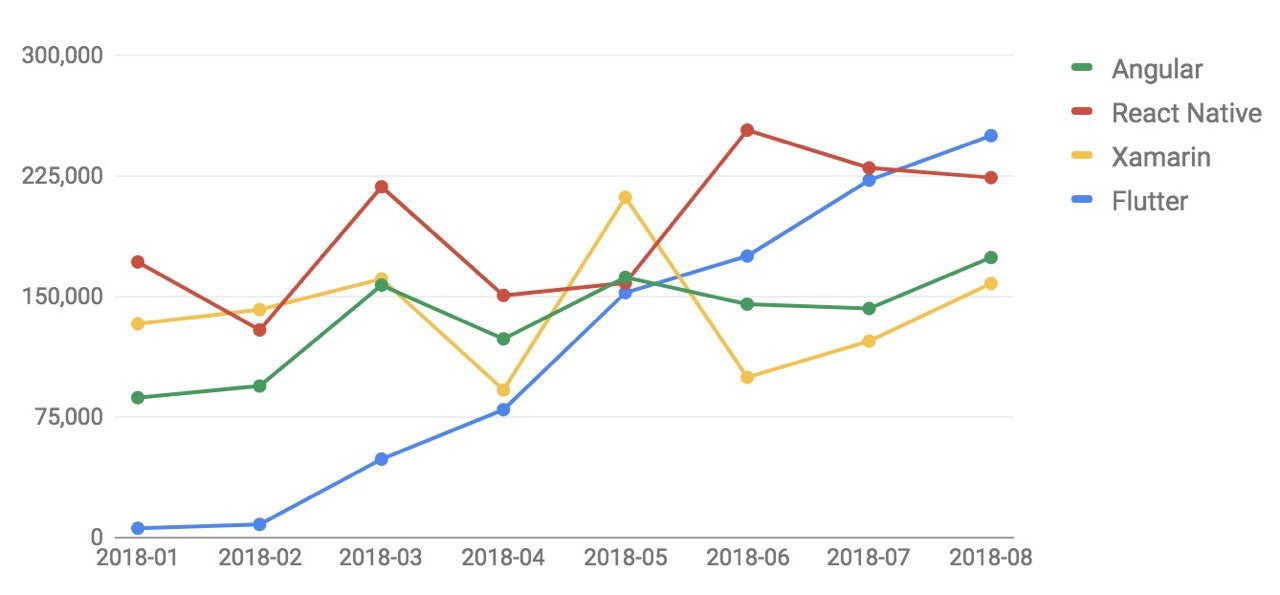
In August 2018, Flutter became the most requested cross-platform technology at Stack Overflow.
In our blog, Artem Zaitsev and Yevgeny Saturov from Surf , a certified agency of Google , will tell you why and how it happened:
Cross-platform solutions have long attracted those who want to quickly and inexpensively launch an MVP product simultaneously under several platforms. The reason is simple - a single code base. It is easier to maintain: artifacts are centralized, there is no duplication of logic and revisions of the same bugs for each of the platforms. Yes, and fewer people are needed for its support and creation - there is no need to contain two native developers.
Existing frameworks are either complex or not very productive due to the nuances of the technical implementation, or are full of bugs. With their help, people tend to quickly get the minimum functionality, and eventually doom themselves to rewriting the project in the long term.
The final release of Google’s mobile development framework Flutter , which has become the most requested cross-platform technology on Stack Overflow, is expected very soon . I emphasize that it is designed specifically for mobile applications and covers two platforms: Android and iOS. Currently presented Release Preview 2 version. New projects on Flutter fall into a special collection , the purpose of which is to show the capabilities of the framework. Now the framework is actively updated with components and architectural add-ins thanks to the developer community (for example, the implementation of Redux).
Why do you need to believe in Flutter?
Great for fast development.
You do not have to get out of the familiar Android Studio. With the help of a plugin, it perfectly adapts to the development of Flutter applications.
Hot Reload is a killer feature that allows you to instantly transfer all changes from the code to a running emulator or a connected device.

Simplicity and expressiveness of layout.
If you have ever developed applications for Android, I am sure that the layout is not something that you enjoyed.
With Flutter everything else. Firstly, no XML files with layout - widgets are created and configured directly in the code (something like Anko Layouts). Widget is used instead of View.
new Column(
  mainAxisAlignment: MainAxisAlignment.center,
  children: <Widget>[
    Padding(
      padding: EdgeInsets.all(16.0),
      child: Text(
        '$_name',
      ),
    ),
    //...
This is the code for the Flutter project. At first, a huge number of brackets are scary, but such “trees” are pretty obvious. Flutter promotes the composition: from ready-made widgets, you can create a new one, like from a designer. Almost any component has a child or children property that accepts another element or an array of elements, respectively. Everything is simple and clear. Make a beautiful user interface quickly enough.
Secondly, right from the start, the creators of the platform offer developers a catalog of ready-made widgets. It contains two sets of elements, Material Components and Cupertino, which look native for each of the platforms. In addition, cross-platform widgets are available. Their appearance and behavior are identical on iOS and on Android devices.
Jet framework
Create a beautiful and pleasant UI in a short time, you can not only thanks to a large number of ready-made widgets, but also the language in which you have to write. Dart vaguely reminiscent of Java, JavaScript, C #. It is expressive and fine-tuned to the needs of the framework, although, after Kotlin, some artistic syntax overkill can introduce into a light stupor.
Flutter is compiled into a native code for each of the platforms. “Under the hood,” he uses Skia as a graphics engine.
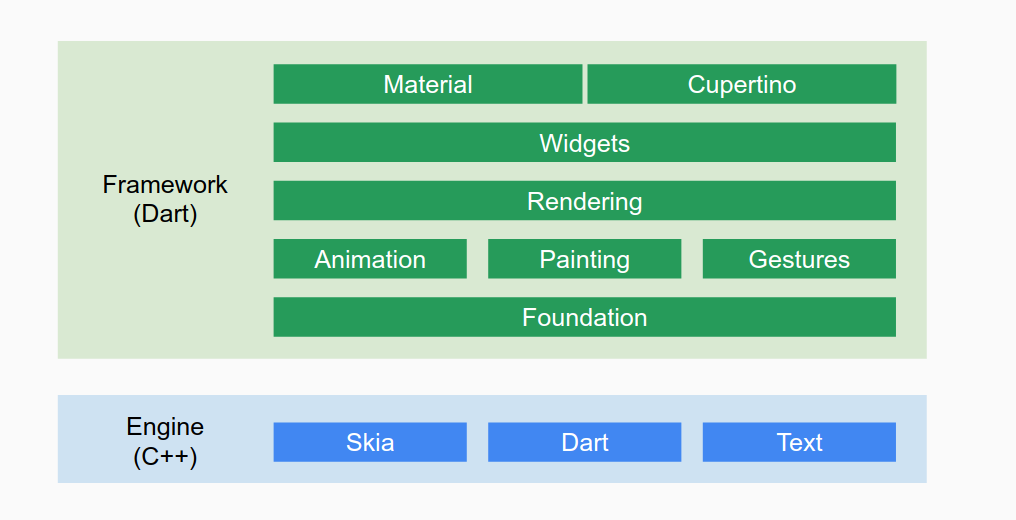
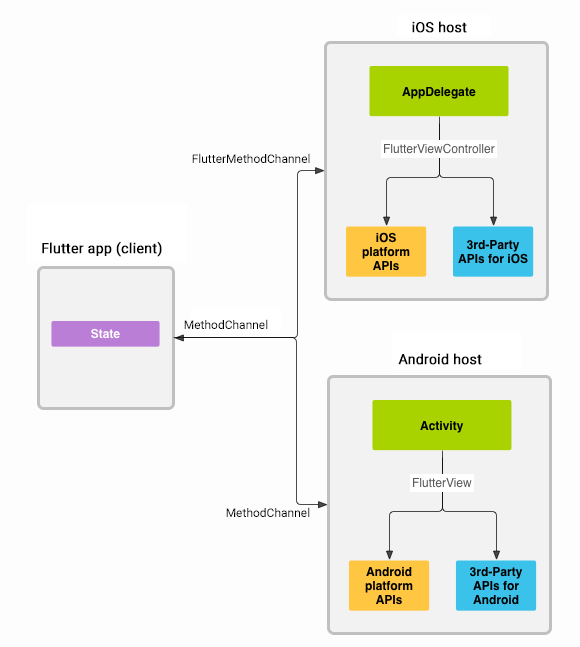
A key feature of the system architecture is that all the widgets, as well as the components responsible for rendering widgets on the canvas, are part of the application, not the platform. It is the absence of the need to switch the context and the use of "bridges" gives a performance boost, which contributes to the achievement of the cherished indicator of 60 FPS when drawing UI.
All the power of the platform is still in your hands.
Why refuse a ton of useful code that has been created in the community of mobile developers for a decade? All libraries available in native SDK applications and platform APIs can be used for Flutter applications.
Setting up the environment
Getting started with Flutter is easy.
When developing, official documentation recommends using Android Studio, IntelliJ or VSCode with the appropriate plug-ins, but any text editor will do.
Step one
Download the Flutter SDK archive from the official website under your OS. Unpack to the desired directory and run the command flutter doctor. This command will check if everything necessary is installed, as well as the presence of plug-ins for installed IDEs (for example, if Android Studio is installed, the utility will check plug-ins for it).
Step Two
If everything went smoothly, you can start creating the first project. If errors are found, the doctor will tell you how to solve them.
Step Three
To use Flutter in Android Studio, you must install two plugins: Flutter and Dart . You can install them in the standard way by opening the settings and selecting the necessary plugins in the search.
Details about setting the environment written in the official documentation .
Dart
import  'package:flutter/material.dart';
void main() => runApp(MyApp());
The first thing that catches the eye when seeing Flutter applications is an unusual code. In the world of Android development, Java is used, and more recently, Kotlin.
Now in the same row with them is Dart . Google is positioning it as an alternative to JavaScript with strong typing, high performance and flexibility.
Dart syntax is easy to learn, although not as beautiful as Kotlin. Perhaps this is a matter of taste and habit.
Creating a project
You can create a project by running the flutter create name command in the console or using the IDE (in Android Studio → New Flutter Project).
Application structure
After creating the project you will see the following structure. There are four packages in the root directory of the application - lib, ios, android and test.
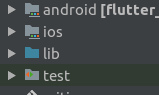
The first is the framework directory. There are all the dart-files and the main application code. Despite the fact that Flutter is compiled into native code, for each of the platforms you have to write some native interactions. In addition, you can embed Flutter into an existing application. For native code, two packages are provided - ios / android, in which it is possible to write in the language familiar to a specific platform - Obj-C / Swift or Java / Kotlin. In the test package you will find tests.
There is a pubspec.yaml configuration file in the root directory - libraries are connected there, etc. If we talk about the analogy, for Flutter it is like build.gradle (it also exists, but already in the native Android part).
The lib package can be broken down into additional packages - there is already a matter of taste and desire to use this or that architecture. By the way, to create an application on Flutter , various techniques are used, which can be found here .
Your project will immediately have a main.dart file containing the code with an example. The application has a single entry point - the main method. He is responsible for creating the root widget.
Everything is a Widget
Everything that you see (or do not see) on the screen, everything with which the interaction takes place and the application itself is widgets. Any user interface entity is a widget. Text field, indent or gesture detector - widgets. The application is built from them, as a constructor.
According to the official website, “each widget is an immutable description of a part of the user interface”.
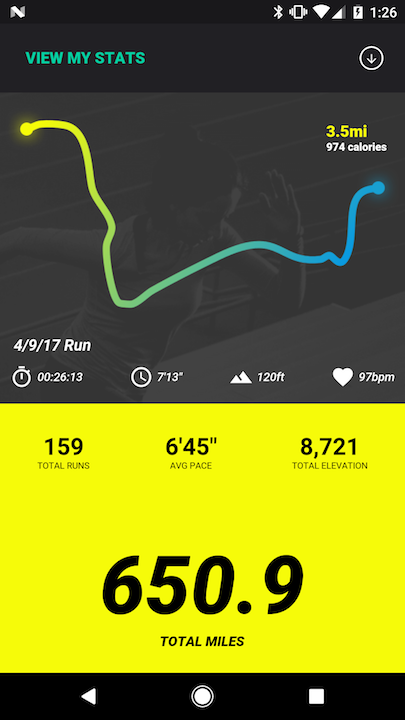
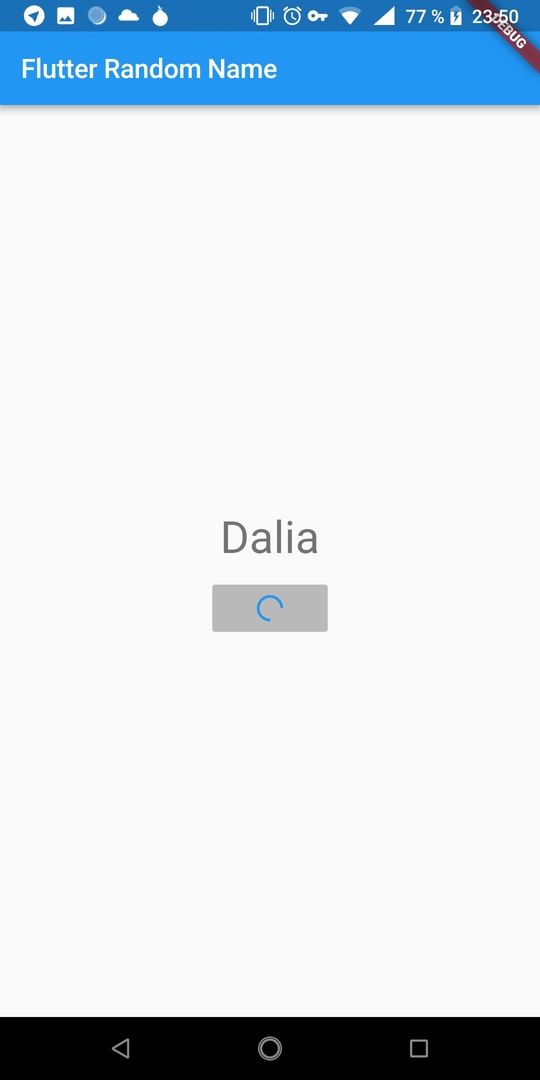
For example, let's build an application with this screen:
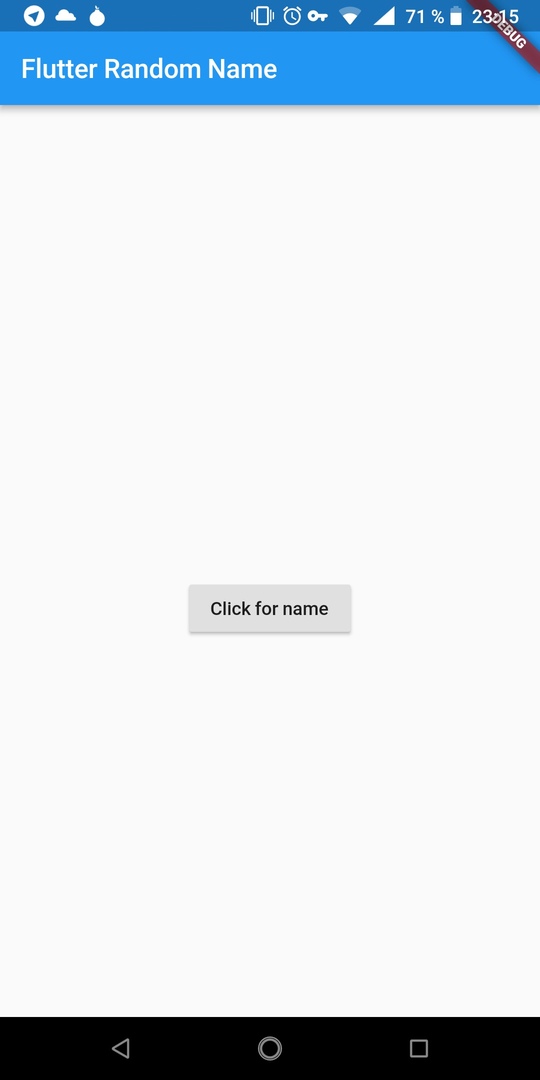
Here are the following widgets:
- attachment
- screen
- Appbar
- text
- button with loader
Some of them are implemented in the framework, some must be made up of finished parts.
Widgets are of two types Statelessand Stateful. The former are static (for example, text), the latter support state changes (for example, the screen).
Stateless
An example of such a widget in an application might be MyApp. This is the root of the application. Inside we will place all that is required for rendering using the build method.
class  MyApp  extends  StatelessWidget {
  // This widget is the root of your application.
  @override
  Widget build(BuildContext context) {
    return  new MaterialApp(
      title: 'Flutter Demo',
      theme: new ThemeData(
        primarySwatch: Colors.blue,
      ),
      home: Scaffold(
        appBar: new AppBar(
          title: new Text("Flutter Random Name"),
          ),
        body: new MyHomePage(),
       ),
    );
  }
}
Any static widget is a class heir StatelessWidget. You just need to override the build method, and in it build the necessary element. Flutter promotes the composition. To create a new item, do not extend the existing one.
In the example, this widget is built from MaterialApp(the root of the application, based on the components of MaterialDesign), inside which lies Scaffoldthe screen.
MyHomePage- also a widget that draws the screen body, excluding AppBar. In this case, it has a state. We will talk about it below.
The interface is built by passing the class constructor to the appropriate field with initialization of the arguments. Dart supports the optional parameters of the methods, thanks to this, flexibility in creating the UI is achieved.
Note: the word newin Dart, starting with the second version, is optional.
Such a layout of widgets can get a static screen of the application. And the developer’s imagination is unlimited at all.
Statefull
State widgets support redrawing when their state changes ( State). To make such a widget, it is necessary to inherit from StatefullWidgetand create a descendant class State<T>, which is the state of the widget and is responsible for what the user sees on the smartphone screen.
Changing the state of the widget occurs through a method call setState() {}. Inside you can, for example, set a different background color for the button, and the framework itself will determine the minimum necessary redrawing of the UI.
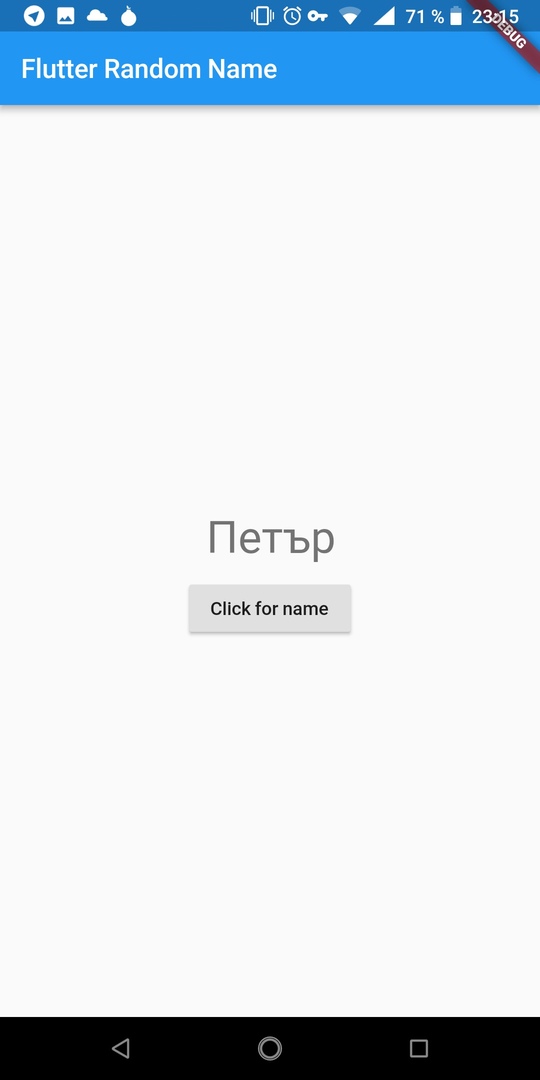
In my case, the main page MyHomePagewill be a state widget. It stores _name- the name that will be displayed in the text block, and the load flag _isLoading(responsible for how the internal widget will be drawn LoadingButton; an example of state management through the parent).
class  _MyHomePageState  extends  State<MyHomePage> {
  String _name = "";
  bool _isLoading = false;
  @override
  Widget build(BuildContext context) => Center(
    child: new Column(
      mainAxisAlignment: MainAxisAlignment.center,
      children: <Widget>[
        Padding(
          padding: EdgeInsets.all(16.0),
          child: Text(
            '$_name',
          ),
        ),
        LoadingButton(
          isLoading: _isLoading,
          action: _generateName,
        )
      ],
    ),
  );
}
The button has a callback action, where the method is applied _generateName(). I note that in Dart there are no access modifiers, such as privateand public. But if it is necessary to make something private inside the module, then the name must begin with the prefix “_”.
_generateNameAsynchronous method . He is responsible for loading the name, changing the flag isLoadingand setting the value name, which causes the button and the text to be redrawn.
final snack = SnackBar(content: Text("Handle error!"));
_generateName() async {
  toggleLoading();
  try {
    //загрузка данных через await
    //парсинг Json
    setName(map["name"]);
    toggleLoading();
  } catch (e) {
    setName("oops!");
    Scaffold.of(context).showSnackBar(snack);
    toggleLoading();
  }
}
void toggleLoading() {
  setState(() {
    _isLoading = !_isLoading;
  });
}
To change the state must be called setState() {}. Without this call, the widget will simply not be redrawn.
The loader implementation was pretty straightforward. At the time of redrawing, either the text or the indicator is substituted into the button.
The implementation takes only a few lines.
_buildButtonChild() {
  if (isLoading) {
    return Transform.scale(
      scale: 0.5,
      child: CircularProgressIndicator(),
    );
  } else {
    return Text("Click for name");
  }
}
Transform.scale need to reduce the size.
Asynchronous interaction in Flutter , actually as in Dart, is based on async-await. More details can be found here , here and here .
Where to begin?
Today, when new materials on Flutter come out almost daily, there is no shortage of good courses to help make friends with this technology.
A good example of a basic course on Flutter is a course on Udacity . Lessons are divided into two chapters, thoughtful passage of each of which will take 3-4 hours.
If the courses are not your option, start immersing yourself in technology through the study of the sources of existing projects. The awesome-flutter repository contains many such projects, and still boasts a very generous selection of ready-made libraries, solutions, samples and other materials for learning and inspiration.
Conclusion
According to the results of a deeper immersion in the topic, we have no trace of the former skepticism. Flutter does not look like an experiment, but rather shows the direction in which a significant part of the mobile development industry will move in the coming years. A few bold concepts that underlie Flutter bring new ideas and opportunities to the development. The quick, almost intuitive creation of the user interface makes prototyping and UX experiments easier than ever and accessible to everyone. In what area Flutter will find its application - time will tell.