How to write a plugin for TiddlyWiki
- Tutorial
TiddlyWiki is a very good thing and I have been using it for a long time. However, some things are not in it, and this is a minus. But you can creatively finish it with a file, and that's a plus.
I needed a progress bar. He has a bunch of applications: show the degree of readiness of the post, for example. Or the number of completed cases compared to the remaining. Anyway, a visual thing.
Since there is no progress bar out of the box, I began to think how to add it. And, for starters, he formulated requirements for him. The progress bar should be able to set the following parameters:
If some parameter is not set, then it should be calculated automatically.
TiddlyWiki has macros to solve such problems . This is a predefined fragment of text where you can transfer parameters and substitute them in the right places.
As part of the experiment, I sketched a test macro that displays a progress bar:
In the same tidler (as a fragment of text is called in TiddlyWiki), I added a call to this macro below:
He saved the tidler and admired the result:

The circuit turned out to be fundamentally working. But had a bunch of discrepancies with the original requirements. And to fix this was not yet possible due to the extreme limitations of creating macros using the WikiText format. I had to understand further.
The documentation found a mention that macros can also be written in JavaScript. To do this, the macro tidler must contain a field
If the array is
That was already good. But in TiddlyWiki you can’t just take and make a tiddler with a piece of JavaScript. Rather, it is possible, but will not work. For a design to work, it must be properly designed. For example, make a plugin.
What is a plugin in TiddlyWiki terminology? This is a certain set of tiddlers, assembled into a single whole, which is marked as hidden and does not appear in the usual list of tiddlers, can be embedded in the system and run for execution, and can also be imported from one wiki to another with a couple of clicks.
Initially, writing plugins required deploying a rather sophisticated infrastructure using node.js. I once tried to do this, but it didn’t work (I don’t remember for what reason). However, at the moment, the developer has added the ability to write plugins directly in the browser, which I used and will now tell you how to do it.
So, dear readers, let's get started creating the plugin. Referring to the documentation , download a clean TiddlyWiki file and start making a plugin for it from it.
The first thing to do is to create a HelloThere tidler , configure it to automatically display when the page is opened, and put in it links to the plugin tiddlers.
The path to the plugin, according to the documentation, should look like this:
The path to the scripts included in the plugin is formed in the same way:
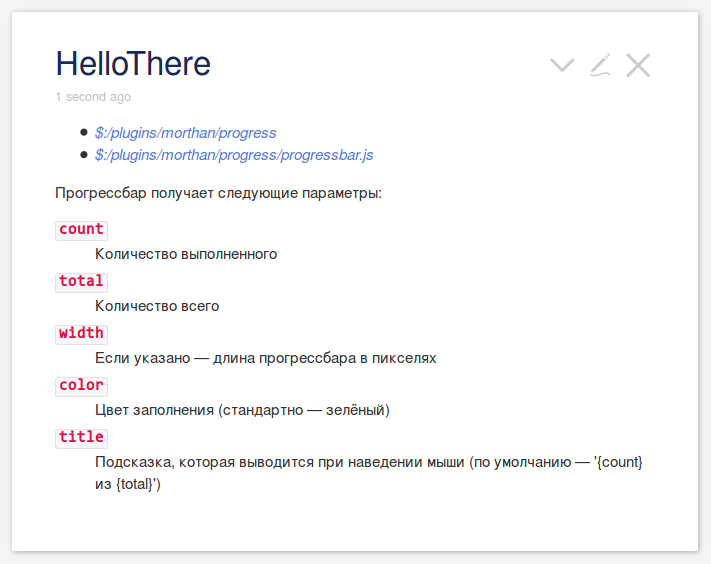
This is what my HelloThere tidler version looks like :
And this is it in the rendered form:

It is worth paying attention to two things. Firstly, the links are given in italics, because neither the plug-in nor the script included in its composition exists yet. Secondly, the progress bar has not yet been drawn, for the same reason.
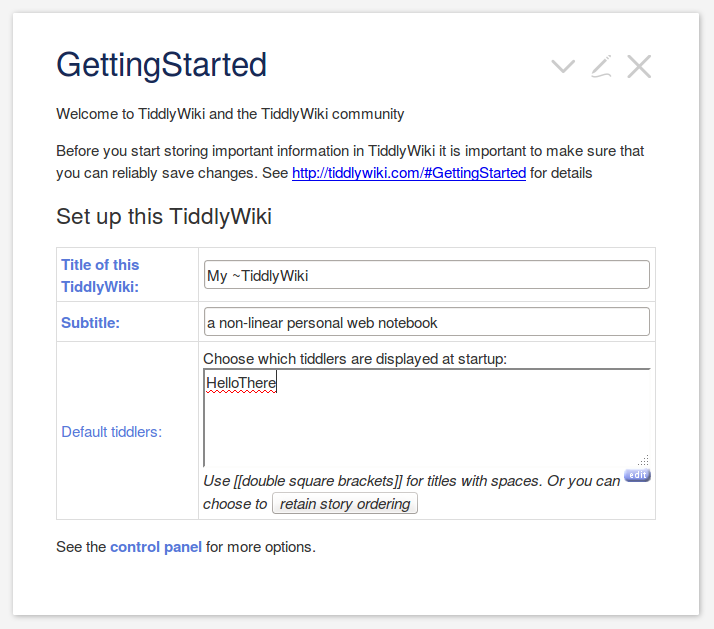
To configure the automatic display of the tiddler when opening the page, add it to the Default tiddlers list . It can be found either in the open by default tiddlere the GettingStarted , or find an icon in the sidebar of the gears and push it. In the settings panel that appears, look for Default tiddlers and set our HelloThere there .

Everything, the first part is ready. Now we need to create plug-in and script tidlers. Let's start with the plugin.
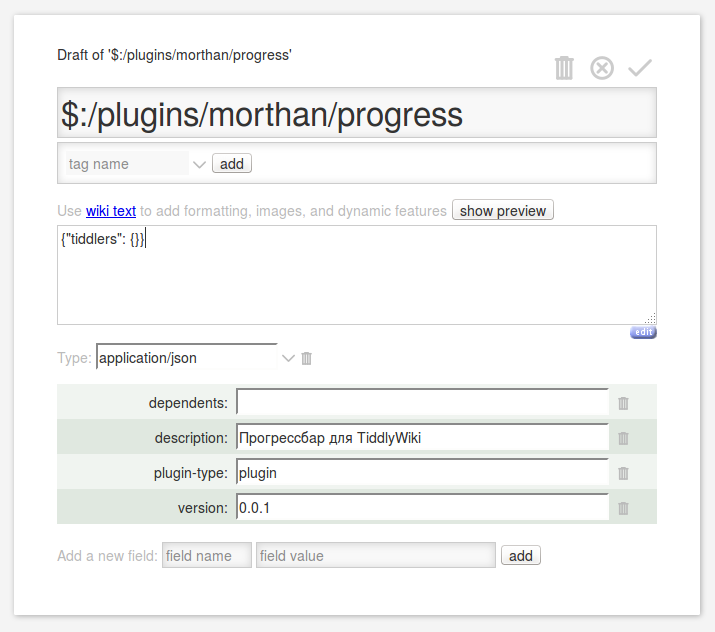
To create a tidler, just click on the link to it. A tidler blank appears, click "Edit" and edit.
As the documentation suggests, the following fields should be written in the plugin:
Fill in the fields, and in the body of the plugin write:

Save the tidler. A third of the work has been completed.
We do the same with the second link, the macro script. Click on it, click "Edit", fill in the fields:
Now the script body itself (under the spoiler):
I’m not a real javascript, I write in this language from case to case, because the idiotic syntax with curly braces annoys me very much. In general, this is just an example of writing a plugin.
In general, we save the finished tidler. Everything you need is already written. But it does not work, because it is not framed.
And now - the magic! Open the JavaScript console in the browser and write this:
The first argument is the name of the plugin to be repackaged. The second is a list of tipdlers to be included in the plugin. Press Enter . The browser says that everything went well and in order for the changes to take effect, you must save and restart the wiki.
So let's do it. After rediscovery in the HelloThere tidler , a beautiful green progress bar suddenly appears.
The new version of TiddlyWiki now has the ability to write plugins directly without leavingthe browser pool . This allows us to creatively refine the system for ourselves, opens up unlimited horizons and brings us one more small step closer to world domination.
PS: I’m not sure of the correct choice of hubs, because I don’t quite understand why they are needed. If I did something wrong, I will be grateful for the clarification in the comments.
I needed a progress bar. He has a bunch of applications: show the degree of readiness of the post, for example. Or the number of completed cases compared to the remaining. Anyway, a visual thing.
Since there is no progress bar out of the box, I began to think how to add it. And, for starters, he formulated requirements for him. The progress bar should be able to set the following parameters:
- fill color;
- the size;
- hover hint.
If some parameter is not set, then it should be calculated automatically.
TiddlyWiki has macros to solve such problems . This is a predefined fragment of text where you can transfer parameters and substitute them in the right places.
As part of the experiment, I sketched a test macro that displays a progress bar:
\define progressbar(count:"0" total:"10")
<svgwidth="$total$5"height="15"><g><title>$count$ из $total$</title><rectx="1.5"y="4.5"height="10"width="$count$0"rx="3"ry="3"style="fill: green; stroke: none" /><rectx="1.5"y="4.5"height="10"width="$total$0"rx="3"ry="3"style="fill: none; stroke: green" /></g></svg>
\end
In the same tidler (as a fragment of text is called in TiddlyWiki), I added a call to this macro below:
Прогрессбар: <<progressbar 34>>
He saved the tidler and admired the result:

The circuit turned out to be fundamentally working. But had a bunch of discrepancies with the original requirements. And to fix this was not yet possible due to the extreme limitations of creating macros using the WikiText format. I had to understand further.
The documentation found a mention that macros can also be written in JavaScript. To do this, the macro tidler must contain a field
module-typewith a value macro(fields in TiddlyWiki are metadata and can be assigned to any tidler). The macro script should export the following properties:name: A string representing the name by which the macro will be calledparams: An array of objects with the following properties:name: parameter namedefault: (optional) default parameter value
run: Function that will be called when the macro starts. Parameters are retrieved from the macro call and arranged according to the params array. The functionrunshould return the string value of the macro. When called,thispoints to the widget node that invoked the macro.
If the array is
paramsempty or absent, then all parameters will simply be passed to the method run(). That was already good. But in TiddlyWiki you can’t just take and make a tiddler with a piece of JavaScript. Rather, it is possible, but will not work. For a design to work, it must be properly designed. For example, make a plugin.
What is a plugin in TiddlyWiki terminology? This is a certain set of tiddlers, assembled into a single whole, which is marked as hidden and does not appear in the usual list of tiddlers, can be embedded in the system and run for execution, and can also be imported from one wiki to another with a couple of clicks.
Initially, writing plugins required deploying a rather sophisticated infrastructure using node.js. I once tried to do this, but it didn’t work (I don’t remember for what reason). However, at the moment, the developer has added the ability to write plugins directly in the browser, which I used and will now tell you how to do it.
So, dear readers, let's get started creating the plugin. Referring to the documentation , download a clean TiddlyWiki file and start making a plugin for it from it.
The first thing to do is to create a HelloThere tidler , configure it to automatically display when the page is opened, and put in it links to the plugin tiddlers.
The path to the plugin, according to the documentation, should look like this:
$:/plugins/ваше_имя/название_плагина
The path to the scripts included in the plugin is formed in the same way:
$:/plugins/ваше_имя/название_плагина/имя_скрипта.js
This is what my HelloThere tidler version looks like :
* [[$:/plugins/morthan/progress]]
* [[$:/plugins/morthan/progress/progressbar.js]]
Прогрессбар получает следующие параметры:
; `count`
: Количество выполненного
; `total`
: Количество всего
; `width`
: Если указано --- длина прогрессбара в пикселях
; `color`
: Цвет заполнения (стандартно --- зелёный)
; `title`
: Подсказка, которая выводится при наведении мыши (по умолчанию --- '{count} из {total}')
<<progressbar 304280>>
And this is it in the rendered form:

It is worth paying attention to two things. Firstly, the links are given in italics, because neither the plug-in nor the script included in its composition exists yet. Secondly, the progress bar has not yet been drawn, for the same reason.
To configure the automatic display of the tiddler when opening the page, add it to the Default tiddlers list . It can be found either in the open by default tiddlere the GettingStarted , or find an icon in the sidebar of the gears and push it. In the settings panel that appears, look for Default tiddlers and set our HelloThere there .

Everything, the first part is ready. Now we need to create plug-in and script tidlers. Let's start with the plugin.
To create a tidler, just click on the link to it. A tidler blank appears, click "Edit" and edit.
As the documentation suggests, the following fields should be written in the plugin:
| Field | Value |
|---|---|
dependents | A list of space-separated plugins on which our plug-in depends (for names with spaces, use square brackets) |
description | Plugin description |
plugin-type | For a regular plugin, for a theme theme, and for a language pack language |
type | Set "application / json" |
version | Plugin version number (for example, "0.0.1") |
{"tiddlers": {}}

Save the tidler. A third of the work has been completed.
We do the same with the second link, the macro script. Click on it, click "Edit", fill in the fields:
| Field | Value |
|---|---|
type | "Application / javascript" |
module-type | "Macro" |
Show code
/*\
title: $:/plugins/morthan/progress/progressbar.js
type: application/javascript
module-type: macro
Macro to display progressbar
\*/
(function(){
/*jslint node: true, browser: true *//*global $tw: false */"use strict";
/*
Information about this macro
*/
exports.name = "progressbar";
exports.params = [
    {name: "count"},
    {name: "total"},
    {name: "width",
     default: ""},
    {name: "color",
     default: "green"},
    {name: "title",
     default: "{count} из {total}"}
];
/*
Run the macro
*/
exports.run = function(count, total, width, color, title) {
    count = parseInt(count);
    total = parseInt(total);
    width = (width == '') ? total * 10 : parseInt(width);
    var html = [svg(width), '<g>', tagTitle(count, total, title),
        innerRect(count, total, width, color), outerRect(width), '</g>',
        '</svg>'];
    return html.join("\n");
};
functionsvg(width) {
    width += 5;
    return'<svg width="' + width + '" height="15">';
};
functionrect(width, fill) {
    return'<rect x="1.5" y="4.5" height="10" width="' + width +
        '" rx="3" ry="3" style="fill: ' + fill + '; stroke: green" />';
};
functionouterRect(width) {
    return rect(width, 'none');
};
functioninnerRect(count, total, width, color) {
    var dx = 0;
    if (count > 0 && count != total) {
        dx = count * width / total;
    }
    elseif (count == total) {
        dx = width;
    }
    return rect(dx, color);
};
functiontagTitle(count, total, title) {
    if (title == '') return'';
    return'<title>' + title.replace('{count}', count).replace('{total}', total) + '</title>';
};
})();
I’m not a real javascript, I write in this language from case to case, because the idiotic syntax with curly braces annoys me very much. In general, this is just an example of writing a plugin.
In general, we save the finished tidler. Everything you need is already written. But it does not work, because it is not framed.
And now - the magic! Open the JavaScript console in the browser and write this:
$tw.utils.repackPlugin('$:/plugins/morthan/progress', ['$:/plugins/morthan/progress/progressbar.js'])
The first argument is the name of the plugin to be repackaged. The second is a list of tipdlers to be included in the plugin. Press Enter . The browser says that everything went well and in order for the changes to take effect, you must save and restart the wiki.
So let's do it. After rediscovery in the HelloThere tidler , a beautiful green progress bar suddenly appears.
Conclusion
The new version of TiddlyWiki now has the ability to write plugins directly without leaving
PS: I’m not sure of the correct choice of hubs, because I don’t quite understand why they are needed. If I did something wrong, I will be grateful for the clarification in the comments.
