June 15, 2015 at 13:59
New panels and connections for Kubotronika
Previously, we showed some options for panels for the design of basic cubes, now we are laying out the full alphabet . The panels have two latches and two guide tabs. To fix the panel, you need to lower one latch at the beginning, and then push the panel a little curving towards the second. The panel should take its place and drop into the inside of the cube.
Let us dwell separately on an attempt to create an electronic designer for mastering the basics of electronics.
The question was raised by the format: “full-featured set” or else “board game”. We note right away that we also had these questions. Because when a bunch of panels have been printed, and it is not possible to select the final version of the electrical connection, then moving the workpieces, we get different schemes that lead to thoughts about board games, i.e. just "drag by the hand" ...

So the idea arose of creating a board game on circuitry with the code name “SCHEMOTECHNICS”, but one snag appeared immediately. If the constructor is valid and the child plays alone, then for him a signal for the correctness of the assignment is a working circuit. Luminous or sounding, and with the presence of moving parts, it does something. But if it is a “board game” format with thematic cubes, then the correctness of execution is either checked by a “control card” or it should be moderated by an adult who understands circuitry.
A collective game may have more options for development, as there is competition and mutual control between the players, but again they must have solid knowledge in the field of circuitry. Therefore, the question of the existence of the “board game” format is rather for you, and from us you can take the panels themselves with conditional images of radio elements (the variety of which will expand) and cubes.
Back to the functional cubes. These cubes should be convenient for children at an age when they still cannot work with breadboards, small pliers, side cutters and individual electronic components. In general, they began to study the material, including books from the era of the USSR, and also once again studied the instructions of the designer "on the buttons", which we sold.
Let's start with the legendary book of V.V. Matskevich “INTERESTING RADIO-ELECTRONICS IN PIONERLAGER” 1986. This book gives many examples of both the circuits themselves, and an example of how to make such a constructor "on the buttons" ourselves. The book, despite its age, did NOT lose its value and there are many interesting examples of the classes themselves and there are explanations for tasks and experiments.

Next was studied the book by Y. Voytsekhovsky "RADIO ELECTRONIC TOYS". The book provides an overview and general recommendations for the selection and manufacture of sets of radio designers. But, most importantly, there is a mention of "Lectron". It is not searched through Yandex, but Google gave two right sites at once.
lectron.inf o - site-museum dedicated to these designers
www.lectron.de - site of the company itself and its product range including and modern.
Information on the sites of the sea and for everyone who is even a little bit interested in this topic, we recommend diving.
But, despite this “sea”, we did not find a connection method that can be adapted to our blocks. Although the use of magnets is mentioned very actively. Also considered options for designers of the USSR where either a wire connection or brackets. Classic connectors for wires do NOT suit us, because our cubes are “small” and the connectors are usually large. With brackets, not everything is clear either, where to get elastic elements for contacts in the conditions of independent production.
Relatively speaking, all the contacts we studied can be divided into mechanical or magnetic. Mechanical ones are more reliable, but it is necessary to create additional force for pressing the contacts of neighboring modules, which is quite difficult to do in our sizes. We liked the magnetic connection more, but the peculiarity of cheap magnets is that they have relatively speaking "+" and "-" and this did not make it possible to center them symmetrically, because there is a possibility that the scheme will meet "+" and "+" or "-" and "-".
But, by sorting out combinations of forms of mutually mating parts, a working solution was found both on magnets and purely mechanical. Both of them still have drawbacks, but we will work on them.
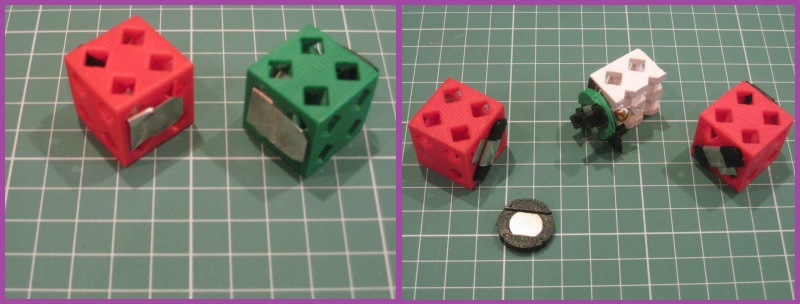
The mechanical connection is simple, convenient and cheap to manufacture, but unfortunately it is prone to deformation due to “incorrect” disconnection. It is clearly visible in the photograph.
Much more complicated and interesting was the case with magnets because they had a "+" and a "-". Therefore, the magnets were logically removed from the design of the cubes into a separate connecting element. And the contacts are arranged so that any rotation around the vertical axis provides mutual contact between the contacts of the two blocks.
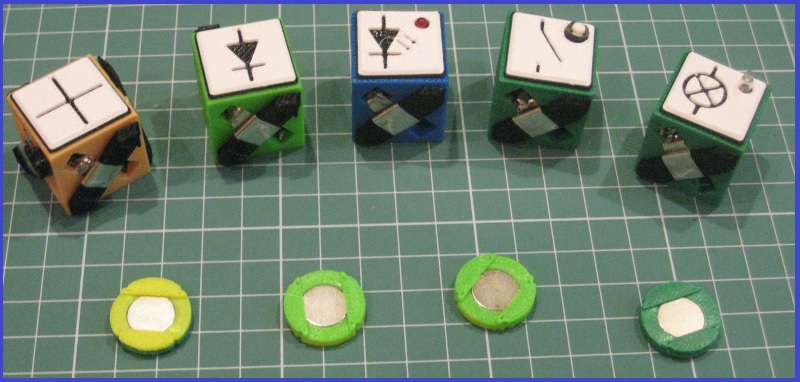
All elements are printed on a 3D printerand the body of the connecting element is glued from two symmetrical halves rotated 90 degrees. On the one hand, we managed to form a contact, but, on the other hand, the circuit has insufficient rigidity and any careless movement can destroy it. In principle, the blocks work and the magnetic connections hold the blocks, but I want to improve a little more.

To thoughts of improvement, we add calculations at the approximate price of such a compound for those who want to assemble on their own. With a rough calculation, the cost of this type of compound is made up of:
- tinned tin from a can, conditionally there is in the kitchen at a price of 0 rubles. (any can of canned food, etc.)
- a 12x2mm neodymium magnet at a price of almost 7 rubles.
- two parts of the printed case 1gr. for magnet and glue
- two contact holders of 1 gram each, the contacts are worn on the block according to the number of outputs of the element
- solder
You can neglect the cost of glue and solder for now and roughly take the figure of 10 rubles “for connection” between two cubes as a basis. We will focus on this figure when developing other ways to connect the cubes.
One disadvantage of such a “magnetic” connection is that it is difficult to withstand the geometry of the assembled circuit and to ensure the connection of conventional Kubotronik units to it.
In the process of testing the magnetic connection and writing this material, we had new ideas on how to realize a symmetrical (mirror) mechanical connection without magnets, but more on that already on Tuesday.
To be continued…
Let us dwell separately on an attempt to create an electronic designer for mastering the basics of electronics.
The question was raised by the format: “full-featured set” or else “board game”. We note right away that we also had these questions. Because when a bunch of panels have been printed, and it is not possible to select the final version of the electrical connection, then moving the workpieces, we get different schemes that lead to thoughts about board games, i.e. just "drag by the hand" ...
So the idea arose of creating a board game on circuitry with the code name “SCHEMOTECHNICS”, but one snag appeared immediately. If the constructor is valid and the child plays alone, then for him a signal for the correctness of the assignment is a working circuit. Luminous or sounding, and with the presence of moving parts, it does something. But if it is a “board game” format with thematic cubes, then the correctness of execution is either checked by a “control card” or it should be moderated by an adult who understands circuitry.
A collective game may have more options for development, as there is competition and mutual control between the players, but again they must have solid knowledge in the field of circuitry. Therefore, the question of the existence of the “board game” format is rather for you, and from us you can take the panels themselves with conditional images of radio elements (the variety of which will expand) and cubes.
Back to the functional cubes. These cubes should be convenient for children at an age when they still cannot work with breadboards, small pliers, side cutters and individual electronic components. In general, they began to study the material, including books from the era of the USSR, and also once again studied the instructions of the designer "on the buttons", which we sold.
Let's start with the legendary book of V.V. Matskevich “INTERESTING RADIO-ELECTRONICS IN PIONERLAGER” 1986. This book gives many examples of both the circuits themselves, and an example of how to make such a constructor "on the buttons" ourselves. The book, despite its age, did NOT lose its value and there are many interesting examples of the classes themselves and there are explanations for tasks and experiments.
Next was studied the book by Y. Voytsekhovsky "RADIO ELECTRONIC TOYS". The book provides an overview and general recommendations for the selection and manufacture of sets of radio designers. But, most importantly, there is a mention of "Lectron". It is not searched through Yandex, but Google gave two right sites at once.
lectron.inf o - site-museum dedicated to these designers
www.lectron.de - site of the company itself and its product range including and modern.
Information on the sites of the sea and for everyone who is even a little bit interested in this topic, we recommend diving.
But, despite this “sea”, we did not find a connection method that can be adapted to our blocks. Although the use of magnets is mentioned very actively. Also considered options for designers of the USSR where either a wire connection or brackets. Classic connectors for wires do NOT suit us, because our cubes are “small” and the connectors are usually large. With brackets, not everything is clear either, where to get elastic elements for contacts in the conditions of independent production.
Relatively speaking, all the contacts we studied can be divided into mechanical or magnetic. Mechanical ones are more reliable, but it is necessary to create additional force for pressing the contacts of neighboring modules, which is quite difficult to do in our sizes. We liked the magnetic connection more, but the peculiarity of cheap magnets is that they have relatively speaking "+" and "-" and this did not make it possible to center them symmetrically, because there is a possibility that the scheme will meet "+" and "+" or "-" and "-".
But, by sorting out combinations of forms of mutually mating parts, a working solution was found both on magnets and purely mechanical. Both of them still have drawbacks, but we will work on them.
The mechanical connection is simple, convenient and cheap to manufacture, but unfortunately it is prone to deformation due to “incorrect” disconnection. It is clearly visible in the photograph.
Much more complicated and interesting was the case with magnets because they had a "+" and a "-". Therefore, the magnets were logically removed from the design of the cubes into a separate connecting element. And the contacts are arranged so that any rotation around the vertical axis provides mutual contact between the contacts of the two blocks.
All elements are printed on a 3D printerand the body of the connecting element is glued from two symmetrical halves rotated 90 degrees. On the one hand, we managed to form a contact, but, on the other hand, the circuit has insufficient rigidity and any careless movement can destroy it. In principle, the blocks work and the magnetic connections hold the blocks, but I want to improve a little more.
To thoughts of improvement, we add calculations at the approximate price of such a compound for those who want to assemble on their own. With a rough calculation, the cost of this type of compound is made up of:
- tinned tin from a can, conditionally there is in the kitchen at a price of 0 rubles. (any can of canned food, etc.)
- a 12x2mm neodymium magnet at a price of almost 7 rubles.
- two parts of the printed case 1gr. for magnet and glue
- two contact holders of 1 gram each, the contacts are worn on the block according to the number of outputs of the element
- solder
You can neglect the cost of glue and solder for now and roughly take the figure of 10 rubles “for connection” between two cubes as a basis. We will focus on this figure when developing other ways to connect the cubes.
One disadvantage of such a “magnetic” connection is that it is difficult to withstand the geometry of the assembled circuit and to ensure the connection of conventional Kubotronik units to it.
In the process of testing the magnetic connection and writing this material, we had new ideas on how to realize a symmetrical (mirror) mechanical connection without magnets, but more on that already on Tuesday.
To be continued…