Database Recovery with Veeam Explorer for Microsoft SQL Server
- Tutorial
After analyzing process theory and practical tips for backing up virtualized SQL Server, let's move on to the topic of restoring databases using Veeam Explorer for Microsoft SQL Server. This tool allows you to restore the database to the source or to another server without having to lift the server itself from the backup.
In general, the recovery process involving Veeam Explorer takes place as follows:
Of course, we focus on the requirements of recovery policies. To select the necessary scenario and prepare everything necessary for its successful implementation, it’s nice to make a checklist and answer the basic questions:
I note that during the recovery process it is not necessary to completely restore and start the server itself. Instead, the backup copy (in the form in which it is stored in the repository, i.e. after compression and deduplication) is mounted on the Veeam backup server. In order to correctly mount the file system of this virtual machine and display it in the usual form in the Veeam Backup Browser browser window, a special Veeam driver is used.
Next, you can choose with which tool we will restore the database:
So, let's focus on restoring a database using Veeam Explorer for Microsoft SQL Server.
Just perform 5 simple preparatory steps. I recommend compiling a small checklist that will help you save time and nerves in case they are especially needed.
Step 1: Check if the ports are open.
To connect the Veeam backup server with the guest OS of your SQL server, most likely you need to open the TCP 1433 and TCP 1434 ports on the backup server. The rest (if necessary) will depend on the configuration of your SQL Server; for details welcome to http://msdn.microsoft.com/en-us/library/cc646023.aspx#BKMK_ssde .
Step 2: Prepare the secondary server (if necessary)
If you need to restore the database to the state corresponding to the selected backup of the SQL server, no additional machines will be required. But if you are going to choose a different scenario, then you will need a staging server, which provides the following operations (see also the table above):
By default, SQL Server installed together with the Veeam backup server will be used as an auxiliary. You can specify a different server by starting Veeam Explorer for SQL (for example, from the Start menu ) and selecting Options from the main menu .
Important! The main thing here is to specify the local instance of SQL Server (i.e., standing on the same machine as Veeam Explorer and the backup server) and check that its version is not lower than the version of SQL whose base you plan to restore (i.e. E. You cannot use SQL Server 2008 to restore / export a database with SQL Server 2014).
Step 3: Assign Account Rights
At different stages of the process, the following rights may be required (if necessary, contact the DBA for their issuance):
Step 4: Explore the limitations and features of operations
Step 5: Prepare files for recovery.
To do this, you can use any recovery option from the supported Veeam Backup & Replication; it is most convenient to use the SQL Restore Wizard (as described here ) - it will perform the necessary operations in automatic mode and launch Veeam Explorer itself. If necessary - for example, if you work with VeeamZIP - similar operations can be performed manually (as described here ) - then the final point will be to add the necessary database to the Veeam Explorer console using the Add Database command (see more details here ).
Important! Restoring databases to SQL server ( Restore menu commands ) is supported for Veeam Backup & Replication Enterprise and Enterprise Plus editions . For all editions (including Free and Standard), you can restore by exporting the database files and then attachment to the desired server.
Scenario number 1. Restoring to the state “as in the selected backup of the SQL server”
You will need a recovery point (backup, replica, VeeamZIP) created taking into account the operation of the application. Required configuration settings:
Note: For those who forgot or missed a description of these settings - they were described in the first series .
This scenario (if you have a Veeam Backup & Replication Enterprise or Enterprise Plus license) allows you to restore the database to the source server or to another server of your choice.
Option 1: restore to the source server
For this, it is convenient to use the quick 1-Click Restore recovery, which will go with the following default settings:
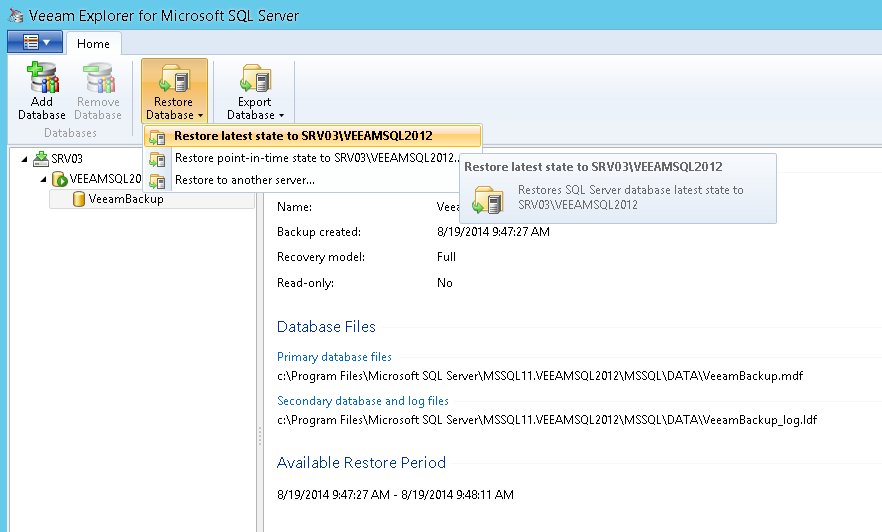
Having realized these facts, we select the necessary base from the tree in the Veeam Explorer console, and from the menu select the command Restore Database> Restore current_state_date to server \ instance .
Note: Here, current_state_date is the date the backup of the SQL server was created, whose contents are now mounted on the Veeam server and shown to you through Veeam Explorer; thus, it will be either “latest” - if the last backup was selected, or the corresponding date.
Useful: You can select several databases — all databases from one instance or all databases from one server — by selecting the appropriate node (instance or server) in the tree.
Option 2: restore to the selected server
To restore to the selected server (not the source), you will have to go through the steps of the wizard:
Scenario number 2. Restore to a specified point in time
This script allows you to restore a database to a point in time of your choice (which may differ from the moment you created a backup of the server itself). In fact, the database will be restored to the state “as in the nearest previous backup of the server”, and then the logs will be “rolled” from their backup - so the database will be brought into the desired state. Therefore, to implement this scenario, you will need these configuration settings:
Note: In the current version, this script is not supported for replicas and backups saved to the repository using archiving jobs.
In this scenario, recovery to the source or to the selected server is also supported; the corresponding step of the Restore Wizard can be accessed by selecting the menu command Restore Database> Restore point-in-time state to
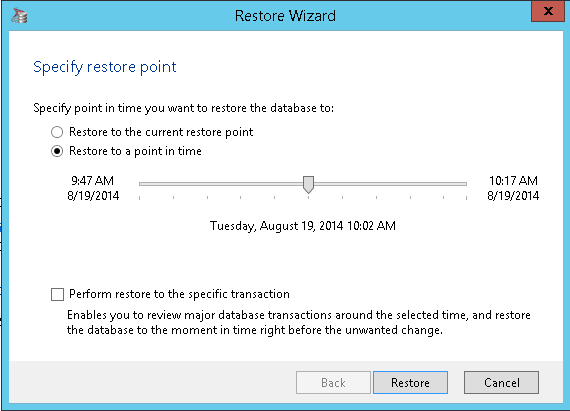
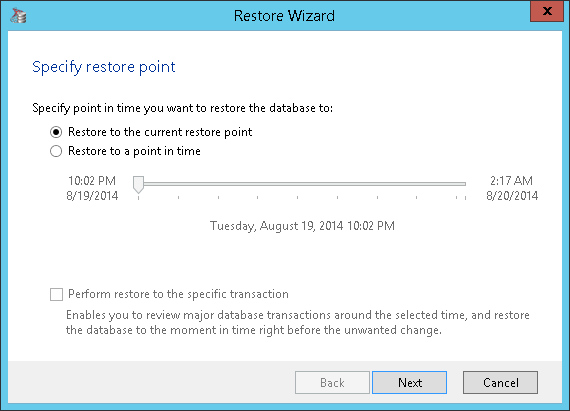
Here you will need to select the option Restore to a point in time and use the slider ("slider") to indicate a specific point in time at which we want to restore the database.
Scenario 3. Restoring to the state before the selected transaction
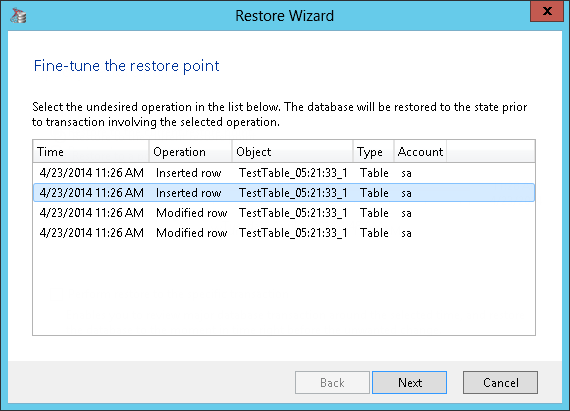
Here the user can view the list of operations for the selected period, find the necessary one (for example, delete a record from the table) and then restore the database to the state it was in before the operation (a full list of operations is given here )
To implement this scenario, you will need these configuration settings:
Note: If the recovery was performed for the secondary node of the group, in some cases an error like “The specified STOPAT time is too early” may occur . In this case, you need to perform recovery from the primary node.
A detailed description of the steps in this scenario is provided in the document “Basic Use Scenarios” . In short, I’ll just say that at the step of the Specify restore point wizard you will need to select the Restore to a point in time option , and also check the Perform restore to specific transaction checkbox so that in the next Fine-tune the restore point step you can view the list of transactions.
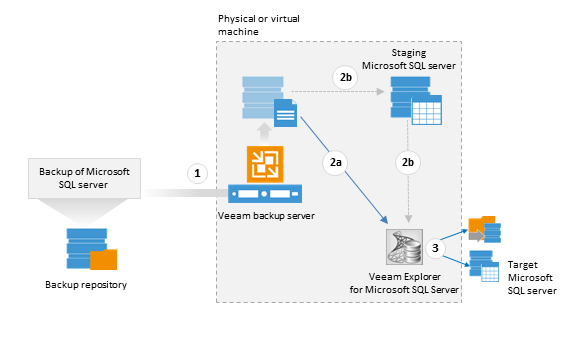
In general, the recovery process involving Veeam Explorer takes place as follows:
- The administrator responsible for recovery launches the Veeam Backup & Replication console and uses its favorite recovery option (from Veeam's offer) to mount SQL Server (directly from the backup, as it is in the repository) to the Veeam backup server, along with the file system and all available on SQL Server instances and bases.
- Veeam Explorer for Microsoft SQL Server gathers information about the hierarchy of instances and databases on this SQL server and creates a view for the user in its console. The user can browse the entire tree and, having found the necessary base (s), select and run the required recovery script. The following recovery and export scenarios are supported:
- To the state corresponding to the selected recovery point (the one that is currently mounted on the Veeam backup server)
- To state at a selected point in time
- On the eve of the selected transaction
The first of these scenarios involves only the target SQL Server; for the rest, you will need both the target server and the auxiliary SQL server (staging server) according to this table:Server Point-in-time recovery Transaction Recovery Export at point in time Export per transaction Auxiliary Not used Used to display logs Is used Used to display and "roll" logs Target Used for logging Used for logging Not used Not used - Finally, the database is completely "recreated" on the target Microsoft SQL Server and is ready to go. If you used the export script, you can attach the database to the desired server.
We determine what and how we want to restore
Of course, we focus on the requirements of recovery policies. To select the necessary scenario and prepare everything necessary for its successful implementation, it’s nice to make a checklist and answer the basic questions:
- Will you restore the database at the time of creation of the SQL recovery point, or is it necessary to provide the possibility of recovery at any point in time (including in the interval between server recovery points)?
In the latter version, log backups will be needed to "roll" them to the selected point, so you will need to select the Backup logs option when configuring the server backup job. - Are you planning to restore the database to the state preceding any operation (for example, deleting a record from a table)?
To recover with this level of granularity, you will need:- transaction log backups
- an auxiliary SQL server (I’ll tell you about the requirements a bit later), which will allow you to display a list of operations in the console so that the user can view them and select the desired one, and then roll the logs.
- Will the database be restored to the original Microsoft SQL Server or to another?
- Check the connection settings of the Veeam backup server with this server.
- Make sure that the account under which you plan to perform recovery has all the necessary rights.
- Check the versioning of SQL Server where you will restore (restoring the database from a server of a newer version to an older server will not be supported).
- Who will be involved in database recovery? Are you personally, or other users (user groups)?
In the second case, it is wise to delegate recovery, using the functionality of Enterprise Manager for this.
I note that during the recovery process it is not necessary to completely restore and start the server itself. Instead, the backup copy (in the form in which it is stored in the repository, i.e. after compression and deduplication) is mounted on the Veeam backup server. In order to correctly mount the file system of this virtual machine and display it in the usual form in the Veeam Backup Browser browser window, a special Veeam driver is used.
Next, you can choose with which tool we will restore the database:
- Veeam Explorer for Microsoft SQL Server - allows you to restore the database to the original or to another server (commercial license is required), to the state corresponding to the selected backup of the server itself / the specified time / on the eve of the selected transaction. I will describe this tool and scripts in more detail below.
- Veeam Backup Enterprise Manager - allows you to delegate recovery options to other users, giving them the right to work with certain servers (also requires a commercial Enterprise Plus license ). It supports recovery to the source or another server to the state corresponding to the selected server backup / specified time.
- For those who are especially keen, you can use the Granular Restore Wizard (U-AIR) and create a request to the backup administrator to restore the database, table or query results to the state at the time of the selected SQL server backup. Since this method uses a virtual laboratory and requires more fine-tuning, and the tool itself is now issued upon request, it is recommended that you contact the support service for this case. If you are still working with version 7, then you can read the documentation .
So, let's focus on restoring a database using Veeam Explorer for Microsoft SQL Server.
What needs to be done before launching Veeam Explorer?
Just perform 5 simple preparatory steps. I recommend compiling a small checklist that will help you save time and nerves in case they are especially needed.
Step 1: Check if the ports are open.
To connect the Veeam backup server with the guest OS of your SQL server, most likely you need to open the TCP 1433 and TCP 1434 ports on the backup server. The rest (if necessary) will depend on the configuration of your SQL Server; for details welcome to http://msdn.microsoft.com/en-us/library/cc646023.aspx#BKMK_ssde .
Step 2: Prepare the secondary server (if necessary)
If you need to restore the database to the state corresponding to the selected backup of the SQL server, no additional machines will be required. But if you are going to choose a different scenario, then you will need a staging server, which provides the following operations (see also the table above):
- Restoring the database to the state on the eve of the selected transaction
- Export of the database (.MDF and .LDF files) in the state in which it was at the selected point in time or on the eve of the selected transaction
By default, SQL Server installed together with the Veeam backup server will be used as an auxiliary. You can specify a different server by starting Veeam Explorer for SQL (for example, from the Start menu ) and selecting Options from the main menu .
Important! The main thing here is to specify the local instance of SQL Server (i.e., standing on the same machine as Veeam Explorer and the backup server) and check that its version is not lower than the version of SQL whose base you plan to restore (i.e. E. You cannot use SQL Server 2008 to restore / export a database with SQL Server 2014).
Step 3: Assign Account Rights
At different stages of the process, the following rights may be required (if necessary, contact the DBA for their issuance):
- The account that you plan to use to access the guest OS of your SQL Server (the one that you specified in the Guest Processing step when setting up the backup job) must be a member of the sysadmin fixed server role on this SQL Server (if this is not so, the contents of the databases will not be displayed in the Veeam Explorer window). See also the Veeam Knowledge Base article .
- The account under which you plan to run Veeam Explorer - as a rule, this is the one under which the Veeam Backup Service runs, the requirements for which are described here - for the database export scenario, it must have permissions on the folder to which it will go export database files (at least Read and Write )
- The account under which the connection to the target SQL Server will be performed to restore the database (this can be the original or another server) must be a member of the sysadmin fixed server role on the target SQL Server.
- You may also need an account under which access will be made to the Windows server OS, where backups of transaction logs will be copied for subsequent “roll-up” (depending on the scenario, this will be either the target server or the secondary server). This account must have access to the administrative folder on the specified server (at least with Read and Write permissions ).
Step 4: Explore the limitations and features of operations
- In the current version, the SQL Server instance on the remote machine is not supported as a secondary server. Use only local instances.
- If you will use SQL Server Express as an auxiliary (for example, the SQL Express 2012 server supplied with Veeam), remember that it has a size limit of the supported databases - it is 10 GB. See here for more details .
- By default, system databases (master, etc.) are excluded from processing. If you need to restore them, you can use, for example, the procedure for restoring guest files (as described here ).
- The current version does not support recovery from a replica to a selected point in time.
- If you need to restore the encrypted database, check out this article from the Veeam Knowledge Base .
Step 5: Prepare files for recovery.
To do this, you can use any recovery option from the supported Veeam Backup & Replication; it is most convenient to use the SQL Restore Wizard (as described here ) - it will perform the necessary operations in automatic mode and launch Veeam Explorer itself. If necessary - for example, if you work with VeeamZIP - similar operations can be performed manually (as described here ) - then the final point will be to add the necessary database to the Veeam Explorer console using the Add Database command (see more details here ).
So, database recovery scripts
Important! Restoring databases to SQL server ( Restore menu commands ) is supported for Veeam Backup & Replication Enterprise and Enterprise Plus editions . For all editions (including Free and Standard), you can restore by exporting the database files and then attachment to the desired server.
Scenario number 1. Restoring to the state “as in the selected backup of the SQL server”
You will need a recovery point (backup, replica, VeeamZIP) created taking into account the operation of the application. Required configuration settings:
- Recovery model for your database - it can be any.
- In the settings for the backup task at the Guest Processing step, the Enable application-aware image processing checkbox should be selected :

- In the settings dialog for processing a virtual machine on the General tab, you need to select these options:
- In the Applications section - Require successful processing (recommended)
- In the section Transaction logs - Process transaction logs with this job (recommended)

- In the same dialog on the SQL tab, you can select any of the log processing options (of course, with an understanding of what will happen to them in this case).
Note: For those who forgot or missed a description of these settings - they were described in the first series .
This scenario (if you have a Veeam Backup & Replication Enterprise or Enterprise Plus license) allows you to restore the database to the source server or to another server of your choice.
Option 1: restore to the source server
For this, it is convenient to use the quick 1-Click Restore recovery, which will go with the following default settings:
- The database will be restored to the state "as in the selected backup SQL server"
- The database files will be copied to the source server and then attached to the source instance (the one that was backed up and now works in production)
- To connect to this server, the account under which Veeam Explorer runs and Windows authentication will be used. If this account does not have enough rights, then Veeam will try to use the account that you specified when configuring the backup job in the Guest Processing step . If it does not work, then a request for entering a username and password will follow (check for admin rights!)
Having realized these facts, we select the necessary base from the tree in the Veeam Explorer console, and from the menu select the command Restore Database> Restore current_state_date to server \ instance .
Note: Here, current_state_date is the date the backup of the SQL server was created, whose contents are now mounted on the Veeam server and shown to you through Veeam Explorer; thus, it will be either “latest” - if the last backup was selected, or the corresponding date.
Useful: You can select several databases — all databases from one instance or all databases from one server — by selecting the appropriate node (instance or server) in the tree.
Option 2: restore to the selected server
To restore to the selected server (not the source), you will have to go through the steps of the wizard:
- At the Specify restore point step, select the option Restore to the current restore point , i.e. restoration to the state “as in the selected backup of the SQL server”:
- Then, at the Specify target SQL Server connection parameters step , we specify everything that is required: the name of the server where we want to restore the database, the name of the database, the account under which we will connect to the target server. Do not forget to check that this account has the necessary rights (actually it was Step 3 from the list of preliminary steps above :-)).
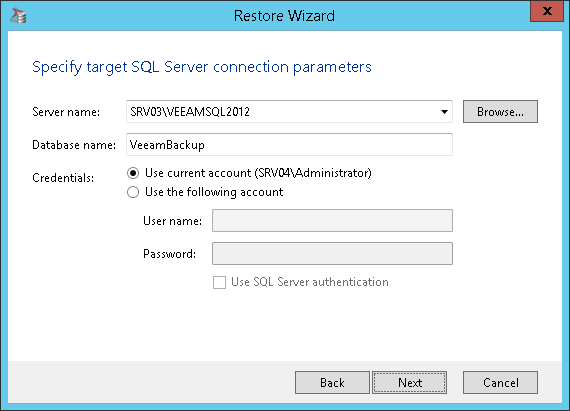
A few explanatory words:- If we want to restore to a specific instance, specify it in the server \ instance format .
- The specified target server must have a version no lower than the original one (i.e., do not try to restore the SQL 2014 database to SQL 2008).
- (for earlier versions of SQL): check that the target database is not in mirror mode (such recovery is not supported)
- If you do not specify the name of the target database, the same name will be used as the original one (from backup).
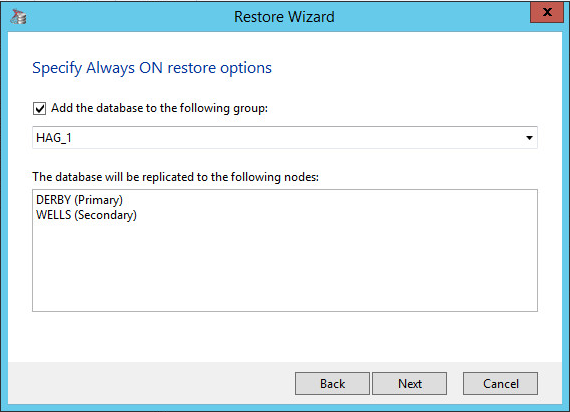
Important! If the database with this name exists on the target server, then by default it will be deleted, and it will be replaced by the one restored from the backup, so in this option, after clicking Next, you will need to confirm this action (either cancel and enter a new database name). - If the specified target server supports AlwaysOn Availability Groups, in the Specify Always ON restore options step, you can select the group in which we want to include the restored database:
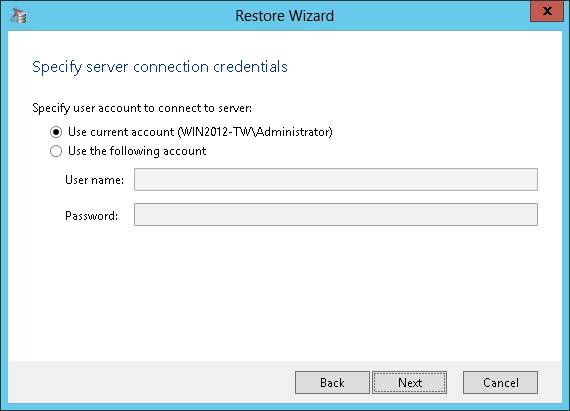
- Next, we indicate under which account it will be necessary to knock on the guest OS of the target server (in particular, to copy the base files there):
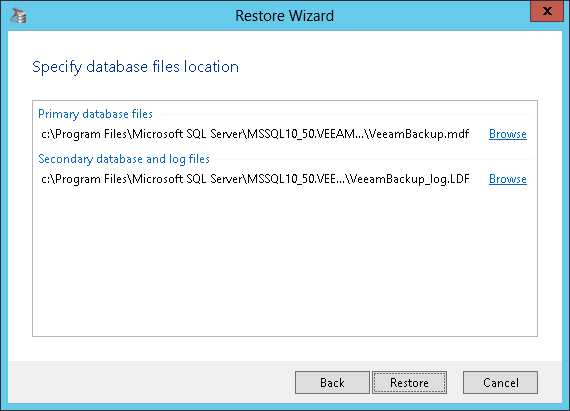
- Then we say where exactly to put these files (.MDF and .LDF):
- Finally, click the Restore button and wait for the report to complete the process.
Scenario number 2. Restore to a specified point in time
This script allows you to restore a database to a point in time of your choice (which may differ from the moment you created a backup of the server itself). In fact, the database will be restored to the state “as in the nearest previous backup of the server”, and then the logs will be “rolled” from their backup - so the database will be brought into the desired state. Therefore, to implement this scenario, you will need these configuration settings:
- The SQL Server recovery model must be Full or Bulk-logged .
- The SQL Server recovery point must be created taking into account the operation of the application ( Enable application-aware image processing is enabled ).
- In the virtual machine processing settings dialog on the General tab, select:
- In the Applications section - Require successful processing (recommended)
- In the section Transaction logs - Process transaction logs with this job (recommended)
- In the settings for processing transaction logs, Backup logs should be selected .
Note: In the current version, this script is not supported for replicas and backups saved to the repository using archiving jobs.
In this scenario, recovery to the source or to the selected server is also supported; the corresponding step of the Restore Wizard can be accessed by selecting the menu command Restore Database> Restore point-in-time state to
Here you will need to select the option Restore to a point in time and use the slider ("slider") to indicate a specific point in time at which we want to restore the database.
Scenario 3. Restoring to the state before the selected transaction
Here the user can view the list of operations for the selected period, find the necessary one (for example, delete a record from the table) and then restore the database to the state it was in before the operation (a full list of operations is given here )
To implement this scenario, you will need these configuration settings:
- The SQL Server recovery model must be Full or Bulk-logged .
- The SQL Server recovery point must be created taking into account the operation of the application ( Enable application-aware image processing is enabled ).
- In the settings dialog for processing a virtual machine on the General tab, you need to select these options:
- In the Applications section - Require successful processing (recommended)
- In the section Transaction logs - Process transaction logs with this job (recommended)
- In the settings for processing transaction logs, Backup logs should be selected .
- An auxiliary server is required - with its help, a list of operations from the backup of the transaction log will be displayed.
- If the database is part of the AlwaysOn Availability Group, check that all nodes in this group are located in the same time zone.
Note: If the recovery was performed for the secondary node of the group, in some cases an error like “The specified STOPAT time is too early” may occur . In this case, you need to perform recovery from the primary node.
A detailed description of the steps in this scenario is provided in the document “Basic Use Scenarios” . In short, I’ll just say that at the step of the Specify restore point wizard you will need to select the Restore to a point in time option , and also check the Perform restore to specific transaction checkbox so that in the next Fine-tune the restore point step you can view the list of transactions.