Hyper-v Server 2012R2: installation and configuration experience
In this article I want to share my experience installing and configuring the Hyper-V Server 2012R2 hypervisor from Microsoft. So let's get started. Given: 2 servers and iscsi storage.
Download the image for installing the server from the Microsoft website. If you have a deployed Windows Deployment Services or the Windows Deployment and Assessment Toolkit ( Windows ADK ) installed , you can unpack the distribution obtained from the link above with the 7-zip archiver into a folder, for example, D: \ W2012 \ x64 \ dvd . Then received
You can reverse-assemble the unpacked distribution kit into a bootable iso, for example, using Ultraiso program, opening the source image in it and adding the install.wim file from the D: \ W2012 \ x64 \ dvd \ sources folder to the Sources folder and saving the resulting image. Again, all the manipulations described above can be omitted, the updated image will accelerate the deployment of the Hyper-V server
If the source disk for installing the server exceeds 2 TB, then in order to be able to use all possible disk space, you must first convert the disk to GPT and mark it up before starting the installation. During installation, this is not possible.
You must boot into PE mode from the installation disk and run diskpart.
Convert MBR to GPT using DISKPART
For further installation, it is necessary to set the boot in UEFI mode in the server BIOS (but this is the case if you have a local disk storage of the server exceed 2 TB, if not, you can skip this step)
In sconfig, enable Remote Desktop (step 7-e-2):

Turn on ping (step 4-3):

On the command line, start powershell and turn off the firewall (you can skip):
Setting a pool of MAC addresses to virtual switch (to change the selected value, ie, taking the last octet of ip-addresses (eg 192.168. 251 . 11 ) mgmt-interface and translate it into hexadecimal notation):
This is necessary so that the MAC addresses of virtual servers located on different hyper-v host do not overlap. By default, they are issued from the same range and can turn out to be the same, as it happened to me when implemented on the same object.
Getting a list of network adapters:
We need NIC1 and NIC2.
Grouping adapters in a group (Team1):
Creating a virtual switch (vSwitch0):
Creating a virtual set. adapter (Management) and connecting it to the virtual switch:
The ports on the physical switch are configured in trunk and Vlan 251. In this example, this is the subnet for managing the Hyper-V server.
Setting the IP address, mask, gateway and DNS server on the virtual adapter (MGMT): item 8 of the sconfig menu (for example: 192.168.251.11/24, gw 192.168.251.1):
After that, the server should ping and you can use remote access.
We connect via RDP, create a virtual network adapter (Cluster) and connect it to the virtual switch:
We will assume that the storage system is already configured and connected to the corresponding ports on the switch. Configure the ip addresses for the interface iscsi adapters:
At the command prompt, run powershell:
An unpleasant bug came out with Broadcom NetXtreme network adapters, which manifested itself in the fact that the drivers running in the image had a very low transmission speed over the network from 3 to 5 MB / s on a gigabit connection. Low network performance -
We fix or update drivers manually.
Installing the necessary roles, there must be a server connection to the Internet:
This is if you have not modified the image, as described in paragraph 1.
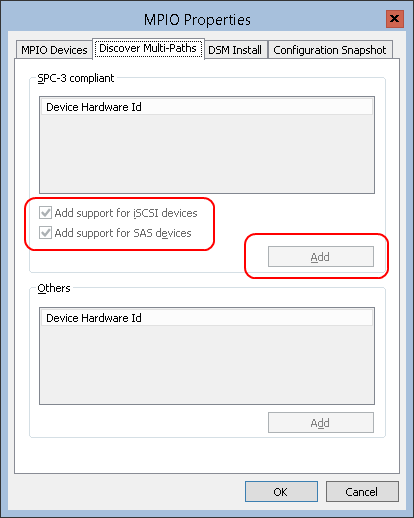
We add support for SAS and iSCSI in the mpiocpl snap-in and after rebooting in the disk manager LUNs will not double if the server is connected in two or more ways.
Verification:
When adding a new volume to the storage, we do it in powershell:
Setting the time (after adding the server to the Windows domain, the time will be synchronized with the PDC):
At the command line:
If necessary, manually:
ps
Corrected a little text and formatting
Cluster setup will be described later.
1. Image preparation
Download the image for installing the server from the Microsoft website. If you have a deployed Windows Deployment Services or the Windows Deployment and Assessment Toolkit ( Windows ADK ) installed , you can unpack the distribution obtained from the link above with the 7-zip archiver into a folder, for example, D: \ W2012 \ x64 \ dvd . Then received
windows updates
copy to the folder D: \ W2012 \ x64 \ upd , create the folder D: \ W2012 \ mnt and using the next batch file update the image.Windows8.1-KB2919355-x64.msu
Windows8.1-KB2919442-x64.msu
Windows8.1-KB2932046-x64.msu
Windows8.1-KB2934018-x64.msu
Windows8.1-KB2937592-x64.msu
Windows8.1-KB2938439 -x64.msu
Windows8.1-KB2959977-x64.msu
Windows8.1-KB2919442-x64.msu
Windows8.1-KB2932046-x64.msu
Windows8.1-KB2934018-x64.msu
Windows8.1-KB2937592-x64.msu
Windows8.1-KB2938439 -x64.msu
Windows8.1-KB2959977-x64.msu
Image upgrade and modification script
Dism / Mount-WIM /WimFile:D:\W2012\x64\DVD\sources\install.wim / index: 1 / MountDir: D: \ W2012 \ mnt
dism / image: D: \ W2012 \ mnt / Enable-Feature / FeatureName: MultipathIo
dism / image: D: \ W2012 \ mnt / Enable-Feature / All / FeatureName: NetFx3 / Source: d: \ W2012 \ x64 \ dvd \ sources \
sxs dism / image: D: \ W2012 \ mnt / Add -Package / PackagePath: d: \ W2012 \ x64 \ upd
Dism / Unmount-Wim / MountDir: D: \ W2012 \ mnt / commit
pause
You can reverse-assemble the unpacked distribution kit into a bootable iso, for example, using Ultraiso program, opening the source image in it and adding the install.wim file from the D: \ W2012 \ x64 \ dvd \ sources folder to the Sources folder and saving the resulting image. Again, all the manipulations described above can be omitted, the updated image will accelerate the deployment of the Hyper-V server
2. Installation
If the source disk for installing the server exceeds 2 TB, then in order to be able to use all possible disk space, you must first convert the disk to GPT and mark it up before starting the installation. During installation, this is not possible.
You must boot into PE mode from the installation disk and run diskpart.
Convert MBR to GPT using DISKPART
 # Diskpart
 # select disk 0
 # convert gpt
 # create partition primary align=64 offset= 104857600
For further installation, it is necessary to set the boot in UEFI mode in the server BIOS (but this is the case if you have a local disk storage of the server exceed 2 TB, if not, you can skip this step)
3. Initial setup
In sconfig, enable Remote Desktop (step 7-e-2):
Turn on ping (step 4-3):
On the command line, start powershell and turn off the firewall (you can skip):
Set-NetFirewallProfile –Profile * -Enabled False
4. Configure the virtual switch
Setting a pool of MAC addresses to virtual switch (to change the selected value, ie, taking the last octet of ip-addresses (eg 192.168. 251 . 11 ) mgmt-interface and translate it into hexadecimal notation):
New-ItemProperty -Path “HKLM:\SOFTWARE\Microsoft\Windows NT\CurrentVersion\Virtualization” -Name MinimumMacAddress -PropertyType Binary -Value ([byte[]](0x00,0x15,0x5D,0xFB,0x0B,0x00)) –Force
New-ItemProperty -Path “HKLM:\SOFTWARE\Microsoft\Windows NT\CurrentVersion\Virtualization” -Name MaximumMacAddress -PropertyType Binary -Value ([byte[]](0x00,0x15,0x5D,0xFB,0x0B,0xFF)) –Force
This is necessary so that the MAC addresses of virtual servers located on different hyper-v host do not overlap. By default, they are issued from the same range and can turn out to be the same, as it happened to me when implemented on the same object.
Getting a list of network adapters:
Get-NetAdapter
PS C:\Users\Administrator> Get-NetAdapter
Name                      InterfaceDescription                    ifIndex Status       MacAddress             LinkSpeed
----          -----------------                   ------- ------       ----------             ---------
NIC4         Broadcom NetXtreme Gigabit Ethernet #2       14 Up         C8-1F-66-D1-CB-FA        1 Gbps
NIC3         Broadcom NetXtreme Gigabit Ethernet #4       16 Up         C8-1F-66-D1-CB-F9        1 Gbps
NIC2         Broadcom NetXtreme Gigabit Ethernet #3       15 Up         C8-1F-66-D1-CB-F8        1 Gbps
NIC1         Broadcom NetXtreme Gigabit Ethernet          13 Up         C8-1F-66-D1-CB-F7        1 Gbps
We need NIC1 and NIC2.
Grouping adapters in a group (Team1):
New-NetLbfoTeam –Name Team1 –TeamMembers “NIC1”,“NIC2” –TeamingMode Lacp –LoadBalancingAlgorithm Dynamic
Creating a virtual switch (vSwitch0):
New-VMSwitch -Name vSwitch0 -NetAdapterName Team1 -AllowManagementOS $False -MinimumBandwidthMode Weight
Creating a virtual set. adapter (Management) and connecting it to the virtual switch:
Add-VMNetworkAdapter -ManagementOS -Name "MGMT" -SwitchName "vSwitch0"
Set-VMNetworkAdapterVlan -ManagementOS -VMNetworkAdapterName "MGMT" -Access -VlanId 251
Set-VMNetworkAdapter -ManagementOS -Name "MGMT" -MinimumBandwidthWeight 20
The ports on the physical switch are configured in trunk and Vlan 251. In this example, this is the subnet for managing the Hyper-V server.
Setting the IP address, mask, gateway and DNS server on the virtual adapter (MGMT): item 8 of the sconfig menu (for example: 192.168.251.11/24, gw 192.168.251.1):
After that, the server should ping and you can use remote access.
We connect via RDP, create a virtual network adapter (Cluster) and connect it to the virtual switch:
Add-VMNetworkAdapter -ManagementOS -Name "Cluster" -SwitchName "vSwitch0"
Set-VMNetworkAdapterVlan -ManagementOS -VMNetworkAdapterName "Cluster" -Access -VlanId 253
Set-VMNetworkAdapter -ManagementOS -Name "Cluster" -MinimumBandwidthWeight 40
5. Storage connection
We will assume that the storage system is already configured and connected to the corresponding ports on the switch. Configure the ip addresses for the interface iscsi adapters:
At the command prompt, run powershell:
New-NetIPAddress -InterfaceAlias "NIC3" -IPAddress 192.168.254.22 -PrefixLength 24
New-NetIPAddress -InterfaceAlias "NIC4" -IPAddress 192.168.255.22 -PrefixLength 24
Set-Service –Name MSiSCSI –StartupType Automatic
Start-Service MSiSCSI
New-IscsiTargetPortal –TargetPortalAddress 192.168.254.12
$target = Get-IscsiTarget
$target = Get-IscsiTarget
$target| Connect-IscsiTarget -IsPersistent $true -IsMultipathEnabled $true -InitiatorPortalAddress 192.168.254.22 -TargetPortalAddress 192.168.254.12
$target| Connect-IscsiTarget -IsPersistent $true -IsMultipathEnabled $true -InitiatorPortalAddress 192.168.255.22 -TargetPortalAddress 192.168.255.12
Get-IscsiSession | Register-IscsiSession
An unpleasant bug came out with Broadcom NetXtreme network adapters, which manifested itself in the fact that the drivers running in the image had a very low transmission speed over the network from 3 to 5 MB / s on a gigabit connection. Low network performance -
Broadcom is aware of this issue and will release a driver update to resolve the issue. Until the driver update is available, you can work around the issue by taking one of the following actions:
Disable VMQ on the Virtual Network Adapter by using the following Windows PowerShell cmdlet:
Set-VMNetworkAdapter –ManagementOS -Name MGMT -VmqWeight 0
We fix or update drivers manually.
6. Installation of the necessary roles
Installing the necessary roles, there must be a server connection to the Internet:
Dism /online /enable-feature:MultipathIo
DISM /online /Enable-Feature /all /FeatureName:NetFx3
This is if you have not modified the image, as described in paragraph 1.
We add support for SAS and iSCSI in the mpiocpl snap-in and after rebooting in the disk manager LUNs will not double if the server is connected in two or more ways.
mpclaim -n -i -d "HP MSA 1040 SAN"
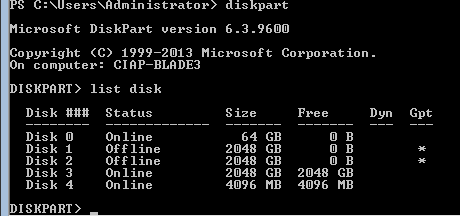
Verification:
diskpart
# list disk
When adding a new volume to the storage, we do it in powershell:
Get-Disk
Initialize-Disk -Number  -PartitionStyle GPT -PassThru | New-Partition -AssignDriveLetter -UseMaximumSize | Format-Volume
Setting the time (after adding the server to the Windows domain, the time will be synchronized with the PDC):
At the command line:
sc config w32time start= auto
net start w32time
If necessary, manually:
Control timedate.cpl
ps
Corrected a little text and formatting
Cluster setup will be described later.