SAP HANA Cloud Platform: Downloading and Storing Data
- Tutorial
In a previous article, we talked about how to create a test instance of the cloud platform (hereinafter HCP - HANA Cloud Platform ) and how to connect the Eclipse development environment to the cloud using the simple XS application (XS - eXtended Services) as an example.
Now we would like to go further and show how you can load data into the database from an external service. At the same time, some subtleties when working with a trial cloud will be shown, related to the requirements of user isolation in the framework of one trial system.
So what we have. The first is access to the control panel of our cloud at https://account.hanatrial.ondemand.com/cockpit
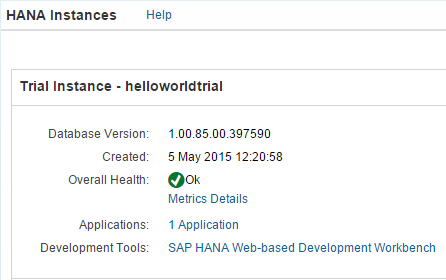
The second is the created platform instance on SAP HANA called helloworldtrial .
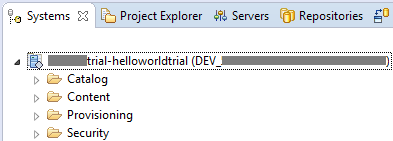
Third, the installed Eclipse development environment with the plug-in for SAP HANA Cloud and with the created connection to helloworldtrial:
What we want to do: create a table in the SAP HANA database and load data from an external source there. For our purposes, we will store information about the current air temperature in several cities. For example, we will take data from openweathermap.org.
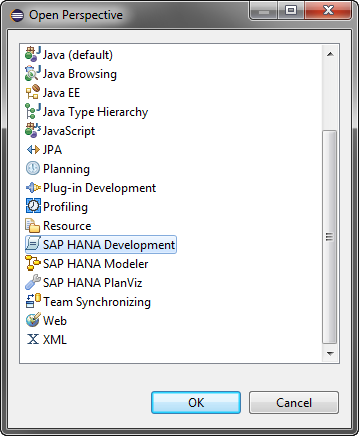
Let's start by creating a new project. We launch our Eclipse, open the perspective of SAP HANA Development ( Window> Open Perspective> Other ... ):
Create a new project XS application, indicating its name (File> New> Project ...> SAP HANA Cloud):
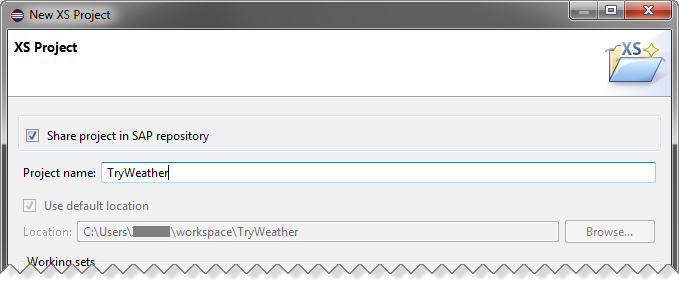
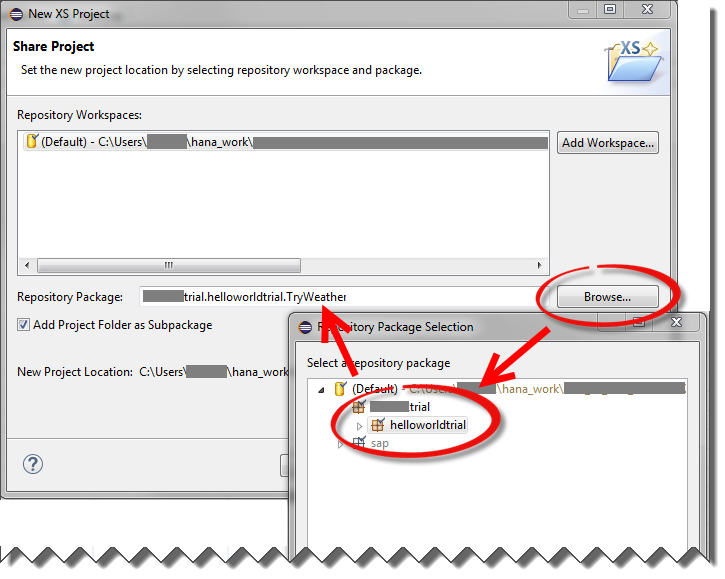
Next, we need to follow the standard steps to the choice of workspace and the package. Attention!For our example, it is important to choose a package that matches our cloud instance, of the form pXXXXXXXXtrial.helloworldtrial. Where pXXXXXXXXtrial is the user name in the cloud system:
And we indicate our main file with a script that will do all the work - get_weather.xsjs:

Control access to the package. .Xsaccess
file Using the .xsaccess file, we specify the properties of our XS application (for example, the required authorization for executing the script, etc.). Replace the contents of this file with:
The exposed property indicates that this XS application can be executed on the server from a URL. The default_file property indicates the main executable file of the application; this will allow us to launch it directly from the control panel (cockpit), without adding the file name.
Now we activate our application to verify that at this stage all the steps have been completed correctly. To do this, right-click on our project in the Project Explorer tab and select Team> Activate in the context menu .
Restart the control panel in the web browser by clicking refresh (F5); otherwise, our XS application does not appear in the list:

Click on the URL of our XS application:

A new window should open with the content “Wrong content type request use application / json”. After making sure that our workpiece starts up, we can move on.
Creating a table in the database
Let's create a table in the database, which will contain the columns: date and time, the name of the settlement and the current air temperature.
There are several ways to create a table in the system - using the interactive designer, SQL script or .hdbtable file.
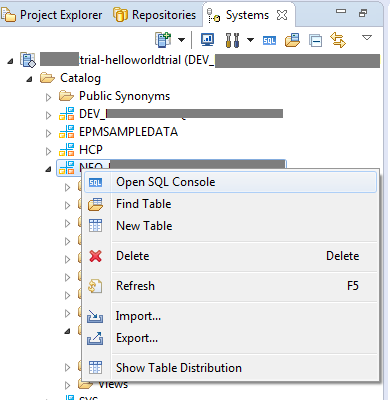
The fastest way is to run the script by substituting the name of our schema. We go to the Systems tab and launch the SQL console for our cloud:
Run this script by substituting the name of our NEO_ schema:
Let's pay attention to the fact that we are creating a table with column storage. And also implicitly create the so-called sequence, which generates a sequence of integers and, when creating records in the table, stores them in the ID attribute.
Having updated the NEO_ directory, we will see our table:

Database user role. .Hdbrole file
In a free trial system, the user has a very limited set of rights. This applies, in particular, authorization to change objects in the directory and user account management. Therefore, in the trial system there is a set of procedures in the “HCP” scheme, which allow the user to manage the rights to the objects created by him.
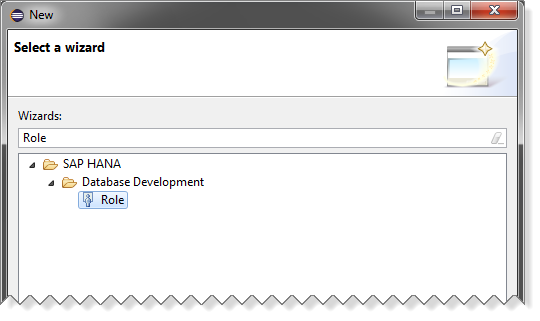
To write and read data from the T_WEATHER table, we need a new role. Add a file of type .hdbrole to our project (in the main menu File> New> Other ...):
let's call it weather_access: Replace the

contents of this file with the following fragment, and then activate the file:
Replace p <<< >>> trial with your user name. Instead of the NEO _ << << >>>> scheme, you need to insert the name of your scheme, which we saved when creating the table. And now the magic begins, related to the fact that our cloud in trial mode creates many users on one system. And for the separation of access rights, these users have very limited privileges.
In order for our system user to receive the role of weather_access, we must perform the system procedure.
Run the SQL console and execute the following script in it:
The main script. .Xsjs file
So, we have an XS script procurement and a table in the database, for which we have added permission to write and read data. In this table we will write data on the current weather.
We will extract the weather data and write them in a table.
This code uses the so-called destination to call the external API.
And access to the database from Javascript is through the connection object in the $ .db namespace:
Now we would like to go further and show how you can load data into the database from an external service. At the same time, some subtleties when working with a trial cloud will be shown, related to the requirements of user isolation in the framework of one trial system.
So what we have. The first is access to the control panel of our cloud at https://account.hanatrial.ondemand.com/cockpit
The second is the created platform instance on SAP HANA called helloworldtrial .
Third, the installed Eclipse development environment with the plug-in for SAP HANA Cloud and with the created connection to helloworldtrial:
What we want to do: create a table in the SAP HANA database and load data from an external source there. For our purposes, we will store information about the current air temperature in several cities. For example, we will take data from openweathermap.org.
Let's start by creating a new project. We launch our Eclipse, open the perspective of SAP HANA Development ( Window> Open Perspective> Other ... ):
Create a new project XS application, indicating its name (File> New> Project ...> SAP HANA Cloud):
Next, we need to follow the standard steps to the choice of workspace and the package. Attention!For our example, it is important to choose a package that matches our cloud instance, of the form pXXXXXXXXtrial.helloworldtrial. Where pXXXXXXXXtrial is the user name in the cloud system:
And we indicate our main file with a script that will do all the work - get_weather.xsjs:
Control access to the package. .Xsaccess
file Using the .xsaccess file, we specify the properties of our XS application (for example, the required authorization for executing the script, etc.). Replace the contents of this file with:
{
     "exposed" : true,
     "default_file" : "get_weather.xsjs"
}
The exposed property indicates that this XS application can be executed on the server from a URL. The default_file property indicates the main executable file of the application; this will allow us to launch it directly from the control panel (cockpit), without adding the file name.
Now we activate our application to verify that at this stage all the steps have been completed correctly. To do this, right-click on our project in the Project Explorer tab and select Team> Activate in the context menu .
Restart the control panel in the web browser by clicking refresh (F5); otherwise, our XS application does not appear in the list:
Click on the URL of our XS application:
A new window should open with the content “Wrong content type request use application / json”. After making sure that our workpiece starts up, we can move on.
Creating a table in the database
Let's create a table in the database, which will contain the columns: date and time, the name of the settlement and the current air temperature.
There are several ways to create a table in the system - using the interactive designer, SQL script or .hdbtable file.
The fastest way is to run the script by substituting the name of our schema. We go to the Systems tab and launch the SQL console for our cloud:
Run this script by substituting the name of our NEO_ schema:
create column table "NEO_<<<>>>"."T_WEATHER"(
    "ID" INTEGER GENERATED ALWAYS AS IDENTITY (MINVALUE 0 START WITH 0 INCREMENT BY 1),
    "FORECAST_TMSTMP" TIMESTAMP NOT NULL ,
    "LOCATION"        NVARCHAR(50) NOT NULL,
    "TEMPERATURE"     REAL NOT NULL,
    "TIMESTMP"        TIMESTAMP DEFAULT CURRENT_TIMESTAMP NOT NULL,
    PRIMARY KEY ("ID"));
Let's pay attention to the fact that we are creating a table with column storage. And also implicitly create the so-called sequence, which generates a sequence of integers and, when creating records in the table, stores them in the ID attribute.
Having updated the NEO_ directory, we will see our table:
Database user role. .Hdbrole file
In a free trial system, the user has a very limited set of rights. This applies, in particular, authorization to change objects in the directory and user account management. Therefore, in the trial system there is a set of procedures in the “HCP” scheme, which allow the user to manage the rights to the objects created by him.
To write and read data from the T_WEATHER table, we need a new role. Add a file of type .hdbrole to our project (in the main menu File> New> Other ...):
let's call it weather_access: Replace the
contents of this file with the following fragment, and then activate the file:
role p<<<>>>trial.helloworldtrial.TryWeather::weather_access {
catalog sql object "NEO_<<<>>>>"."T_WEATHER": SELECT, UPDATE, INSERT;
}
Replace p <<< >>> trial with your user name. Instead of the NEO _ << << >>>> scheme, you need to insert the name of your scheme, which we saved when creating the table. And now the magic begins, related to the fact that our cloud in trial mode creates many users on one system. And for the separation of access rights, these users have very limited privileges.
In order for our system user to receive the role of weather_access, we must perform the system procedure.
Run the SQL console and execute the following script in it:
call "HCP"."HCP_GRANT_ROLE_TO_USER"('p<<<>>>trial .helloworldtrial.TryWeather::weather_access', 'p<<<>>>');
Additional built-in procedures in the trial system
I would like to draw attention to the fact that when changing tables, views, procedures in the trial system directory, it is necessary to explicitly update permissions to access these objects. This is done by calling the procedure:
After changing and activating the .hdbrole file, you must do:
call "HCP"."HCP_GRANT_SELECT_ON_ACTIVATED_OBJECTS";
After changing and activating the .hdbrole file, you must do:
call "HCP"."HCP_GRANT_ACTIVATED_ROLES";
The main script. .Xsjs file
So, we have an XS script procurement and a table in the database, for which we have added permission to write and read data. In this table we will write data on the current weather.
Where can I get weather data
To get the temperature we use the API from openweathermap.org. This service was described in more detail in an article on Habré .
Example URL for receiving current weather data in Moscow: http://api.openweathermap.org/data/2.5/weather?q=Moscow,ru&units=metric .
The received data in the form of a JSON object contains, inter alia, information on air temperature in unix timestamp format. Tag “dt”:
Example URL for receiving current weather data in Moscow: http://api.openweathermap.org/data/2.5/weather?q=Moscow,ru&units=metric .
The received data in the form of a JSON object contains, inter alia, information on air temperature in unix timestamp format. Tag “dt”:
{
	...
	"dt " : 1430318471,
	"id " : 524901,
	"name " : "Moscow ",
	"cod " : 200
}
We will extract the weather data and write them in a table.
Script source code
Important! Replace the constant values in the first two lines with your username (ends with -trial) and the name of the NEO_ database schema:
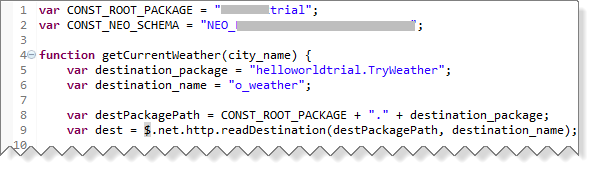
var CONST_ROOT_PACKAGE = "<<>>";
var CONST_NEO_SCHEMA = "<<>>";
function getCurrentWeather(city_name) {
	var destination_package = "helloworldtrial.TryWeather";
	var destination_name = "o_weather";
	var destPackagePath = CONST_ROOT_PACKAGE + "." + destination_package;
	var dest = $.net.http.readDestination(destPackagePath, destination_name);
	var client = new $.net.http.Client();
	var req = new $.web.WebRequest($.net.http.GET, "?q=" + city_name
			+ "&units=metric");
	client.request(req, dest);
	var response = client.getResponse();
	var weather_data = JSON.parse(response.body.asString(),
			function(key, value) {
				if (key === "dt") {
					return new Date(value * 1000);
				}
				return value;
			});
	return [ weather_data.dt, city_name, weather_data.main.temp ];
}
function storeData(data_receiving_time, city, temp) {
	var conn = $.db.getConnection();
	var stmt = conn
			.prepareStatement("INSERT INTO \""
					+ CONST_NEO_SCHEMA
					+ "\".T_WEATHER (FORECAST_TMSTMP,LOCATION,TEMPERATURE) VALUES (?,?,?)");
	stmt.setTimestamp(1, data_receiving_time);// время получения данных о погоде OpenWeatherMap
	stmt.setString(2, city);
	stmt.setFloat(3, temp);
	var rs = stmt.executeQuery();
	rs.close();
	stmt.close();
	conn.commit();
	conn.close();
}
function processRequest() {
	var cityNames = [ "Moscow,ru", "Saint Petersburg,ru", "Novosibirsk,ru",
			"Volgograd,ru", "Krasnoyarsk,ru" ];
	var body = "";
	var cityName, i;
	var dt;
	var city;
	var temp;
	var out_vals;
	try {
		for (i = 0; i < cityNames.length; i++) {
			cityName = cityNames[i];
			out_vals = getCurrentWeather(cityName);
			dt = out_vals[0];
			city = out_vals[1];
			temp = out_vals[2];
			storeData(dt, city, temp);
			body += "Данные сохранены.\nДата: " + dt + "\nГород: " + city
					+ "\nТемпература: " + temp + " C\n\n";
		}
		$.response.setBody(body);
		$.response.contentType = "text/plain";
		$.response.status = $.net.http.OK;
	} catch (e) {
		$.response.contentType = "text/plain";
		$.response.status = $.net.http.INTERNAL_SERVER_ERROR;
		$.response.setBody(e.toString());
	}
}
processRequest();
This code uses the so-called destination to call the external API.
And access to the database from Javascript is through the connection object in the $ .db namespace:
var conn = $.db.getConnection();
var stmt = conn.prepareStatement("INSERT INTO <> (FORECAST_TMSTMP,LOCATION,TEMPERATURE) VALUES (?,?,?)");
Доступ к внешнему URL. Файл .xshttpdest
Добавим новый объект типа .xshttpdest с названием o_weather в наш проект:
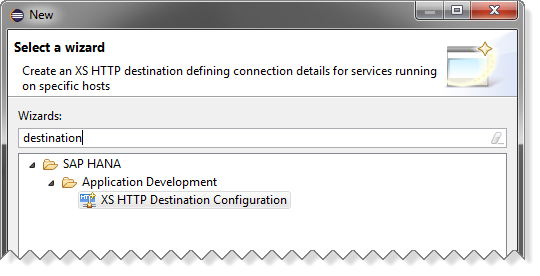
И заменим содержимое этого файла на:
host = "api.openweathermap.org";
port = 80;
description = "current weather";
useSSL = false;
pathPrefix = "/data/2.5/weather";
authType = none;
useProxy = true;
proxyHost = "proxy-trial";
proxyPort = 8080;
timeout = 5000; // in milliseconds
Сохраним и активируем этот объект.
Теперь в панели управления HCP на вкладке с XS приложениями мы увидим новый элемент в панели Destinations:

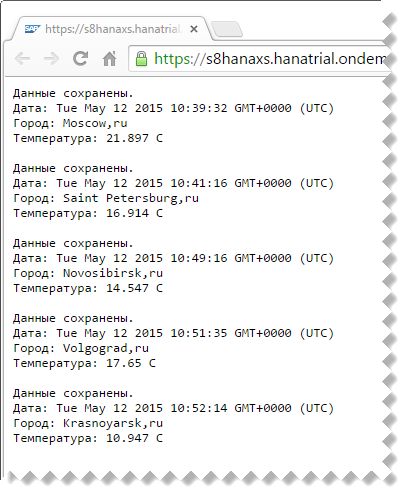
Кликнув на URL нашего приложения, запустим скрипт и получим приблизительно такой результат на экране:
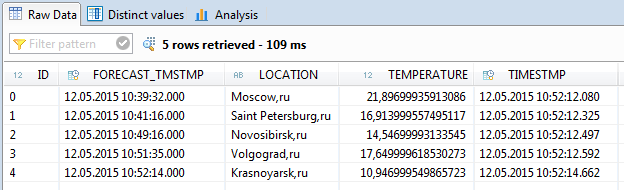
Теперь в Eclipse проверим, что данные были сохранены в таблице. Для этого по правой кнопке мыши на таблице T_WEATHER выберем Open Data Preview:
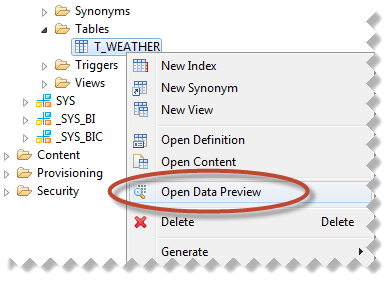
И убедимся, что новая запись в базе данных была создана:
Итого
Итак, в данной статье мы создали XS приложение, которое умеет получать данные из внешнего источника (в нашем случае — веб сервис) и сохранять их в таблице в базе данных HANA. Кроме того, мы создали два специальных объекта: определение ролей (weather_access.hdbrole) и определение канала для доступа к внешнему веб-сервису (o_weather.xshttpdest). А также вызвали хранимые процедуры для того, чтобы в trial системе дать разрешения на доступ к таблице базы данных.