 June 4, 2015 at 17:17
ASA5525-X + MS CA Windows Server 2012R2 - two-factor authentication
In order to pass certification for compliance with the PCI DSS standard , two-factor authentication was required. And since we use a solution from Cisco as a firewall, we decided to use it ... It would seem like nothing complicated - everything has been studied for a long time and has been configured more than once and you can easily find the necessary instructions, for example, these:
but, as is usually the case with similar "universal" instructions, they don’t take into account the subtleties, and this just takes up most of the time when deploying. I just want to tell you about these moments. I hope this will save you a lot of time!
The first unpleasant moment was that Offline Root CA issued a certificate for Subordinate Issuing CA for a period of 1 year (!) And this despite the previously created
Therefore, carefully check the validity of the certificate and if it is issued for 1 year, change it immediately. You can change it like this:
And a gross mistake was to ignore the warning from Microsoft:
Therefore, remove the AlternateSignatureAlgorithm = 1 line from CAPolicy.inf , otherwise you will have a problem installing certificates on the ASA: Microsoft CA RSASSA-PSS Algorithm Issue with ASA It is solved by changing the parameters in the registry:
and reissue all certificates.
And finally, the third point was connected with setting SSL parameters on the ASA, namely TLS V1 and resp. Cipher (versions and algorithms). At the time of the PKI infrastructure deployment, we installed the asa911-smp-k8 firmware , which did not allow us to configure it normally. They decided to upgrade to asa941-smp-k8 , but again they didn’t quite carefully read the configuration update procedure. We got here such a strange error:
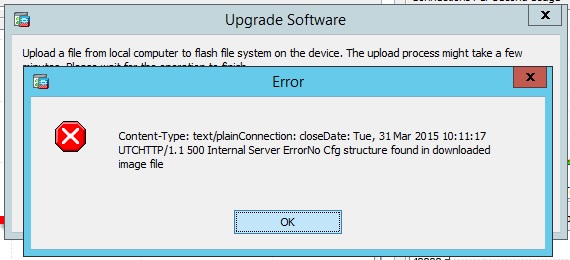
- this is when I try to download the firmware file to the piece of iron. And all that was needed was to first install the firmware version asa912-smp-k8
I hope this knowledge and experience is useful to someone. Good luck
PS as rightly noted in the comments - I completely forgot about two-factor authentication, wrote about certificates, forgot about Active Directory . I’ll try to fix it, to start the configuration process through ASDM:
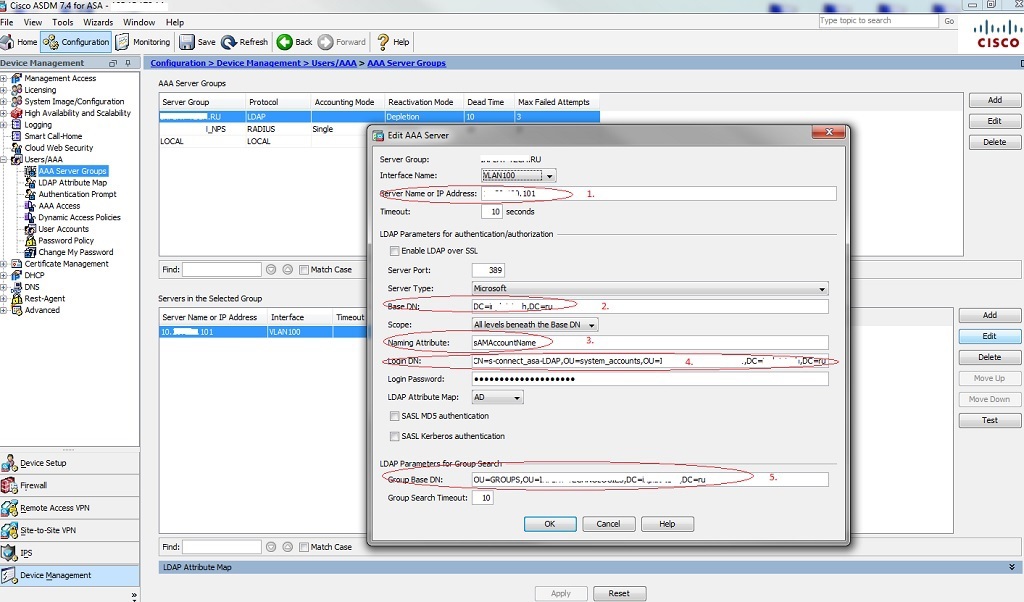
Go to Configuration -> Device Management -> Users / AAA -> AAA Servers Group , create a new group (name and protocol). I will show the settings for the LDAP protocol in the pictures, and in the config and RADIUS too (for whom it is more convenient to use). Next, add the server to the newly created group:
1. specify the DNS name or IP of the server; server type Microsoft
2. Base DN, - in the example, let it be DC = domain, DC = ru
3. The user’s attribute by which it will be produced from AD objects is sAMAccountName
4. Distinguished Name of the user who has access to view \ search for objects in AD (you can take it from the "Active Directory - users and computers" console by enabling the display of additional components in the attribute editor)
5. The path to the OU that will be used group search
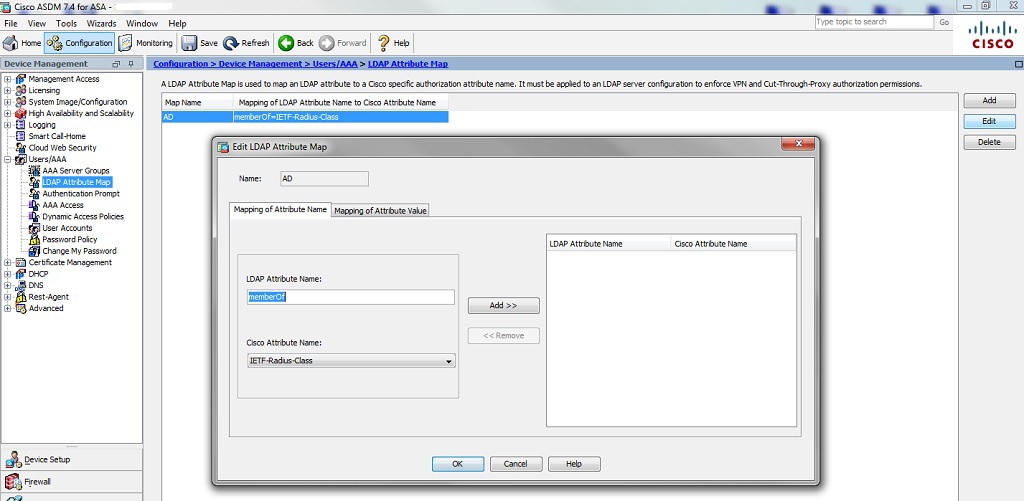
Pay attention to the LDAP Attribute Map item - an important detail that needs to be configured!
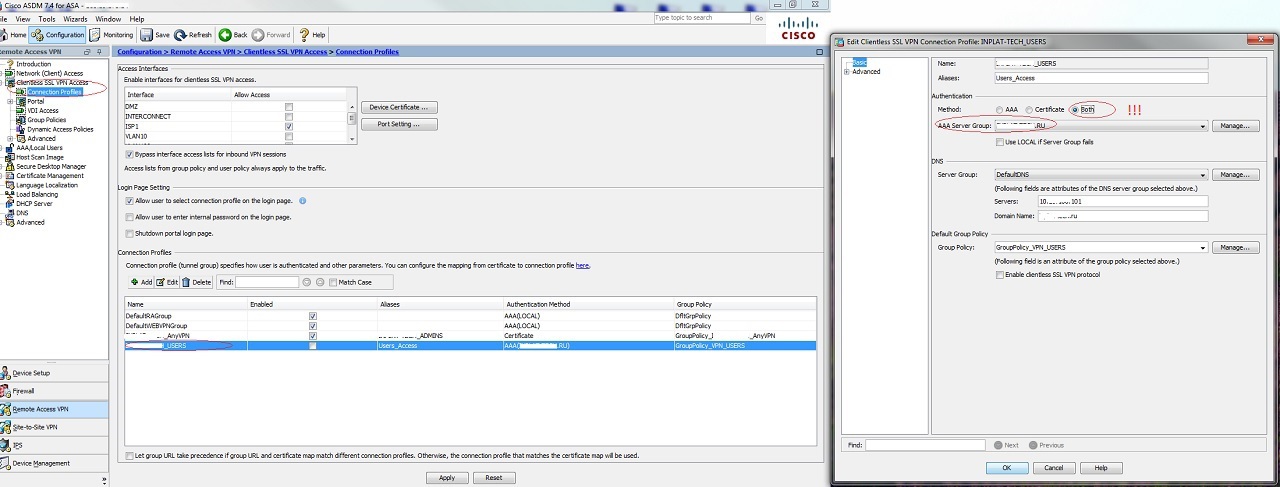
And finally, when we have already configured CA, all necessary certificates are installed, connection to AAA servers is checked, AnyConnect \ WebVPN is configured, you can enable two-factor authentication:
Test Lab Guide: Deploying a Two-Level Hierarchy of Active Directory Certificate Services Public Key Infrastructure
CISCO: Configuring Digital Certificates
Cisco ASA with Radius and Certificates for Two-Factor Authentication (using a Microsoft CA)
but, as is usually the case with similar "universal" instructions, they don’t take into account the subtleties, and this just takes up most of the time when deploying. I just want to tell you about these moments. I hope this will save you a lot of time!
The first unpleasant moment was that Offline Root CA issued a certificate for Subordinate Issuing CA for a period of 1 year (!) And this despite the previously created
CAPolicy.inf:
[Version]
Signature="$Windows NT$"
[PolicyStatementExtension]
Policies=InternalPolicy
[InternalPolicy]
OID= 1.2.3.4.1455.67.89.5
Notice="Legal Policy Statement"
URL=http://www.contoso.com/pki/cps.txt
[Certsrv_Server]
RenewalKeyLength=2048
RenewalValidityPeriod=Years
RenewalValidityPeriodUnits=20
CRLPeriod=weeks
CRLPeriodUnits=26
CRLDeltaPeriod=Days
CRLDeltaPeriodUnits=0
LoadDefaultTemplates=0
AlternateSignatureAlgorithm=1
Therefore, carefully check the validity of the certificate and if it is issued for 1 year, change it immediately. You can change it like this:
Click the Start button and select Run.
In the Open box, type regedit, and then click OK.
Locate and highlight the following registry key:
HKEY_LOCAL_MACHINE \ System \ CurrentControlSet \ Services \ CertSvc \ Configuration \ <cssname>
In the right pane, double-click ValidityPeriod .
In the value field, enter one of the following actions and click OK:
Days
Week Days
Months
Years
.
In the right pane, double-click ValidityPeriodUnits .
In the value field, enter the numerical value that you want, and then click OK. For example, enter 2.
Stop and restart the certification services. To do this:
Click Start, and then click Run.
In the Open box, type cmd, and then click OK.
At the command prompt, enter the following commands. Press Enter after each line.certsvc net stop net start certsvc
Type exit to exit the command line.
And a gross mistake was to ignore the warning from Microsoft:
Caution Caution
Certificate clients running Windows XP and Windows Server 2003 do not support an alternative signature algorithm. So that such clients can apply for certificates, do not add the AlternateSignatureAlgorithm = 1 line to the CAPolicy.inf file. For more information, see Recommendations for Using Alternative Signature Formats.
Therefore, remove the AlternateSignatureAlgorithm = 1 line from CAPolicy.inf , otherwise you will have a problem installing certificates on the ASA: Microsoft CA RSASSA-PSS Algorithm Issue with ASA It is solved by changing the parameters in the registry:
Windows Registry Editor Version 5.00
[HKEY_LOCAL_MACHINE \ SYSTEM \ CurrentControlSet \ Services \ CertSvc \ Configuration \% Your_CA_Name% \ CSP]
"ProviderType" = dword: 00000000
"Provider" = "Microsoft Software Key Storage Provider"
"HashAlgorithm" = dword: 00008004
"CNGPublicKeyAlAlgorithm =" "
" CNGHashAlgorithm "=" SHA1 "
" AlternateSignatureAlgorithm "= dword: 00000001
" MachineKeyset "= dword: 00000001
"ProviderType" = dword: 00000000
"Provider" = "Microsoft Software Key Storage Provider"
"HashAlgorithm" = dword: 00008004
"CNGPublicKeyAlAlgorithm =" "
" CNGHashAlgorithm "=" SHA1 "
" AlternateSignatureAlgorithm "= dword: 00000001
" MachineKeyset "= dword: 00000001
and reissue all certificates.
And finally, the third point was connected with setting SSL parameters on the ASA, namely TLS V1 and resp. Cipher (versions and algorithms). At the time of the PKI infrastructure deployment, we installed the asa911-smp-k8 firmware , which did not allow us to configure it normally. They decided to upgrade to asa941-smp-k8 , but again they didn’t quite carefully read the configuration update procedure. We got here such a strange error:
- this is when I try to download the firmware file to the piece of iron. And all that was needed was to first install the firmware version asa912-smp-k8
I hope this knowledge and experience is useful to someone. Good luck
PS as rightly noted in the comments - I completely forgot about two-factor authentication, wrote about certificates, forgot about Active Directory . I’ll try to fix it, to start the configuration process through ASDM:
Go to Configuration -> Device Management -> Users / AAA -> AAA Servers Group , create a new group (name and protocol). I will show the settings for the LDAP protocol in the pictures, and in the config and RADIUS too (for whom it is more convenient to use). Next, add the server to the newly created group:
1. specify the DNS name or IP of the server; server type Microsoft
2. Base DN, - in the example, let it be DC = domain, DC = ru
3. The user’s attribute by which it will be produced from AD objects is sAMAccountName
4. Distinguished Name of the user who has access to view \ search for objects in AD (you can take it from the "Active Directory - users and computers" console by enabling the display of additional components in the attribute editor)
5. The path to the OU that will be used group search
Pay attention to the LDAP Attribute Map item - an important detail that needs to be configured!
ldap attribute-map AD
map-name memberOf IETF-Radius-Class
And finally, when we have already configured CA, all necessary certificates are installed, connection to AAA servers is checked, AnyConnect \ WebVPN is configured, you can enable two-factor authentication:
The promised part of the config
ASA Version 9.4 (1)
!
domain-name domain.ru
!
ldap attribute-map AD
map-name memberOf IETF-Radius-Class
aaa-server domain.RU protocol ldap
aaa-server domain.RU (VLAN100) host 10.0.0.101
ldap-base-dn DC = domain, DC = ru
ldap-group -base-dn OU = GROUPS, OU = domainNOLOGIES, DC = domain, DC = ru
ldap-scope subtree
ldap-naming-attribute sAMAccountName
ldap-login-password *****
ldap-login-dn CN = s-connect_asa- LDAP, OU = system_accounts, OU = BRANCH, DC = domain, DC = ru
server-type microsoft
ldap-attribute-map AD
aaa-server domain_NPS protocol radius
aaa-server domain_NPS (VLAN100) host 10.0.0.101
key *****
no user-identity enable
user-identity domain domain aaa-server domain.RU
user-identity default-domain domain
user-identity action domain-controller-down domain disable-user-identity-rule
aaa authentication enable console domain_NPS LOCAL
aaa authentication http console domain_NPS LOCAL
aaa authentication serial console LOCAL
aaa authentication ssh console domain_NPS LOCAL
aaa authentication telnet console LOCAL
aaa authorization command LOCAL
aaa authorization exec authentication-server auto-enable
!
!
webvpn
enable ISP1
anyconnect image disk0: /AnyConnect/anyconnect-linux-3.1.07021-k9.pkg 1 regex "Linux"
anyconnect image disk0: /AnyConnect/anyconnect-linux-64-4.1.00028-k9.pkg 2 regex "Linux"
anyconnect image disk0: /AnyConnect/anyconnect-macosx-i386-4.1.00028-k9.pkg 3 regex "Intel Mac the X OS »
anyconnect image disk0: /AnyConnect/anyconnect-win-4.1.00028-k9.pkg 4 regex« the Windows NT »
anyconnect profiles domain_AnyVPN disk0: /domain_anyvpn.xml
anyconnect profiles domain_VPN_Users disk0: /domain_vpn_users.xml
anyconnect the enable
tunnel-group -list enable
certificate-group-map DefaultCertificateMap 10 domain_AnyVPN
error-recovery disable
group-policy DfltGrpPolicy attributes
default-domain value domain.ru
group-policy GroupPolicy_domain_AnyVPN internal
group-policy GroupPolicy_domain_AnyVPN attributes
wins-server none
dns-server value 10.0.0.101
vpn-tunnel-protocol ikev2 ssl-client ssl-clientless
default-domain value domain.ru
webvpn
anyconnect mtu 1406
anyconnect ssl keepalive 20
anyconnect profiles value domain_AnyVPN type user
always -on-vpn profile-setting
group-policy GroupPolicy_VPN_USERS internal
group-policy GroupPolicy_VPN_USERS attributes
dns-server value 10.0.0.101
vpn-tunnel-protocol ikev2 ssl-client
default-domain value domain.ru
address-pools value VPN_Users
webvpn
anyconnect profiles value domain_VPNv_U type user
customization value Dflt Customization
tunnel-group domain_AnyVPN type remote-access
tunnel-group domain_AnyVPN general-attributes
address-pool VPN_Admins
authentication-server-group domain.RU
default-group-policy GroupPolicy_domain_AnyVPN
tunnel-group domain_AnyVPN webvpn-attributes
authentication aaa certificate
radius-reject- message
group-alias domain_ADMINS enable
group-alias domain_AnyVPN disable
tunnel-group domain_USERS type remote-access
tunnel-group domain_USERS general-attributes
address-pool VPN_Users
authentication-server-group domain.RU
default-group-policy GroupPolicy_VPN_USERS
tunnel-group domain_USERS webvpn-attributes
group-alias Users_Access enable
!
!
domain-name domain.ru
!
ldap attribute-map AD
map-name memberOf IETF-Radius-Class
aaa-server domain.RU protocol ldap
aaa-server domain.RU (VLAN100) host 10.0.0.101
ldap-base-dn DC = domain, DC = ru
ldap-group -base-dn OU = GROUPS, OU = domainNOLOGIES, DC = domain, DC = ru
ldap-scope subtree
ldap-naming-attribute sAMAccountName
ldap-login-password *****
ldap-login-dn CN = s-connect_asa- LDAP, OU = system_accounts, OU = BRANCH, DC = domain, DC = ru
server-type microsoft
ldap-attribute-map AD
aaa-server domain_NPS protocol radius
aaa-server domain_NPS (VLAN100) host 10.0.0.101
key *****
no user-identity enable
user-identity domain domain aaa-server domain.RU
user-identity default-domain domain
user-identity action domain-controller-down domain disable-user-identity-rule
aaa authentication enable console domain_NPS LOCAL
aaa authentication http console domain_NPS LOCAL
aaa authentication serial console LOCAL
aaa authentication ssh console domain_NPS LOCAL
aaa authentication telnet console LOCAL
aaa authorization command LOCAL
aaa authorization exec authentication-server auto-enable
!
!
webvpn
enable ISP1
anyconnect image disk0: /AnyConnect/anyconnect-linux-3.1.07021-k9.pkg 1 regex "Linux"
anyconnect image disk0: /AnyConnect/anyconnect-linux-64-4.1.00028-k9.pkg 2 regex "Linux"
anyconnect image disk0: /AnyConnect/anyconnect-macosx-i386-4.1.00028-k9.pkg 3 regex "Intel Mac the X OS »
anyconnect image disk0: /AnyConnect/anyconnect-win-4.1.00028-k9.pkg 4 regex« the Windows NT »
anyconnect profiles domain_AnyVPN disk0: /domain_anyvpn.xml
anyconnect profiles domain_VPN_Users disk0: /domain_vpn_users.xml
anyconnect the enable
tunnel-group -list enable
certificate-group-map DefaultCertificateMap 10 domain_AnyVPN
error-recovery disable
group-policy DfltGrpPolicy attributes
default-domain value domain.ru
group-policy GroupPolicy_domain_AnyVPN internal
group-policy GroupPolicy_domain_AnyVPN attributes
wins-server none
dns-server value 10.0.0.101
vpn-tunnel-protocol ikev2 ssl-client ssl-clientless
default-domain value domain.ru
webvpn
anyconnect mtu 1406
anyconnect ssl keepalive 20
anyconnect profiles value domain_AnyVPN type user
always -on-vpn profile-setting
group-policy GroupPolicy_VPN_USERS internal
group-policy GroupPolicy_VPN_USERS attributes
dns-server value 10.0.0.101
vpn-tunnel-protocol ikev2 ssl-client
default-domain value domain.ru
address-pools value VPN_Users
webvpn
anyconnect profiles value domain_VPNv_U type user
customization value Dflt Customization
tunnel-group domain_AnyVPN type remote-access
tunnel-group domain_AnyVPN general-attributes
address-pool VPN_Admins
authentication-server-group domain.RU
default-group-policy GroupPolicy_domain_AnyVPN
tunnel-group domain_AnyVPN webvpn-attributes
authentication aaa certificate
radius-reject- message
group-alias domain_ADMINS enable
group-alias domain_AnyVPN disable
tunnel-group domain_USERS type remote-access
tunnel-group domain_USERS general-attributes
address-pool VPN_Users
authentication-server-group domain.RU
default-group-policy GroupPolicy_VPN_USERS
tunnel-group domain_USERS webvpn-attributes
group-alias Users_Access enable
!









