Homemade NAS from a netbook with a redesigned PCI express SATA controller for ExpressCard / 34
The article describes an unusual data storage system based on a netbook with the addition of an external converted SATA controller and software from the XPEnology project. The DIY hub, it seems to me, is most consistent in spirit with a project in which the main place is occupied by technical creativity and a love of geek technologies. I did not pursue the goal of creating a full-fledged home storage system, although everything works at the proper level. For these purposes, I have been working for several years a real NAS from Synology.
So, a story about old hardware, a soldering iron and a new software.
What was in the beginning, what interested the inquiring mind.
1. The Lenovo IdeaPad S10 netbook was lying around idle, a veteran who had been in battle, with a transplanted keyboard, lost his battery, and was deprived of a webcam eye. A platform based on the Intel Atom N270 1.6 GHz, about which ark.intel.com reports that it is a 32-bit x86 architecture. An important characteristic of this netbook is the presence of an ExpressCard / 34 slot, that is, a slot with a full PCI Express x1 bus, which is not very typical for netbooks.
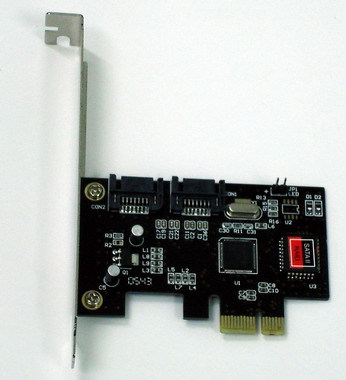
2. SATA2 RAID Espada controller based on SIL3132. Which besides the unnecessary RAID, I have a PCI Express x1 slot.
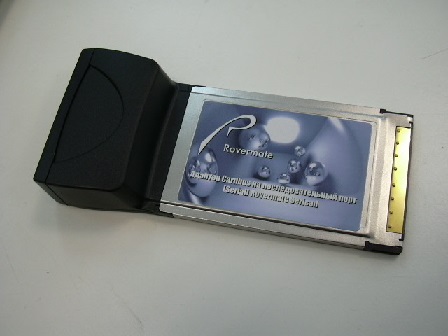
3. An almost unnamed RS-232 <-> ExpressCard / 34 serial port adapter, which in fact is not a PCI Express device, but only parasitizes on ExpressCard / 34 USB 2.0 lines. But on the other hand, it has a full set of contacts, which is of particular value for the project.
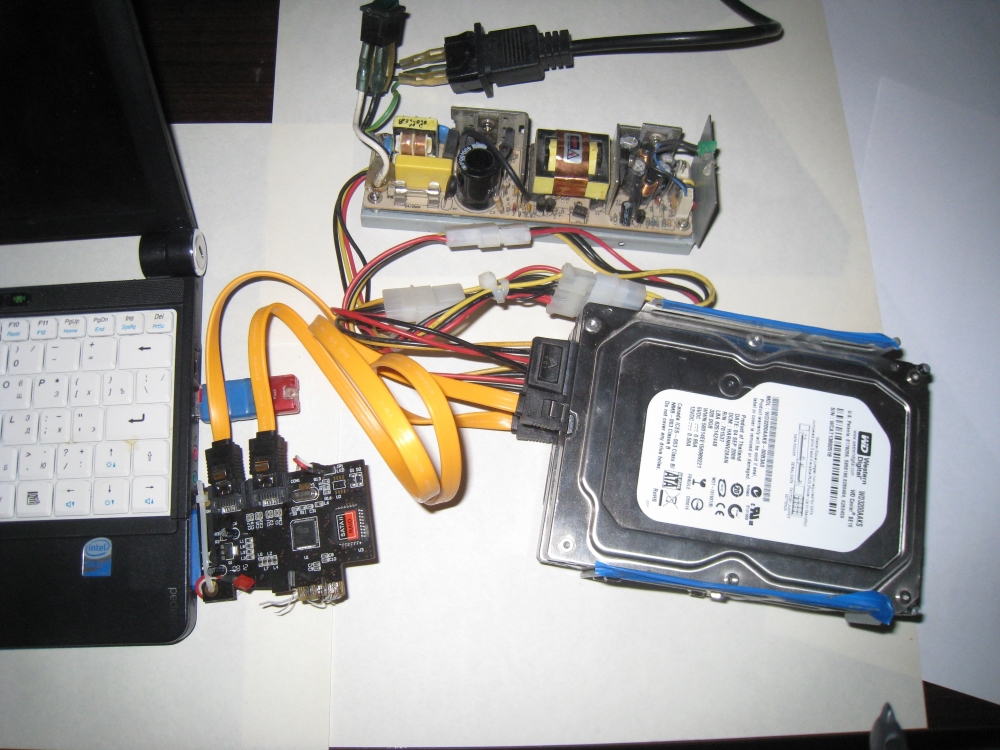
4. You will also need an external power supply + 5V, + 12V with power connectors for external hard drives. SATA power adapters. And of course, a couple of HDDs (after all, NAS) and a flash drive ~ 1GB for the bootloader.
As you most likely noticed, the peripherals and the netbook have a PCI Express x1 bus, but with different connectors. The incompatibility that arose on the way is solved with the mind and a soldering iron. After analyzing and comparing the pinouts of the PCIe and ExpressCard / 34 slots, the following combining scheme was drawn. There were not very many lines (the necessary connections were drawn "by hand"), and therefore the quite feasible task of crossing interfaces.

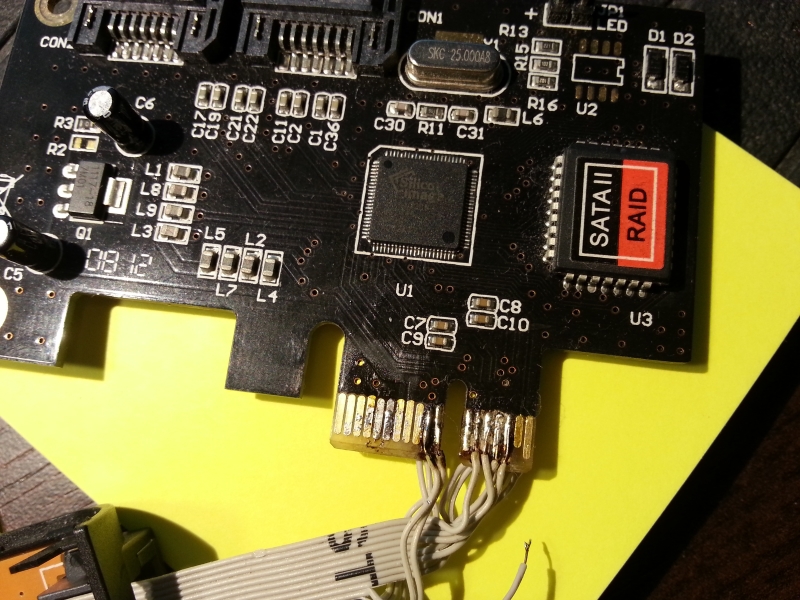
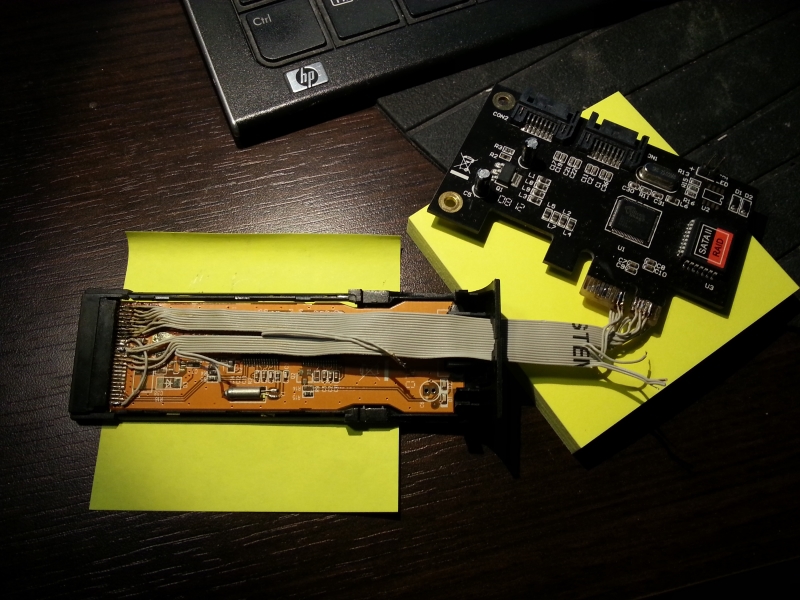
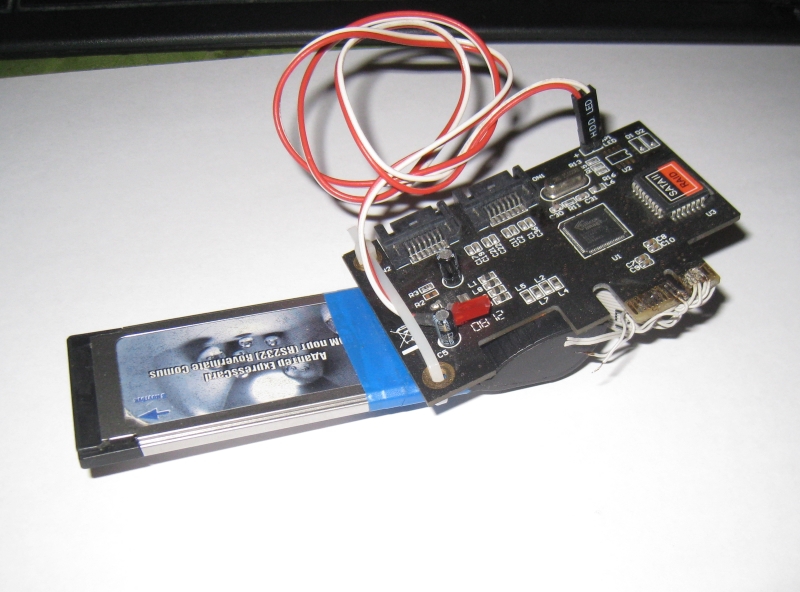
We disassemble the RS-232 ExpressCard adapter, cut the unnecessary USB 2.0 lines with a scalpel and, in accordance with the received scheme, carefully solder the stripped cable made of an 80-core IDE cable. The length of the loop can be a few centimeters (about the length: 18-centimeter PCIe risers are offered on eBay). Next, we rid the RAID controller of the iron strip and solder the second end of the cable to it according to the scheme. Soldering the adapter is the most difficult moment in all the crafts, here the main thing is accuracy and straight arms that have become classics. The result is such a hybrid.
Let's give the product a finished look, wrap it with blue tape and fasten it with a plastic screed.
Congratulations on the successful conversion to ExpressCard / 34 SATA2 controller on two HDDs. "Drumroll". We make sure that it is defined in the system (see video below), and that we can configure disks in the BIOS RAID menu.
This is how the whole system looks.
I have been following the XPEnology project for a long time . The essence of which is to launch Synology DSM software on third-party x86 / x64 systems. The choice of software, as such, I did not deal with, XPEnology was initially an integral part of the future crafts.
The main branch on the XPEnology project platforms is the x64 system, but there is also an unsupported x86 branch. The latter is just of interest, since the netbook processor, as mentioned above, does not support x64 instructions.
The system is installed in accordance with the instructions of the XPEnology project, so I will only say a few words about what started. We used the NanoBoot-x86-5.0.3.2 bootloader, the final version of DSM 5.0-4528. Not bad considering platform limitations. The system boots from an external USB flash drive.
For Lenovo S10, it was experimentally revealed that the installation must be done with the internal SATA HDD disabled, otherwise DSM is not installed correctly. After a successful start of the system, you can reconnect the internal drive.
Lenovo S10 drives in DSM are distributed as follows:
By default, the distribution of external and internal disks in DSM does not correspond to what I wanted, I wanted to see drives 1-3 in DSM as internal SATA, and USB disks as external USB.
To get the desired scheme, you need to edit the files /etc/synoinfo.conf and /etc.defaults/synoinfo.conf via ssh using vi.
To do this, create the following masks for the distribution of ports:
Video of a working system:
On this, allow me to take my leave.
So, a story about old hardware, a soldering iron and a new software.
This is done because it could be done!
Part 1. Materials at hand
What was in the beginning, what interested the inquiring mind.
1. The Lenovo IdeaPad S10 netbook was lying around idle, a veteran who had been in battle, with a transplanted keyboard, lost his battery, and was deprived of a webcam eye. A platform based on the Intel Atom N270 1.6 GHz, about which ark.intel.com reports that it is a 32-bit x86 architecture. An important characteristic of this netbook is the presence of an ExpressCard / 34 slot, that is, a slot with a full PCI Express x1 bus, which is not very typical for netbooks.
2. SATA2 RAID Espada controller based on SIL3132. Which besides the unnecessary RAID, I have a PCI Express x1 slot.
3. An almost unnamed RS-232 <-> ExpressCard / 34 serial port adapter, which in fact is not a PCI Express device, but only parasitizes on ExpressCard / 34 USB 2.0 lines. But on the other hand, it has a full set of contacts, which is of particular value for the project.
4. You will also need an external power supply + 5V, + 12V with power connectors for external hard drives. SATA power adapters. And of course, a couple of HDDs (after all, NAS) and a flash drive ~ 1GB for the bootloader.
Part 2. Give me a soldering iron and I will turn the world upside down
As you most likely noticed, the peripherals and the netbook have a PCI Express x1 bus, but with different connectors. The incompatibility that arose on the way is solved with the mind and a soldering iron. After analyzing and comparing the pinouts of the PCIe and ExpressCard / 34 slots, the following combining scheme was drawn. There were not very many lines (the necessary connections were drawn "by hand"), and therefore the quite feasible task of crossing interfaces.
We disassemble the RS-232 ExpressCard adapter, cut the unnecessary USB 2.0 lines with a scalpel and, in accordance with the received scheme, carefully solder the stripped cable made of an 80-core IDE cable. The length of the loop can be a few centimeters (about the length: 18-centimeter PCIe risers are offered on eBay). Next, we rid the RAID controller of the iron strip and solder the second end of the cable to it according to the scheme. Soldering the adapter is the most difficult moment in all the crafts, here the main thing is accuracy and straight arms that have become classics. The result is such a hybrid.
Let's give the product a finished look, wrap it with blue tape and fasten it with a plastic screed.
Congratulations on the successful conversion to ExpressCard / 34 SATA2 controller on two HDDs. "Drumroll". We make sure that it is defined in the system (see video below), and that we can configure disks in the BIOS RAID menu.
This is how the whole system looks.
Part 3. Software
I have been following the XPEnology project for a long time . The essence of which is to launch Synology DSM software on third-party x86 / x64 systems. The choice of software, as such, I did not deal with, XPEnology was initially an integral part of the future crafts.
The main branch on the XPEnology project platforms is the x64 system, but there is also an unsupported x86 branch. The latter is just of interest, since the netbook processor, as mentioned above, does not support x64 instructions.
The system is installed in accordance with the instructions of the XPEnology project, so I will only say a few words about what started. We used the NanoBoot-x86-5.0.3.2 bootloader, the final version of DSM 5.0-4528. Not bad considering platform limitations. The system boots from an external USB flash drive.
For Lenovo S10, it was experimentally revealed that the installation must be done with the internal SATA HDD disabled, otherwise DSM is not installed correctly. After a successful start of the system, you can reconnect the internal drive.
Lenovo S10 drives in DSM are distributed as follows:
| Disc 1 | 1st port of an external SATA controller |
| Disc 2 | 2nd port of an external SATA controller |
| Disc 3 | Lenovo internal SATA |
| Disc 18 | 1st external USB drive |
| Disc 19 | 2nd external USB drive |
By default, the distribution of external and internal disks in DSM does not correspond to what I wanted, I wanted to see drives 1-3 in DSM as internal SATA, and USB disks as external USB.
To get the desired scheme, you need to edit the files /etc/synoinfo.conf and /etc.defaults/synoinfo.conf via ssh using vi.
To do this, create the following masks for the distribution of ports:
# ESATA нам ненужны
esataportcfg="0x0"
# маска для дисков 17-20
usbportcfg="0xf0000"
# маска для дисков 1-16
internalportcfg="0xffff"
Video of a working system:
On this, allow me to take my leave.