How I built hexapods in Space Engineers. Part 1
- Tutorial
Hello I want to tell about the design and programming of limb control system in a hexapod built in Space Engineers.
Looking ahead, I’ll say that everything related to programming in Space Engineer will be in the next article. In this article, I’ll tell you about inverse kinematics and show a prototype on HTML Canvas, in which I debugged algorithms.
The articulated chassis was originally built, and then there was a digging unit on it. Such a configuration ensured contact of all wheels with the surface on large irregularities, including when twisting.

It seems like this.
But I was faced with the impossibility of placing it exactly on the field, since the wheels often slid down (the problem of physics — most blocks (including the wheels) have a too small friction coefficient). The wheeled platform with all-wheel wheel modules was too cumbersome and suffered from periodic physics explosion. As a result, it was decided to build a walking robot - namely, the hexapod, as the most stable walking platform.
Where does a normal person start building hexa pods? Probably go into the game and begin to build the body of a robot with limbs, and then think about how to revive it all. But this is not our method.
The following scheme was chosen for the leg structure:
Inner joint - internal joint swinging along the yaw axis
Mid joint and outer joint - external joints swinging along the pitch axis (pitch). The direction of reference is from the base of the foot to the end of the foot.

Angle 0 for all joints means that the leg is fully extended (it will be easier to build a straight leg in the game).
The task is to find such angles of rotation of the joints at a given target point, so that the end of the leg is at the given point. So time to remember trigonometry.
The angle of the inner joint can be found through the arctangent of the horizontal coordinates of the target.
With two other joints more difficult. We have the length of all joints. You can find the angle to the horizon and the distance between the middle joint and the ground, as well as the distance to the target point.
Further, through the cosine theorem, we need to find the angles of the triangle on known sides.
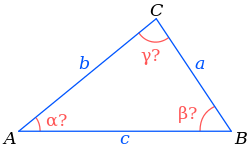

→ Solving triangles
This is what the code looks like:
Further. The robot must walk, right? That is, we must transmit the coordinates of a given position N times per second to each leg. Taking into account the fact that legs 6 and 3 of them move in antiphase it turns out to be somehow difficult. You need to enter a new level of abstraction.
But what if we imagine that the leg is moving in a circle and it needs to pass an angle indicating the position on this circle? Removal to the side becomes permanent and only one parameter needs to be passed, changing cyclically. Then the target coordinates are through the sine and cosine.
While it is enough
Considering how everything will work, I realized that the task is too complicated for everything to work the first time (everything is bad with Space Engineers debugging, but more on that in the next part).
So I decided to write a visualizer. I wanted to make it without additional libraries and be able to run it in one click and without being tied to the environment.
Therefore, JS + HTML Canvas was selected.
Now let's draw an owl.
Code:
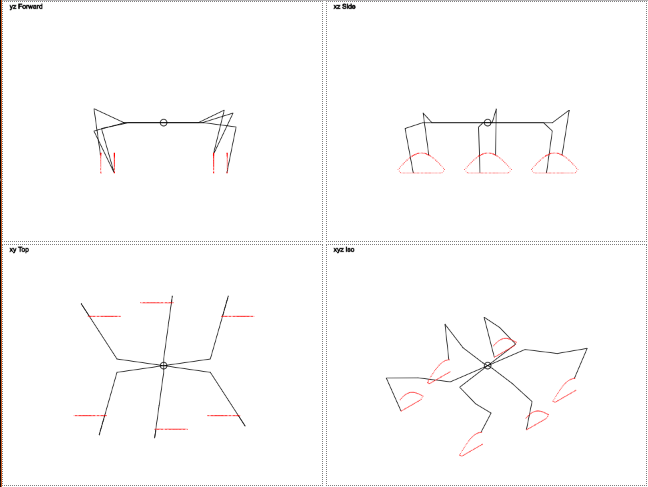
Result:
Isn't it pretty?
Here you can see that the trajectory of the movement of the legs is different from the circumference. Vertical movement resembles a stripped-down sine wave, and horizontal movement is linear. This should reduce the load on the legs.
Now a few explanations of what happens in the code.
For turning, I considered 2 situations:
If the robot is standing, the legs move in a circle.
The only thing is that movement along a circle would make the code with the current implementation much more difficult. Therefore, the legs move tangentially to the circumference.
When the robot moves, you need to implement something like the Ackermann steering geometry with a differential.
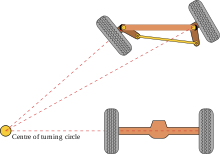
That is, the step length of the legs moving along a smaller radius is less. And the angle of rotation is greater.
To implement a change in the angle of rotation for each leg, I came up with the following algorithm:
1. We consider the angle from the initial position of the leg to the center of the robot:
2. We consider the angle from the initial position of the leg to (the center of the robot + the offset that is responsible for the rotation is a variable parameter):
3. Turn the step on the difference of these angles:
But that's not all. Still need to change the step length. Realization in the forehead - to multiply the step length by changing the distance to the center - had a fatal flaw - the external legs walked too wide and began to touch each other.
Therefore, it was necessary to complicate the implementation:
1. We consider the change in the distance to the center for each leg:
0.3 is the magic number
2. Find the relationship between the minimum and maximum change
This multiplier reflects the difference between the minimum and maximum variation of the distance to the center. It is always less than 1, and if you multiply the length of a step on it, it will not increase when turning, even for legs external to the direction of rotation.
Here's how it works (gif 2 megabytes):
→ You can play around with the result here.
For a closer look, I recommend saving the contents in an html file and continuing in your favorite text editor.
In the next post I will tell you how I made it all work in Space Engineers.
Spoiler: in Programmable Block you can write on C # almost the latest version.
Looking ahead, I’ll say that everything related to programming in Space Engineer will be in the next article. In this article, I’ll tell you about inverse kinematics and show a prototype on HTML Canvas, in which I debugged algorithms.
Background and problem statement.
The articulated chassis was originally built, and then there was a digging unit on it. Such a configuration ensured contact of all wheels with the surface on large irregularities, including when twisting.
It seems like this.
But I was faced with the impossibility of placing it exactly on the field, since the wheels often slid down (the problem of physics — most blocks (including the wheels) have a too small friction coefficient). The wheeled platform with all-wheel wheel modules was too cumbersome and suffered from periodic physics explosion. As a result, it was decided to build a walking robot - namely, the hexapod, as the most stable walking platform.
Where does a normal person start building hexa pods? Probably go into the game and begin to build the body of a robot with limbs, and then think about how to revive it all. But this is not our method.
I started with the theory
The following scheme was chosen for the leg structure:
Inner joint - internal joint swinging along the yaw axis
Mid joint and outer joint - external joints swinging along the pitch axis (pitch). The direction of reference is from the base of the foot to the end of the foot.
Angle 0 for all joints means that the leg is fully extended (it will be easier to build a straight leg in the game).
The task is to find such angles of rotation of the joints at a given target point, so that the end of the leg is at the given point. So time to remember trigonometry.
The angle of the inner joint can be found through the arctangent of the horizontal coordinates of the target.
const yawRad = Math.atan2(esimatedLegPosition.x, esimatedLegPosition.y);With two other joints more difficult. We have the length of all joints. You can find the angle to the horizon and the distance between the middle joint and the ground, as well as the distance to the target point.
Further, through the cosine theorem, we need to find the angles of the triangle on known sides.
→ Solving triangles
This is what the code looks like:
getLegAngles(esimatedLegPosition) {
	const yawRad = Math.atan2(esimatedLegPosition.x, esimatedLegPosition.y);
	const dx = Math.hypot(esimatedLegPosition.x, esimatedLegPosition.y) - this.innerJoint.length;
	const dz = this.step.idlePosition.z + esimatedLegPosition.z;
	const hyp = Math.hypot(dx, dz);
	if (hyp > this.midJoint.length + this.outerJoint.length) {//out of reach
		hyp = this.midJoint.length + this.outerJoint.length;
	}
	const innerAngleRad = Math.acos((this.outerJoint.length * this.outerJoint.length - this.midJoint.length * this.midJoint.length - hyp * hyp) / (-2 * this.midJoint.length * hyp)) + Math.atan2(dz, dx);
	const outerAngleRad = Math.acos((hyp * hyp - this.midJoint.length * this.midJoint.length - this.outerJoint.length * this.outerJoint.length) / (-2 * this.midJoint.length * this.outerJoint.length)) - Math.PI;
	return { yaw: yawRad, midPitch: innerAngleRad, outerPitch: outerAngleRad };
}
Motion
Further. The robot must walk, right? That is, we must transmit the coordinates of a given position N times per second to each leg. Taking into account the fact that legs 6 and 3 of them move in antiphase it turns out to be somehow difficult. You need to enter a new level of abstraction.
But what if we imagine that the leg is moving in a circle and it needs to pass an angle indicating the position on this circle? Removal to the side becomes permanent and only one parameter needs to be passed, changing cyclically. Then the target coordinates are through the sine and cosine.
While it is enough
Considering how everything will work, I realized that the task is too complicated for everything to work the first time (everything is bad with Space Engineers debugging, but more on that in the next part).
So I decided to write a visualizer. I wanted to make it without additional libraries and be able to run it in one click and without being tied to the environment.
Therefore, JS + HTML Canvas was selected.
Now let's draw an owl.
Code:
Spoiler header
Vector:
Joint:
Шаг — структура данных для управления ногой:
Нога:
Робот:
Но для отрисовки понадобятся еще несколько классов:
Обертка над Canvas:
В классе Leg есть метод для получения текущих координат суставов. Вот эти координаты мы и будем отрисовывать.
Так-же я добавил отрисовку точек, в которых находилась нога в N последних тиков.
И наконец Worker, который будет запускать симуляцию:
classVector{
		constructor(x, y, z) {
			this.x = x;
			this.y = y;
			this.z = z;
		};
		distanceTo(vector) {
			returnMath.sqrt(Math.pow(this.x - vector.x, 2) + Math.pow(this.y - vector.y, 2) + Math.pow(this.z - vector.z, 2));
		}
		diff(vector) {
			returnnew Vector(
				this.x - vector.x,
				this.y - vector.y,
				this.z - vector.z
			);
		}
		add(vector) {
			returnnew Vector(
				this.x + vector.x,
				this.y + vector.y,
				this.z + vector.z
			);
		}
	}
Joint:
classJoint{
		constructor(angle, position, length) {
			this.angle = angle;
			this.position = position;
			this.length = length;
			this.targetAngle = angle;
			this.previousAngle = angle;
			this.velocity = 0;
		};
		setTargetAngle(targetAngle) {
			this.targetAngle = targetAngle;
			this.velocity = this.targetAngle - this.normalizeAngle(this.angle);
		}
		normalizeAngle(angle) {
			while (angle <= -Math.PI) angle += Math.PI * 2;
			while (angle > Math.PI) angle -= Math.PI * 2;
			return angle;
		}
		getCurrentVelocity() {//per tickreturnthis.normalizeAngle(this.angle - this.previousAngle);
		}
		tick() {
			this.previousAngle = this.angle;
			this.angle = this.angle + this.velocity;
		}
	}
Шаг — структура данных для управления ногой:
classStep{
		constructor(
			idlePosition,//vector relative to inner joint
			angle,//step direction
			length,//step length
			height,//step height
			phaseShift//
		) {
			this.idlePosition = idlePosition;
			this.angle = angle;//radiansthis.length = length;
			this.height = height;
			this.phaseShift = phaseShift;
		}
	}
Нога:
classLeg{
		constructor(
			vehicleCenter,
			innerJoint,
			midJoint,
			outerJoint,
			step,
			phaseStep
		) {
			this.vehicleCenter = vehicleCenter;
			this.innerJoint = innerJoint;
			this.midJoint = midJoint;
			this.outerJoint = outerJoint;
			this.step = step;
			this.phaseStep = phaseStep;
			this.innerJoint.length = innerJoint.position.distanceTo(midJoint.position);//calculatethis.midJoint.length = midJoint.position.distanceTo(outerJoint.position);//calculate//this.outerJoint.length = 100;this.joints = [innerJoint, midJoint, outerJoint];
			this.preCalculateAngles();
		}
		preCalculateAngles() {
			this.angles = {};
			for (let phase = 0; phase < 360; phase += this.phaseStep) {
				this.angles[phase] = this.getLegAngles(this.getEsimatedLegPosition(phase, this.step.phaseShift))
			}
		}
		applyStepHeight(z) {
			const idleYawRad = Math.atan2(this.step.idlePosition.x, this.step.idlePosition.y);
			const diffHypot = Math.hypot(this.step.idlePosition.x, this.step.idlePosition.y);
			const minZ = Math.abs(this.midJoint.length - this.outerJoint.length);
			const maxZ = (this.midJoint.length + this.outerJoint.length) * 0.6;
			if (Math.hypot(z, 0) > maxZ) {
				z = z > 0 ? maxZ : -maxZ;
			}
			const safeY = (this.innerJoint.length + this.midJoint.length * 0.5 + this.outerJoint.length * 0.5) * Math.cos(idleYawRad);
			const vAngle = Math.asin(z / safeY);
			const y = safeY * Math.cos(vAngle) * Math.cos(idleYawRad);
			this.step.idlePosition.z = z;
			this.step.idlePosition.y = this.step.idlePosition.y > 0 ? y : -y;
			this.preCalculateAngles();
		}
		applyStepAngle(angle) {
			this.step.angle = angle;
			this.preCalculateAngles();
		}
		applyPhase(phase/*0-360*/) {
			const legAngles = this.angles[phase];
			this.innerJoint.setTargetAngle(legAngles.yaw);
			this.midJoint.setTargetAngle(legAngles.midPitch);
			this.outerJoint.setTargetAngle(legAngles.outerPitch);
		}
		getEsimatedLegPosition(phase, phaseShift) {
			phase = (phase + phaseShift) % 360;
			const stepX = ((phase < 180 ? phase : 180 - phase % 180) / 180 - 0.5) * this.step.length;//linear movement along step directionconst stepZ = Math.max(Math.sin(phase * Math.PI / 180), -0.2) * this.step.height / 1.2;
			//const stepZ = Math.max((phase > 180 ? Math.cos(phase * Math.PI / 360) + 0.9 : Math.cos((phase - 120) * Math.PI / 360)) * .9 - .1, 0) * this.step.height;const x = this.step.idlePosition.x + stepX * Math.cos(this.step.angle);
			const y = this.step.idlePosition.y + stepX * Math.sin(this.step.angle);
			returnnew Vector(x, y, stepZ);
		}
		getLegAngles(esimatedLegPosition) {
			const yawRad = Math.atan2(esimatedLegPosition.x, esimatedLegPosition.y);
			const dx = Math.hypot(esimatedLegPosition.x, esimatedLegPosition.y) - this.innerJoint.length;
			const dz = this.step.idlePosition.z + esimatedLegPosition.z;
			const hyp = Math.hypot(dx, dz);
			if (hyp > this.midJoint.length + this.outerJoint.length) {//out of reach
				hyp = this.midJoint.length + this.outerJoint.length;
			}
			const innerAngleRad = Math.acos((this.outerJoint.length * this.outerJoint.length - this.midJoint.length * this.midJoint.length - hyp * hyp) / (-2 * this.midJoint.length * hyp)) + Math.atan2(dz, dx);
			const outerAngleRad = Math.acos((hyp * hyp - this.midJoint.length * this.midJoint.length - this.outerJoint.length * this.outerJoint.length) / (-2 * this.midJoint.length * this.outerJoint.length)) - Math.PI;
			if (isNaN(yawRad) || isNaN(innerAngleRad) || isNaN(outerAngleRad)) {
				console.log(yawRad, innerAngleRad, outerAngleRad);
				console.log(dx, dz);
				return;
			}
			return { yaw: yawRad, midPitch: innerAngleRad, outerPitch: outerAngleRad };
		}
		getMaxMinAngles() {
			const angles = [0, 90, 180, 270].map((phase) => {
				returnthis.getLegAngles(getEsimatedLegPosition(phase, 0));
			});
			return {
				yawMin: Math.min(angles.map((x) => { return x.yaw })),
				yawMax: Math.max(angles.map((x) => { return x.yaw })),
				midPitchMin: Math.min(angles.map((x) => { return x.midPitch })),
				midPitchMax: Math.max(angles.map((x) => { return x.midPitch })),
				outerPitchMin: Math.min(angles.map((x) => { return x.outerPitch })),
				outerPitchMax: Math.max(angles.map((x) => { return x.outerPitch })),
			}
		}
		tick() {
			this.joints.forEach(function (joint) { joint.tick(); });
		}
		getVectors() {
			const res = [];
			const sinYaw = Math.sin(this.innerJoint.angle);
			const cosYaw = Math.cos(this.innerJoint.angle);
			let currentVector = this.vehicleCenter;
			res.push(currentVector);
			currentVector = currentVector.add(this.innerJoint.position);
			res.push(currentVector);
			currentVector = currentVector.add(new Vector(
				this.innerJoint.length * sinYaw,
				this.innerJoint.length * cosYaw,
				0
			));
			res.push(currentVector);
			const dxMid = Math.cos(this.midJoint.angle) * this.midJoint.length;
			const dzMid = Math.sin(this.midJoint.angle) * this.midJoint.length;
			currentVector = currentVector.add(new Vector(
				dxMid * sinYaw,
				dxMid * cosYaw,
				dzMid
			));
			res.push(currentVector);
			const c = this.midJoint.angle + this.outerJoint.angle;
			const dxOuter = Math.cos(c) * this.outerJoint.length;
			const dzOuter = Math.sin(c) * this.outerJoint.length;
			currentVector = currentVector.add(new Vector(
				dxOuter * sinYaw,
				dxOuter * cosYaw,
				dzOuter
			));
			res.push(currentVector);
			return res;
		}
	}
Робот:
classHexapod{
		constructor(phaseStep) {
			this.idleHeight = -70;
			this.stepAngle = 0;
			this.turnAngle = 0;
			this.stepLength = 70;
			this.stepHeight = 30;
			this.debugPoints = [];
			const vehicleCenter = new Vector(0, 0, 0);
			this.legs = [
				new Leg(
					vehicleCenter,
					new Joint(0, new Vector(-70, 10, 0), 50),
					new Joint(0, new Vector(-70, 60, 0), 50),
					new Joint(0, new Vector(-70, 110, 0), 70),
					new Step(new Vector(-30, 90, this.idleHeight), this.stepAngle, this.stepLength, this.stepHeight, 0),
					phaseStep
				),
				new Leg(
					vehicleCenter,
					new Joint(0, new Vector(-70, -10, 0), 50),
					new Joint(0, new Vector(-70, -60, 0), 50),
					new Joint(0, new Vector(-70, -110, 0), 70),
					new Step(new Vector(-30, -90, this.idleHeight), this.stepAngle, this.stepLength, this.stepHeight, 180),
					phaseStep
				),
				new Leg(
					vehicleCenter,
					new Joint(0, new Vector(0, 10, 0), 50),
					new Joint(0, new Vector(0, 60, 0), 50),
					new Joint(0, new Vector(0, 110, 0), 70),
					new Step(new Vector(0, 100, this.idleHeight), this.stepAngle, this.stepLength, this.stepHeight, 180),
					phaseStep
				),
				new Leg(
					vehicleCenter,
					new Joint(0, new Vector(0, -10, 0), 50),
					new Joint(0, new Vector(0, -60, 0), 50),
					new Joint(0, new Vector(0, -110, 0), 70),
					new Step(new Vector(0, -100, this.idleHeight), this.stepAngle, this.stepLength, this.stepHeight, 0),
					phaseStep
				),
				new Leg(
					vehicleCenter,
					new Joint(0, new Vector(70, 10, 0), 50),
					new Joint(0, new Vector(70, 60, 0), 50),
					new Joint(0, new Vector(70, 110, 0), 70),
					new Step(new Vector(30, 90, this.idleHeight), this.stepAngle, this.stepLength, this.stepHeight, 0),
					phaseStep
				),
				new Leg(
					vehicleCenter,
					new Joint(0, new Vector(70, -10, 0), 50),
					new Joint(0, new Vector(70, -60, 0), 50),
					new Joint(0, new Vector(70, -110, 0), 70),
					new Step(new Vector(30, -90, this.idleHeight), this.stepAngle, this.stepLength, this.stepHeight, 180),
					phaseStep
				),
			];
		}
		applyPhase(phase/*0-360*/) {
			this.legs.forEach(function (leg) {
				leg.applyPhase(phase);
			});
		}
		changeHeight(value) {
			this.legs.forEach(function (leg) {
				leg.applyStepHeight(this.idleHeight + value);
			}, this);
		}
		changeStepLength(value) {
			this.stepLength += value;
			this.legs.forEach(function (leg) {
				leg.step.length = this.stepLength;
				leg.preCalculateAngles();
			}, this);
		}
		applyTurn1(centerX, centerY) {
			const angleToAxis = Math.atan2(centerX, centerY);
			const distanceToAxis = Math.hypot(centerX, centerY);
			distanceToAxis = 1000/distanceToAxis;
			this.legs.forEach(leg => {
				const dx = leg.step.idlePosition.x + leg.innerJoint.position.x + Math.sin(angleToAxis)*distanceToAxis || 0;
				const dy = leg.step.idlePosition.y + leg.innerJoint.position.y + Math.cos(angleToAxis)*distanceToAxis || 0;
				const angle = Math.atan2(dy,dx);
				const hypIdle = Math.hypot(dx, dy);
				leg.applyStepAngle(angle+Math.PI/2);
				leg.step.length = this.stepLength *hypIdle/ ((distanceToAxis || 0) + 1000);
			});
		}
		applyTurn(centerX, centerY) {
			this.stepAngle = Math.atan2(centerX, centerY);
			if (this.stepAngle > Math.PI / 2) this.stepAngle -= Math.PI;
			if (this.stepAngle < -Math.PI / 2) this.stepAngle += Math.PI;
			const mults = this.legs.map(leg =>Math.hypot(leg.step.idlePosition.y + leg.innerJoint.position.y, leg.step.idlePosition.x + leg.innerJoint.position.x)
				/ Math.hypot(leg.step.idlePosition.y + leg.innerJoint.position.y + centerY*.3, leg.step.idlePosition.x + leg.innerJoint.position.x + centerX*.3));
			const minMult = Math.min(...mults);
			const maxMult = Math.max(...mults);
			const mult = minMult / maxMult;
			const d = Math.pow(Math.max(...this.legs.map(leg =>Math.hypot(leg.step.idlePosition.y + leg.innerJoint.position.y, leg.step.idlePosition.x + leg.innerJoint.position.x))),2)/Math.hypot(centerX,centerY);
			const a =  Math.atan2(centerX,centerY);
			this.legs.forEach(leg => {
				const dx = leg.step.idlePosition.x + leg.innerJoint.position.x;
				const dy = leg.step.idlePosition.y + leg.innerJoint.position.y;
				const idleAngle = Math.atan2(dx, dy) + this.stepAngle;
				const turnAngle = Math.atan2(dx + centerX, dy + centerY);
				const hypIdle = Math.hypot(dx, dy);
				const hyp = Math.hypot(dx + centerX, dy + centerY);
				leg.applyStepAngle(turnAngle - idleAngle);
				leg.step.length = this.stepLength * hyp / hypIdle * mult;
			});
			this.debugPoints = [new Vector(Math.sin(a)*-d,Math.cos(a)*-d,0)];
		}
		tick() {
			this.legs.forEach(function (leg) {
				leg.tick();
			});
		}
		getVectors() {
			returnthis.legs.map(function (leg) { return leg.getVectors() });
		}
	}
Но для отрисовки понадобятся еще несколько классов:
Обертка над Canvas:
classCanvas{
		constructor(id, label, axisSelectorX, axisSelectorY) {
			const self = this;
			this.id = id;
			this.label = label;
			this.canvas = document.getElementById(id);
			this.ctx = this.canvas.getContext('2d');
			this.axisSelectorX = axisSelectorX;
			this.axisSelectorY = axisSelectorY;
			this.canvasHeight = this.canvas.offsetHeight;
			this.canvasWidth = this.canvas.offsetWidth;
			this.initialY = this.canvasHeight / 2;
			this.initialX = this.canvasWidth / 2;
			this.traceCounter = 0;
			this.maxTraces = 50;
			this.traces = {};
			const axisSize = 150;
			this.axisVectors = [
				[
					new Vector(-axisSize, -axisSize, -axisSize),
					new Vector(-axisSize, -axisSize, axisSize)
				],
				[
					new Vector(-axisSize, -axisSize, -axisSize),
					new Vector(-axisSize, axisSize, -axisSize)
				],
				[
					new Vector(-axisSize, -axisSize, -axisSize),
					new Vector(axisSize, -axisSize, -axisSize)
				],
			]
			this.mouseOver = false;
			this.mousePos = { x: 0, y: 0 };//relative to centerthis.clickPos = { x: 0, y: 0 };//relative to centerthis.canvas.addEventListener("mouseenter", function (event) {
				self.mouseOver = true;
			}, false);
			this.canvas.addEventListener("mouseleave", function (event) {
				self.mouseOver = false;
			}, false);
			this.canvas.addEventListener("mousemove", function (event) {
				if (self.mouseOver) {
					self.mousePos = { x: event.offsetX - self.initialX, y: event.offsetY - self.initialY };
				}
			}, false);
			this.canvas.addEventListener("mouseup", function (event) {
				if (self.mouseOver) {
					self.clickPos = { x: event.offsetX - self.initialX, y: event.offsetY - self.initialY };
				}
			}, false);
		};
		clear(drawAxis) {
			this.ctx.clearRect(0, 0, this.canvasWidth, this.canvasHeight);
			this.ctx.strokeStyle = "#000000";
			this.ctx.strokeText(this.label, 10, 10);
			if (drawAxis) {
				this.axisVectors.forEach(function (vectors, i) {
					this.ctx.moveTo(this.initialX, this.initialY);
					this.ctx.beginPath();
					vectors.forEach(function (vector) {
						this.ctx.lineTo(this.initialX + this.axisSelectorX(vector), this.initialY - this.axisSelectorY(vector));
					}, this);
					this.ctx.stroke();
					const lastVector = vectors[vectors.length - 1];
					this.traces[[this.traceCounter, i]] = lastVector
				}, this);
			}
		}
		drawVectors(vectors) {/*2d array*/
			vectors.forEach(function (vectors, i) {
				this.ctx.moveTo(this.initialX, this.initialY);
				this.ctx.beginPath();
				vectors.forEach(function (vector) {
					this.ctx.lineTo(this.initialX + this.axisSelectorX(vector), this.initialY - this.axisSelectorY(vector));
				}, this);
				this.ctx.stroke();
				const lastVector = vectors[vectors.length - 1];
				this.traces[[this.traceCounter, i]] = lastVector
			}, this);
			for (const key inthis.traces) {
				const vector = this.traces[key];
				this.ctx.fillStyle = "#FF0000";//redthis.ctx.fillRect(this.initialX + this.axisSelectorX(vector), this.initialY - this.axisSelectorY(vector), 1, 1);
			}
			this.ctx.strokeStyle = "#000000";
			this.ctx.beginPath();
			this.ctx.arc(this.clickPos.x + this.initialX, this.clickPos.y + this.initialY, 5, 0, 2 * Math.PI);
			this.ctx.stroke();
			if (this.mouseOver) {
				this.ctx.strokeStyle = "#00FF00";
				this.ctx.beginPath();
				this.ctx.arc(this.mousePos.x + this.initialX, this.mousePos.y + this.initialY, 10, 0, 2 * Math.PI);
				this.ctx.stroke();
			}
			this.traceCounter = (this.traceCounter + 1) % this.maxTraces;
		}
		drawPoints(points) {
			this.ctx.fillStyle = "#00ff00";//green
			points.forEach(function (point) {
				this.ctx.fillRect(this.initialX + this.axisSelectorX(point), this.initialY - this.axisSelectorY(point), 3, 3);
			}, this);
		}
	}
В классе Leg есть метод для получения текущих координат суставов. Вот эти координаты мы и будем отрисовывать.
Так-же я добавил отрисовку точек, в которых находилась нога в N последних тиков.
И наконец Worker, который будет запускать симуляцию:
classWorker{
		constructor(tickTime) {
			const self = this;
			this.phaseStep = 5;
			this.tickTime = tickTime;
			const tan30 = Math.tan(Math.PI / 6);
			const scale = 0.7;
			this.canvases = [
				new Canvas('canvasForward', 'yz Forward', function (v) { return v.y }, function (v) { return v.z }),
				new Canvas('canvasSide', 'xz Side', function (v) { return v.x }, function (v) { return v.z }),
				new Canvas('canvasTop', 'xy Top', function (v) { return v.x }, function (v) { return -v.y }),
				new Canvas('canvasIso', 'xyz Iso', function (v) { return v.x * scale + v.y * scale }, function (v) { return v.z * scale + v.x * tan30 * scale - v.y * tan30 * scale }),
			];
			this.bot = new Hexapod(this.phaseStep);
			this.phase = 0;
			this.focus = true;
			window.addEventListener('focus', function () {
				console.log('focus');
				self.focus = true;
			});
			window.addEventListener('blur', function () {
				console.log('blur');
				self.focus = false;
			});
			this.start();
		}
		tick(argument) {
			const canvasForward = this.canvases[0];
			const bot = this.bot;
			if (canvasForward.mouseOver) {
				bot.changeHeight(-canvasForward.mousePos.y);
			} else {
				bot.changeHeight(0);
			}
			const canvasTop = this.canvases[2];
			if (canvasTop.mouseOver) {
				bot.applyTurn(-canvasTop.mousePos.x, -canvasTop.mousePos.y);
			} else {
				bot.applyTurn(0, 0);
			}
			this.phase = (this.phase + this.phaseStep) % 360;
			bot.applyPhase(this.phase);
			bot.tick();
			const vectors = bot.getVectors();
			this.canvases.forEach(function (c) {
				c.clear(false);
				c.drawVectors(vectors);
				c.drawPoints(bot.debugPoints);
			});
		}
		start() {
			this.stop();
			this.interval = setInterval((function (self) {
				returnfunction () {
					if (self.focus) {
						self.tick();
					}
				}
			})(this), this.tickTime);
		}
		stop() {
			clearInterval(this.interval);
		}
	}
Result:
Isn't it pretty?
Here you can see that the trajectory of the movement of the legs is different from the circumference. Vertical movement resembles a stripped-down sine wave, and horizontal movement is linear. This should reduce the load on the legs.
Now a few explanations of what happens in the code.
How to teach a robot to turn?
For turning, I considered 2 situations:
If the robot is standing, the legs move in a circle.
The only thing is that movement along a circle would make the code with the current implementation much more difficult. Therefore, the legs move tangentially to the circumference.
When the robot moves, you need to implement something like the Ackermann steering geometry with a differential.
That is, the step length of the legs moving along a smaller radius is less. And the angle of rotation is greater.
To implement a change in the angle of rotation for each leg, I came up with the following algorithm:
1. We consider the angle from the initial position of the leg to the center of the robot:
const idleAngle = Math.atan2(dx, dy) + this.stepAngle;2. We consider the angle from the initial position of the leg to (the center of the robot + the offset that is responsible for the rotation is a variable parameter):
const turnAngle = Math.atan2(dx + centerX, dy + centerY);3. Turn the step on the difference of these angles:
leg.applyStepAngle(turnAngle - idleAngle);But that's not all. Still need to change the step length. Realization in the forehead - to multiply the step length by changing the distance to the center - had a fatal flaw - the external legs walked too wide and began to touch each other.
Therefore, it was necessary to complicate the implementation:
1. We consider the change in the distance to the center for each leg:
const mults = this.legs.map(leg =>Math.hypot(leg.step.idlePosition.y + leg.innerJoint.position.y, leg.step.idlePosition.x + leg.innerJoint.position.x)
	/ Math.hypot(leg.step.idlePosition.y + leg.innerJoint.position.y + centerY*.3, leg.step.idlePosition.x + leg.innerJoint.position.x + centerX*.3));
0.3 is the magic number
2. Find the relationship between the minimum and maximum change
const minMult = Math.min(...mults);
	const maxMult = Math.max(...mults);
	const mult = minMult / maxMult;
This multiplier reflects the difference between the minimum and maximum variation of the distance to the center. It is always less than 1, and if you multiply the length of a step on it, it will not increase when turning, even for legs external to the direction of rotation.
const hypIdle = Math.hypot(dx, dy);
	const hyp = Math.hypot(dx + centerX, dy + centerY);
	leg.step.length = this.stepLength * hyp / hypIdle * mult;
Here's how it works (gif 2 megabytes):
gif 2 megabytes
→ You can play around with the result here.
For a closer look, I recommend saving the contents in an html file and continuing in your favorite text editor.
In the next post I will tell you how I made it all work in Space Engineers.
Spoiler: in Programmable Block you can write on C # almost the latest version.