Lesson 1.1 - Actors and ActorSystem
- Transfer
- Tutorial

And here we are! Welcome to the first lesson.
In this tutorial, you will create your first actors and be introduced to the basics of Akka.NET .
Basic concepts / premises
In this first lesson, you will learn the basics of creating a console application with your first actor system and simple actors inside. We will create two actors, one for reading from the console, and one for writing after some simple processing.
What is an actor?
“Actor” can actually be imagined as an analogue of a person participating in the system. This is an object that can do something and communicate.
We will assume that you are already familiar with object-oriented programming (OOP). The actor model is very similar to object-oriented programming (OOP), in the actor model all of these are actors .
Repeat this constantly for yourself: all these are actors (everything is an actor) . All these are actors. All these are actors! When designing a system, imagine it as a hierarchy of people where tasks are divided and delegated between them until the task becomes so small that it can be performed by one actor.
At the moment, we suggest thinking like this: in OOP, you are trying to give each object a single, well-defined goal, right? Well, the model of actors is no different, only now the objects to which you give a specific purpose are called actors.
You can also read: What is an Akka.NET Actor ?
How do actors communicate?
Actors communicate with each other just like people do, through messaging. These posts are just old C # classes.
//this is a message!
public class SomeMessage
{
    public int SomeValue {get; set}
}
We’ll talk more about the message in the next lesson, so don’t worry about it now. All you need to know is that you send messages using the Tell () method to another actor.
//send a string to an actor
someActorRef.Tell("this is a message too!");
What can actors do?
Everything you can write. Really.
You program actors to process the messages that they receive and they can do whatever they need to work with them. Access the database, write to a file, modify internal variables or something else you need.
But in addition to processing the messages that he receives, actors can also do other things:
- Creating other actors
- Sending messages to other actors (such as the sender of the current message)
- Changing your own behaviors and the processing of the next messages they receive
Actors are inherently asynchronous (more on that in future lessons), and the actor model says nothing about which of the actors should do what or in what order. It is up to you.
What types of actors exist?
All actors are inherited from UntypedActor , but don’t worry about it now. We will cover different types of actors later.
In the first part, all your actors will be inherited from UntypedActor .
How can you create an actor?
There are two main things you need to know when creating an actor:
- All actors are created in a specific context.
- Actors need Props to create. Props is just an object that encapsulates the formula for creating this type of actor.
We’ll take a closer look at Props in the third lesson, so don’t worry about that now. We provided Props for you in the source code, so you just need to figure out how to use Props to create an actor.
What is an ActorSystem?
ActorSystem is a reference to the underlying system and Akka.NET framework. All actors live in the context of this system of actors. You will need to create your first actors from the context of this ActorSystem.
By the way, ActorSystem is a very heavy object: create it only one per application.
IIIiiii ... let's go! You have enough conceptual material now to dive and make your first actors.
Exercise
Let's go deeper.
Note: In the presented code there are sections marked “YOU NEED TO FILL IN HERE” - find these regions of the code and start filling them with the corresponding functionality to achieve the goal.
Running an empty project
Go to the DoThis folder and open WinTail in Visual Studio. The solution consists of a simple console application.
You will use this solution throughout the first part.
Install the latest Akka.NET package from NuGet
In the NuGet package manager console, write the following command:
Install-Package Akka
This will install the latest Akka.NET libraries that you will need to compile this example.
Then you should add using namespace to the very top of the Program.cs file
// in Program.cs
using Akka.Actor;
Create Your First ActorSystem
Go to Program.cs and add the following line:
MyActorSystem = ActorSystem.Create("MyActorSystem");
NOTE : When you create Props , ActorSystem or ActorRef you will very rarely see the new keyword . These objects must be created through the method factory built into Akka.NET. If you use the new keyword, maybe you are making a mistake.
Create ConsoleReaderActor and ConsoleWriterActor
The actor classes themselves already exist, but you will have to create the objects themselves.
Again, in Program.cs add just below where you created your ActorSystem :
var consoleWriterActor = MyActorSystem.ActorOf(Props.Create(() => new ConsoleWriterActor()));
var consoleReaderActor = MyActorSystem.ActorOf(Props.Create(() => new ConsoleReaderActor(consoleWriterActor)));
Let ConsoleReaderActor send a message to ConsoleWriterActor
It's time to get your actors to work.
To do this, you need to do:
1. Let ConsoleReaderActor send a message to the ConsoleWriterActor actor containing the content that we just read from the console.
// in ConsoleReaderActor.cs
_consoleWriterActor.Tell(read);
2. Let ConsoleReaderActor send a message to itself after sending a ConsoleWriterActor message. This will create a loop reading console commands.
// in ConsoleReaderActor.cs
Self.Tell("continue");
3. Send the initial message to ConsoleReaderActor in order to start reading from the console.
// in Program.cs
consoleReaderActor.Tell("start");
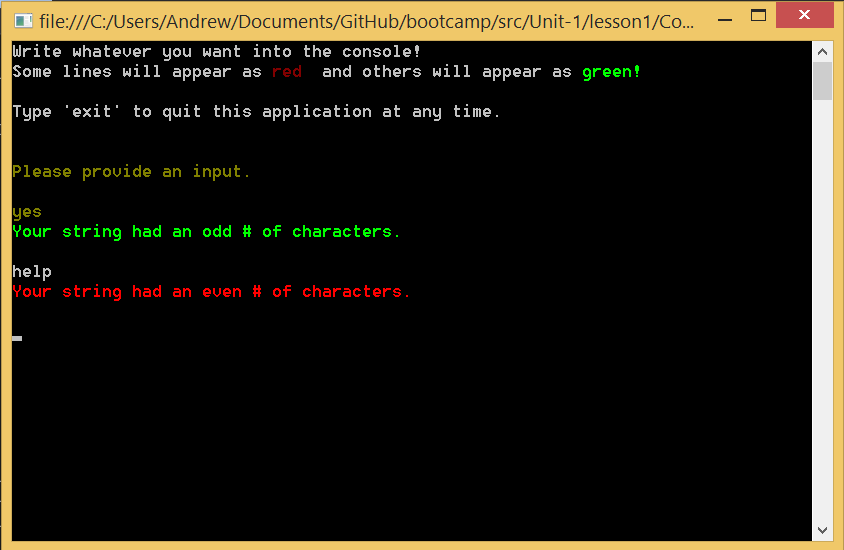
Step 5: Build and Run!
When you are finished with your changes, press F5 to compile and run the example in Visual Studio.
You will need to see something like this if everything is done correctly:
When you finish
Compare your code with the code in the Completed folder to see the instructions included in this example.