How to make an iOS game from an empty plastic bottle, picture and shader for the weekend
Once I asked my wife:
- We have no plans for the weekend?
“It seems not,” she answered.
“Then I pick this Swift one more time.”
- Poke around.
And so I set myself the task of writing a very simple iOS toy on Swift, without resorting to any ^. * C. * $ (My last experience with Swift was that 80% of the project was written on Objective-C (which, due to my C ++ thinking, has been reduced to the closest I know (Objective-C) + 2C-Objective = C)).
Given: One picture, some thoughts in my head.
It is necessary: The game was written before the alarm on Monday.
I will not describe in detail the things that have gone painlessly for me, I hope that they should not cause any misunderstanding in you either.
Do not ask why I write in pure OpenGL, and do not use any SpriteKit, I myself do not know the answer to this question.
So, I created a project, opened the editor of the main Storyboard, deleted everything here. I dragged GLKViewController onto the board, assigned it the GameViewController class, and its view - GameView:
Pay attention to the glClear call: this function takes an argument of type GLbitfield (UInt32). Ah, what a bad luck, because the constant is GL_COLOR_BUFFER_BIT of type Int32, and in Swift, implicit casting is forbidden. This fact, at first upset me, but then I realized that this magnificent ban makes the code of an inattentive programmer (yes, you are certainly attentive and you don’t need anything) be a little better.
We pressWin + R ⌘ + R, and what do we see? No, not an orange screen - white. That's because we forgot to initialize the OpenGLES context:
It would seem that it hindered doing this without our knowledge, and asking us only to indicate the version of OpenGLES in the storyboard editor? Let's not blow our cheeks: I think the developers of GLKit had good reasons for this.
Let's now try to load the texture. For this, I started this class:
The brief essence of initialization: we take UIImage (a general-purpose picture), turn it into CGIImage (a picture for processing ), create a CGContext (a drawing context with an available memory for us - imageData), draw our picture in this context, and then send it to video card memory using glTexImage2D. You probably have a couple of questions?
I probably had a couple of answers:
A small handful of syntactic sugar: an ampersand before a variable turns it into UnsafeMutablePointer (a class for working with C'sh pointers in Swift); and arrays are cast (implicit casting, detected!) to the UnsafePointer type.
I can not help but bring the shader class:
There is nothing interesting in it, just another attempt to shove non-C objects in C functions.
Let's draw two triangles on the entire screen so that for each pixel on the screen a fragment shader is executed that will create a small miracle.
Crazy pens begin! Take the old vertex shader that no one needs:
Now we take an empty plastic bottle (seriously?), Cut off its bottom and look through the funnel - this is how our game will somehow look. Calmly, now I will explain everything: we will take a conformal mapping of a square onto a plane arranged as follows:
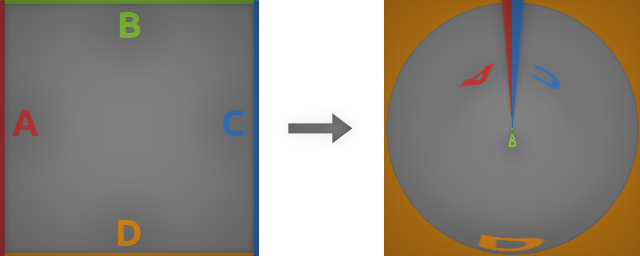
And we will try to vary it as if we are moving along a tunnel. Let's sketch for the fragment shader:
Yes, we just translated the rectangular coordinates of the image into polar and already achieved what we wanted, but not what we intended.
The fact is that if you imagine an endless tunnel and look along it, you will never see the end of the tunnel. He is somewhere in the infinitely distant center ... Wait a minute! Infinitely remote? You probably know how to get infinity at home without any tricky devices? Of course! In the center of the screen, we divide by zero:
Let's take a little walk through the tunnel now:
The variable pos.z increases over time, and we run along the tunnel forward. Now add the movement in the screen plane:
Some kind of nonsense came out, we just moved the drawn picture. Let's try to achieve the effect of perspective: imagine that you are inside the tunnel. Now start moving to the right then, everything to the right of the center will begin to flatten, and everything to the left will stretch:
What have you done, demon? Yes, I have a radius now - Barbie size!
And why does this transformation do what we need? dot is a function that counts the scalar product of two vectors, i.e.
Let's consider the first term: if the deviation pos.x and the coordinate newCoord.x, for which we consider the radius, have the same sign (then newCoord.x is behind the tunnel center in the direction of shift pos.x), then a positive value is subtracted from the radius, the radius in this direction decreases and flattenes the image; when pos.x and newCoord.x have a different sign, stretching occurs. A similar thing happens with y-coordinates. Although this is not an honest prospect, it is considered very fast; and with small deviations, the deception is almost invisible.
Now change the scenery. I'm already tired of looking at these concrete walls.
Add blur when driving at high speed:
We just averaged several images shifted along the direction of movement and got the effect of a fast ride:
Add traffic lights:
Just added some color inversely to the distance from the light source.
That's all with graphics, perhaps.
In order to implement game logic, make GameView a delegate of GLKViewController:
In the storyboard editor, right-click on GLKViewController and connect the delegate field to GLKView. Now, if you define the glkViewControllerUpdate method in the GameView, it will be called before rendering each frame. In it, I implemented the game logic for each frame: I entered several game states (acceleration, braking, pause) and for each state I described the behavior of the speed of movement and the position of the camera; made a reaction to the passage of a red light; added a loss when driving too slow.
After minor modifications, I posted the game on the AppStore . The process of publishing the game took longer than its creation: taking screenshots for all platforms, adding descriptions and tags, waiting for Apple's approval (oh, horror, 9 days!).
Swift has many convenient features compared to my main language; iOS development seemed to me quite enjoyable. So wait for new articles on this topic.
- We have no plans for the weekend?
“It seems not,” she answered.
“Then I pick this Swift one more time.”
- Poke around.
And so I set myself the task of writing a very simple iOS toy on Swift, without resorting to any ^. * C. * $ (My last experience with Swift was that 80% of the project was written on Objective-C (which, due to my C ++ thinking, has been reduced to the closest I know (Objective-C) + 2C-Objective = C)).
Task
Given: One picture, some thoughts in my head.
It is necessary: The game was written before the alarm on Monday.
I will not describe in detail the things that have gone painlessly for me, I hope that they should not cause any misunderstanding in you either.
Entities for working with OpenGL
Do not ask why I write in pure OpenGL, and do not use any SpriteKit, I myself do not know the answer to this question.
So, I created a project, opened the editor of the main Storyboard, deleted everything here. I dragged GLKViewController onto the board, assigned it the GameViewController class, and its view - GameView:
import UIKit
import GLKit
class GameView: GLKView {
    override func drawRect(rect: CGRect) {
        glClearColor(0.8, 0.4, 0.2, 1.0)
        glClear(GLbitfield(GL_COLOR_BUFFER_BIT))
    }
}
Pay attention to the glClear call: this function takes an argument of type GLbitfield (UInt32). Ah, what a bad luck, because the constant is GL_COLOR_BUFFER_BIT of type Int32, and in Swift, implicit casting is forbidden. This fact, at first upset me, but then I realized that this magnificent ban makes the code of an inattentive programmer (yes, you are certainly attentive and you don’t need anything) be a little better.
We press
class GameViewController: GLKViewController {
    var gameView: GameView!
    override func viewDidLoad() {
        super.viewDidLoad()
        gameView = self.view as GameView
        gameView.context = EAGLContext(API: .OpenGLES3)
        assert(gameView.context != nil, "Cannot to initialize OpenGL ES3.")
    }
}
It would seem that it hindered doing this without our knowledge, and asking us only to indicate the version of OpenGLES in the storyboard editor? Let's not blow our cheeks: I think the developers of GLKit had good reasons for this.
Let's now try to load the texture. For this, I started this class:
Texture class
class Texture {
    let name: GLuint = 0
    let width: GLsizei
    let height: GLsizei
    init(
        image: UIImage,
        wrapX: GLint = GL_CLAMP_TO_EDGE,
        wrapY: GLint = GL_CLAMP_TO_EDGE,
        filter: GLint = GL_NEAREST
        ) {
        let cgImage = image.CGImage
        width = GLsizei(CGImageGetWidth(cgImage));
        height = GLsizei(CGImageGetHeight(cgImage));
        let pixelCount = width * height
        var imageData = [UInt32](count: Int(pixelCount), repeatedValue:0)
        let imageContext = CGBitmapContextCreate(
            &imageData,
            UInt(width),
            UInt(height),
            8,
            UInt(width * 4),
            CGImageGetColorSpace(cgImage),
            CGBitmapInfo(CGImageAlphaInfo.PremultipliedLast.rawValue)
        )
        CGContextDrawImage(imageContext, CGRect(x: 0, y: 0, width: Int(width), height: Int(height)), cgImage);
        glGenTextures(1, &name);
        glBindTexture(GLenum(GL_TEXTURE_2D), name);
        glTexParameteri(GLenum(GL_TEXTURE_2D), GLenum(GL_TEXTURE_MIN_FILTER), filter);
        glTexParameteri(GLenum(GL_TEXTURE_2D), GLenum(GL_TEXTURE_MAG_FILTER), filter);
        glTexParameteri(GLenum(GL_TEXTURE_2D), GLenum(GL_TEXTURE_WRAP_S), wrapX);
        glTexParameteri(GLenum(GL_TEXTURE_2D), GLenum(GL_TEXTURE_WRAP_T), wrapY);
        glTexImage2D(GLenum(GL_TEXTURE_2D), 0, GL_RGBA, GLsizei(width), GLsizei(height), 0, GLenum(GL_RGBA), GLenum(GL_UNSIGNED_BYTE), imageData);
    }
    deinit {
        glDeleteTextures(1, [name])
    }
}
The brief essence of initialization: we take UIImage (a general-purpose picture), turn it into CGIImage (a picture for processing ), create a CGContext (a drawing context with an available memory for us - imageData), draw our picture in this context, and then send it to video card memory using glTexImage2D. You probably have a couple of questions?
- Oh my globe! Why so many steps? Can't you get getData from UIImage?
- It pains me to look at these GLenum (..). Why is Swift so cruel?
I probably had a couple of answers:
- Nope, you can’t. And this is the shortest chain of transformations after which you can access bytes of the picture, which I was able to dazzle using standard functions.
- I think in some update Apple will fix these automatic conversions from C'sh code to Swift, and the types of function arguments will begin to be consistent with the types of real arguments, but for now, be patient.
A small handful of syntactic sugar: an ampersand before a variable turns it into UnsafeMutablePointer (a class for working with C'sh pointers in Swift); and arrays are cast (implicit casting, detected!) to the UnsafePointer type.
I can not help but bring the shader class:
Class shader
class Shader {
    let handle: GLuint
    init(name: String, type: GLint) {
        let file = NSBundle.mainBundle().pathForResource(name, ofType: (type == GL_VERTEX_SHADER ? "vert" : "frag"))!
        let source = NSString(contentsOfFile: file, encoding: NSUTF8StringEncoding, error: nil)!
        var sourceCString = source.UTF8String
        var sourceLength = GLint(source.length)
        handle = glCreateShader(GLenum(type))
        glShaderSource(handle, 1, &sourceCString, &sourceLength)
        glCompileShader(handle);
        var compileSuccess = GLint(-42)
        glGetShaderiv(handle, GLenum(GL_COMPILE_STATUS), &compileSuccess)
        if (compileSuccess == GL_FALSE) {
            var log = [GLchar](count:1024, repeatedValue: 0)
            glGetShaderInfoLog(handle, GLsizei(log.count), nil, &log)
            NSLog("\nShader '\(name)' is wrong: [\n\(NSString(bytes: log, length: log.count, encoding: NSUTF8StringEncoding)!)\n]")
        }
    }
    deinit {
        glDeleteShader(handle)
    }
}
There is nothing interesting in it, just another attempt to shove non-C objects in C functions.
Shaders
Let's draw two triangles on the entire screen so that for each pixel on the screen a fragment shader is executed that will create a small miracle.
Crazy pens begin! Take the old vertex shader that no one needs:
attribute vec2 vertex;
varying vec2 coord = vertex;
void main(void) {
    gl_Position = vec4(vertex, 0., 1.);
}
Now we take an empty plastic bottle (seriously?), Cut off its bottom and look through the funnel - this is how our game will somehow look. Calmly, now I will explain everything: we will take a conformal mapping of a square onto a plane arranged as follows:
And we will try to vary it as if we are moving along a tunnel. Let's sketch for the fragment shader:
uniform sampler2D img;
varying vec2 coord;
float pi2 = 6.2832;
void main() {
  float r = length(coord);
  float a = atan( coord.y , coord.x );
  vec2 uv = vec2(a/pi2, r);
  gl_FragColor = texture2D(img, uv);
}
Yes, we just translated the rectangular coordinates of the image into polar and already achieved what we wanted, but not what we intended.
Image in polar coordinates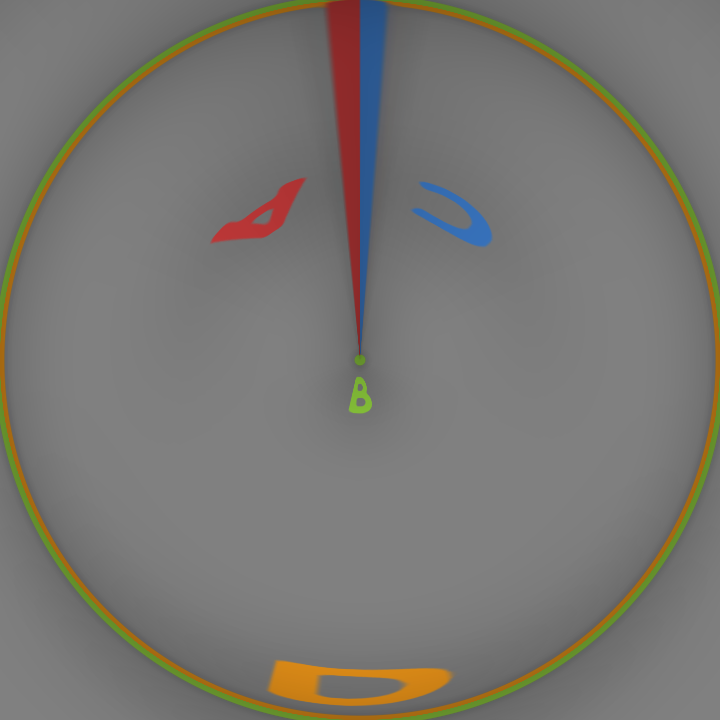
The fact is that if you imagine an endless tunnel and look along it, you will never see the end of the tunnel. He is somewhere in the infinitely distant center ... Wait a minute! Infinitely remote? You probably know how to get infinity at home without any tricky devices? Of course! In the center of the screen, we divide by zero:
vec2 uv = vec2(a/pi2, 1./r);
Tunnel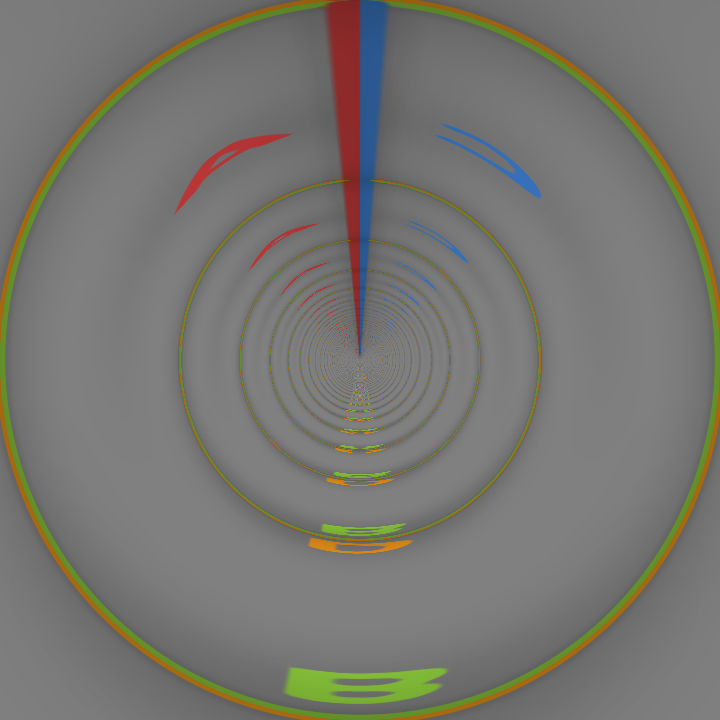
Let's take a little walk through the tunnel now:
gl_FragColor = texture2D(img, uv + uv(0, pos.z));
The variable pos.z increases over time, and we run along the tunnel forward. Now add the movement in the screen plane:
vec2 newCoord = coord + pos.xy;
That's what happened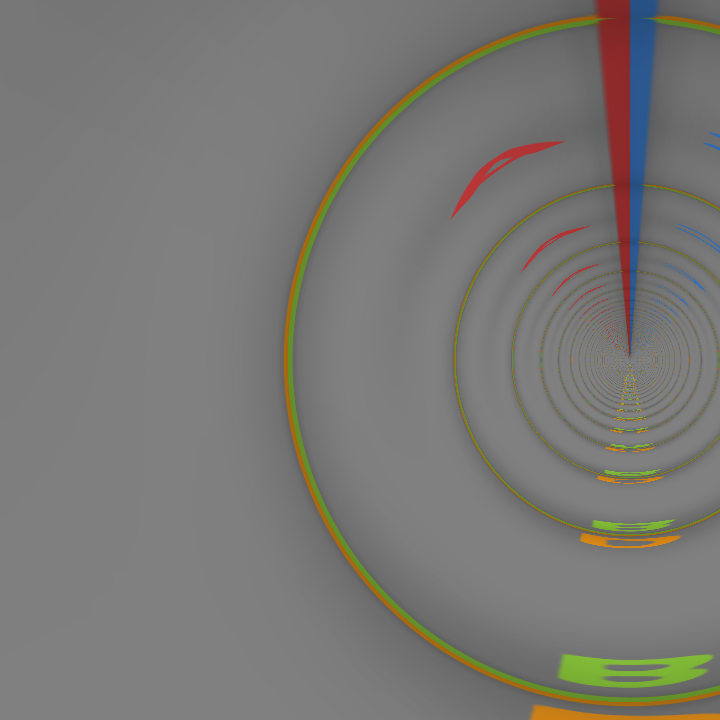
Some kind of nonsense came out, we just moved the drawn picture. Let's try to achieve the effect of perspective: imagine that you are inside the tunnel. Now start moving to the right then, everything to the right of the center will begin to flatten, and everything to the left will stretch:
float r = length(newCoord) - dot(newCoord, pos);
What have you done, demon? Yes, I have a radius now - Barbie size!
Strange radius
And why does this transformation do what we need? dot is a function that counts the scalar product of two vectors, i.e.
dot(newCoord, pos) = newCoord.x * pos.x + newCoord.y * pos.yLet's consider the first term: if the deviation pos.x and the coordinate newCoord.x, for which we consider the radius, have the same sign (then newCoord.x is behind the tunnel center in the direction of shift pos.x), then a positive value is subtracted from the radius, the radius in this direction decreases and flattenes the image; when pos.x and newCoord.x have a different sign, stretching occurs. A similar thing happens with y-coordinates. Although this is not an honest prospect, it is considered very fast; and with small deviations, the deception is almost invisible.
Now change the scenery. I'm already tired of looking at these concrete walls.
A change of scenery
Add blur when driving at high speed:
float ds = speed / blurCount;
for (float dx = -speed; dx < speed; dx += ds)
  gl_FragColor += texture2D(img, uv + vec2(0, pos.z + dx));
gl_FragColor /= gl_FragColor.a;
We just averaged several images shifted along the direction of movement and got the effect of a fast ride:
Blyuyuyuyur!

Add traffic lights:
gl_FragColor += texture2D(img, uv + vec2(0, pos.z + dx)) + lightColor / distance(uv, lightPos);
Just added some color inversely to the distance from the light source.
That's what happened

That's all with graphics, perhaps.
Game cycle
In order to implement game logic, make GameView a delegate of GLKViewController:
class GameView: GLKView, GLKViewControllerDelegate { /*...*/ }
In the storyboard editor, right-click on GLKViewController and connect the delegate field to GLKView. Now, if you define the glkViewControllerUpdate method in the GameView, it will be called before rendering each frame. In it, I implemented the game logic for each frame: I entered several game states (acceleration, braking, pause) and for each state I described the behavior of the speed of movement and the position of the camera; made a reaction to the passage of a red light; added a loss when driving too slow.
All
After minor modifications, I posted the game on the AppStore . The process of publishing the game took longer than its creation: taking screenshots for all platforms, adding descriptions and tags, waiting for Apple's approval (oh, horror, 9 days!).
Swift has many convenient features compared to my main language; iOS development seemed to me quite enjoyable. So wait for new articles on this topic.