WEB Server based on ENC28j60 + Arduino - it can't be easier
Hello.
As many people hear that it is necessary to create a WEB server, it immediately becomes uncomfortable, they are trying in every possible way to move away from this topic by applying other options for managing and monitoring their devices. But the Internet and the network are already in almost every device. So what is your creation worse?
So if you are interested - go ahead.
The Wolf is not as scary as it is painted. Among us there are many specialists, but also many newcomers. Learning is never too late, I myself learn a lot, and I learn a lot in practice. I hope this article will help beginners or refresh the memory of beginners.
Based on the popular module with the controller ENC28j60.

And also I took Arduino UNO (also possible Nano or Pro Mini). All of them work on ATmega328.
In this article I will show the basics of creating a WEB server on the simplest libraries.
In this case:
#include “etherShield.h”
#include “ETHER_28J60.h”
They are easy to understand - but there are also less options. For routine monitoring and load management - more than enough.
Let's look at what we need for this.

First, the libraries are being initialized.
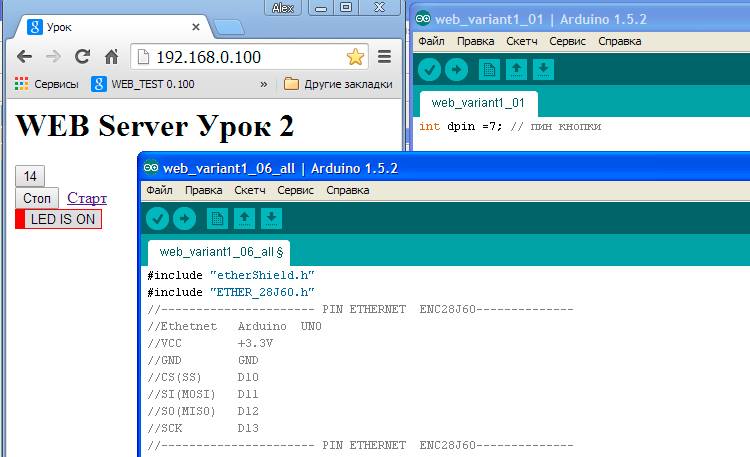
Next, I indicated the pins for connecting the module with the ENC28j60 controller. We also need to specify the parameters of our network device. To do this, specify the MAC address - remember, it should not coincide with the MAC address of your network devices. Likewise, the IP Address - must be individual - but be on your subnet.
For example, you have a router (192,168,0,1), your PC (192,168,0,5), then your device may be (192,168,0,100).
For example, you have a router (192,168,4,1), your PC (192,168,4,10), then your device may be (192,168,4,100).
Next, you need to specify the port. The default is 80 - since Web browsers by default poll it (see the port change test in the video below).
Next is ETHER_28J60 ethernet; - point to the name of the object to be accessed (ethernet), below in the program we will use this name.
Next We need to initialize the network controller - we apply all the settings for addresses and ports.
Well, here I think the most difficult and not interesting ended ...
Further in the main cycle of the program we must set a condition that will check if there is a request for our IP address? .. If there is, then send the lines of our page, and the browser will already give it the familiar look. Let's see an example:

A highlighted line creates a large test on a page, it is easy to edit, and such lines can be added as needed (but everything depends on the amount of controller flash memory).
Ethernet.respond () command sends all our lines of the site to the browser from which they made a request to the site (in this case, 192.168.0.100).
But if you noticed that this site does not have a name (just an IP address). Do not worry, this is fixable if you add one line:

Now ... now it’s better.
Further, adding lines, we will add objects to the page that will help us display information or manage it.
Let's start with the link, when you click on it, we will send a request to the controller with the test (which we will need later for processing).

The red arrow is the name of the button, and the blue arrow we indicate the text in the request when you click on the link. So, if we click on the “Stop” link, we will send a request to our server: “192.168.0.100/stop” - where “stop” will be the request text.
Next, we consider the same option with a button only:

The attributes necessary for the browser to display the buttons are added. When you click on that, a request with the “start” test will already be sent. I think everything is clear here.
For beauty lovers, you can add parameters and create an interesting button:

For the next option, we will need variables, we will add them at the beginning of the sketch:

Now we will display the table on Our page:

The table attribute is used to designate the object. Next, I emphasized in red (tr) the outer borders of the table and in blue the inner borders. Note that they are pairwise, and in the center of the pair is your value or variable (for example ves1 or ves2). You may also notice that the pair creates bold text and plain text. At the end, the table object ends with / table.
I think with the display of objects on the page it’s enough to create not complicated WEB pages (in more detail and clearly you can see below in the video tutorials for beginners).
But how to process the request - for this we slightly modify our condition from the very beginning, adding a variable for the string. We also create for example two conditions for processing requests: 1st is an empty request (192.168.0.100); 2nd is a request with the text “start” (192.168.0.100/start)

Depending on the request sent to the server, the site will be displayed on the browser according to the specified lines:

This is how you can make dynamic pages that change, and display various information in depending on the parameters of variables or queries from links and buttons.
In more detail and clearly you can see everything mentioned above in the Video tutorials for beginners:
Links to example sketches (The library in the first example):
www.facebook.com/download/1779869258903901/web_urok_01.rar
www.facebook.com/download/351288838383944/web_urok_02.rar
www.facebook.com/download/435653776600017/web_urok_03. rar
I tried to present the material in accessible words without using complex terms.
I hope this article will help many beginners to create their own web server. For more advanced, there will be videos from other libraries ... more complicated.