Flickr API in Android App. Authorization
Hi, habra people!
I want to share with you a little experience of using the Flickr API in Android applications and tell you about the authorization of the Flickr user. Which in the future can be used for example to display a list of albums and images.
First of all, we need to get an API Key, we will use applications not for commercial purposes, for registration we follow the link Create an App .

We are asked to enter "Name", "Purpose" and "Rights Agreements", we send our data and in result we get the API Key and API Secret. We need them in the future to form a request to the server.
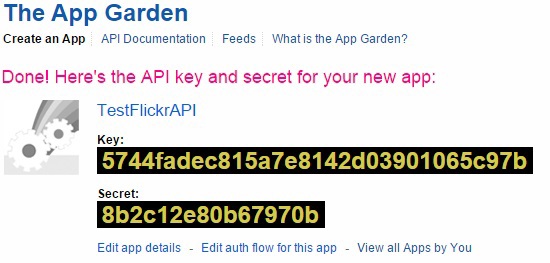
After that we need to edit some data, in the same window we go to Edit auth flow for this app .

Descriptions and logo are not interesting to us, you can enter at will. In the Callback URL field, we definitely need to specify a callback address, which we will use to return to our Activity. In my case, I ask appforflickr: // callback . In bolka<intent-filter> this will look like this:
Next, go directly to the construction of the application itself.
In the application manifest, we add “android.permission.INTERNET” and the <intent-filter> block as a result we get:
To authorize users in the application, we will launch the Activity from the WebView. But first, we will create the login address. The template looks like this:
[api_sig] is the signature, it includes the Secret received during the registration of the application and the list of arguments in alphabetical order, name and values.
In our case, the API Key: 5744fadec815a7e8142d03901065c97b , API Secret: 8b2c12e80b67970b , write access rights , the signature is a string of:
and get the values [api_sig].
As a result, the address for user authorization will be as follows:
Add conditions to onCreate () to get a frob:
After processing, we call the flickr.auth.getToken method from the API to get the token and nsid , which will be needed for further requests, as well as the username and fullname of the user.
To send requests, create a class HttpRequest:
Class HttpClientHelper to get the HttpClient:
Class InputStreamConverter to convert an InputStream to a String:
Address to get token:
We make another change to onCreate () to send the request:
Further, the answer is:
I hope my article will be useful to someone.
Ps. This is my first post on Habré, so sorry for the few words and do not judge strictly.
I want to share with you a little experience of using the Flickr API in Android applications and tell you about the authorization of the Flickr user. Which in the future can be used for example to display a list of albums and images.
Application registration
First of all, we need to get an API Key, we will use applications not for commercial purposes, for registration we follow the link Create an App .
We are asked to enter "Name", "Purpose" and "Rights Agreements", we send our data and in result we get the API Key and API Secret. We need them in the future to form a request to the server.
After that we need to edit some data, in the same window we go to Edit auth flow for this app .
Descriptions and logo are not interesting to us, you can enter at will. In the Callback URL field, we definitely need to specify a callback address, which we will use to return to our Activity. In my case, I ask appforflickr: // callback . In bolka<intent-filter> this will look like this:
...
<dataandroid:scheme="appforflickr"android:host="callback"/>
...
Next, go directly to the construction of the application itself.
In the application manifest, we add “android.permission.INTERNET” and the <intent-filter> block as a result we get:
<?xml version="1.0" encoding="utf-8"?><manifestxmlns:android="http://schemas.android.com/apk/res/android"package="test.testflickrapi" ><uses-permissionandroid:name="android.permission.INTERNET"/><applicationandroid:allowBackup="true"android:icon="@drawable/ic_launcher"android:label="@string/app_name"android:theme="@style/AppTheme" ><activityandroid:name=".ui.activities.MainActivity"android:label="@string/app_name" ><intent-filter><actionandroid:name="android.intent.action.MAIN" /><categoryandroid:name="android.intent.category.LAUNCHER" /></intent-filter><intent-filter><actionandroid:name="android.intent.action.VIEW"/><categoryandroid:name="android.intent.category.DEFAULT"/><categoryandroid:name="android.intent.category.BROWSABLE"/><dataandroid:scheme="appforflickr"android:host="callback"/></intent-filter></activity></application></manifest>Creating a link to authorize the user
To authorize users in the application, we will launch the Activity from the WebView. But first, we will create the login address. The template looks like this:
http://flickr.com/services/auth/?api_key=[api_key]&perms=[perms]&api_sig=[api_sig]
- read - permissions to read personal information
- write - permissions to add and edit photos and information (includes 'read')
- delete - permissions to delete photos (includes 'read' and 'write')
[api_sig] is the signature, it includes the Secret received during the registration of the application and the list of arguments in alphabetical order, name and values.
In our case, the API Key: 5744fadec815a7e8142d03901065c97b , API Secret: 8b2c12e80b67970b , write access rights , the signature is a string of:
secret + 'api_key' + [api_key] + 'perms' + [perms]
publicstaticfinal String md5SumOfString(final String s){
        try {
            MessageDigest digest = java.security.MessageDigest.getInstance("MD5");
            digest.update(s.getBytes());
            byte messageDigest[] = digest.digest();
            StringBuffer hexString = new StringBuffer();
            for (int i = 0; i < messageDigest.length; i++)
                hexString.append(Integer.toHexString(0xFF & messageDigest[i]));
            return hexString.toString();
        } catch (NoSuchAlgorithmException e) {
            e.printStackTrace();
        }
        return"";
    }
and get the values [api_sig].
As a result, the address for user authorization will be as follows:
http://www.flickr.com/services/auth/?api_key=9a0554259914a86fb9e7eb014e4e5d52&perms=write&api_sig=b8d7c1ae026d5f86f1f44944f5257f3
startActivity(new Intent(Intent.ACTION_VIEW, Uri.parse(url)));
appforflickr://callback?frob=72157650137623777-b09eae52121bf8ad-130818926
Add conditions to onCreate () to get a frob:
Uri uri = getIntent().getData();
if (uri != null) {
    String frob = uri.getQueryParameter("frob");
} else
	startActivity(new Intent(Intent.ACTION_VIEW, Uri.parse(url)));
After processing, we call the flickr.auth.getToken method from the API to get the token and nsid , which will be needed for further requests, as well as the username and fullname of the user.
To send requests, create a class HttpRequest:
publicclassHttpRequestextendsAsyncTask<String, String, String> {
    publicstaticfinal String TAG = HttpRequest.class.getSimpleName();
    @OverrideprotectedvoidonPreExecute(){
        Log.d(TAG, "START");
    }
    @Overrideprotected String doInBackground(String... params){
        String result = "";
        try {
            String uri = params[0];
            HttpGet httpGet = new HttpGet(uri);
            HttpResponse response = HttpClientHelper.getHttpClient().execute(httpGet);
            HttpEntity entity = response.getEntity();
            if (entity != null) {
                InputStream inStream = entity.getContent();
                result = InputStreamConverter.convertStreamToString(inStream);
                inStream.close();
            }
            return result;
        } catch (IllegalStateException e) {
            return result;
        } catch (ClientProtocolException e) {
            return result;
        } catch (IOException e) {
            return result;
        }
    }
    @OverrideprotectedvoidonPostExecute(String result){
        Log.d(TAG, "STOP");
    }
}
Class HttpClientHelper to get the HttpClient:
publicclassHttpClientHelper{
    privatestatic HttpClient httpClient = null;
    privatestaticfinalint REGISTRATION_TIMEOUT = 30 * 1000;
    privatestaticfinalint WAIT_TIMEOUT = 30 * 1000;
    privateHttpClientHelper(){}
    publicstaticsynchronized HttpClient getHttpClient(){
        if (httpClient == null) {
            HttpParams params = new BasicHttpParams();
            HttpProtocolParams.setVersion(params, HttpVersion.HTTP_1_1);
            HttpProtocolParams.setContentCharset(params, HTTP.DEFAULT_CONTENT_CHARSET);
            HttpProtocolParams.setUseExpectContinue(params, true);
            ConnManagerParams.setTimeout(params, WAIT_TIMEOUT);
            HttpConnectionParams.setConnectionTimeout(params, REGISTRATION_TIMEOUT);
            HttpConnectionParams.setSoTimeout(params, WAIT_TIMEOUT);
            SchemeRegistry schemeReg = new SchemeRegistry();
            schemeReg.register(new Scheme("http", PlainSocketFactory.getSocketFactory(), 80));
            schemeReg.register(new Scheme("https", SSLSocketFactory.getSocketFactory(), 443));
            ClientConnectionManager connectionMgr = new ThreadSafeClientConnManager(params, schemeReg);
            httpClient = new DefaultHttpClient(connectionMgr, params);
        }
        return httpClient;
    }
}
Class InputStreamConverter to convert an InputStream to a String:
publicclassInputStreamConverter{
    privateInputStreamConverter(){}
    publicstatic String convertStreamToString(InputStream inputStream){
        BufferedReader reader = new BufferedReader(new InputStreamReader( inputStream));
        StringBuilder builder = new StringBuilder();
        String line = null;
        try {
            while ((line = reader.readLine()) != null) {
                builder.append(line + "\n");
            }
        } catch (IOException e) {
            e.printStackTrace();
        } finally {
            try {
                inputStream.close();
            } catch (IOException e) {
                e.printStackTrace();
            }
        }
        return builder.toString();
    }
}
Address to get token:
https://api.flickr.com/services/rest/?method=flickr.auth.getToken&api_key=9a0554259914a86fb9e7eb014e4e5d52&frob=72157650137623777-b09eae52121bf8ad-130818926&format=json&nojsoncallback=1&perms=write&api_sig=8fd09b55f670ec9a4ba07c076e520ae8
We make another change to onCreate () to send the request:
Uri uri = getIntent().getData();
if (uri != null) {
    String frob = uri.getQueryParameter("frob");
    String url = "..."; // Наш сформированый адрес для получения token
	String response = "";
	HttpRequest httpRequest = new HttpRequest(this);
	httpRequest.execute(url);
	try {
		response = httpRequest.get();
	} catch (InterruptedException | ExecutionException e) {
		e.printStackTrace();
	}
} else
	startActivity(new Intent(Intent.ACTION_VIEW, Uri.parse(url)));
Further, the answer is:
{"auth":{"token":{"_content":"12134650097774510-014feda8303a4a64"},"perms":{"_content":"write"},"user":{"nsid":"230211065@N05","username":"user","fullname":"User Alex"}},"stat":"ok"}
I hope my article will be useful to someone.
Ps. This is my first post on Habré, so sorry for the few words and do not judge strictly.