Programming Arduino in pure C
In the life of an arduino, sooner or later a moment comes when in a regular development environment it becomes crowded. If the sketches no longer have enough memory, you need hard realtime and work with interruptions or just want to be closer to the hardware - then it's time to switch to C. Experienced electronics engineers at the mention of Arduino frown scornfully and send the newcomer to the radio store for a soldering iron. This may not be the worst advice, but we will not follow it for now. If we discard the Arduino IDE and the wiring / processing language, we will have in our hands an excellent debugging board, already equipped with everything necessary for the microcontroller to work. And, importantly, a bootloader has already been sewn into the controller’s memory, which allows downloading firmware without using a programmer.
To program in C, we need the AVR GCC Toolchain.
Windows:
Install WinAVR , which contains everything you need.
Debian and Ubuntu: MacOs X: Installing CrossPack for AVR Development We also need the installed Arduino IDE, as it contains the avrdude utility, which is needed to download the firmware to the controller. CrossPack also contains avrdude, but the version coming with it does not know how to work with Arduino. After everything is installed, we will create our first project. First, write a Makefile . It will allow us to avoid entering long commands manually at each compilation and firmware download.
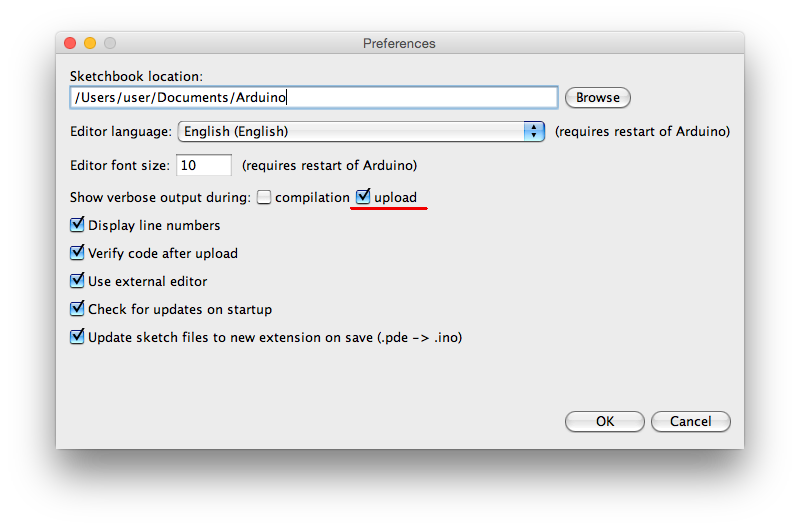
In this file we need to enter our command to run avrdude. On different systems, it will look different. To find out your version, run the Arduino IDE and check the box “Show verbose output during upload”.
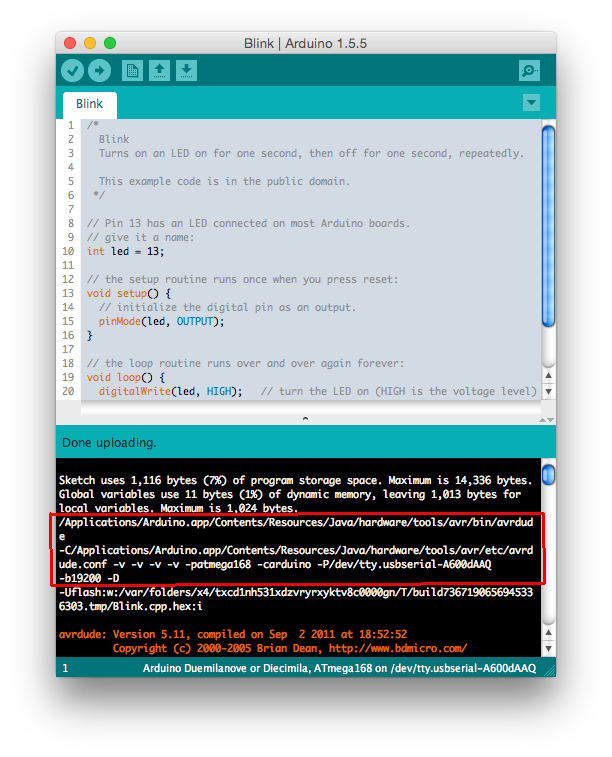
Now load any sketch into Arduino and watch the messages displayed at the bottom of the window. We find avrdude call there, copy everything except the -Uflash parameter and paste it into the Makefile after “AVRDUDE =”.
A short note: all indentation in the Makefile is done with tabs (Tab key). If your text editor replaces these characters with spaces, the make command will refuse to build the project.
Now let's create the main.c file - actually the text of our program, in which we traditionally blink with the LED.
Our project is ready. Open the console in the directory of our project and enter the “make” command:
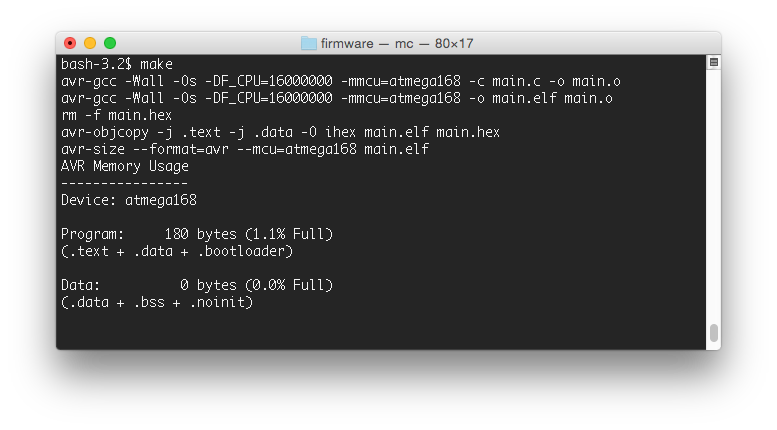
As you can see, the size of the resulting firmware is only 180 bytes. A similar Arduino sketch takes 1116 bytes in the controller's memory.
Now let's go back to the console and enter “make flash” to load the compiled file into the controller:
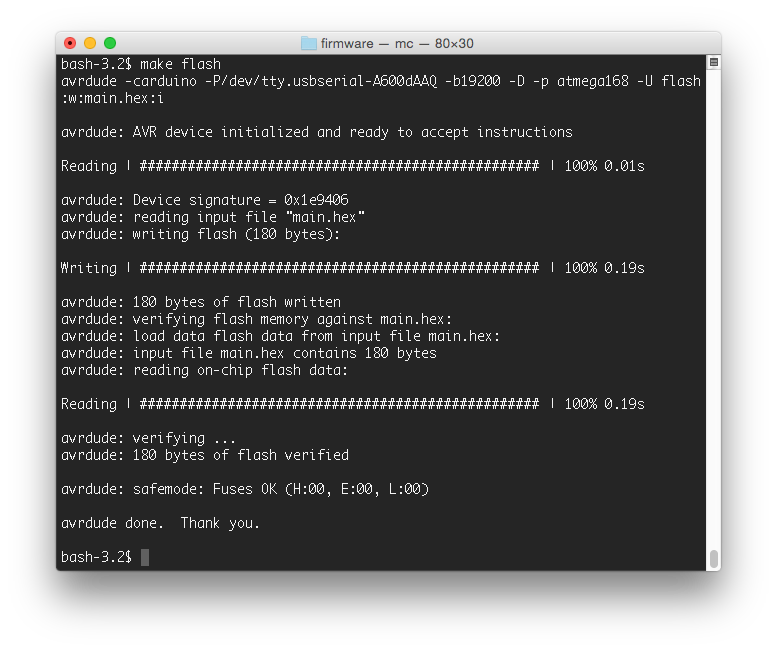
If the download went without errors, then the LED connected to the 13th contact of the board will blink joyfully. Sometimes avrdude can not find the board or falls off by timeout - in this case, moving the USB cable can help. Also, in order to avoid access conflicts to the board, do not forget to close the Arduino IDE before the make flash command.
Perhaps many of the things described in this article will seem obvious to seasoned developers. I tried to describe the process in the most understandable language for the novice arduinoist and collect in one place the information that I managed to get from various sources, and verified experimentally. Maybe this article will save someone a couple of hours of time.
Good luck in mastering microcontrollers!
Happy New Year!
To program in C, we need the AVR GCC Toolchain.
Windows:
Install WinAVR , which contains everything you need.
Debian and Ubuntu: MacOs X: Installing CrossPack for AVR Development We also need the installed Arduino IDE, as it contains the avrdude utility, which is needed to download the firmware to the controller. CrossPack also contains avrdude, but the version coming with it does not know how to work with Arduino. After everything is installed, we will create our first project. First, write a Makefile . It will allow us to avoid entering long commands manually at each compilation and firmware download.
sudo apt-get install gcc-avr binutils-avr avr-libc
#Контроллер, установленный на плате. Может быть другим, например atmega328
DEVICE     = atmega168
#Тактовая частота 16 МГц
CLOCK      = 16000000
#Команда запуска avrdude. Ее нужно скопировать из Arduino IDE.
AVRDUDE = /Applications/Arduino.app/Contents/Resources/Java/hardware/tools/avr/bin/avrdude -C/Applications/Arduino.app/Contents/Resources/Java/hardware/tools/avr/etc/avrdude.conf -carduino -P/dev/tty.usbserial-A600dAAQ -b19200 -D -p atmega168
OBJECTS    = main.o
COMPILE = avr-gcc -Wall -Os -DF_CPU=$(CLOCK) -mmcu=$(DEVICE)
all:	main.hex
.c.o:
	$(COMPILE) -c $< -o $@
.S.o:
	$(COMPILE) -x assembler-with-cpp -c $< -o $@
.c.s:
	$(COMPILE) -S $< -o $@
flash:	all
	$(AVRDUDE) -U flash:w:main.hex:i
clean:
	rm -f main.hex main.elf $(OBJECTS)
main.elf: $(OBJECTS)
	$(COMPILE) -o main.elf $(OBJECTS)
main.hex: main.elf
	rm -f main.hex
	avr-objcopy -j .text -j .data -O ihex main.elf main.hex
	avr-size --format=avr --mcu=$(DEVICE) main.elf
In this file we need to enter our command to run avrdude. On different systems, it will look different. To find out your version, run the Arduino IDE and check the box “Show verbose output during upload”.

Now load any sketch into Arduino and watch the messages displayed at the bottom of the window. We find avrdude call there, copy everything except the -Uflash parameter and paste it into the Makefile after “AVRDUDE =”.

A short note: all indentation in the Makefile is done with tabs (Tab key). If your text editor replaces these characters with spaces, the make command will refuse to build the project.
Now let's create the main.c file - actually the text of our program, in which we traditionally blink with the LED.
#include
#include
#define LED_PIN 5
int main() {
	DDRB |= 1 << LED_PIN;
	while(1) {
		PORTB |= 1 << LED_PIN;
		_delay_ms(1000);
		PORTB &= ~(1 << LED_PIN);
		_delay_ms(1000);
	}
	return 0;
}
Our project is ready. Open the console in the directory of our project and enter the “make” command:

As you can see, the size of the resulting firmware is only 180 bytes. A similar Arduino sketch takes 1116 bytes in the controller's memory.
Now let's go back to the console and enter “make flash” to load the compiled file into the controller:

If the download went without errors, then the LED connected to the 13th contact of the board will blink joyfully. Sometimes avrdude can not find the board or falls off by timeout - in this case, moving the USB cable can help. Also, in order to avoid access conflicts to the board, do not forget to close the Arduino IDE before the make flash command.
Perhaps many of the things described in this article will seem obvious to seasoned developers. I tried to describe the process in the most understandable language for the novice arduinoist and collect in one place the information that I managed to get from various sources, and verified experimentally. Maybe this article will save someone a couple of hours of time.
Good luck in mastering microcontrollers!
Happy New Year!