BLE by Nordic Semiconductor. Getting started with the stack using the nRF51822 chip
Hello.
For some time I had the idea of writing an article about this stack, its features and application using the nRF51822 chip. And the recent publication " BLE stack from TI " made me sit down and try to turn the idea into something tangible.
Nordic Semiconductor provides a very interesting, in my opinion, solution. On the one hand, a powerful chip based on the ARM Cortex-M0 core, on the other hand, the constantly evolving software of the stack and the set of libraries included in the SDK.
Unfortunately, there are no articles on HLE on BLE topics on the NORDIC, as in other cases, there are practically none in RuNet, so I hope that the article will be useful to those who begin to use the products of this company in the part related to BLE, as well as those who are fond of Bluetooth technology and BLE in particular.
1. Iron
The nRF51822 chip we are considering in terms of memory size is presented in 3 versions:
- 256KB flash and 16KB of RAM;
- 128KB flash and 16KB of RAM;
- 256KB flash and 32KB RAM.
In this case, the RAM is divided into blocks and each block has its own power management. I focus on this, because when programming the chip, you need to know that the top half of the RAM is always used for the application, while the lower half is always used by the stack.
Depending on the version of the stack, the client software download address may also change. It is also necessary to pay attention to this. If the software download address is incorrect, the programmer will give an error, the description of which will never understand why the chip could not be flashed. The software download address is specified in the specification for each version of the stack.
So, if you decide to work with BLE from NORDIC, then first of all you need to purchase one of the debugging kits. Here are some of them:
- nRF51822 Evaluation Kit(EK) is an independent evaluation and prototyping platform based on the nRF51822 chip.

The kit includes:
- board with a chip, with a pair of buttons and a pair of LEDs. On the board is a programmer from Segger, which has its own unique number, which allows us to program our chip, debug it, and, importantly, which allows us to use UART to communicate nRF51822 with a computer via USB;
- USB dongle, also with nRF51822 chip and Segger programmer, which has special NORDIC firmware and is used to communicate with the board.
- nRF51822 Development Kit (DK) - dependent on the “Starter Kit” platform, makes it possible to create full-fledged applications using not only BLE, but also all the resources of the nRF51822 chip, as a microcontroller.
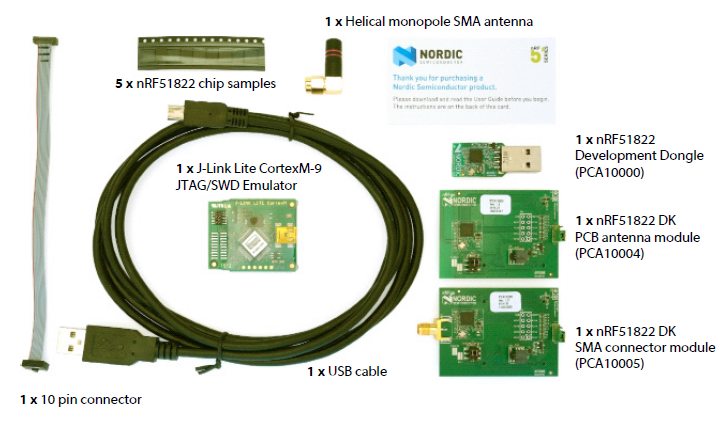
The kit includes:
- board with nRF51822 and with PCB antenna;
- board with nRF51822 and with connector for antenna;
- USB dongle is the same as in EK;
- 5 nRF51822 chips;
- programmer
By the way, “dependence” on the “Starter Kit” is not critical if you know how to use a soldering iron or if you have a breadboard and wiring.
- nRF51822 Starter Kit (SK) is a kind of “motherboard”, to which you can connect EK and DK to use all the features of the nRF51822 chip.
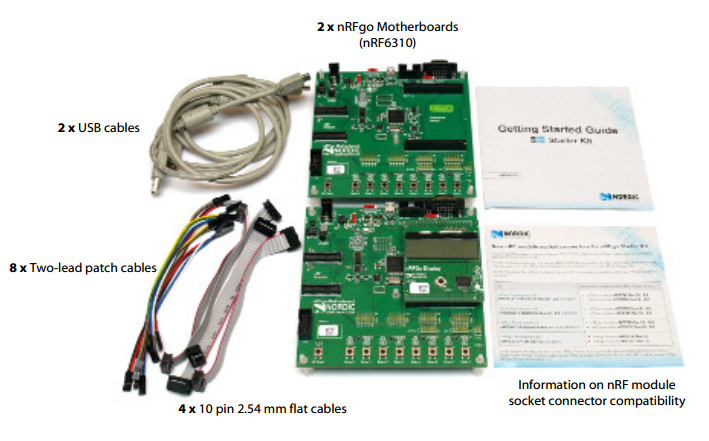
The kit includes 2 motherboards with cable sets.

Recently, the company does not recommend the use of EK and DK, as new debugging kits appeared: " nRF51 DK " and " nRF51 Dongle ", but I believe that EK and DK are still a very good tool for learning and prototyping.
At the moment, my task uses nRF51822 DK without SK. Thanks to the connectors on the DK boards, you can use any connecting wires and breadboard to connect any peripherals, for example, LEDs to indicate a connection or any error. The peculiarity of using DK without SK is that you need to supply power to the DK board, and for this you need to know the pinout of the board connectors.

It is in the document "nRF51822_Development_Kit_User_Guide". Due to the fact that I use the STM32L152-DISCOVERY debugging module as a “super-host” for nRF51822, 3.3V power is supplied from there.
Nuance: until you purchase one of the sets, you will not be able to download either the specification, the stack, or the software from the site, with the exception of the nRFgo Studio software and documentation for the chips.
Each debug set has its own unique number (key) pasted on the box with the set. After purchasing the kit, you need to register on the site and enter the key indicated on the box in the user profile. After that, you will be available:
- product specifications;
- user guides;
- specifications, firmware and API stack;
- software;
- "Reference layout";
2. Software offered by NORDIC
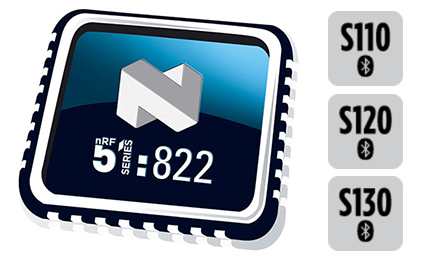
- SoftDevice S110 stack (S120, S130) - contains API header files and a binary (HEX) file that contains the firmware of the stack (for each type of stack its own HEX). There is no source code for the stack itself.
- nRF51 SDK - contains the header files for the API to the stack, as well as the source code of the C libraries for simplifying work with the stack and peripherals of the nRF51422 and nRF51822 chips;
- Master Control Panel (MCP) - 32 and 64-bit software designed to work with a USB dongle and allowing you to search for devices, discover services, read service attributes, establish a Bluetooth connection, receive and transmit data. In server mode, it is possible to create any services with characteristics defined both in Bluetooth SIG and with your own. In general, this is the main program for debugging your software on the other side of a wireless connection. When installing Master Control Panel, software called “Master Emulator” is also installed. Little has been written about it, but many developers may like it. The fact is that this is an API that allows you to create a .NET application for a PC with the role of a master device.
- nRFgo Studio - 32 and 64 bit software designed for flashing the stack and client software. Also, with it, you can change the firmware of the motherboards included in the SK kit; create your services, including on your own UUIDs; configure connection security settings, configure GAP and advertising, configure chip peripherals, calculate chip energy consumption, and much more.
- nRF Sniffer - software for viewing packets transmitted from one device to another;
- nRF51-BLE-Driver - in fact, this is not a driver in the usual sense of the word. This is a DLL that provides the API for the stack in C language. Thanks to it, you can write a PC application that will communicate with the stack, which can be embedded in the USB dongle, which is part of the DK or EK. The API provides an implementation of the peripheral role only.
- You can also download the source code for Android and iOS applications that allow you to work with debugging kits. The applications themselves can be found in the respective app stores. Applications allow you to test, for example, the operation of updating firmware over the air (DFU - Device Firmware Update Service) or UART via Bluetooth.
3. Development Tools
For programming, you can use both paid and free development tools. NORDIC suggests using Keil MDK-ARM, IAR, as well as any IDE that allows you to work with GCC ARM. To work with GCC, a document called “nAN-29 nRF51 Development with GCC and Eclipse Application Note” is proposed, which describes proposals for developers who want to use Eclipse, GCC, and GDB.
NORDIC believes that it is preferable to use Keil, and even the “nRF51 SDK” installer integrates the SDK into Keil, which simplifies the process of creating an application project. All examples in the SDK have project files in Keil format.
4. Stack SoftDevice
The stack is offered in 3 versions.
- S110 SoftDevice - designed to be used if your device should have the role of a peripheral device (Peripheral / Broadcaster).
- S120 SoftDevice - designed to be used if your device should be a central device (Central / Observer). This stack can support up to 8 simultaneous connections with peripherals.
- S120 SoftDevice - designed to be used if your device should be both peripheral and central (Central / Peripheral / Broadcaster / Observer).
The API of any of the stack options allows you to control both the BLE controller and the host, i.e. and other peripherals included in the chip. It’s more correct to say this: if you use the SoftDevice stack, then the rest of the peripherals are controlled through the stack API and it controls what and when can be applied. Naturally, the chip can be used without a stack at all, like a regular microcontroller.
The release information for the next version of the SDK always indicates the supported version of the stack. This is very important, because the first thing a programmer faces is the inability to flash his program due to the mismatch between the SDK version and SoftDevice. For example, SDK version 6.1.0 works with the following stack versions: S110 - 7.0.0, 7.1.0; S120 - 1.0.0.
5. Firmware stack and client application.
Due to the fact that the stack is offered only in the form of a binary firmware file, the question arises: how to work with the chip if you need to sew both the stack and your program?


As can be seen from these two figures, the stack is sewn to the bottom of the flash memory and uses the lower half of RAM starting at 0x2000000. The application is sewn into flash memory, starting from the address CODE_R1_BASE it uses RAM from the address RAM_R1_BASE.
The variables CODE_R1_BASE and RAM_R1_BASE differ depending on the version of the stack.
The stack is sewn using the “nRFgo Studio” program once, after which you can write your application and sew it either “nRFgo Studio” or, more conveniently, using Keil.
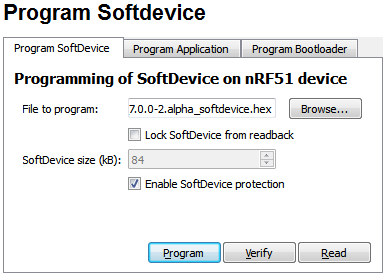
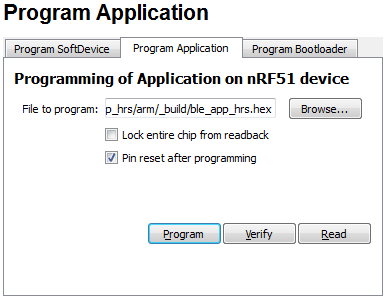
The stack hex file is sewn once, after which you can write your application and sew it either with “nRFgo Studio” or, more conveniently, with Keil.
Here is an example of setting memory in Keil for stack S110 v.6.0.0:
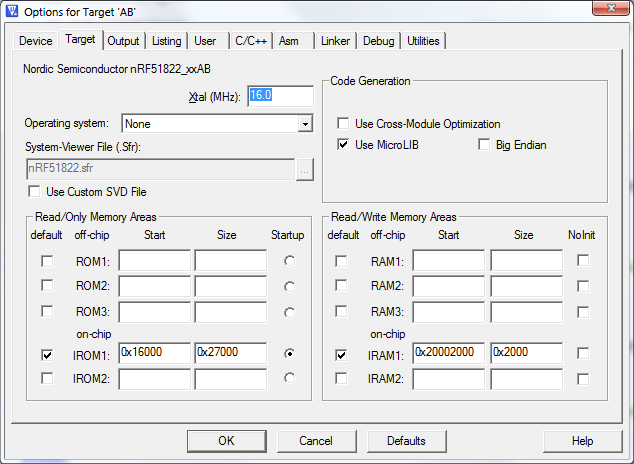
CODE_R1_BASE is 0x16000, and RAM_R1_BASE is 0x20002000
And here is an example of setting memory in Keil for stack S120 v.1.0.0:
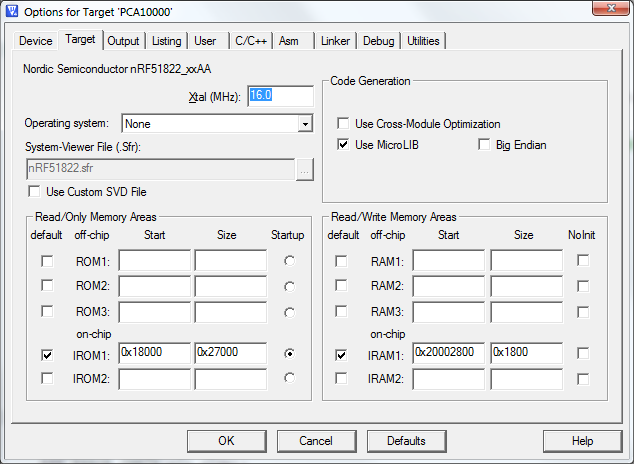
CODE_R1_BASE is 0x18000, and RAM_R1_BASE is 0x20002800
6. Conclusion
The SDK offers a large number of examples of using the nRF51822 chip, both just a microcontroller and using a stack. Thanks to the examples, you can quickly learn how to program the chip while studying all the intricacies of the SDK in parallel, and there are a lot of them.
NORDIC has created a good forum where you can get an answer to almost any question. Employees of the company often answer questions themselves rather quickly.
Thank you for reading my article to the end. If you are interested, and I will go through the sandbox, then in the next article I will talk about the features of implementing client software using the SDK stack.
I want to wish you good luck and success in the development and application of Nordic Semiconductor products, I personally like their solutions.
Thanks for attention.