We continue to put OpenWrt on anything. D-link DNS-320L
I bought this NAS for a clear purpose, it should work on OpenWRT. I myself am not strong in linux, so I collected information bit by bit from the Internet. Nothing was found in the Russian-language part, so I decided to write instructions for the people + to save something, since I do not trust my memory.
The result was a NAS that downloads firmware from internal memory and mounts a usb connected hard drive as main memory.
A man named Andreas Böhler wrote a patch for openwrt revision 39746 to enable compilation of firmware. The following steps are performed on the Debian OS under VirtualBox.
Install packages for compilation:
Download the firmware sources:
Apply patches:
Well, compilation of the firmware.
Checking the installed components:
If such a window appears, select the Marwell Kirkwood line in the Target System and the D-Link DNS320L line in the Target Profile:

If this did not happen, and there are no errors, you need to do:
Actually, this is enough for a clean initial working firmware. If desired, you can run through the menu and install the necessary packages. I installed Base System -> block-mount and Kernel Modules -> FileSystem -> kmod-fs-ext4 , since I plan to transfer the root directory to the hard drive. I used an external USB hard, but with the same success, you can use sata hard or a USB flash drive.
We start compilation:
If you have a multi-core computer, then:
where 5 is the number of cores +1
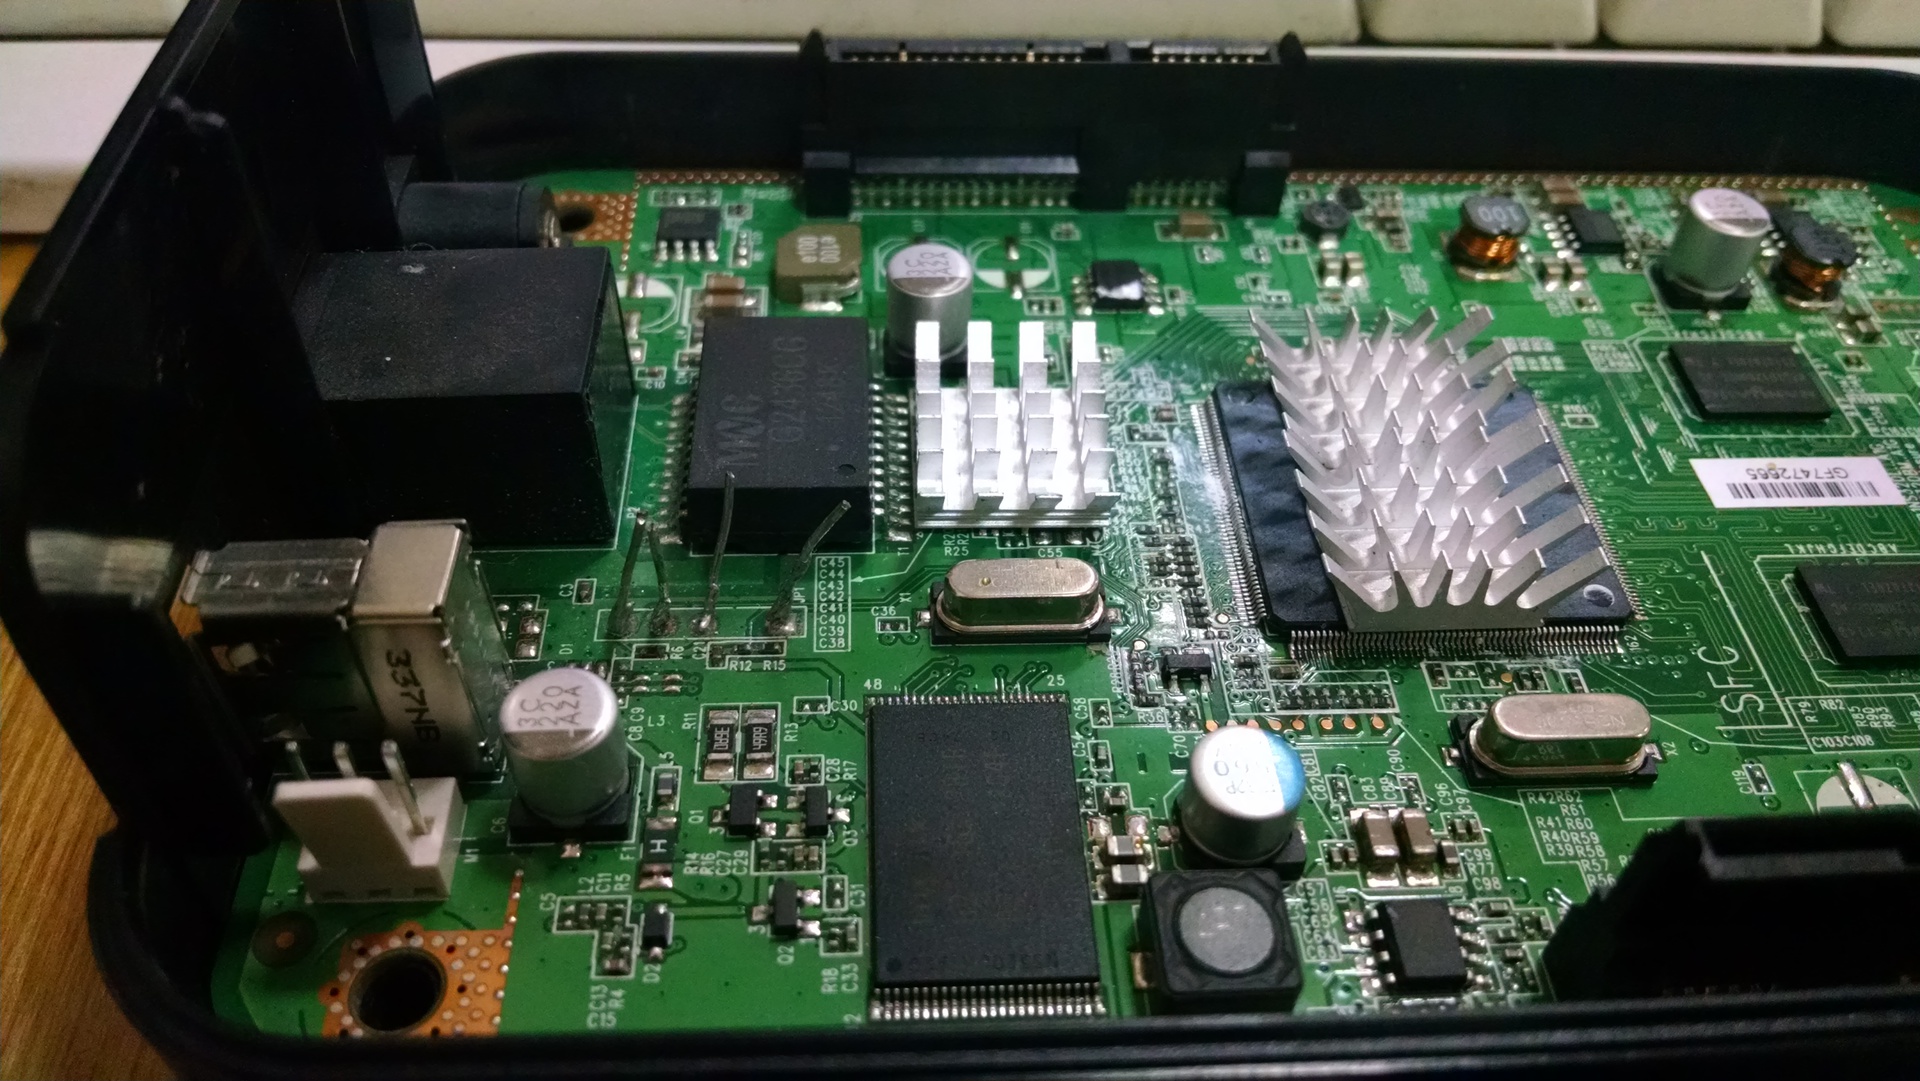
Let's leave the compilation, this is a slow business. Next, you need to connect to the NAS console. To do this, there are 4 pins on the ward, located near usb and a network, I soldered sticks to them for easy connection, I use this adapter, you can use any adapter on PL2303, for example, a cable from Siemens dca-510: The
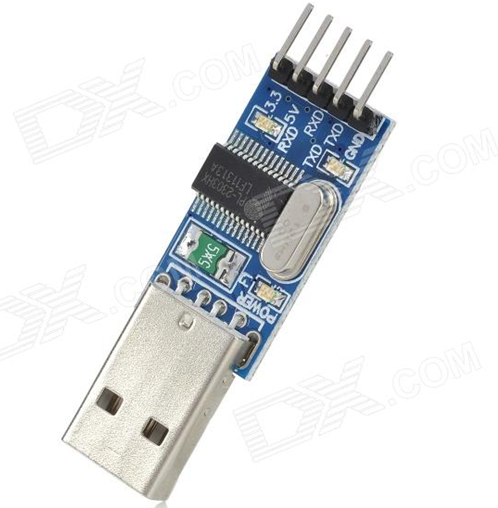
pins on the DNS320L board are ( from jamie.lentin.co.uk/devices/dlink-dns325 ):

The outputs of the board must be connected to the corresponding outputs of the USB-TTL adapter. If it does not work, then you do not need to swap RX and TX, 3.3v! I connected and burned 2 adapters.
After connecting, open Putty and install the connection port (the port can be viewed in the Device Manager -> COM and LPT Ports) speed 115200.

In the category serial data bits - 8, Flow Control - None.

Click Open - the Empty Console opens. We connect the NAS power and press the power button, the download has started, we are waiting for the inscription: If you want to stop u-boot booting, then press space then 1 when prompted to press any key
Quickly press "Space", then "1". We get the input line:
Marvell>
(Sorry, forgot to make screenshots)
Next, run the tftp server.
To do this, download tftpd32.jounin.net/download/tftpd32.450.zip
Unpack and drop the files openwrt-kirkwood-dns320l-jffs2-nand-2048-128k.img and openwrt-kirkwood-uImage of the compiled firmware into the same folder. We connect the NAS to the computer with a patch cord, give the ip address to the computer 2.66.66.32 and run tftp32:

We write in putty (information on the site http://www.aboehler.at/cms/projects-a-hacks/50-dns320l with errors)
After that, the NAS will restart and OpenWRT will start.
After loading OpenWRT, you need to change some files.
Further:
Enter the root password:
And after boot up, openwrt will get the ip address over the network, you can connect via ssh.
Next hard, which will be / formatted in ext4, unzip openwrt-kirkwood-dns320l-rootfs.tar to it on the NAS
sda1 we change to the disk partition on which / will be and you unpacked the archive.
After rebooting, if everything is done correctly, we get OpenWRT with the root on the disk.
Only 2 semi-problems remained:
1. the cooler does not spin, I decided this by connecting to the power bypassing the board;
2. disks do not park, the temporary solution is UPS from sudden loss of light
Files with the firmware that I used are on Yandex.Disk .
UPD1: Slightly changed the kernel settings, now available memory is 118 MB Yandex.Disk bigroot , you need to re-flash the kernel and jffs.
UPD2: I can’t compare about speed (now there are other screws, but there’s no possibility of returning), who can throw the dump / backup official ?, I will make the official comparison, alt-f and openwrt 12 and 14, write in a personal ;-)
PS if We saw a mistake, do not hesitate to write in PM, I will correct it as soon as I can.
The result was a NAS that downloads firmware from internal memory and mounts a usb connected hard drive as main memory.
A man named Andreas Böhler wrote a patch for openwrt revision 39746 to enable compilation of firmware. The following steps are performed on the Debian OS under VirtualBox.
Install packages for compilation:
sudo apt-get install subversion git g ++ libncurses5-dev zlib1g-dev gawk
Download the firmware sources:
svn co -r 39746 svn: //svn.openwrt.org/openwrt/trunk dns320l
Apply patches:
cd dns320l
wget www.aboehler.at/hg/linux-dns320l/raw-rev/223820522d49 -O patch.diff
patch -p0 <./patch.diff
patch -p0 -ib / openwrt / openwrt-dns320l.patch
Well, compilation of the firmware.
Checking the installed components:
make prereq
If such a window appears, select the Marwell Kirkwood line in the Target System and the D-Link DNS320L line in the Target Profile:
If this did not happen, and there are no errors, you need to do:
make menuconfig
Actually, this is enough for a clean initial working firmware. If desired, you can run through the menu and install the necessary packages. I installed Base System -> block-mount and Kernel Modules -> FileSystem -> kmod-fs-ext4 , since I plan to transfer the root directory to the hard drive. I used an external USB hard, but with the same success, you can use sata hard or a USB flash drive.
We start compilation:
make
If you have a multi-core computer, then:
make –j5
where 5 is the number of cores +1
Let's leave the compilation, this is a slow business. Next, you need to connect to the NAS console. To do this, there are 4 pins on the ward, located near usb and a network, I soldered sticks to them for easy connection, I use this adapter, you can use any adapter on PL2303, for example, a cable from Siemens dca-510: The
pins on the DNS320L board are ( from jamie.lentin.co.uk/devices/dlink-dns325 ):
The outputs of the board must be connected to the corresponding outputs of the USB-TTL adapter. If it does not work, then you do not need to swap RX and TX, 3.3v! I connected and burned 2 adapters.
After connecting, open Putty and install the connection port (the port can be viewed in the Device Manager -> COM and LPT Ports) speed 115200.
In the category serial data bits - 8, Flow Control - None.
Click Open - the Empty Console opens. We connect the NAS power and press the power button, the download has started, we are waiting for the inscription: If you want to stop u-boot booting, then press space then 1 when prompted to press any key
Quickly press "Space", then "1". We get the input line:
Marvell>
(Sorry, forgot to make screenshots)
Next, run the tftp server.
To do this, download tftpd32.jounin.net/download/tftpd32.450.zip
Unpack and drop the files openwrt-kirkwood-dns320l-jffs2-nand-2048-128k.img and openwrt-kirkwood-uImage of the compiled firmware into the same folder. We connect the NAS to the computer with a patch cord, give the ip address to the computer 2.66.66.32 and run tftp32:
We write in putty (information on the site http://www.aboehler.at/cms/projects-a-hacks/50-dns320l with errors)
setenv bootargs_openwrt 'console=ttyS0,115200 earlyprintk root=/dev/mtdblock2 rootfstype=jffs2'
setenv bootcmd_openwrt 'setenv bootargs $(bootargs_openwrt); nand read.e 0xa00000 0x100000 0x400000; bootm 0xa00000'
setenv to_openwrt 'setenv mainlineLinux yes; setenv bootcmd \'run bootcmd_openwrt\'; saveenv; reset'
tftp 0x6400000 openwrt-kirkwood-uImage
nand erase 0x100000 0x400000
nand write.e 0x6400000 0x100000 0x400000
tftp 0x6400000 openwrt-kirkwood-dns320l-jffs2-nand-2048-128k.img
nand erase 0x500000 0xfb00000
nand write.e 0x6400000 0x500000 0x200000
run to_openwrt
After that, the NAS will restart and OpenWRT will start.
We will analyze in more detail
setenv bootargs_openwrt 'console=ttyS0,115200 earlyprintk root=/dev/mtdblock2 rootfstype=jffs2'
Аргументы - как выводить консоль,  путь / файловая система jffs2
setenv bootcmd_openwrt 'setenv bootargs $(bootargs_openwrt); nand read.e 0xa00000 0x100000 0x400000; bootm 0xa00000'
Комманды загрузки - Читаем с nand адреса 0x100000 длиной 0x400000 в RAM по адресу 0xa00000 , затем загружаемся по адресу 0xa00000
tftpboot 0x6400000 openwrt-kirkwood-uImage
Загружаем по tftp с компа openwrt-kirkwood-uImage в ram по адресу 0x6400000
nand erase 0x100000 0x400000
Чистим nand для записи uImage
nand write.e 0x6400000 0x100000 0x400000
Записываем с 0x6400000 ram в 0x100000 nand длиной 0x400000
tftpboot 0x6400000 openwrt-kirkwood-dns320l-jffs2-nand-2048-128k.img
Загружаем по tftp с компа openwrt-kirkwood-dns320l-jffs2-nand-2048-128k.img в ram по адресу 0x6400000
nand erase 0x500000 0xfb00000
Чистим nand для записи uImage
nand write.e 0x6400000 0x500000 0x200000
Записываем с 0x6400000 ram в 0x500000 nand длиной 0x200000
run to_openwrt
Сохранение параметров и перезагрузка в OpenWRT
After loading OpenWRT, you need to change some files.
vi /etc/opkg.conf   - путь для установки пакетов
Изменить строку:
#src/gz barrier_breaker http://downloads.openwrt.org/snapshots/trunk/kirkwood/packages
На строку:
src/gz barrier_breaker http://downloads.openwrt.org/attitude_adjustment/12.09/kirkwood/generic/packages
vi /etc/config/network – настройка сети, жирным выделено настройка dhcp
config interface 'lan'
	option ifname 'eth0'
	option proto 'dhcp'
	option defaultroute '1'
#	option type 'bridge'
#	option proto 'static'
#	option ipaddr '192.168.1.1'
#	option netmask '255.255.255.0'
#	option ip6assign '60'
Further:
passwd
Enter the root password:
reboot
And after boot up, openwrt will get the ip address over the network, you can connect via ssh.
Next hard, which will be / formatted in ext4, unzip openwrt-kirkwood-dns320l-rootfs.tar to it on the NAS
opkg install kmod-usb-uhci kmod-usb-storage block-mount kmod-fs-ext4
installs the necessary packages to transfer to usb
vi / etc / config / fstab
config mount
option target / overlay
option device / dev / sda1
option fstype ext4
option options rw, sync
option enabled 1
option enabled_fsck 0
sda1 we change to the disk partition on which / will be and you unpacked the archive.
After rebooting, if everything is done correctly, we get OpenWRT with the root on the disk.
Only 2 semi-problems remained:
1. the cooler does not spin, I decided this by connecting to the power bypassing the board;
2. disks do not park, the temporary solution is UPS from sudden loss of light
Files with the firmware that I used are on Yandex.Disk .
UPD1: Slightly changed the kernel settings, now available memory is 118 MB Yandex.Disk bigroot , you need to re-flash the kernel and jffs.
UPD2: I can’t compare about speed (now there are other screws, but there’s no possibility of returning), who can throw the dump / backup official ?, I will make the official comparison, alt-f and openwrt 12 and 14, write in a personal ;-)
PS if We saw a mistake, do not hesitate to write in PM, I will correct it as soon as I can.