Many have heard of tile window managers; some have even heard of XMonad. And the guys from Google even traded Unity / Gnome for XMonad. What is it, how to set it up and how to live with it? A brief workaround for fans to customize everything in a row.
Man, why do I need it?
For myself, I highlighted several situations when it is especially useful, especially useful:
Laptop desktop for development. There is not enough space, I really want to use it as efficiently as possible;
Multi-monitor jobs. XMonad lets you take full advantage of multiple monitors with xinerma;
Frequent switching of task contexts. For example, a developer often has to switch between the IDE, file manager, console, and other tools. This process can be accelerated;
Tired of visual noise from standard window managers.
In general, less words, more work! If you want to manage the working environment as deftly as the hero of the Kopps series deals with criminals , then you didn’t come in for a reason.
A bit about code and examples
I use archlinux, so all examples will be in the archlinux section. But on other Linux all actions are performed in a similar way.
I tried to arrange all the examples in the form of scripts, so that later I could deploy them to the new system. I will leave links to github.
Step 1: Install XMonad
This action is specific to archlinux.
The first thing to do is install yaourt if it is not worth it of course. I will not bore, I do this with the install-01-yaourt.sh script . (. When found in the spaces of the Internet, thanks to the author)
Put XMonad:
yaourt -S xmonad xmonad-contrib xmobar dmenu2
Or, if we want to put the repository from haskell-core:
You can also put the version through yaourt darcs, but we will omit this virant.
Step 2: Minimum XMonad Setup
XMonad is configured using the ~ / .xmonad / xmonad.hs file. As you probably guessed, the configuration is written in Haskell.
If you do not know Haskell, it does not matter, use other people's configs. When the config works, understand what’s possible and on a conceptual level.
Minimum .xmonad / xmonad.hs:
import XMonad
main = xmonad defaultConfig
        { modMask = mod4Mask -- Use Super instead of Alt
        , terminal = "urxvt"
        }
XMonad Young Fighter Management Course
When using the tile window manager, there are no windows as such. There are tiles. Tiles behave in accordance with the current Layout automatically located one way or another (for example, Layout Grid - stupidly displays the table or Full - display one main window).
Layout
Compiles tiles. By default, switching between Layout`s is done using the combination modKey + space.
In our case, modKey = Windows key (Super).
Tile
These are the very windows familiar to us.
In Layout, support for changing the size of tiles and the number of master windows can be configured . You can also “disconnect” a tile by holding the modKey button and dragging the window with the mouse. And modKey + RightMouseButton will resize the window. To transfer a tile from doFloat mode to standard mode, use the combination modKey + t.
A master tile is a tile or group of tiles that will be displayed in the “most visible place”. On the screen in the header, the master tile is the largest, it is immediately visible.
You can switch between tiles with combinations of modKey + tab or modKey + j / modKey + k - focus on the previous / next tile. Also, tiles can be interchanged with the master tile or the previous ones: modKey + enter- swap the current tile and master tile. modKey + J / modKey + K - swap with next / previous
Workspace
These are essentially desktops, for each workspace Layout its own and is saved when switching to other desktops upon return. Although this behavior can be changed, but that's another story.
You can switch between Wokspace using the combination modKey + #, where # is the desktop number (not on the numeric keypad).
To summarize:
modKey tab + - focus to the next (or modKey + shift + tab on previous); modKey + j / modKey + k - focus on the next / previous; modKey + J / modKey + K - change the current and next / previous; modKey + entеr - swap the current tile and master tile; modKey + m - focus on the master tile; modKey + # - desktop number #; modKey + t- transfer the tile from doFloat mode to standard.
There are many ways to run XMonad, consider a couple.
1. Clean start
We only have XMonad installed, we don’t need either Gnome, KDE, or XFCE. We are on our own.
In this case, to start, just configure xmonad to start in the X system initialization file: .xinitrc:
Now when startx starts, xmonad will start (of course, this command is executed when there is no X session yet).
2. Replacing the current window manager
XMonad can brazenly replace the current window manager. To do this, just run a simple command:
xmonad --replace
3. Integration with __ Substitute What You Need__
And you can substitute, for example, GNOME ( dock for archlinux ).
Here, I think, everyone will find what he needs, we will move on to the most interesting.
Step 4: Boring Wallpaper
If you started xmonad with a minimal config, you probably already noticed that there is a black screen. No wallpapers!
How is it, we thought, in gnome is, in kde is ... And here we are!
We quickly correct this misunderstanding:
sudo pacman -S feh
feh --bg-center /usr/share/backgrounds/gnome/Bokeh_Tails.jpg # Тут можно подставить путь до любой картинки. Или, о господи, даже http урл!
feh --bg-center http://habrastorage.org/files/c1a/90a/763/c1a90a763acc48a083a325d42f86f8ad.jpg # да да, даже так!
You probably liked it, huh? You can put your favorite picture from the Internet directly to your desktop, fix the result:
Well now you can work, take a tool in your hands and begin to finish XMonad.
Here it would be possible to attach a config and say - done, but no. We’re here to make a little sense.
We will work on our config, convert it to the following form:
Now there are our desktops with names, but you, Uncle Fedor, will not see this anyway, because your xmobar is not configured!
Okay, put xmobar aside, do something more substantial:
Let's execute a combination of modKey + shift + enter. The tile with the console should open. If it does not open, there may be a problem in the xmonad.hs config line:
terminal = "urxvt"
Indicate the terminal that is in the system, or install urxvt:
sudo pacman -S rxvt-unicode
With the
combination of modKey + p, you can call dmenu (it will open at the top by typing a command, a list of applications that can be launched will be displayed there). We call gvim, for example, modKey + p -> print gvim (if it is, of course, in the system), press enter.
So, we have desktops, tiles, layouts ... So let's automatically route applications to different desktops? Let's.
We go to our xmonad.hs config and add the following:
...
defaults = defaultConfig {
          terminal                 = "urxvt"
        , workspaces           = myWorkspaces
        , modMask              = mod4Mask
        , layoutHook            = myLayoutHook
        , handleEventHook  = fullscreenEventHook  -- для корректного отображения окон в полно экранном режиме
        , startupHook           = setWMName "LG3D"  -- для совместимости определёных приложений, java например(IntelliJ IDEA)
        , borderWidth           = 2
        , manageHook          = myManageHook  -- Добавили ХУК Сюда
        , normalBorderColor  = "black"
        , focusedBorderColor  = "orange"
	}
-- Добавим хуук с реализацией
myManageHook :: ManageHook
myManageHook = composeAll . concat $
	[ [className =? c --> doF (W.shift "1:web")		| c <- myWeb]
	, [className =? c --> doF (W.shift "2:dev")		| c <- myDev]
	, [className =? c --> doF (W.shift "3:term")	        | c <- myTerm]
	, [className =? c --> doF (W.shift "4:vm")		| c <- myVMs]
	, [manageDocks]
	]
	where
	myWeb = ["Firefox","Chromium","Chrome"]
	myDev = ["Eclipse","Gedit","sublime-text"]
	myTerm = ["Terminator","xterm","urxvt"]
	myVMs = ["VirtualBox"]
....
Now
xmonad --recompile && xmonad --restart
Through dmenu, run for example sublime-text, and here it is! Here it is magic! He immediately appeared on the desktop with a note 2: dev.
Press modKey + shift + enter to launch the terminal and, lo and behold! He will be on the 3rd desktop.
But how do I know the className of a tile to send to the right desktop?
It is very simple. Open the console, type the xprop command, then poke the mouse in the desired window and the console displays information about it. We are interested in the WM_CLASS (STRING) field.
In principle, it is not necessary to filter windows by className, it is possible by other parameters. You can see that, for example, in the title field , you can also send a window wherever you want.
This is what we have been going for so long ...
And then we remembered about Uncle Fedor. More precisely - about xmobar. Let's make a status bar. For those who still do not understand, this is a black panel on top (a screenshot in the header).
Step 6: File
So xmobar should already be installed. Therefore, open our xmonad.hs config and change:
main = do
        xmonad defaults
On the:
main = do
	xmproc <- spawnPipe "/usr/bin/xmobar ~/.xmonad/xmobar.hs"
	xmonad $ defaults {
	logHook =  dynamicLogWithPP $ defaultPP {
            ppOutput = System.IO.hPutStrLn xmproc
          , ppTitle = xmobarColor xmobarTitleColor "" . shorten 100
          , ppCurrent = xmobarColor xmobarCurrentWorkspaceColor "" . wrap "[" "]"
          , ppSep = "   "
          , ppWsSep = " "
          , ppLayout  = (\ x -> case x of
              "Spacing 6 Mosaic"                      -> "[:]"
              "Spacing 6 Mirror Tall"                 -> "[M]"
              "Spacing 6 Hinted Tabbed Simplest"      -> "[T]"
              "Spacing 6 Full"                        -> "[ ]"
              _                                       -> x )
          , ppHiddenNoWindows = showNamedWorkspaces
      }
} where showNamedWorkspaces wsId = if any (`elem` wsId) ['a'..'z']
                                       then pad wsId
                                       else ""
There is no time to explain anything, just create further configs, namely ~. / Xmonad / xmobar.hs:
Wow, now you can sit down and execute an already familiar command:
xmonad --recompile && xmonad --restart
Our long-awaited bar should have appeared and now,% USERNAME%, should finally see what kind of worker it is on. They also took the title of the current window to our bar (just like in mac os x, only more flexible). DynamicLogWithPP is responsible for this , which copies information to stdin xmobar, pre-formatting it.
Be careful, in font you need to specify an existing font in your system. It can be found in the output of the fc-list command.
Step 7: File
It seems that everything works, but somehow it’s not comfortable. What else would you do? Let's display Volume Level in our bar! Hmm, Hmobar! He said do it.
Change ~ / .xmonad / xmobar.hs
Kind people have already written for us the PipeReader plugin, which stupidly reads the pipe and displays this thing in the bar.
Add a call to the PipeReader plugin and change the template by adding a volume display to it:
Now when you click on modKey + - / + (this is - and + on the NumKeyboard), the volume will change and its level will immediately be displayed in our panel.
The reader, who had not yet fallen asleep, could notice an additional tasty snack in the form of a line:
I just want to say that I do not pretend to be any exclusivity of this material. Yes, and you can’t call it right, for sure everything can be done better. I just wanted to show the way along which you can go to set up your own environment so that this cold autumn makes your soul warm and pleasant.
I hope it was interesting and useful, I will gladly discuss the topics of the working environment, xmonad and everything related to Linux.
PS: To save space, all examples of configs are not supplied with the necessary import directives. Imports can be pulled from the github.

 , then you didn’t come in for a reason.
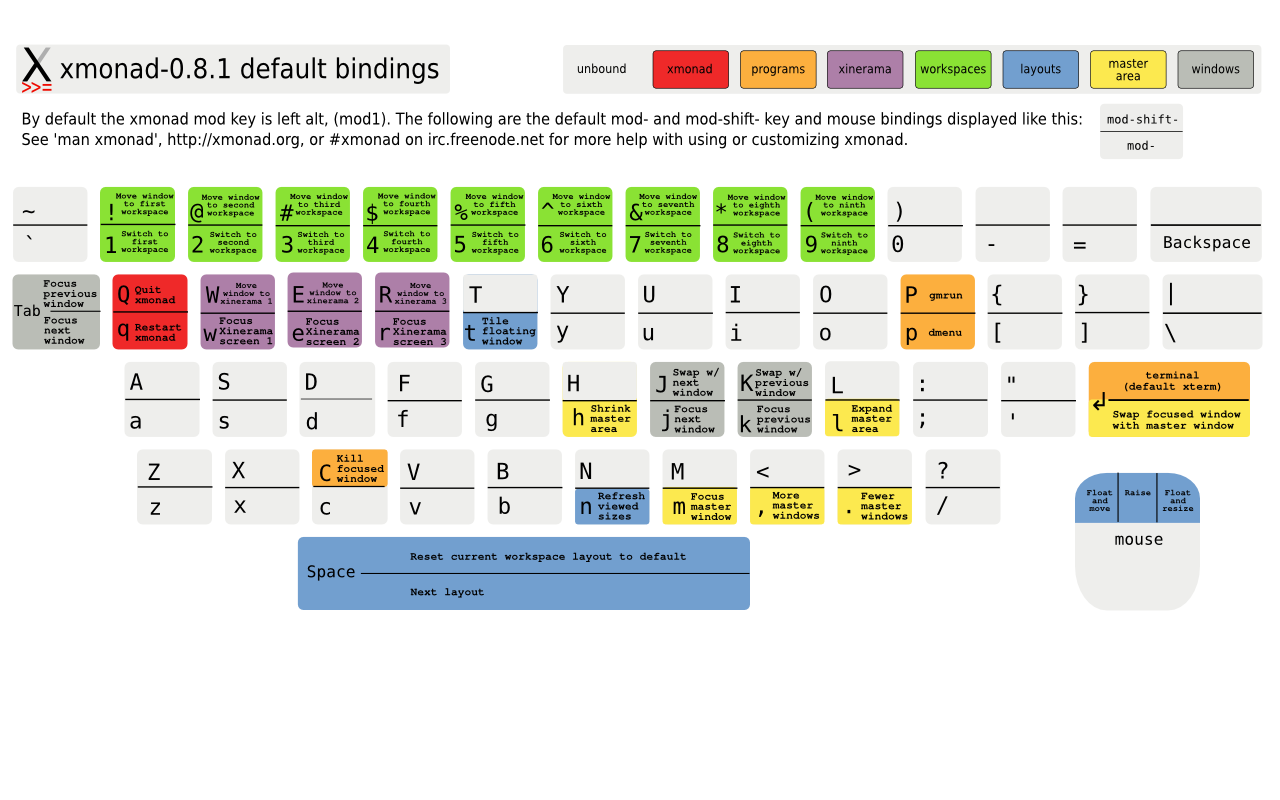