The place where the sound lives
A sound can do much: to tell, to warn, to delight, to frighten, to call, to push away ... But the main thing is that it immerses the user in the game world. In order for the sound to live, to play with all its shades, we need not only the skill of the sound designer and good equipment. It is also important that the room itself is working on sound.
We will talk today about the experience of creating such a room in the Plarium Krasnodar office.

The quality and nature of the sound is largely dependent on the acoustic properties of the room. A properly organized studio should provide the optimal combination of absorption and diffusion effects. To professionally approach its arrangement, you need to understand the nature of sound and its behavior in different types of premises.
For example, it is important to know that in closed spaces the acoustic field is formed not only by a direct wave coming from the sound source, but also by its reflection from the walls, the ceiling and any other obstacles. These direct and reflected waves form a diffuse sound field, thanks to which the sound does not disappear instantly, but gradually fades. This effect is called reverberation, and the sound attenuation rate is called the reverberation time.
The reverberation time depends on many factors, starting with the size and coverage of the room surfaces and ending with its shape. So, for example, in an ordinary rectangular room with parallel wall surfaces, a flutter effect or “flashing echo” often appears when, as a result of multiple reflections at the receiving point, the sound is amplified from time to time, and on short impulse sounds it turns into a rattle, crackle or repeated gradually echoing.
The free operation of knowledge in the field of acoustics will tell you how to avoid such troubles, and will provide a theoretical basis for calculating the studio room that is most suitable for your purposes, therefore, study the hardware before proceeding with the design.

Depending on the destination, studios can vary in size, equipment and requirements. Our company needed a small chamber recording studio, for which we used a space of 24 m2.
Our task was to organize two rooms:
To calculate the dimensions of the control room, you can use the formula recommended by the European Broadcasting Union and the International Telecommunications Union:
1.1w / h ≤ l / h ≤ 4.5w / h - 4,
l / h <3, w / h <3
where l is the length , w - width, h - room height.
At the same time, the integral ratio of the length and width of the room to its height within ± 5% should be excluded.
To simplify the calculations, we used special calculators that are easy to find on the Internet.
From the formula it is clear that for the “breath” of the studio acoustics the height of the ceilings is crucial. Try to make the ceiling as high as possible, the requirements for the length and width of the room will depend on it.
Since processing and synthesizing sound is a priority task in game dev, the control room was more important for us. We started the area calculations from it, and the room left the remaining space.
Below is a graph in which the results of calculations for the control room fall into the lower part of the favorable zone, which means that you can begin to work on these calculations.

So it was divided into the tone-room and control room the space of our studio.

When the calculations were finished and the room was divided into a tone-room and a control room, we decided to define the concepts of studio spaces.
For a small studio, like ours, the concept of NE is best suited (Non-Environment - “infinite” control rooms). Indoors, eliminate all right angles and opposing surfaces, observing the symmetry of the left and right halves. The ceiling, rear and side walls make sound-absorbing, and the surfaces in front of the sound engineer - the front wall and the floor - sound-reflecting.
A neutral concept with an asymmetrical room geometry without parallel walls was chosen for our tone-room. Such tone rooms have the most versatile sound and are suitable for recording instruments as well as for voice actors. If your studio is planning only one tone-room, the best option is to make it neutral.
Since one of the main functions of our premises is insulation and acoustic correction, we decided to implement the “room-in-room” concept, when external soundproofing walls are rigidly attached to the floor and ceiling, and the internal ones are completely untied and made independently.
Having chosen the concept and finished the basic calculations, we took up additional nuances of room planning.
For any equipment you need power, so we took care of a sufficient number and convenient location of sockets, calculated the cross-section of power cables, made a reliable grounding to avoid suggestive and other electrical noise. All this was done at the planning stage, in order not to stumble over extension cords. In addition, at the same time we thought out a noiseless ventilation and air-conditioning system: sound engineers and sound designers spend a lot of time in the studio, which means there should be a comfortable temperature and fresh air.

The market of sound insulation materials is actively developing, but if your studio is not built in the capital, you will have to spend time looking for a suitable supplier.
The main thing when choosing a material is to understand that it does not work wonders. You can spend money on expensive brands that in the hands of non-professionals do not meet expectations. The way the studio will sound and look will almost completely depend on the project and its execution. This does not mean that by implementing a good project using handicraft materials such as egg packages, you will get a professional result. We decided to choose something inexpensive, but of high quality.
Before starting construction, the room must be prepared: it is too late to drill new holes and lay wires when the walls of the external structure are already erected. We invited specialists in ventilation and fire alarm systems at the very beginning of work in order to immediately discuss with them the methods of sound insulation of air ducts and the ways of laying wires to the fire safety sensors.
After that, since the studio was supposed to be located in a semi-basement room, we had to take care of waterproofing and protection from rodents.
Then we turned to a company with which we had previously entered into an agreement for the supply of acoustic insulation materials. Together with representatives of this company, we adjusted the calculations and decided on a brigade of workers.
The construction of our recording studio involved the installation of structures that provide sound insulation to the room.
1. Two independent frameworks of iron profiles, filled with a double layer of acoustic mineral wool, were taken as the basis for the external and internal walls. For additional sound insulation between the frames we decided to leave empty space. The joints and the intersections of the profiles were insulated with rubber gaskets, and the partition itself was sheathed on both sides with a double layer of gypsum-fiber and gypsum plasterboards.

2. In the control room the design of the floating sound-proof floor was made. The surface after the plates OSB - thick carpet.
3. In the control room mounted sound-proof suspended ceiling.

4. Under the sound-proof suspended ceiling, a sound-absorbing Armstrong-type suspended ceiling was installed with acoustic mineral fiber plates and a layer of mineral wool laid on top of them.
5. The ventilation system was laid below the sound-proof suspended ceiling. At each entry point of the ventilation ducts into the control room, silencers were installed, and the surface of all ducts was insulated with a layer of foiled basalt wool.

6. Metal-plastic doors with a three-chamber double-glazed window and a rigid fixation system of the closed door were installed in the rooms.
In total, the construction took 3 weeks, and every day we monitored the progress of work and the accuracy of the project. Looking back now, we understand that this was the right decision.
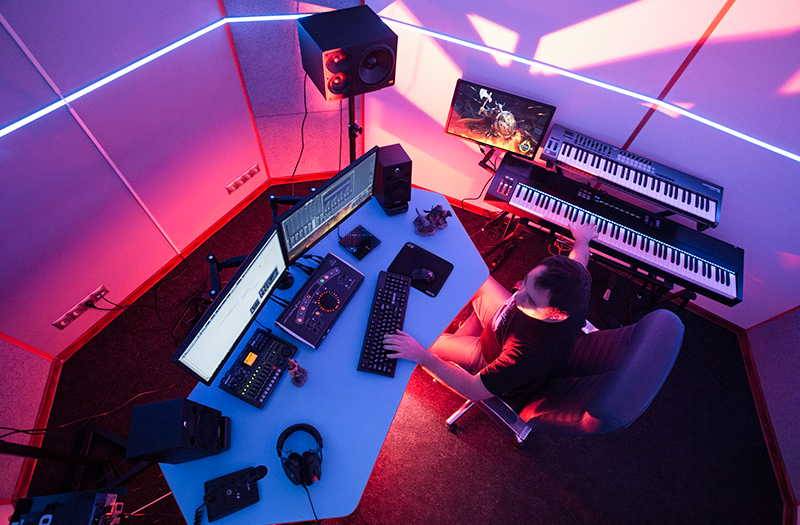
Of course, the work on the arrangement of the studio was not over. We had to purchase and install a workstation based on a powerful computer, professional sound interfaces with high-quality analog-digital converters, amplifying equipment, a microphone park, connecting wires and switching, audio signal processing and output devices, acoustic systems and much more. But this is a topic for a separate article. The main thing - we built a house where high-quality sound can live.

We will talk today about the experience of creating such a room in the Plarium Krasnodar office.
1. Theory
The quality and nature of the sound is largely dependent on the acoustic properties of the room. A properly organized studio should provide the optimal combination of absorption and diffusion effects. To professionally approach its arrangement, you need to understand the nature of sound and its behavior in different types of premises.
For example, it is important to know that in closed spaces the acoustic field is formed not only by a direct wave coming from the sound source, but also by its reflection from the walls, the ceiling and any other obstacles. These direct and reflected waves form a diffuse sound field, thanks to which the sound does not disappear instantly, but gradually fades. This effect is called reverberation, and the sound attenuation rate is called the reverberation time.
The reverberation time depends on many factors, starting with the size and coverage of the room surfaces and ending with its shape. So, for example, in an ordinary rectangular room with parallel wall surfaces, a flutter effect or “flashing echo” often appears when, as a result of multiple reflections at the receiving point, the sound is amplified from time to time, and on short impulse sounds it turns into a rattle, crackle or repeated gradually echoing.
The free operation of knowledge in the field of acoustics will tell you how to avoid such troubles, and will provide a theoretical basis for calculating the studio room that is most suitable for your purposes, therefore, study the hardware before proceeding with the design.
2. Design
Calculations and markup
Depending on the destination, studios can vary in size, equipment and requirements. Our company needed a small chamber recording studio, for which we used a space of 24 m2.
Our task was to organize two rooms:
- tone-room, which serves to record voice, sound effects and musical instruments. It should be isolated from all external sounds, have acceptable reverberation and ensure comfortable accommodation of musicians / actors during recording;
- control room, where the sound designer will create, listen to and process audio material. Such a room is well soundproofed and allows you to hear the pure sound of monitors without tinting it or distorting the reverberation of sound material.
To calculate the dimensions of the control room, you can use the formula recommended by the European Broadcasting Union and the International Telecommunications Union:
1.1w / h ≤ l / h ≤ 4.5w / h - 4,
l / h <3, w / h <3
where l is the length , w - width, h - room height.
At the same time, the integral ratio of the length and width of the room to its height within ± 5% should be excluded.
To simplify the calculations, we used special calculators that are easy to find on the Internet.
From the formula it is clear that for the “breath” of the studio acoustics the height of the ceilings is crucial. Try to make the ceiling as high as possible, the requirements for the length and width of the room will depend on it.
Since processing and synthesizing sound is a priority task in game dev, the control room was more important for us. We started the area calculations from it, and the room left the remaining space.
Below is a graph in which the results of calculations for the control room fall into the lower part of the favorable zone, which means that you can begin to work on these calculations.
So it was divided into the tone-room and control room the space of our studio.
Concept selection
When the calculations were finished and the room was divided into a tone-room and a control room, we decided to define the concepts of studio spaces.
For a small studio, like ours, the concept of NE is best suited (Non-Environment - “infinite” control rooms). Indoors, eliminate all right angles and opposing surfaces, observing the symmetry of the left and right halves. The ceiling, rear and side walls make sound-absorbing, and the surfaces in front of the sound engineer - the front wall and the floor - sound-reflecting.
A neutral concept with an asymmetrical room geometry without parallel walls was chosen for our tone-room. Such tone rooms have the most versatile sound and are suitable for recording instruments as well as for voice actors. If your studio is planning only one tone-room, the best option is to make it neutral.
Since one of the main functions of our premises is insulation and acoustic correction, we decided to implement the “room-in-room” concept, when external soundproofing walls are rigidly attached to the floor and ceiling, and the internal ones are completely untied and made independently.
Drawing up drawings and schemes
Having chosen the concept and finished the basic calculations, we took up additional nuances of room planning.
For any equipment you need power, so we took care of a sufficient number and convenient location of sockets, calculated the cross-section of power cables, made a reliable grounding to avoid suggestive and other electrical noise. All this was done at the planning stage, in order not to stumble over extension cords. In addition, at the same time we thought out a noiseless ventilation and air-conditioning system: sound engineers and sound designers spend a lot of time in the studio, which means there should be a comfortable temperature and fresh air.
3. Construction
Materials
The market of sound insulation materials is actively developing, but if your studio is not built in the capital, you will have to spend time looking for a suitable supplier.
The main thing when choosing a material is to understand that it does not work wonders. You can spend money on expensive brands that in the hands of non-professionals do not meet expectations. The way the studio will sound and look will almost completely depend on the project and its execution. This does not mean that by implementing a good project using handicraft materials such as egg packages, you will get a professional result. We decided to choose something inexpensive, but of high quality.
Preparatory work
Before starting construction, the room must be prepared: it is too late to drill new holes and lay wires when the walls of the external structure are already erected. We invited specialists in ventilation and fire alarm systems at the very beginning of work in order to immediately discuss with them the methods of sound insulation of air ducts and the ways of laying wires to the fire safety sensors.
After that, since the studio was supposed to be located in a semi-basement room, we had to take care of waterproofing and protection from rodents.
Then we turned to a company with which we had previously entered into an agreement for the supply of acoustic insulation materials. Together with representatives of this company, we adjusted the calculations and decided on a brigade of workers.
Construction works
The construction of our recording studio involved the installation of structures that provide sound insulation to the room.
1. Two independent frameworks of iron profiles, filled with a double layer of acoustic mineral wool, were taken as the basis for the external and internal walls. For additional sound insulation between the frames we decided to leave empty space. The joints and the intersections of the profiles were insulated with rubber gaskets, and the partition itself was sheathed on both sides with a double layer of gypsum-fiber and gypsum plasterboards.
2. In the control room the design of the floating sound-proof floor was made. The surface after the plates OSB - thick carpet.
3. In the control room mounted sound-proof suspended ceiling.
4. Under the sound-proof suspended ceiling, a sound-absorbing Armstrong-type suspended ceiling was installed with acoustic mineral fiber plates and a layer of mineral wool laid on top of them.
5. The ventilation system was laid below the sound-proof suspended ceiling. At each entry point of the ventilation ducts into the control room, silencers were installed, and the surface of all ducts was insulated with a layer of foiled basalt wool.
6. Metal-plastic doors with a three-chamber double-glazed window and a rigid fixation system of the closed door were installed in the rooms.
In total, the construction took 3 weeks, and every day we monitored the progress of work and the accuracy of the project. Looking back now, we understand that this was the right decision.
P.S
Of course, the work on the arrangement of the studio was not over. We had to purchase and install a workstation based on a powerful computer, professional sound interfaces with high-quality analog-digital converters, amplifying equipment, a microphone park, connecting wires and switching, audio signal processing and output devices, acoustic systems and much more. But this is a topic for a separate article. The main thing - we built a house where high-quality sound can live.