How did I collect the logger on SD card Shield V2.0
Hello, Habr!
 I urgently needed to collect a simple data logger for one old industrial gas analyzer, which had only current outputs to paper recorders. It seems to be a simple task, but it amused me notably. Details of this story under the cut. Conclusions there.
The task, indeed, was the simplest. But as always, everything is urgent. I did not want to spend money on an industrial logger, but the Arduino UNO shawl was in stock. Five minutes of googling the question and found a suitable nameplate that was perfectly suited for this task. The DOG-4 industrial gas analyzer , which had to be connected to a logger, has only conclusions on paper recorders. Conclusions current 0..5 mA for each analyzed gas (NO and SO2).
 By the way, the optical gas analyzer is an excellent and reliable design, but morally outdated electronics inside spoil the whole thing. The task was to summarize the data for a week and record them electronically for calculations to technologists. No further details were provided.
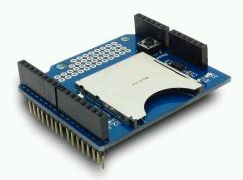
The nameplate found on the Internet was ordered at this(by the way, very good) store and literally the next day was delivered to Tomsk from Novosibirsk. The description label is very convenient, it has a platform for prototyping, which I hoped to use in this simple project. It is enough to load the current outputs of the recorders, for example, on 1 kOhm resistors pulled in the ground and you will receive digital data from the device for the entire measurement range. The ADC bits of 10 bits Arduino was quite happy with the technologists (it would be much more fun to cut data from paper tapes). The package arrived, beautiful packaging, a description of how in the online store. The presence of a prototyping pad is indicated, on which it was necessary to solder only two resistors.

However, an autopsy showed that the nameplate did not match the description. This is what was actually in the box. Instead of a platform for prototyping, there turned out to be a 5 - 3.3 V power switch, the purpose of which remained unclear to me, since it would initially be more reasonable to take 3.3 V power from the Arduino board and power the SD card without risk of burning the card. Transferring the switch to 5 V immediately supplies five-volt power to the card, thereby conscientiously disabling it in the future. Fun Chinese electronics. It is clear that the correct power was immediately supplied at 3.3 V. The library downloaded from the manufacturer’s official page for working with the device also turned out to be a highlight. She just didn't work.
The nameplate uses 4 pins of Arduino, according to this table. Here, thank God, nothing is messed up.

Already thinking about starting to program the correct operation of this device myself, I remembered that in versions of Arduino IDE 1.0+ developers everywhere for some reason began to use the definition #include "Arduino.h" instead of #include "WProgram.h "And therefore the old libraries stopped working in later versions of the Arduino IDE. Returning to the library from the manufacturer’s website, I found that it was for this reason that I could not “get it”. The situation is treated quite simply. In files with the .h and .cpp extensions, the #include "WProgram.h" line must be replaced with such a construction
After that, the library will work in any version of the Arduino IDE. You can do it yourself, or you can download the already corrected version of the library from this link .
The final code of my logger for a gas analyzer is unlikely to be interesting for the post, but I give a simple example for review. This will look like a working code for writing data to an SD card, which will write the phrase “Hello, Habrahabr!” Every 5 seconds to a file
A few important points. Before you start recording, you must format the card (FAT16) and open an empty file with the name that will be used in the program. In the example, this is data.log. Do not pull the card from the nameplate to the "hot" one. It is better to provide software power off with the digitalWrite command (MEM_PW, LOW);
If your data is variable length, use string length calculation. In the example, this is unsigned long length = sizeof (buffer) -1. Inaccuracies in the length of phrases lead to a malfunction of the recording process and you can get a broken file instead of data.
conclusions
The nameplate turned out to be quite working. Excellent data writing speed. Of course, it is not very pleasant that the description is not true, but it is even amusing and makes it possible to give a little brain shot. By the way, the same nameplate can also be used for mini SD. The connector for such a card is on the back.
Have a nice day, everyone!
I urgently needed to collect a simple data logger for one old industrial gas analyzer, which had only current outputs to paper recorders. It seems to be a simple task, but it amused me notably. Details of this story under the cut. Conclusions there. The task, indeed, was the simplest. But as always, everything is urgent. I did not want to spend money on an industrial logger, but the Arduino UNO shawl was in stock. Five minutes of googling the question and found a suitable nameplate that was perfectly suited for this task. The DOG-4 industrial gas analyzer , which had to be connected to a logger, has only conclusions on paper recorders. Conclusions current 0..5 mA for each analyzed gas (NO and SO2).
By the way, the optical gas analyzer is an excellent and reliable design, but morally outdated electronics inside spoil the whole thing. The task was to summarize the data for a week and record them electronically for calculations to technologists. No further details were provided. The nameplate found on the Internet was ordered at this(by the way, very good) store and literally the next day was delivered to Tomsk from Novosibirsk. The description label is very convenient, it has a platform for prototyping, which I hoped to use in this simple project. It is enough to load the current outputs of the recorders, for example, on 1 kOhm resistors pulled in the ground and you will receive digital data from the device for the entire measurement range. The ADC bits of 10 bits Arduino was quite happy with the technologists (it would be much more fun to cut data from paper tapes). The package arrived, beautiful packaging, a description of how in the online store. The presence of a prototyping pad is indicated, on which it was necessary to solder only two resistors.
However, an autopsy showed that the nameplate did not match the description. This is what was actually in the box.
Instead of a platform for prototyping, there turned out to be a 5 - 3.3 V power switch, the purpose of which remained unclear to me, since it would initially be more reasonable to take 3.3 V power from the Arduino board and power the SD card without risk of burning the card. Transferring the switch to 5 V immediately supplies five-volt power to the card, thereby conscientiously disabling it in the future. Fun Chinese electronics. It is clear that the correct power was immediately supplied at 3.3 V. The library downloaded from the manufacturer’s official page for working with the device also turned out to be a highlight. She just didn't work. The nameplate uses 4 pins of Arduino, according to this table. Here, thank God, nothing is messed up.
Already thinking about starting to program the correct operation of this device myself, I remembered that in versions of Arduino IDE 1.0+ developers everywhere for some reason began to use the definition #include "Arduino.h" instead of #include "WProgram.h "And therefore the old libraries stopped working in later versions of the Arduino IDE. Returning to the library from the manufacturer’s website, I found that it was for this reason that I could not “get it”. The situation is treated quite simply. In files with the .h and .cpp extensions, the #include "WProgram.h" line must be replaced with such a construction
#if defined(ARDUINO) && ARDUINO >= 100
#include "Arduino.h"
#else
#include "WProgram.h"
#endif
After that, the library will work in any version of the Arduino IDE. You can do it yourself, or you can download the already corrected version of the library from this link .
The final code of my logger for a gas analyzer is unlikely to be interesting for the post, but I give a simple example for review. This will look like a working code for writing data to an SD card, which will write the phrase “Hello, Habrahabr!” Every 5 seconds to a file
#include "FileLogger.h"
// подключаем карточку к питанию 3,3 вольт на 8 пине
#define MEM_PW 8
void setup(void) {
  pinMode(MEM_PW, OUTPUT); // Инициируем пин 8 и подаем питание на карту
  digitalWrite(MEM_PW, HIGH);
}
void loop(void) {
  byte buffer[] = "Hello, Habrahabr! \r\n";
    unsigned long length = sizeof(buffer)-1; // Важно!
       int result = FileLogger::append("data.log", buffer, length);
delay(5000); // ждем 5 секунд
}
A few important points. Before you start recording, you must format the card (FAT16) and open an empty file with the name that will be used in the program. In the example, this is data.log. Do not pull the card from the nameplate to the "hot" one. It is better to provide software power off with the digitalWrite command (MEM_PW, LOW);
If your data is variable length, use string length calculation. In the example, this is unsigned long length = sizeof (buffer) -1. Inaccuracies in the length of phrases lead to a malfunction of the recording process and you can get a broken file instead of data.
conclusions
The nameplate turned out to be quite working. Excellent data writing speed. Of course, it is not very pleasant that the description is not true, but it is even amusing and makes it possible to give a little brain shot. By the way, the same nameplate can also be used for mini SD. The connector for such a card is on the back.
Have a nice day, everyone!