Native segue from left to right in iOS
I warn you right away, this is a trick. It is not suitable for everyone and not always, but if you need to display a window with some information to the left of the main one, then my method will be just right.
It is possible that everyone already knows it, and I invented the bicycle, but I invented it myself, after a couple of days of fruitless attempts to make a native segue from left to right, so I'm glad to share it.
First, some input. Segue is a way to change screens in iOS. One of the most popular variations is push (from show iOS 8, show). Push segue always replaces the current view from right to left. That is, you seem to have a second window on the right, and when you click a button, it moves to the left, replacing the first.
You see this behavior in the phone book when choosing a subscriber. At the same time, the button for returning to the previous window appears at the top, and when you click on it, the desired animation from left to right occurs.
The problem is that I needed to do the same thing, but there are no standard methods for mirroring this (according to Google). There are lots of instructions on how to make custom segue with similar animation, but they all cut their eyes with their unnaturalness compared to the native push.
Here is what I got as a result:
Only standard methods and 0% custom animation are used. Ready example on GitHub .
The main trick is that we do not make any new segue, we use the native push, as intended.
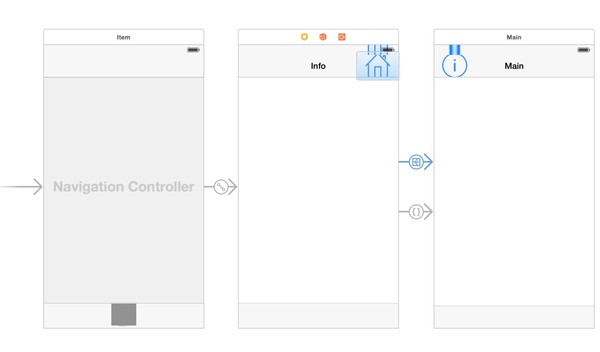
I think the meaning is clear from this screenshot. The start window is Info, which we need to display on the left. When it is activated, we quickly and quietly, without animation, display the Main window using push segue. And after that, you can already go back using unwindFromViewController. Only the user does not know about it and sees a smooth and beautiful left to right segue.
I will not paint how to connect elements to each other and assign custom classes, I’m sure that you all already know this. In any case, you can download the source from GitHub and see.
We will need 2 icons, one custom segue and one InfoViewController.
On the Info window, we add one button with the house icon on the right. Then we connect it to the Main window with a regular push (show) segue.
Create a custom class InfoViewController, a descendant of UIViewController and assign its Info window:
Now you need to create a custom segue that will quietly display the Main window when the application starts:
Now you need to create a link to this custom segue controller Info with Main. This connection must be assigned the identifier FastSegue.
The thing is small - to return to the Info window when you click on the button of the Main window. This is an optional part, because, by default, a return button will be generated there with the arrow and the name of the previous window, but I need an icon.
In addition, as it turned out, if you replace the backBarButtonItem with your element, then you cannot open the Info window with a gesture from left to right, as with a regular segue.
So, add the UINavigationItem and leftBarButtonItem element to the Main window to replace the automatically generated native backBarButtonItem. We select the “i” icon as a picture and our button is successfully displayed when the application starts. Just does nothing.
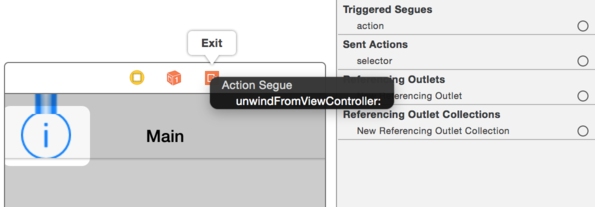
In order for it to replace the backBarButtonItem functionality, you need to assign action unwindFromViewController to it - that's why we designated it in the Info window controller.
So we associate the button with the exit point and select unwindFromViewController:
That's all!
I also add that for an invisible starting switch, you need LaunchImage, or LaunchScreen, but there are no applications without them.
If it seems to you that I wrote complete nonsense and a crutch here, I will be glad to see your solution and put it into practice.To me, this method also seems not quite true, and, moreover, not at all universal , but it works as I need and looks great!
Thanks for attention.
Replaced the old video with a slightly more visual one, with tables.
As it turned out, this is not a crutch, it’s not “unusual behavior”. The native Mail app works the same way .
Open Mail - we see letters at once and at the top there is a button to open all mailboxes. When you click on it, left to right segue occurs, most likely, exactly the same done. That is, a preliminary inconspicuous rewind to the second window.
It turns out that I re-invented what Apple itself has been using for a long time. Hello to all those who disagree .
It is possible that everyone already knows it, and I invented the bicycle, but I invented it myself, after a couple of days of fruitless attempts to make a native segue from left to right, so I'm glad to share it.
First, some input. Segue is a way to change screens in iOS. One of the most popular variations is push (from show iOS 8, show). Push segue always replaces the current view from right to left. That is, you seem to have a second window on the right, and when you click a button, it moves to the left, replacing the first.
You see this behavior in the phone book when choosing a subscriber. At the same time, the button for returning to the previous window appears at the top, and when you click on it, the desired animation from left to right occurs.
The problem is that I needed to do the same thing, but there are no standard methods for mirroring this (according to Google). There are lots of instructions on how to make custom segue with similar animation, but they all cut their eyes with their unnaturalness compared to the native push.
Here is what I got as a result:
Only standard methods and 0% custom animation are used. Ready example on GitHub .
Idea
The main trick is that we do not make any new segue, we use the native push, as intended.
I think the meaning is clear from this screenshot. The start window is Info, which we need to display on the left. When it is activated, we quickly and quietly, without animation, display the Main window using push segue. And after that, you can already go back using unwindFromViewController. Only the user does not know about it and sees a smooth and beautiful left to right segue.
Implementation
I will not paint how to connect elements to each other and assign custom classes, I’m sure that you all already know this. In any case, you can download the source from GitHub and see.
We will need 2 icons, one custom segue and one InfoViewController.
On the Info window, we add one button with the house icon on the right. Then we connect it to the Main window with a regular push (show) segue.
Create a custom class InfoViewController, a descendant of UIViewController and assign its Info window:
#import "InfoViewController.h"
@interface InfoViewController ()
@end
@implementation InfoViewController
    // Быстрая перемотка на окно Main при первом запуске
    // Запускаем custom segue с идентификатором FastSegue
	- (void) viewDidLoad {
		[self performSegueWithIdentifier:@"FastSegue" sender:nil];
	}
    // Указание метода для возврата на окно Info
	- (IBAction)unwindFromViewController:(UIStoryboardSegue *)sender {
	}
@end
Now you need to create a custom segue that will quietly display the Main window when the application starts:
#import "FastSegue.h"
@implementation FastSegue
    // Обычный push segue, только без анимации
	- (void) perform {
		[[[self sourceViewController] navigationController] pushViewController:[self destinationViewController] animated:NO];
	}
@end
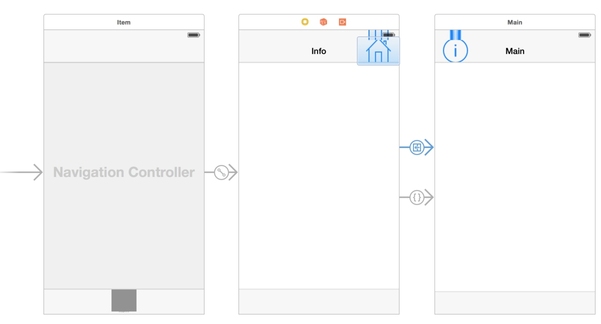
Now you need to create a link to this custom segue controller Info with Main. This connection must be assigned the identifier FastSegue.
 |  |
The thing is small - to return to the Info window when you click on the button of the Main window. This is an optional part, because, by default, a return button will be generated there with the arrow and the name of the previous window, but I need an icon.
In addition, as it turned out, if you replace the backBarButtonItem with your element, then you cannot open the Info window with a gesture from left to right, as with a regular segue.
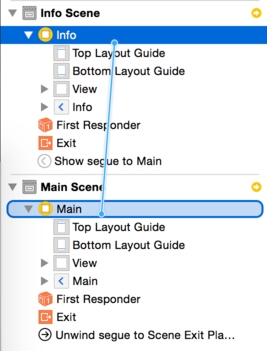
So, add the UINavigationItem and leftBarButtonItem element to the Main window to replace the automatically generated native backBarButtonItem. We select the “i” icon as a picture and our button is successfully displayed when the application starts. Just does nothing.
In order for it to replace the backBarButtonItem functionality, you need to assign action unwindFromViewController to it - that's why we designated it in the Info window controller.
So we associate the button with the exit point and select unwindFromViewController:
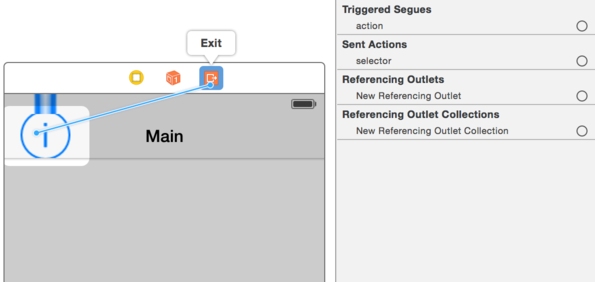 |  |
That's all!
I also add that for an invisible starting switch, you need LaunchImage, or LaunchScreen, but there are no applications without them.
If it seems to you that I wrote complete nonsense and a crutch here, I will be glad to see your solution and put it into practice.
Thanks for attention.
Updated
Replaced the old video with a slightly more visual one, with tables.
Updated 2
As it turned out, this is not a crutch, it’s not “unusual behavior”. The native Mail app works the same way .
Open Mail - we see letters at once and at the top there is a button to open all mailboxes. When you click on it, left to right segue occurs, most likely, exactly the same done. That is, a preliminary inconspicuous rewind to the second window.
It turns out that I re-invented what Apple itself has been using for a long time. Hello to all those who disagree .