Node.js tutorial, part 6: event loop, call stack, timers
- Transfer
Today, in the sixth part of the translation guide for Node.js, we will talk about the cycle of events, about the call stack, about the function

If you want to understand how JavaScript code is executed, then the Event Loop is one of the most important concepts that you need to understand. Here we will talk about how JavaScript works in a single-threaded mode, and how the asynchronous functions are handled.
For many years I have been developing in JavaScript, but I cannot say that I fully understood how everything functions, so to speak, “under the hood”. The programmer may not know about the intricacies of the internal subsystems of the environment in which he works. But it is usually useful to have at least a general idea of such things.
The JavaScript code you write is executed in single-threaded mode. At a time, only one action is performed. This restriction is, in fact, quite useful. This greatly simplifies the way programs work, eliminating the need for programmers to solve problems specific to multi-threaded environments.
In fact, the JS programmer needs to pay attention only to what actions his code performs, and try to avoid situations that cause blocking of the main thread. For example, making network calls in synchronous mode and endless loops .
Usually in browsers, each open tab has its own event loop. This allows you to perform the code of each page in an isolated environment and avoid situations where a certain page, in the code of which there is an infinite loop or heavy calculations are performed, can “hang” the entire browser. The browser supports the work of a set of simultaneously existing event cycles used, for example, to handle calls to various APIs. In addition, its own event loop is used to support web workers .
The most important thing that a JavaScript programmer needs to constantly remember is that his code uses its own event loop, so the code must be written so that this event loop does not block.
Any JavaScript code that takes too much time to execute, that is, code that doesn’t return control to an event loop for too long, blocks the execution of any other page code. This even leads to blocking of the user interface event handling, which is expressed in the fact that the user cannot interact with the page elements and work with it normally, for example, scrolling.
Virtually all of the basic mechanisms for providing I / O to JavaScript are non-blocking. This applies to both the browser and Node.js. Among such mechanisms, for example, it is possible to point out tools for performing network requests, used in both client and server environments, and tools for working with Node.js files. There are synchronous ways to perform such operations, but they are used only in special cases. That is why in JavaScript, traditional callbacks and newer mechanisms — promises and async / await constructions — are of paramount importance.
Call Stack in JavaScript is based on the LIFO principle (Last In, First Out - last entered, first out). The event loop constantly checks the call stack to see if it has a function to execute. If, when executing the code, it encounters a call to some function, information about it is added to the call stack and the function is executed.
If even before you were not interested in the concept of “call stack”, then you, if you met with error messages that include stack tracing, already imagine what it looks like. Here, for example, how similar looks in the browser.

An error message in the browser
Browser, when an error occurs, reports a sequence of function calls, information about which is stored in the call stack, which allows you to detect the source of the error and understand which function calls led to the situation.
Now that we have talked in general about the event loop and the call stack, consider an example illustrating the execution of a code snippet, and how this process looks from the point of view of the event loop and the call stack.
Here is the code with which we will experiment:
If you execute this code, the following will fall into the console:
This result is quite expected. Namely, when this code is run, the function is first called
Changing the state of the call stack when executing the code under investigation.
The event loop, at each iteration, checks whether there is anything in the call stack, and if so, it does this until the call stack is empty.
Event loop iterations
The above example looks quite normal, there is nothing special about it: JavaScript finds the code to be executed and executes it in order. Let's talk about how to postpone the function until the call stack is cleared. In order to do this, use this structure:
It allows you to perform the function passed to the function
Consider an example:
What this code displays might seem unexpected:
When we run this example, the function is first called
This is what the call stack will now look like.
Changing the state of the call stack when executing the code being examined.
This is the order in which the functions in our program will now be executed.
Iterations of the event loop
Why does this happen that way?
When a function is called
In the event queue, if we are talking about the browser, there are also user-initiated events — events triggered by mouse clicks on the page elements, events triggered when entering data from the keyboard. Immediately there are DOM event handlers like
The event loop gives priority to what is on the call stack. First, it performs everything that it manages to find in the stack, and after the stack is empty, it proceeds to process what is in the event queue.
We do not need to wait until the function, like
In ECMAScript 2015 (ES6), the concept of a job queue (Job Queue) was introduced, which is used by promises (they also appeared in ES6). Thanks to the job queue, the result of the asynchronous function can be used as quickly as possible, without having to wait for the call stack to clear.
If the promise is allowed before the end of the current function, the corresponding code will be executed immediately after the current function completes.
I found an interesting analogy for what we are talking about. This can be compared to a roller coaster in an amusement park. After you ride the hill and want to do it again, you take a ticket and stand at the tail of the queue. This is how the event queue works. But the queue of tasks looks different. This concept is similar to the discount ticket, which gives you the right to make the next trip immediately after you have completed the previous one.
Consider the following example:
Here is what will be displayed after its execution:
What can be seen here demonstrates the serious difference between promises (and async / await constructions based on them) and traditional asynchronous functions, which are organized through
The method
Suppose the event loop is busy executing the code of the current function. When this operation is completed, the JavaScript engine will execute all functions passed
For example, if you use the construct, the
Another function that Node.js provides for asynchronous code execution is
The callback function passed
What
The function passed
Calling a function
Above, we have already talked about the function
Recall that when a function is called, a callback
Here we pass a
The function
In the previous sections we have used
This code will output the following:
This technique is especially useful in situations where, when performing heavy computational tasks, I would not want to block the main thread, allowing other functions to be performed, breaking up similar tasks into several stages, arranged in the form of calls
If we recall the aforementioned function
The function
The callback passed to the function shown above will be called every 2 seconds. In order to provide the possibility of stopping this process, you need to get the timer identifier returned
A common technique is to call
The function
If each call to this callback always requires the same time, less

Periodically called callback, each session of which takes the same time, is within the interval between calls
It is possible that a different time is required to execute a callback each time, which is still shorter

Periodically called callback, each session of which takes a different time, within the interval between calls
When used

Periodically called callback, each session of which takes a different time, which sometimes does not fit into the interval between calls.
In order to avoid such a situation, you can use the technique of recursively setting the timer using
With this approach, you can implement the following scenario:

A recursive setTimeout () call to schedule callback execution.
Today we talked about the internal mechanisms of Node.js, such as the event loop, call stack, discussed working with timers that allow you to schedule code execution. Next time we dive into the topic of asynchronous programming.
Dear readers! Have you encountered situations when you had to use process.nextTick ()?

process.nextTick(), about the timers. Understanding these and other Node.js mechanisms is one of the foundations for successful application development for this platform.[We advise to read] Other parts of the cycle
Часть 1: Общие сведения и начало работы
Часть 2: JavaScript, V8, некоторые приёмы разработки
Часть 3: Хостинг, REPL, работа с консолью, модули
Часть 4: npm, файлы package.json и package-lock.json
Часть 5: npm и npx
Часть 6: цикл событий, стек вызовов, таймеры
Часть 7: асинхронное программирование
Часть 8: Руководство по Node.js, часть 8: протоколы HTTP и WebSocket
Часть 9: Руководство по Node.js, часть 9: работа с файловой системой
Часть 10: Руководство по Node.js, часть 10: стандартные модули, потоки, базы данных, NODE_ENV
Полная PDF-версия руководства по Node.js
Cycle of events
If you want to understand how JavaScript code is executed, then the Event Loop is one of the most important concepts that you need to understand. Here we will talk about how JavaScript works in a single-threaded mode, and how the asynchronous functions are handled.
For many years I have been developing in JavaScript, but I cannot say that I fully understood how everything functions, so to speak, “under the hood”. The programmer may not know about the intricacies of the internal subsystems of the environment in which he works. But it is usually useful to have at least a general idea of such things.
The JavaScript code you write is executed in single-threaded mode. At a time, only one action is performed. This restriction is, in fact, quite useful. This greatly simplifies the way programs work, eliminating the need for programmers to solve problems specific to multi-threaded environments.
In fact, the JS programmer needs to pay attention only to what actions his code performs, and try to avoid situations that cause blocking of the main thread. For example, making network calls in synchronous mode and endless loops .
Usually in browsers, each open tab has its own event loop. This allows you to perform the code of each page in an isolated environment and avoid situations where a certain page, in the code of which there is an infinite loop or heavy calculations are performed, can “hang” the entire browser. The browser supports the work of a set of simultaneously existing event cycles used, for example, to handle calls to various APIs. In addition, its own event loop is used to support web workers .
The most important thing that a JavaScript programmer needs to constantly remember is that his code uses its own event loop, so the code must be written so that this event loop does not block.
Locking event loop
Any JavaScript code that takes too much time to execute, that is, code that doesn’t return control to an event loop for too long, blocks the execution of any other page code. This even leads to blocking of the user interface event handling, which is expressed in the fact that the user cannot interact with the page elements and work with it normally, for example, scrolling.
Virtually all of the basic mechanisms for providing I / O to JavaScript are non-blocking. This applies to both the browser and Node.js. Among such mechanisms, for example, it is possible to point out tools for performing network requests, used in both client and server environments, and tools for working with Node.js files. There are synchronous ways to perform such operations, but they are used only in special cases. That is why in JavaScript, traditional callbacks and newer mechanisms — promises and async / await constructions — are of paramount importance.
Call stack
Call Stack in JavaScript is based on the LIFO principle (Last In, First Out - last entered, first out). The event loop constantly checks the call stack to see if it has a function to execute. If, when executing the code, it encounters a call to some function, information about it is added to the call stack and the function is executed.
If even before you were not interested in the concept of “call stack”, then you, if you met with error messages that include stack tracing, already imagine what it looks like. Here, for example, how similar looks in the browser.
An error message in the browser
Browser, when an error occurs, reports a sequence of function calls, information about which is stored in the call stack, which allows you to detect the source of the error and understand which function calls led to the situation.
Now that we have talked in general about the event loop and the call stack, consider an example illustrating the execution of a code snippet, and how this process looks from the point of view of the event loop and the call stack.
Event loop and call stack
Here is the code with which we will experiment:
const bar = () =>console.log('bar')
const baz = () =>console.log('baz')
const foo = () => {
  console.log('foo')
  bar()
  baz()
}
foo()
If you execute this code, the following will fall into the console:
foo
bar
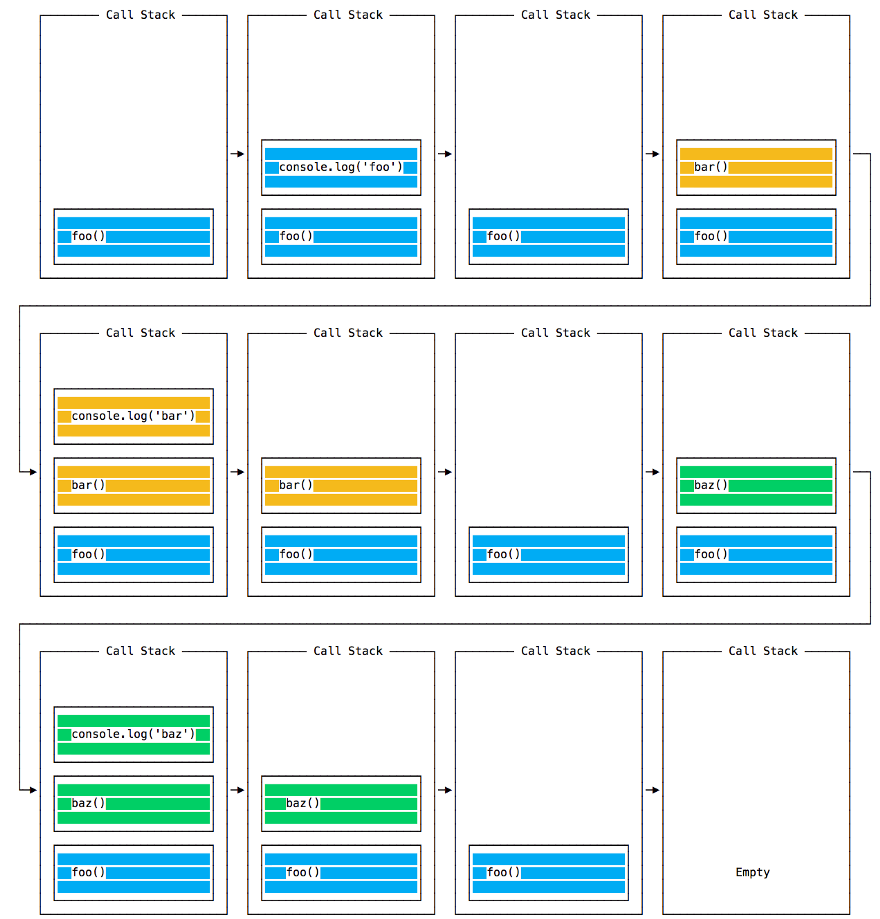
bazThis result is quite expected. Namely, when this code is run, the function is first called
foo(). Inside this function, we first call the function bar(), and then - baz(). At the same time, the call stack during the execution of this code undergoes changes as shown in the following figure.Changing the state of the call stack when executing the code under investigation.
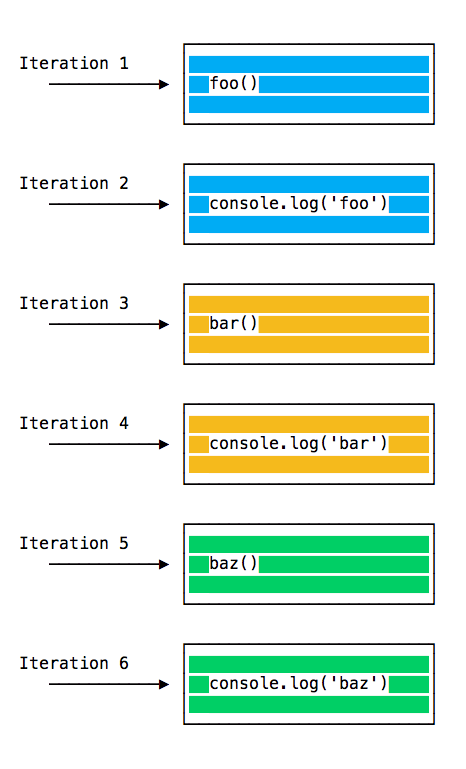
The event loop, at each iteration, checks whether there is anything in the call stack, and if so, it does this until the call stack is empty.
Event loop iterations
Queuing a function
The above example looks quite normal, there is nothing special about it: JavaScript finds the code to be executed and executes it in order. Let's talk about how to postpone the function until the call stack is cleared. In order to do this, use this structure:
setTimeout(() => {}), 0)It allows you to perform the function passed to the function
setTimeout()after all the other functions called in the program code are executed. Consider an example:
const bar = () =>console.log('bar')
const baz = () =>console.log('baz')
const foo = () => {
  console.log('foo')
  setTimeout(bar, 0)
  baz()
}
foo()
What this code displays might seem unexpected:
foo
baz
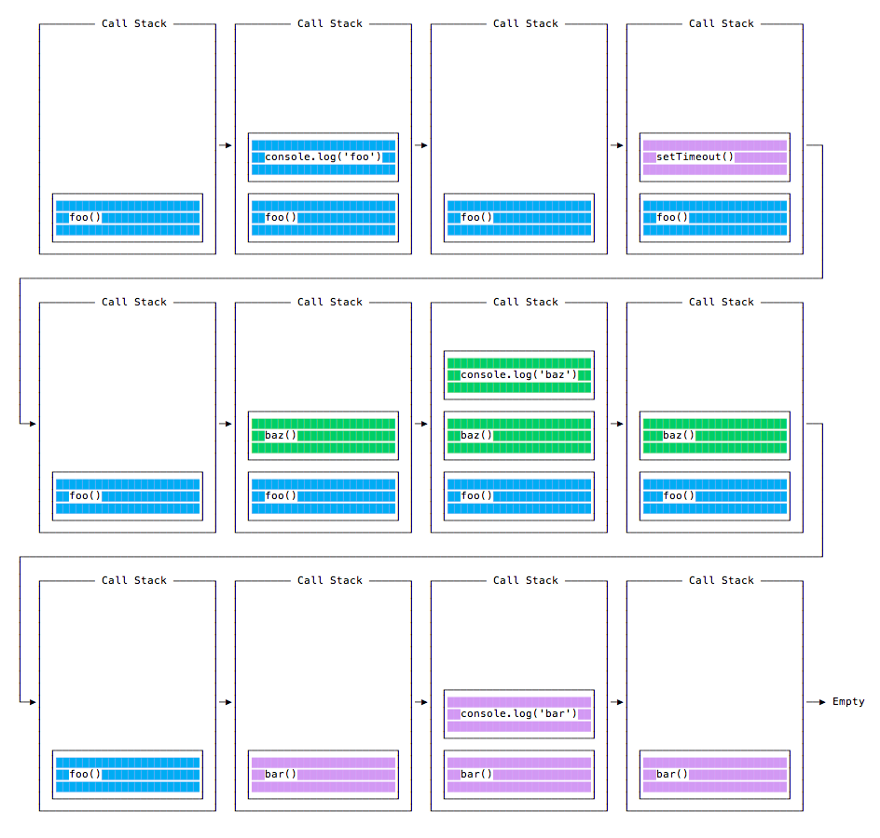
barWhen we run this example, the function is first called
foo(). In it, we call setTimeout(), passing the function as the first argument bar. Passing to it as the second argument 0, we inform the system that this function should be performed as soon as possible. Then we call the function baz(). This is what the call stack will now look like.
Changing the state of the call stack when executing the code being examined.
This is the order in which the functions in our program will now be executed.
Iterations of the event loop
Why does this happen that way?
Event queue
When a function is called
setTimeout(), the browser or the Node.js platform starts a timer. After the timer fires (in our case it happens immediately, since we set it to 0), the callback function that is passed setTimeout()enters the event queue (Event Queue). In the event queue, if we are talking about the browser, there are also user-initiated events — events triggered by mouse clicks on the page elements, events triggered when entering data from the keyboard. Immediately there are DOM event handlers like
onloadfunctions called when receiving responses to asynchronous requests for loading data. Here they are waiting for their turn to be processed.The event loop gives priority to what is on the call stack. First, it performs everything that it manages to find in the stack, and after the stack is empty, it proceeds to process what is in the event queue.
We do not need to wait until the function, like
setTimeout(), completes the work, since such functions are provided by the browser and they use their own threads. So, for example, setting the setTimeout()timer for 2 seconds using the function , you should not, after stopping the execution of another code, wait for these 2 seconds, since the timer runs outside of your code.ES6 Job Queue
In ECMAScript 2015 (ES6), the concept of a job queue (Job Queue) was introduced, which is used by promises (they also appeared in ES6). Thanks to the job queue, the result of the asynchronous function can be used as quickly as possible, without having to wait for the call stack to clear.
If the promise is allowed before the end of the current function, the corresponding code will be executed immediately after the current function completes.
I found an interesting analogy for what we are talking about. This can be compared to a roller coaster in an amusement park. After you ride the hill and want to do it again, you take a ticket and stand at the tail of the queue. This is how the event queue works. But the queue of tasks looks different. This concept is similar to the discount ticket, which gives you the right to make the next trip immediately after you have completed the previous one.
Consider the following example:
const bar = () =>console.log('bar')
const baz = () =>console.log('baz')
const foo = () => {
  console.log('foo')
  setTimeout(bar, 0)
  newPromise((resolve, reject) =>
    resolve('should be right after baz, before bar')
  ).then(resolve =>console.log(resolve))
  baz()
}
foo()
Here is what will be displayed after its execution:
foo
baz
should be right after baz, before bar
bar
What can be seen here demonstrates the serious difference between promises (and async / await constructions based on them) and traditional asynchronous functions, which are organized through
setTimeout()or other APIs of the platform used.process.nextTick ()
The method
process.nextTick()interacts in a special way with the event loop. Tick (tick) call one full pass of the event cycle. By passing the function to the method process.nextTick(), we inform the system that this function must be called after the current iteration of the event loop is completed, before the next one begins. Using this method looks like this:process.nextTick(() => {
//выполнить какие-то действия
})Suppose the event loop is busy executing the code of the current function. When this operation is completed, the JavaScript engine will execute all functions passed
process.nextTick()during the execution of the previous operation. Using this mechanism, we strive to ensure that a certain function would be executed asynchronously (after the current function), but as soon as possible, without putting it in a queue. For example, if you use the construct, the
setTimeout(() => {}, 0)function will be executed at the next iteration of the event loop, that is, much later than when used in the same situation process.nextTick(). This method should be used when you need to ensure the execution of some code at the very beginning of the next iteration of the event loop.setImmediate ()
Another function that Node.js provides for asynchronous code execution is
setImmediate(). Here's how to use it:setImmediate(() => {
//выполнить некий код
})The callback function passed
setImmediate()in will be executed at the next iteration of the event loop. What
setImmediate()is different from setTimeout(() => {}, 0)(that is, from the timer, which should work as soon as possible) and from process.nextTick()? The function passed
process.nextTick()will be executed after the current iteration of the event loop is completed. That is, such a function will always be executed until a function that is scheduled to be executed using setTimeout()or setImmediate(). Calling a function
setTimeout()with a 0 ms delay set is very similar to a call setImmediate(). The order of performance of the functions transferred to them depends on various factors, but in both cases callbacks will be called up at the next iteration of the event loop.Timers
Above, we have already talked about the function
setTimeout()that allows you to schedule calls to the callbacks transferred to it. Let us devote some time to a more detailed description of its features and consider another function setInterval(), similar to it. In Node.js, the functions for working with timers are included in the timer module , but you can use them without connecting this module in the code, since they are global.SetsetTimeout () function
Recall that when a function is called, a callback
setTimeout()is passed to it, in milliseconds, after which a callback will be called. Consider an example:setTimeout(() => {
// выполняется через 2 секунды
}, 2000)
setTimeout(() => {
// выполняется через 50 миллисекунд
}, 50)Here we pass a
setTimeout()new function, which is immediately described, but here you can use an existing function, passing setTimeout()its name and a set of parameters to start it. It looks like this:const myFunction = (firstParam, secondParam) => {
//выполнить некий код
}
// выполняется через 2 секунды
setTimeout(myFunction, 2000, firstParam, secondParam)The function
setTimeout()returns the timer identifier. Usually it is not used, but it can be saved, and, if necessary, delete the timer, if the scheduled execution of the callback is no longer necessary:constid = setTimeout(() => {
// этот код должен выполниться через 2 секунды
}, 2000)
// Программист передумал, выполнять этот код больше не нужно
clearTimeout(id)▍ Zero delay
In the previous sections we have used
setTimeout(), passing it as the time after which you need to call the callback, 0. This meant that the callback would be called as soon as possible, but after the completion of the current function:setTimeout(() => {
console.log('after ')
}, 0)
console.log(' before ')This code will output the following:
beforeafterThis technique is especially useful in situations where, when performing heavy computational tasks, I would not want to block the main thread, allowing other functions to be performed, breaking up similar tasks into several stages, arranged in the form of calls
setTimeout(). If we recall the aforementioned function
setImmediate(), then in Node.js it is standard, which is not the case with browsers (in IE and Edge it is implemented , in others it is not).SetsetInterval () function
The function
setInterval()is similar to setTimeout(), but there are differences between them. Instead of performing the callback transferred to it once, it setInterval()will periodically, at a specified interval, call this callback. Ideally, this will continue until the programmer explicitly stops this process. Here is how to use this feature:setInterval(() => {
// выполняется каждые 2 секунды
}, 2000)The callback passed to the function shown above will be called every 2 seconds. In order to provide the possibility of stopping this process, you need to get the timer identifier returned
setInterval()and use the command clearInterval():constid = setInterval(() => {
// выполняется каждые 2 секунды
}, 2000)
clearInterval(id)A common technique is to call
clearInterval()inside a callback transmitted setInterval()when a certain condition is met. For example, the following code will be run periodically until the property App.somethingIWaitaccepts a value arrived:const interval = setInterval(function() {
if (App.somethingIWait === 'arrived') {
clearInterval(interval)
// если условие выполняется - удалим таймер, если нет - выполним некие действия
}
}, 100)▍Recursive setting setTimeout ()
The function
setInterval()will call the callback passed to it every nmillisecond, not caring if the callback has completed after its previous call. If each call to this callback always requires the same time, less
n, then there are no problems here.Periodically called callback, each session of which takes the same time, is within the interval between calls
It is possible that a different time is required to execute a callback each time, which is still shorter
n. If, for example, we are talking about performing some network operations, then such a situation is quite expected.Periodically called callback, each session of which takes a different time, within the interval between calls
When used
setInterval(), a situation may arise where the execution of a callback takes longer thannthat resulting in the next call being made before the previous one is completed.Periodically called callback, each session of which takes a different time, which sometimes does not fit into the interval between calls.
In order to avoid such a situation, you can use the technique of recursively setting the timer using
setTimeout(). The point is that the next callback call is scheduled after the completion of its previous call:const myFunction = () => {
// выполнить некие действия
setTimeout(myFunction, 1000)
}
setTimeout(
myFunction()
}, 1000)With this approach, you can implement the following scenario:
A recursive setTimeout () call to schedule callback execution.
Results
Today we talked about the internal mechanisms of Node.js, such as the event loop, call stack, discussed working with timers that allow you to schedule code execution. Next time we dive into the topic of asynchronous programming.
Dear readers! Have you encountered situations when you had to use process.nextTick ()?