Using Vendor-Specific Attributes in Cisco ACS 5 with APC and Supermicro
- Tutorial
In this article, I would like to share the experience of using Vendor-Specific Attributes (hereinafter referred to as VSA) in Cisco Secure ACS 5.5 (hereinafter simply as ACS) by setting up RADIUS authentication on APC Smart-UPS and Supermicro IPMI. ACS in turn will authorize users in LDAP. At the end of the article, as a bonus, I will show how to remove dump packets on ACS for Troubleshoot using Wireshark.
Warning: for ease of understanding, the article contains many screenshots.
The first step is to configure the External Identity Stores, namely, configure the connection to AD / LDAP and configure the mapping of groups. There is already an article on Habréon this topic, so I’ll omit this point and go directly to preparing ACS to authorize APC Smart-UPS users in it (at the end showing the differences in setting up Supermicro IPMI).
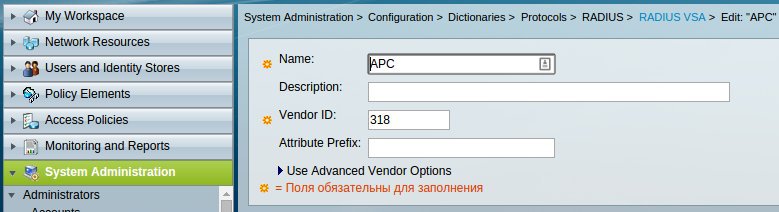
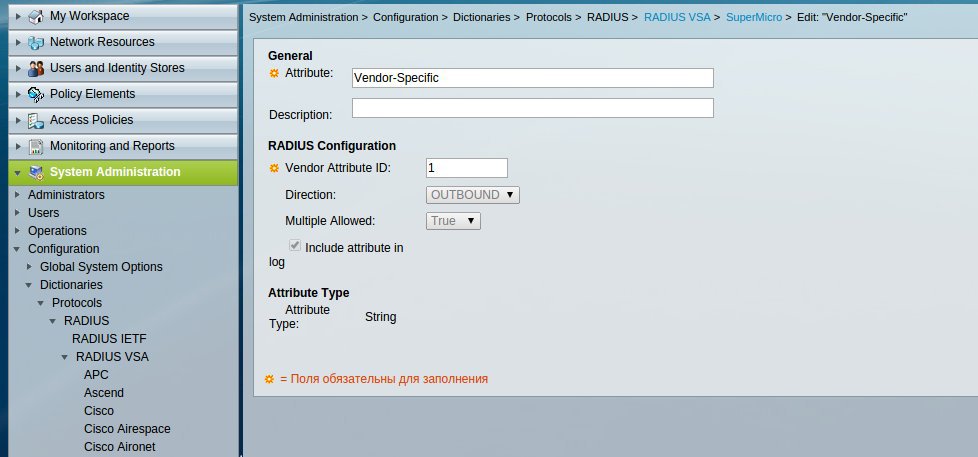
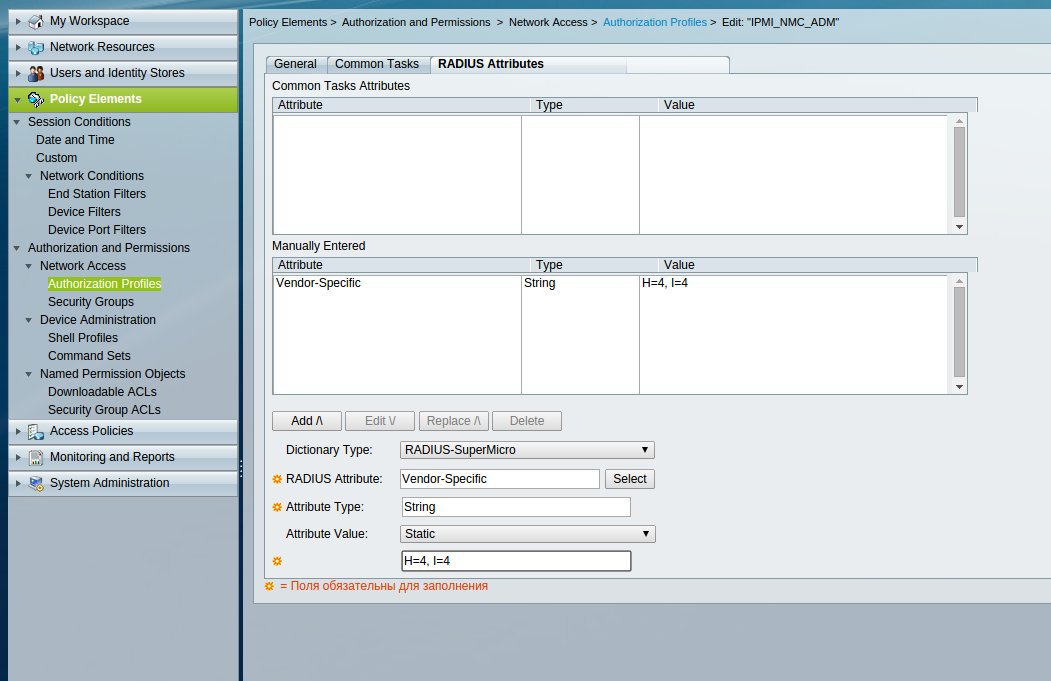
First you need to create a RADIUS VSA in order to transfer an additional field to the client upon successful authorization. In this case, the level of rights of the logged in user is transferred. The required field names as well as their values can be found in the manufacturer's documentation ( APC and Supermicro ). Creating a VSA is done in the menu under System Administration -> Configuration -> Dictionaries -> Protocols -> RADIUS -> RADIUS VSA. First, create the Vendor Specific Dictionary (Vendor ID can be found on the IANA website ).
Then we add the attributes themselves.

Create Device Type for UPS and IPMI. To do this, in Network Resources -> Network Device Groups -> Device Type create an APC-UPS group.

Next, in Network Resources -> Network Devices and AAA Clients, we describe the subnet in which our UPSs are located. You can describe each device separately, simply by specifying its IP, but with a large number it is more convenient to operate with groups of devices.

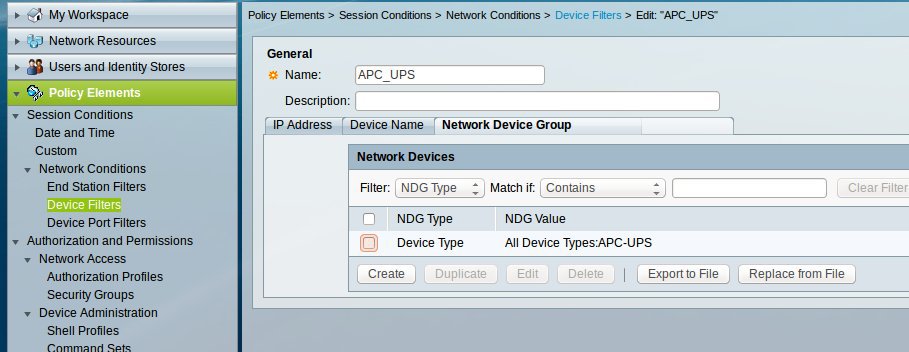
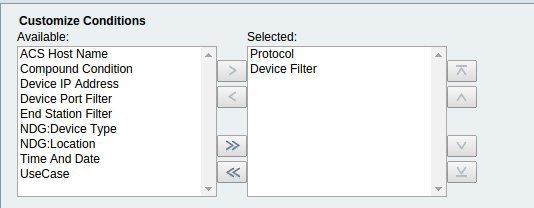
Now you need to create a Device Filter so that you can then send an authorization request to the necessary Access Service. This is done in the section Policy Elements -> Session Conditions -> Network Conditions -> Device Filters.
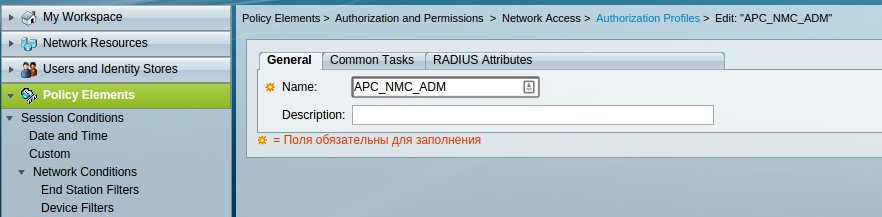
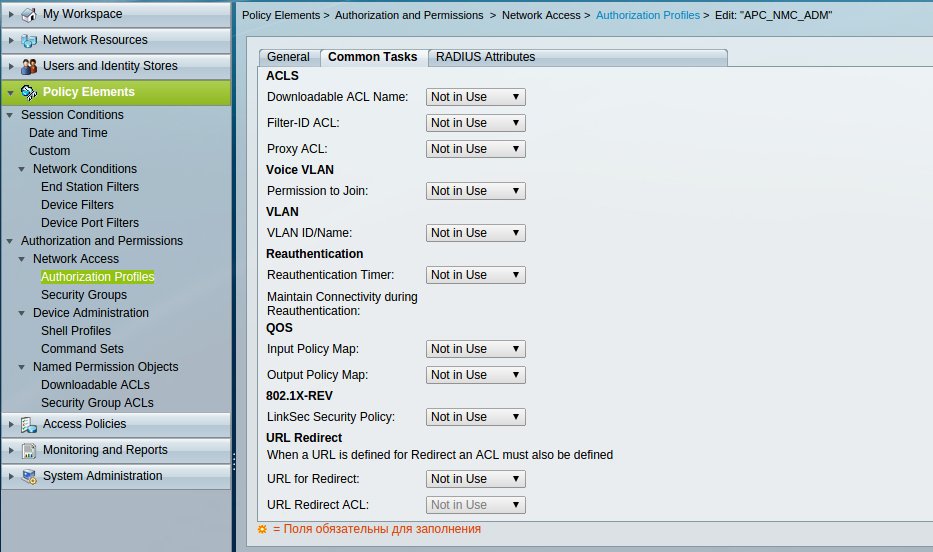
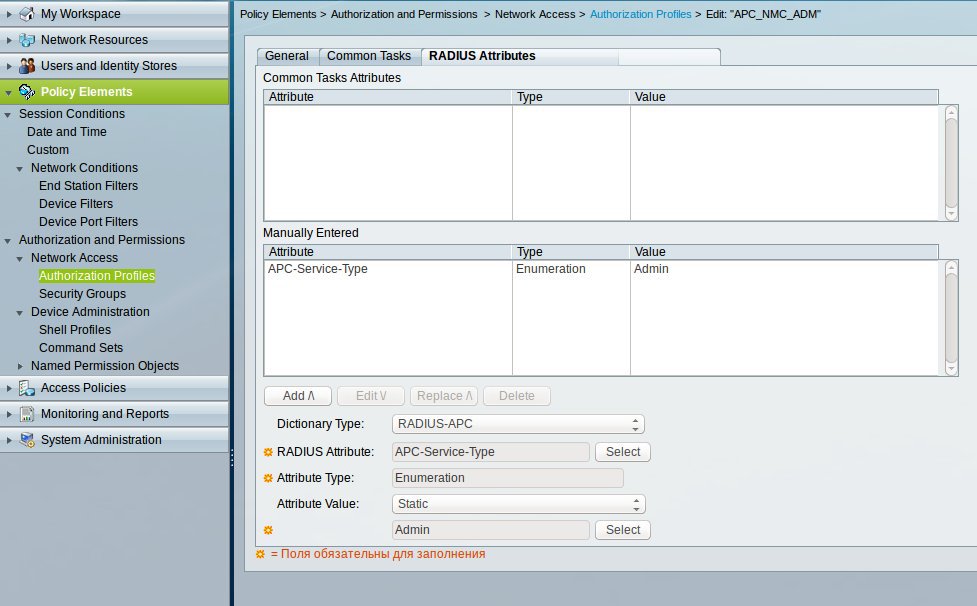
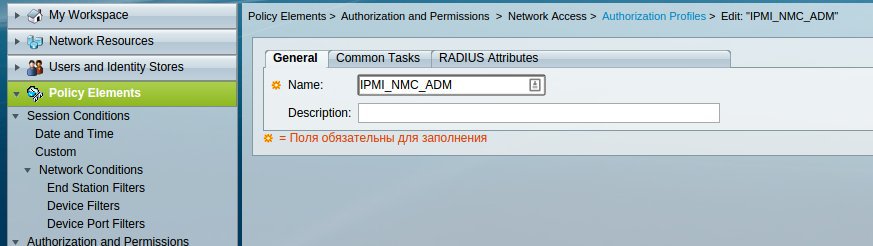
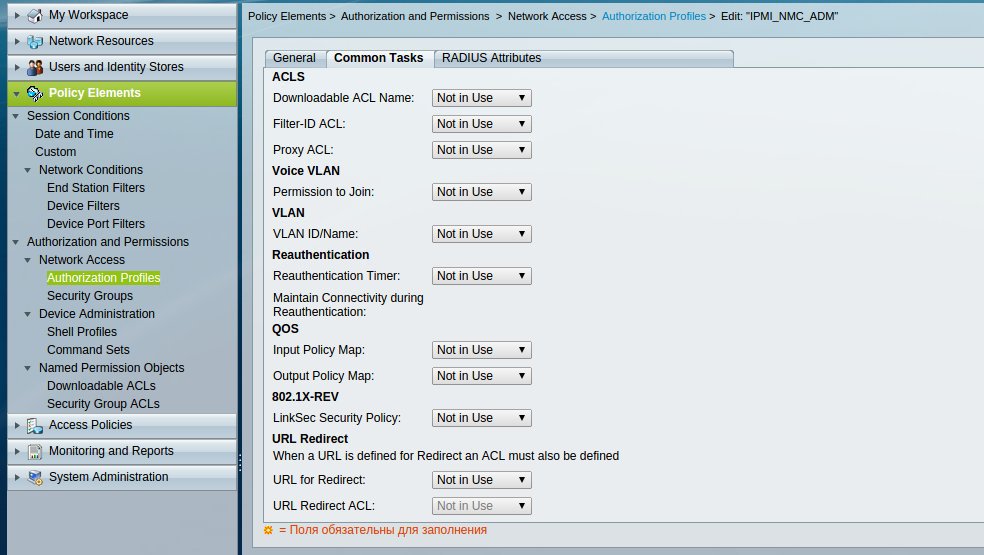
Create an Authorization Profile to transfer the VSA to the client device under Policy Elements -> Authorization and Permissions -> Network Access -> Authorization Profiles.
Configure the Access Service in the Access Policies -> Access Services section.


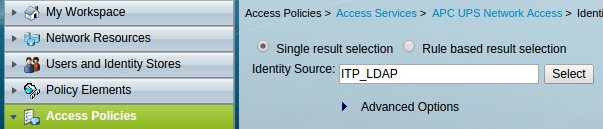
We specify for it the Identity Source here Access Policies -> Access Services -> APC UPS Network Access -> Identity.
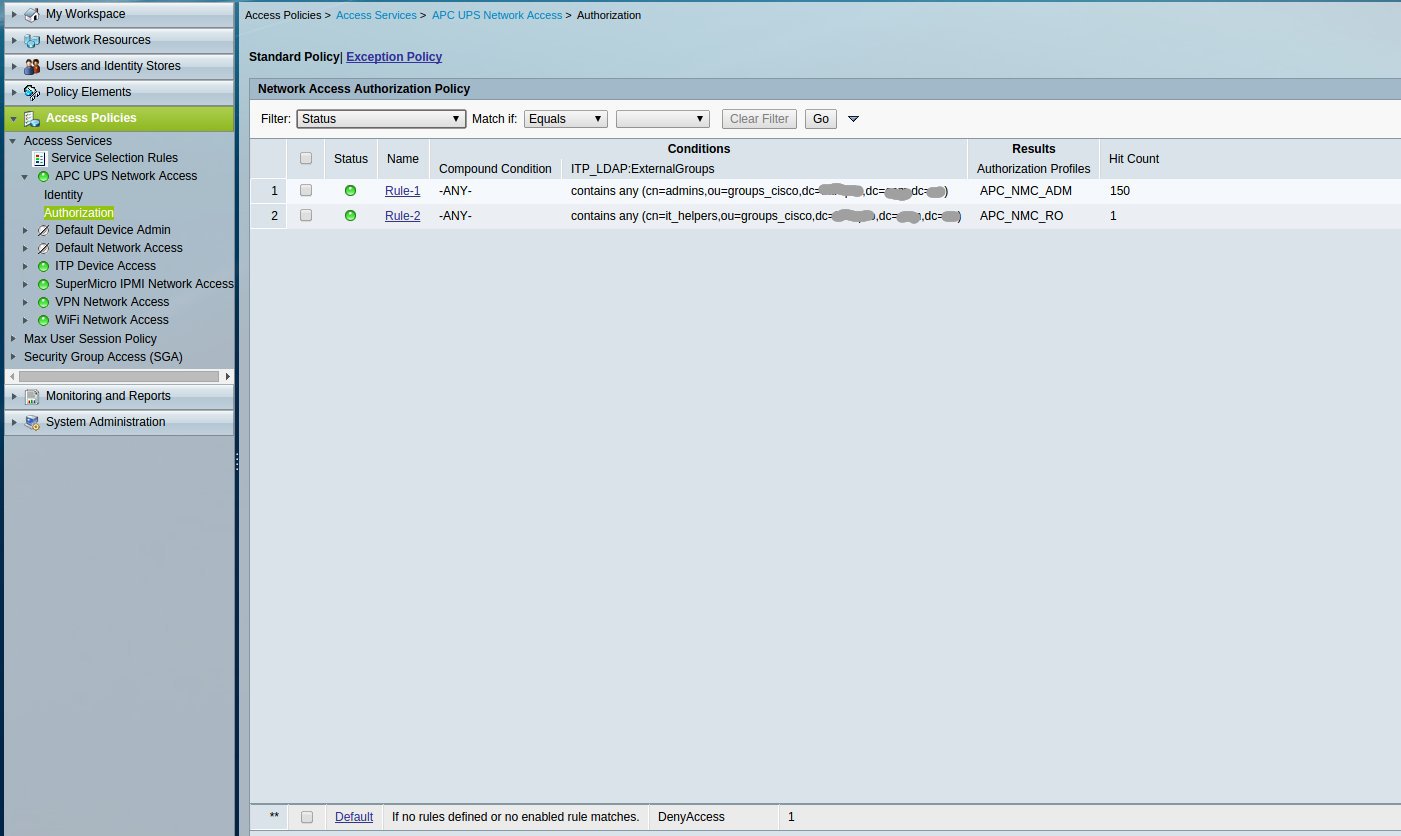
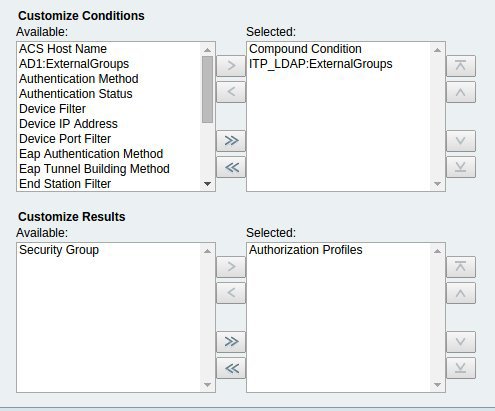
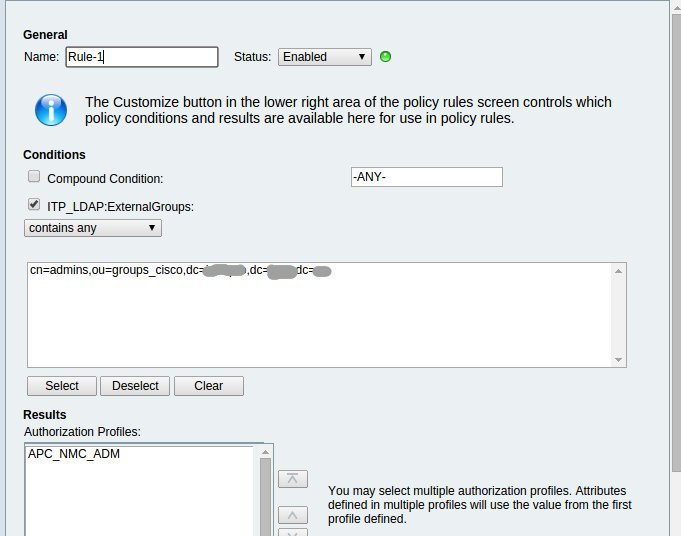
And create the Network Access Authorization Policy rules in Access Policies -> Access Services -> APC UPS Network Access -> Authorization.
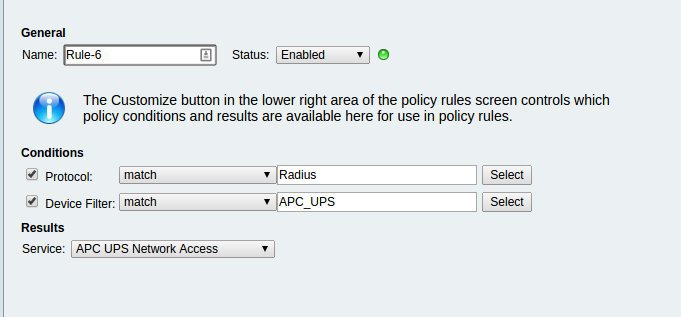
The last step in ACS is to create an Access Services selection rule in Access Policies -> Access Services -> Service Selection Rules.

Finally, we configure UPS to authorize users through RADIUS.


Congratulations! Now you can log into UPS by authorizing the user via RADIUS (which in turn authorizes users in LDAP / AD and also takes groups from it). If the RADIUS server is unavailable, authorization will occur through the local account, so do not forget to configure it and set it a strong password.
Now let's look at the difference between APC Smart-UPS and Supermicro IPMI. It lies in another VSA dictionary and authorization profile.

The remaining settings are similar to the above settings for UPS from APC.
Configuring RADIUS in IPMI is pretty trivial.

Unlike APC NMC, Supermicro IPMI cannot specify account source priority. Both local and RADIUS users work simultaneously. Also, do not forget to change the default password of the ADMIN user.
I want to draw your attention to the bug / feature that we found in the IPMI firmware versions used by us: User password longer than 16 characters is truncated. Mnu had 17 characters - had to be "cut back". Perhaps it was fixed in newer versions - they did not check.
Often, during authorization setup, it may be necessary to dump packets between the end device and the authorization server represented by Cisco ACS. Prior to Cisco ACS 5.5, this was all bad ( CSCtd13775 ), but the request was heard and now ACS has a full-fledged tcpdump. You can call it using the command:
As can be seen from the help output, we are dealing with the ordinary tcpdump version 3.9.4, so that you can use all the known / familiar methods of working with it. There is only one feature - the options passed to tcpdump must be enclosed in double quotes. For example, to intercept a radius session with a terminal device that has IP 192.168.1.1, you can run the following command:
Next, copy it to the tftp server:
And we can safely “feed” his Wireshark for further analysis.
1) Configuring Cisco ACS 5.3 in conjunction with Active Directory
2) IANA PRIVATE ENTERPRISE NUMBERS
3) IPMI User's Guide
4) How do I configure my RADIUS server to authenticate my APC Network Enabled device?
Warning: for ease of understanding, the article contains many screenshots.
The first step is to configure the External Identity Stores, namely, configure the connection to AD / LDAP and configure the mapping of groups. There is already an article on Habréon this topic, so I’ll omit this point and go directly to preparing ACS to authorize APC Smart-UPS users in it (at the end showing the differences in setting up Supermicro IPMI).
First you need to create a RADIUS VSA in order to transfer an additional field to the client upon successful authorization. In this case, the level of rights of the logged in user is transferred. The required field names as well as their values can be found in the manufacturer's documentation ( APC and Supermicro ). Creating a VSA is done in the menu under System Administration -> Configuration -> Dictionaries -> Protocols -> RADIUS -> RADIUS VSA. First, create the Vendor Specific Dictionary (Vendor ID can be found on the IANA website ).
Then we add the attributes themselves.
Create Device Type for UPS and IPMI. To do this, in Network Resources -> Network Device Groups -> Device Type create an APC-UPS group.
Next, in Network Resources -> Network Devices and AAA Clients, we describe the subnet in which our UPSs are located. You can describe each device separately, simply by specifying its IP, but with a large number it is more convenient to operate with groups of devices.
Now you need to create a Device Filter so that you can then send an authorization request to the necessary Access Service. This is done in the section Policy Elements -> Session Conditions -> Network Conditions -> Device Filters.
Create an Authorization Profile to transfer the VSA to the client device under Policy Elements -> Authorization and Permissions -> Network Access -> Authorization Profiles.
Configure the Access Service in the Access Policies -> Access Services section.
We specify for it the Identity Source here Access Policies -> Access Services -> APC UPS Network Access -> Identity.
And create the Network Access Authorization Policy rules in Access Policies -> Access Services -> APC UPS Network Access -> Authorization.
The last step in ACS is to create an Access Services selection rule in Access Policies -> Access Services -> Service Selection Rules.
Finally, we configure UPS to authorize users through RADIUS.
Congratulations! Now you can log into UPS by authorizing the user via RADIUS (which in turn authorizes users in LDAP / AD and also takes groups from it). If the RADIUS server is unavailable, authorization will occur through the local account, so do not forget to configure it and set it a strong password.
Now let's look at the difference between APC Smart-UPS and Supermicro IPMI. It lies in another VSA dictionary and authorization profile.
The remaining settings are similar to the above settings for UPS from APC.
Configuring RADIUS in IPMI is pretty trivial.
Unlike APC NMC, Supermicro IPMI cannot specify account source priority. Both local and RADIUS users work simultaneously. Also, do not forget to change the default password of the ADMIN user.
I want to draw your attention to the bug / feature that we found in the IPMI firmware versions used by us: User password longer than 16 characters is truncated. Mnu had 17 characters - had to be "cut back". Perhaps it was fixed in newer versions - they did not check.
Promised Bonus:
Often, during authorization setup, it may be necessary to dump packets between the end device and the authorization server represented by Cisco ACS. Prior to Cisco ACS 5.5, this was all bad ( CSCtd13775 ), but the request was heard and now ACS has a full-fledged tcpdump. You can call it using the command:
acs-01/admin# tech dumptcp --help
tcpdump version 3.9.4
libpcap version 0.9.4
Usage: tcpdump [-aAdDeflLnNOpqRStuUvxX] [-c count] [ -C file_size ]
                [ -E algo:secret ] [ -F file ] [ -i interface ] [ -M secret ]
                [ -r file ] [ -s snaplen ] [ -T type ] [ -w file ]
                [ -W filecount ] [ -y datalinktype ] [ -Z user ]
                [ expression ]
As can be seen from the help output, we are dealing with the ordinary tcpdump version 3.9.4, so that you can use all the known / familiar methods of working with it. There is only one feature - the options passed to tcpdump must be enclosed in double quotes. For example, to intercept a radius session with a terminal device that has IP 192.168.1.1, you can run the following command:
acs-01/admin# tech dumptcp "host 192.168.1.1 and port 1812 -vvv -s 0 -w radius.pcap"
Next, copy it to the tftp server:
acs-01/admin# copy disk:radius.pcap tftp://192.168.1.254/
And we can safely “feed” his Wireshark for further analysis.
Useful links:
1) Configuring Cisco ACS 5.3 in conjunction with Active Directory
2) IANA PRIVATE ENTERPRISE NUMBERS
3) IPMI User's Guide
4) How do I configure my RADIUS server to authenticate my APC Network Enabled device?