Installing Bitrix Web Environment in the MegaFon Cloud
Few people know that Megafon has recently entered the hosting market and offers a service such as a virtual server. The other day I was engaged in the deployment of the Bitrix environment in their cloud, and discovered several interesting points. Who cares, then read on under the cut.
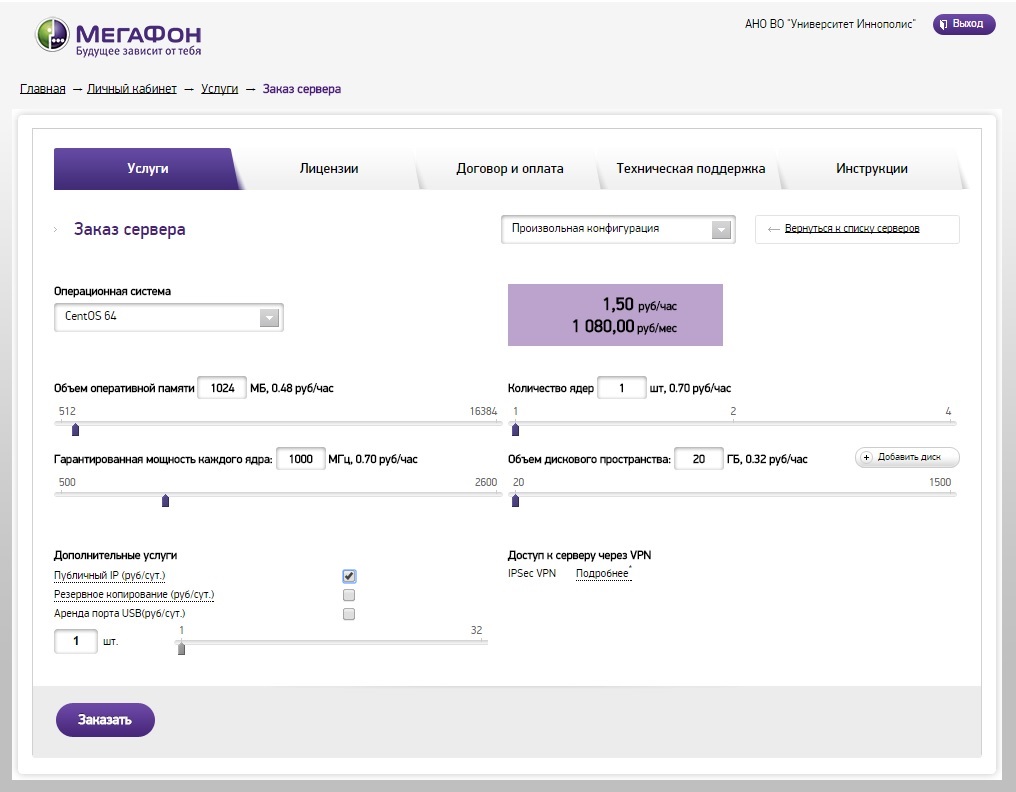
So, we create a virtual server and select the parameters we need. Then we wait 20-30 minutes until the orchestration system creates a virtual machine according to the specified parameters.
After the machine is created, we connect to our server via SSH. First of all, you need to change the root user password, since by default it is the same for all virtual machines - Qwerty123456. The author of this password is clearly in the trend of recent events :
Then the fun begins. If you execute the df command, you can see that out of the ordered 20 Gb, only about 3.5 Gb is actually available. And what is the catch, you ask?
But the fact is that the rest of the space is given to us unallocated. Accordingly, we need to handle the section to expand on the remaining available space. To begin with, using the fdisk command with the L parameter, we determine the device on which the allocated disk space is located. In our case, this is the / dev / sda drive (for a 32-bit system, it will be / dev / hda).
We create a new partition with the LVM (8e) file system (more about LVM here ), which will occupy the existing unallocated disk space of the device / dev / sda. Based on the results of the previous command, we saw that there are already two partitions on the disk, so the created partition will be the third in a row.
Change file system type to LVM
We write the partition table to disk:
Reboot the server
Next, run the lvm utility and convert the / dev / sda3 partition to a physical volume so that LVM can use it:
See which volume groups and logical partitions exist.
Add a new physical volume to the volume group:
Increase the size of the logical volume lv_root by all available free disk space in the group:
Now the logical volume is allocated all the available disk space, but if we execute the df command, we will see that the operating system still cannot use it. We need to change the size of the mounted root file system:
We check the size of the disk space of the file system, now everything is as it should:
You can install apache, nginx, mysql, php and configure them in accordance with the Bitrix recommendations in a matter of minutes using a script from the official repository. During installation, select the 4th generation of the Bitrix environment
After installing the environment, go to the menu, set the password for the user bitrix, if necessary, add domains.
Now the machine is ready, you can open the ports.
25 - smtp server, 80 - http, 443 - https, 5222 - bitrix xmpp server, 5223 - bitrix xmpp server by ssl, 8890 - ntlm authentication, 8891 - ntlm authorization by ssl, 8893 - http instant messaging server, 8894 - https server instant messaging
This completes the server setup, enjoy your work.
So, we create a virtual server and select the parameters we need. Then we wait 20-30 minutes until the orchestration system creates a virtual machine according to the specified parameters.
Connect to server and change password
After the machine is created, we connect to our server via SSH. First of all, you need to change the root user password, since by default it is the same for all virtual machines - Qwerty123456. The author of this password is clearly in the trend of recent events :
# passwd rootIncrease disk size in a virtual machine
Then the fun begins. If you execute the df command, you can see that out of the ordered 20 Gb, only about 3.5 Gb is actually available. And what is the catch, you ask?
# df -h
Filesystem            Size  Used Avail Use% Mounted on
/dev/mapper/VolGroup-lv_root
                      2.6G  1.7G  767M  70% /
tmpfs                 495M     0  495M   0% /dev/shm
/dev/sda1             485M   37M  423M   8% /boot
But the fact is that the rest of the space is given to us unallocated. Accordingly, we need to handle the section to expand on the remaining available space. To begin with, using the fdisk command with the L parameter, we determine the device on which the allocated disk space is located. In our case, this is the / dev / sda drive (for a 32-bit system, it will be / dev / hda).
#fdisk –l
Disk /dev/sda: 21.5 GB, 21474836480 bytes
…
   Device Boot      Start         End      Blocks   Id  System
/dev/sda1   *           1          64      512000   83  Linux
Partition 1 does not end on cylinder boundary.
/dev/sda2              64         914     6827008   8e  Linux LVM
Partition 2 does not end on cylinder boundary.
…
We create a new partition with the LVM (8e) file system (more about LVM here ), which will occupy the existing unallocated disk space of the device / dev / sda. Based on the results of the previous command, we saw that there are already two partitions on the disk, so the created partition will be the third in a row.
# fdisk /dev/sda
Command (m for help): n
Command action
   e   extended
   p   primary partition (1-4)
p
Partition number (1-4): 3
First cylinder (914-2610, default 914):
Using default value 914
Last cylinder, +cylinders or +size{K,M,G} (914-2610, default 2610):
Using default value 2610
Change file system type to LVM
Command (m for help): t
Partition number (1-4): 3
Hex code (type L to list codes): 8e
Changed system type of partition 3 to 8e (Linux LVM)
We write the partition table to disk:
Command (m for help): w
The partition table has been altered!
Calling ioctl() to re-read partition table.
WARNING: Re-reading the partition table failed with error 16: Device or resource busy.
The kernel still uses the old table. The new table will be used at
the next reboot or after you run partprobe(8) or kpartx(8)
Syncing disks.
Reboot the server
#rebootNext, run the lvm utility and convert the / dev / sda3 partition to a physical volume so that LVM can use it:
# lvm
lvm> pvcreate /dev/sda3
  Physical volume "/dev/sda3" successfully created
See which volume groups and logical partitions exist.
# lvs
  LV      VG       Attr      LSize Pool Origin Data%  Move Log Cpy%Sync Convert
  lv_root VolGroup -wi-ao--- 2.60g
  lv_swap VolGroup -wi-ao--- 3.91g
Add a new physical volume to the volume group:
lvm> vgextend VolGroup /dev/sda3
  Volume group "VolGroup" successfully extended
Increase the size of the logical volume lv_root by all available free disk space in the group:
lvm> lvextend -l +100%FREE /dev/VolGroup/lv_root
  Extending logical volume lv_root to 15.59 GiB
  Logical volume lv_root successfully resized
Now the logical volume is allocated all the available disk space, but if we execute the df command, we will see that the operating system still cannot use it. We need to change the size of the mounted root file system:
# resize2fs -p /dev/mapper/VolGroup-lv_root
resize2fs 1.41.12 (17-May-2010)
Filesystem at /dev/mapper/VolGroup-lv_root is mounted on /; on-line resizing required
old desc_blocks = 1, new_desc_blocks = 1
Performing an on-line resize of /dev/mapper/VolGroup-lv_root to 4087808 (4k) blocks.
The filesystem on /dev/mapper/VolGroup-lv_root is now 4087808 blocks long.
We check the size of the disk space of the file system, now everything is as it should:
# df -h
Filesystem                     Size  Used Avail Use% Mounted on
/dev/mapper/VolGroup-lv_root   16G  1.7G   13G  12% /
tmpfs                         495M     0  495M   0% /dev/shm
/dev/sda1                     485M   37M  423M   8% /boot
Installing the Bitrix Environment
You can install apache, nginx, mysql, php and configure them in accordance with the Bitrix recommendations in a matter of minutes using a script from the official repository. During installation, select the 4th generation of the Bitrix environment
# cd /
# wget http://repos.1c-bitrix.ru/yum/bitrix-env.sh
# chmod +x bitrix-env.sh
# ./bitrix-env.sh
After installing the environment, go to the menu, set the password for the user bitrix, if necessary, add domains.
# cd /root
# sh menu.sh
Now the machine is ready, you can open the ports.
iptables -I INPUT -p tcp --dport 25 -j ACCEPT
iptables -I INPUT -p tcp --dport 80 -j ACCEPT
iptables -I INPUT -p tcp --dport 443 -j ACCEPT
iptables -I INPUT -p tcp --dport 5222 -j ACCEPT
iptables -I INPUT -p tcp --dport 5223 -j ACCEPT
iptables -I INPUT -p tcp --dport 8890 -j ACCEPT
iptables -I INPUT -p tcp --dport 8891 -j ACCEPT
iptables -I INPUT -p tcp --dport 8893 -j ACCEPT
iptables -I INPUT -p tcp --dport 8894 -j ACCEPT
service iptables save
/etc/init.d/iptables restart
25 - smtp server, 80 - http, 443 - https, 5222 - bitrix xmpp server, 5223 - bitrix xmpp server by ssl, 8890 - ntlm authentication, 8891 - ntlm authorization by ssl, 8893 - http instant messaging server, 8894 - https server instant messaging
This completes the server setup, enjoy your work.