How we made a studio to record online courses
- Tutorial
 In short, Stepic is a platform where each user can create and post their own online course. Last year, Stapik was used in the Bioinformatics Algorithms course at Coursera as an engine for testing programming and data analysis tasks.
 After some time, we realized that it was worth promoting the development of online education in Russia. What is needed for that? Good teachers and a good studio where you can record videos. Since we love programming, we decided to start with courses one way or another related to programming, these are algorithms and data structures , operating systems and the C ++ language from teachers of Computer Science Center.
And after some time, we realized that the more good recording studios there are, the better for all of us and education in general . Therefore, we decided to tell, show and put into the open source all those small developments that Stepic currently has in terms of video courses and their production.
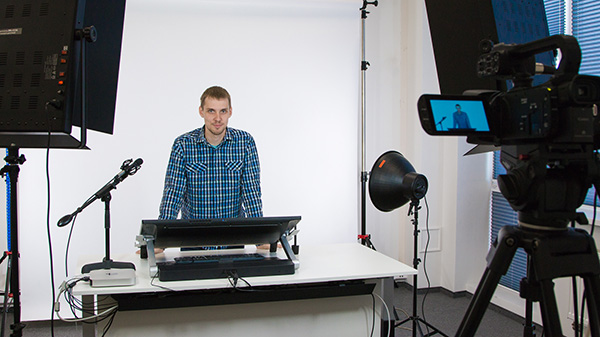
Studio and equipment
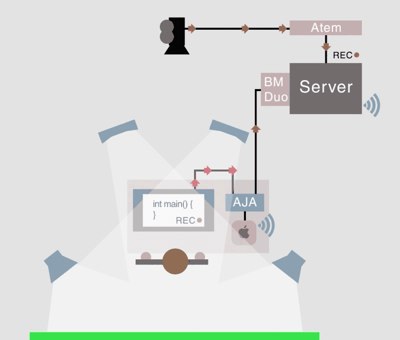
This diagram depicts the automated process of recording video lectures, which we came to:
We decided not to reinvent the wheel, but to see how such projects are equipped abroad. The starting point was a studio in the Swiss EPFL , where EMOOCs 2014 was held in the winter. A video about the studio in EPFL can be seen here .
A list of the necessary equipment was compiled (approximate prices in Russia are indicated):
- 2 racks for the background (3'000 rubles apiece)
- 4 racks for 4 light sources (1'500 rubles apiece)
- 2 FalconEyes sources with 5 energy-saving cold light bulbs per background light (5'500 rubles apiece)
- 2 sources with cold light bulbs for illumination of a lecturer (DFL-C556) (11'000 rubles apiece)
- White and green background (1'500 rubles apiece)
- Camcorder Canon XA25 (90'000 rub.)
- Tripod for the Libec TH-950DV camera (10'000 rubles)
- Microphone Audio-Technica AT2031 (8'000 rubles), sticks into the camera
- Microphone stand Samson MB1 Mini Boom Stand (2'500 rub.)
- Microphone mount AT8410a Microphone Shock Mount (3'500 rubles)
- Wacom Cintiq 24HD Interactive Pen Display DTK-2400 (120'000 rubles) - a monitor on which you can draw by hand on slides
- Apple Mac mini: i5, 2.5HGz (Late 2012) (~ 25'000 rub.) - the teacher’s computer, which is connected to the Wacom monitor
- PC (Server): i7, 3 TB HDD, 16 GB RAM, Win (~ 25'000 rubles) - the computer on which the server is running and where the video streams flow
- AJA ROI (35'000 rub.)
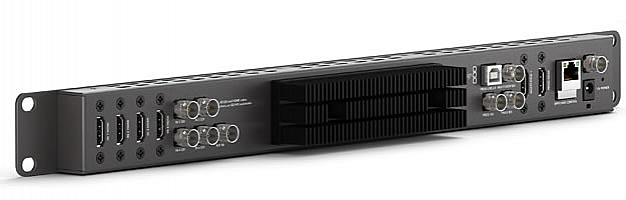
- BlackMagic DeckLink Duo (18'000 rub.)
Total, approximately: 385 thousand rubles.
I think the choice of all points, with the exception of three, does not raise questions. But about why we chose this canon and why we need AJA ROI and DeckLink, I would like to tell below.
AJA ROI and DeckLink Duo
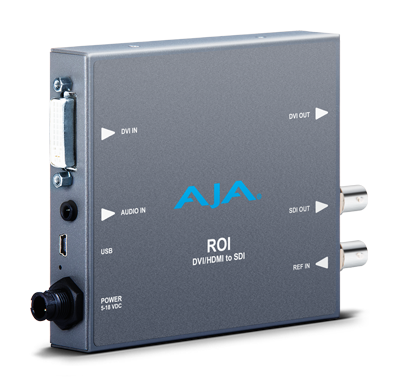

In our studio (as in the Swiss studio) we use BNC wires that go out of the camera and AJA ROI and come to the DeckLink Duo on the PC. Which, at a certain point, at the request of the teacher, begins to record two streams and neatly put them in a folder on the server. AJA ROI acts as a signal splitter, it is installed between Mac mini and Wacom, duplicates the channel that receives Mac mini and transfers it to the server.
The schematic view of the studio was presented above so that you can understand how our light sources are located and how the wires are laid.
Camera
The Canon XA25 camera was not chosen by chance. The fact is that this model is the only one in the market in a similar price segment that has an SDI output, and this is very important.
What kind of SDI channel is this and why is it so rarely heard about it if it is so good?
SDI is the standard for image transmission that is still used on television and the transmission medium for this channel is a regular 75 Ohm coaxial cable, which is found in every radio store. That's all. So why use this SDI? It is very simple, if you have 2 SDI channels encoded in real time, you have no problems, if you use the HDMI protocol instead of SDI, then you may already need additional equipment that can process these streams in real time.
Also, the advantages of SDI are the relative lack of restrictions imposed on the length of the cable and its reliable fastening.
So, everything has arrived, everything is assembled, let's run and see what problems we may encounter.
Problems
The first unpleasant surprise that awaited us was the restriction on the image format on the SDI channel from the camera. As I already mentioned, the camera is the only one in this price segment that can deliver HD video through an analog interface. But the fly in the ointment is that the image in 1080i format is transmitted via SDI ( here you can read about the differences between 1080i and 1080p ).
The second problem: there is no signal! The fact is that the SDI interface is very sensitive to frame rate and resolution, so if your camera produces 1080i and 50 frames per second (this is the format the camera produces Canon), then the server should have exactly 1080i and 50, otherwise you will see a black screen and you will think that the problem is not in the settings.
Even if the settings on the camera and server are the same, sometimes it may happen that there is no image - the matter may be in the wires themselves. In this case, you just need to check all the contacts and find the weak link. Although the SDI mounts themselves are very reliable and will never fall out, the problem may be somewhere in the middle of the cable. We faced such a problem and by trial and error found and eliminated a weak spot.
Well, if everything works, let's move on.
How now to record lectures on the server? I want some simple solution. However, the most obvious solution (using the software that comes with the BlackMagic DeckLink capture card) is far from the most convenient.
Firstly, the lecturer himself cannot start recording, which means that he needs a person who will do this.
Secondly, DeckLink Studio does not allow encoding in real time, which means we will receive uncompressed video = 1 minute about 1 GB ...
Well, the last inconvenience is that you need to open two copies of the application from different users. This of course is solved by writing a bat script (I remind you: the server is Windows), but by clicking on the record in two different channels manually, we get 2 unsynchronized files.
Synchronous recording of two video streams
The obvious solution is to use a Mac server and buy Movie Recorder for $ 1000 per channel. This is exactly what our colleagues in Switzerland did. But we decided to take a different path. Of course, there were ideas to implement a custom interface using the DeckLink SDK, but then we got a wonderful device that really helps us to this day. So, meet:
ATEM Television Studio. In general, the purpose of this card: in real time, encode video from different cameras and allow the operator to switch between them. As usual, the software supplied is not very convenient. However, on the Internet, a ready-made software ( MXLight ) was found that has a command line interface and allows you to record an image from a channel connected to this card.
So, we have a bat-file that can start recording from the camera, and another bat-file that can stop this process:
set name=D:\VIDEO\CPP_Course\Week3\Professor\Step4
set TIMESTAMP=%TIME:~0,2%_%TIME:~3,2%_%TIME:~6,2%
if exist %name%.TS ( START D:\VIDEO\MXLight\MXLight.exe record-to-file=%name%_%TIMESTAMP%.TS record=on )
else ( START D:\VIDEO\MXLight\MXLight.exe record-to-file=%name%.TS record=on )
It remains to deal with the interface of the DeckLink card. The solution was found very quickly - ffmpeg for Windows supports DirectShow, and the DeckLink card is nothing more than a DirectShow device.
And voila - here it is the bat-file that starts the screen recording:
set name=D:\VIDEO\CPP_Course\Week3\ScreenCast\Final_ScreenCast_LAST
set EXT=mp4
set TIMESTAMP=%TIME:~0,2%_%TIME:~3,2%_%TIME:~6,2%
if exist %name%.%EXT% ( START D:\VIDEO\ffmpeg\bin\ffmpeg.exe -y -video_size 1920x1080 -pixel_format uyvy422 -rtbufsize 702000k -framerate 24 -f dshow -i video="Decklink Video Capture" %name%_%TIMESTAMP%.%EXT% )
else ( START D:\VIDEO\ffmpeg\bin\ffmpeg.exe -y -video_size 1920x1080 -pixel_format uyvy422 -rtbufsize 702000k -framerate 24 -f dshow -i video="Decklink Video Capture" %name%.%EXT% )
But with stopping the screen recording I had to tinker a bit, the fact is that you can’t just take and close ffmpeg. In this case, the capture file will be damaged, and may play with interference. For the correct completion of the video capture mode, we need to send the keypressed event “q” from the keyboard.
Thus, you still need a person who starts the recording and stops it correctly.
I really didn’t like this, and as an experiment I decided to raise a simple Node.js server, and since I never wrote on JS, I could kill two birds with one stone.
So the epicStudio application was born, the launch of which is carried out by the lecturer himself from a browser open on Wacom (Mac mini). Link to gihtab - epicStudio .

After starting, the teacher begins to give a lecture and draw on slides. At the end of the lecture, the teacher stops the recording on his own and can start recording a new topic. At the end of the day, I can only download files from the server and glue the lecture.
We also tried to optimize this process. So, I wrote various tools for automatically cutting out unnecessary pieces, applying watermarks and bringing all videos to the same volume. I think they will be briefly described next time, in any case, I put my tools in this repository and you can see them there.
Finally, examples of the resulting video:
UPD: In January 2015, we updated the configuration of our studio - it became more convenient, better and ... cheaper. We’ll write a post in more detail, but if you are urgently interested in the configuration and equipment list, ask at team@stepic.org . We are also assembling a similar studio in Moscow, which will be open to teachers who host MOOCs on Stepic . So if you would like to record a course with us, please contact.
UPD2: Continued (April 2015): habrahabr.ru/company/stepic/blog/255053