Do-it-yourself low-cost multi-camera FullHD video recording of the concert
First of all, of course, you need to make a reservation that multi-camera shooting cannot be done in principle only with your own hands, since one person physically cannot simultaneously work with five cameras at once. So, at least, we still need video operators. And the rest, everything will be done with your own hands using improvised means. And I will try to tell as detailed as possible on a specific example about the nuances that exist (though without specifying specific monetary equivalents, as this would contradict my agreements with the organizer of the event).
The degree of budget, of course, is also a relative value. Naturally, the budget for the video filming of the project, which will be discussed later, cost the customer not one (or even two) hundred dollars. But, nevertheless, if, for example, you look at
Alfacam for an unknown amount of millions of dollars, which is “in service” with Channel One, but essentially intended specifically for these purposes, you understand how much it still managed to be done on a budget (although the result is, of course, also not very correct to compare).
In order to somehow clarify the topic under discussion, I will tell everything on the example of my video shooting of the Black Sea Cup of KVN, which takes place annually in the summer in Ilyichevsk (Odessa region, Ukraine).
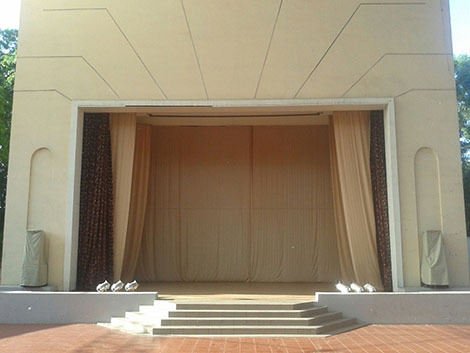
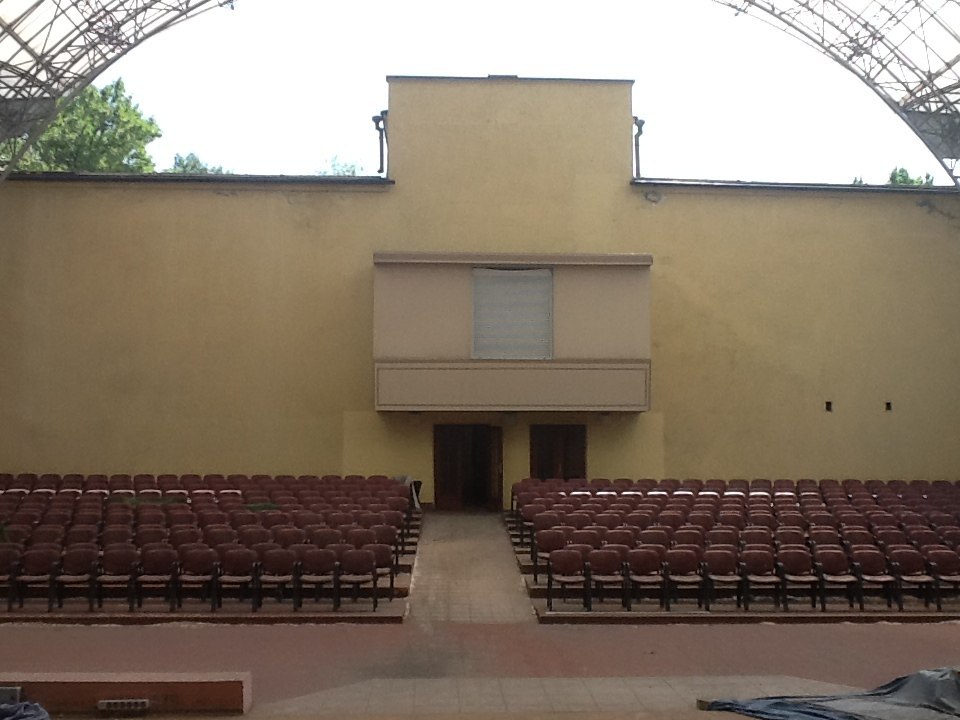
Any project needs preliminary planning. First of all, this is knowledge of the characteristics of the place where the event will take place. If the hall is not familiar, then it is highly desirable to make a sortie to the area at least a day before the event in order to reconnoiter the situation. In our case, the action took place in the open summer hall of the local PortClub. Picture 1. View from the hall to the stage (the picture is clickable) Picture 2. View from the stage to the hall (the picture is clickable)

An open area imposes additional difficulties on the shooting process. The biggest of which - during the concert, natural lighting changes. Our event began in the summer at 19 o’clock. At this time, the sun is already starting to set, but it is still actively shining. In addition, the location and configuration of our hall is such that when the sun sets, it shines from the left side to the stage. From here the first difficulty arises - if the speaker stands on the stage in the center or on the right - he is well lit by the sun. If on the left, then it is in the shade. We shot KVN - there are some movements of the actors around the scene every 5-15 seconds. So the constant transfer of the camera from the left side of the scene to the right and vice versa is inevitable. In this case, of course, the camera gives either overexposure, then a very dark picture. So close-up operators
The second difficulty, connected with the same changing natural light, on the cameras during the concert you need to tighten the white balance. Considering that the color rendition cameras should be at least approximately the same (and ideally not approximately, but quite the same), this is a rather difficult task for the director to manage to adjust the operators who need more "fun" and who on the contrary, "yellow." In any case, you need to be prepared that during post-installation you still have a lot of fun with this problem. And still, far from the fact that it will be possible to achieve a good result.
However, I was distracted. So, preliminary planning is needed.
The limited budget suggests that wireless devices will either be used to a minimum or not at all. And good old wire technologies will be used. The wires must first be deployed on the ground, and this already requires that planning.
When I first visit the new hall, I personally immediately sketch for myself where you can approximately place the cameras and how many they should be. Usually I take any household video camera or phone and I wonder what each camera can “see” from each point. What can she close the review and in which direction.
The halls can be of the most incredible (and even absurd and illogical) configurations - for example, one had to shoot in a hall where, almost at the very center a few meters from the stage, there was a support pillar supporting the roof. Obviously, it was necessary to get hungry in order to minimize the hit of this column in the frame.
In addition, depending on the specifics of the event, you need to make some corrections. For example, when shooting KVN, the public’s reaction to the joke is important - that’s why you need to place at least one camera on the stage or under the stage directed to the hall. For music concerts this is not an urgent need - it is enough that one of the operators at the end of the song / composition unfolds in the hall.
One of the important points (at least for KVN) is that the director must know in advance what will happen on stage. This is necessary in order to place emphasis - sometimes it is necessary at a certain moment to show the face or other parts of the body coarsely. Know who and when should run out (for example, in one of the teams, one of the team's actors was leaving the hall, and not from behind the curtains). To do this, give instructions to a particular operator what to do. The director must know all these and many other points in advance. And, since regular psychics are on vacation,for this you need to attend at least a dress rehearsal and be sure to take notes along the way. For example, who and where it comes from, in which issue, how many actors, and whom you especially need to pay attention to. And much more. All this can also be attributed to the preparation for the shooting.
You need to immediately figure out the division of operators into plans (general plan, medium plan, etc.). It is acceptable for KVN to put one reference camera in the background, which shoots the whole scene the whole concert. In KVN, very often someone runs out from behind the curtains - so in these cases it is necessary to have a general picture.
We put the second camera on the general plan - it captures all those on stage.
We put two cameras in the middle second and middle foreground. They are used in dialogs and other sedentary scenes.
Also, one of them can sometimes be involved in close-ups. For example, someone made a poster from behind the curtains - you need to show it in full. In some scenes, too, sometimes there is the opportunity to grab a close-up. It is precisely to “seize”, since in KVN all the action takes place very dynamically.
Based on the foregoing and taking into account the features of this hall, the following arrangement is proposed:
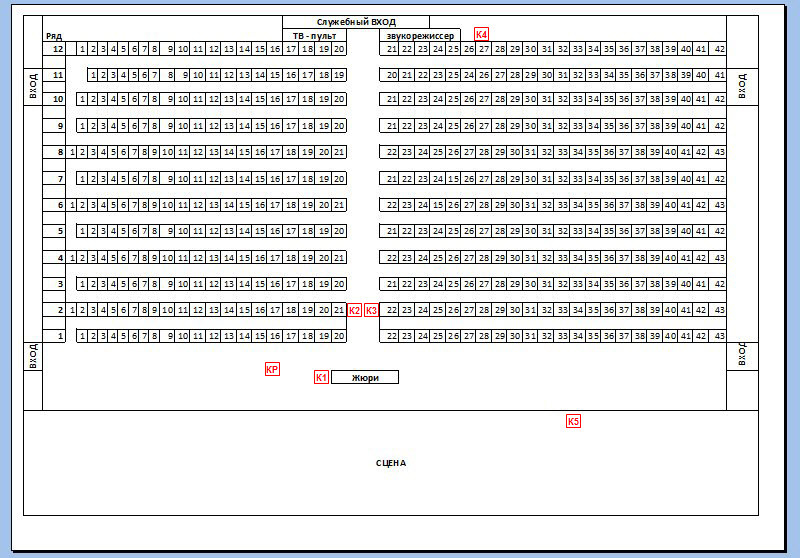
Figure 3. Hall plan (K1-5 - camera locations, KR - location of the camera crane)
K1 - the operator sits on the side of the jury table. The main task is to shoot the scene, the average plans. During the announcement, the jury moves forward a bit and takes the jury off its knees.
K2- central camera. The main task is to shoot the scene, medium plans (rarely large). For the duration of the contest, the “Warm-up” takes place on a questioner.
K3 - the central camera. The main task is to shoot the scene, the overall plan. For the duration of the contest, “Warm Up” removes the average plan for answering questions.
K4 - rear safety camera. The main task is to shoot a scene, a long-range plan. During the performance of the teams - “walks” around the hall and removes the reaction of the audience in the hall.
K5 - camera on stage. The main task is to capture the audience’s reaction to jokes. At the submission of the jury - removes the members of the jury. During the “Warm up” contest, he “walks” around the stage and takes off the discussions of the teams.
KR- camera crane. It is mainly used only at the beginning and end of the performance of teams, as well as in songs and dances. At the competition, “Warm-up” runs over the audience and removes the reaction of the audience, because at this time, the K5 camera is engaged on stage.
How it looks on the ground:
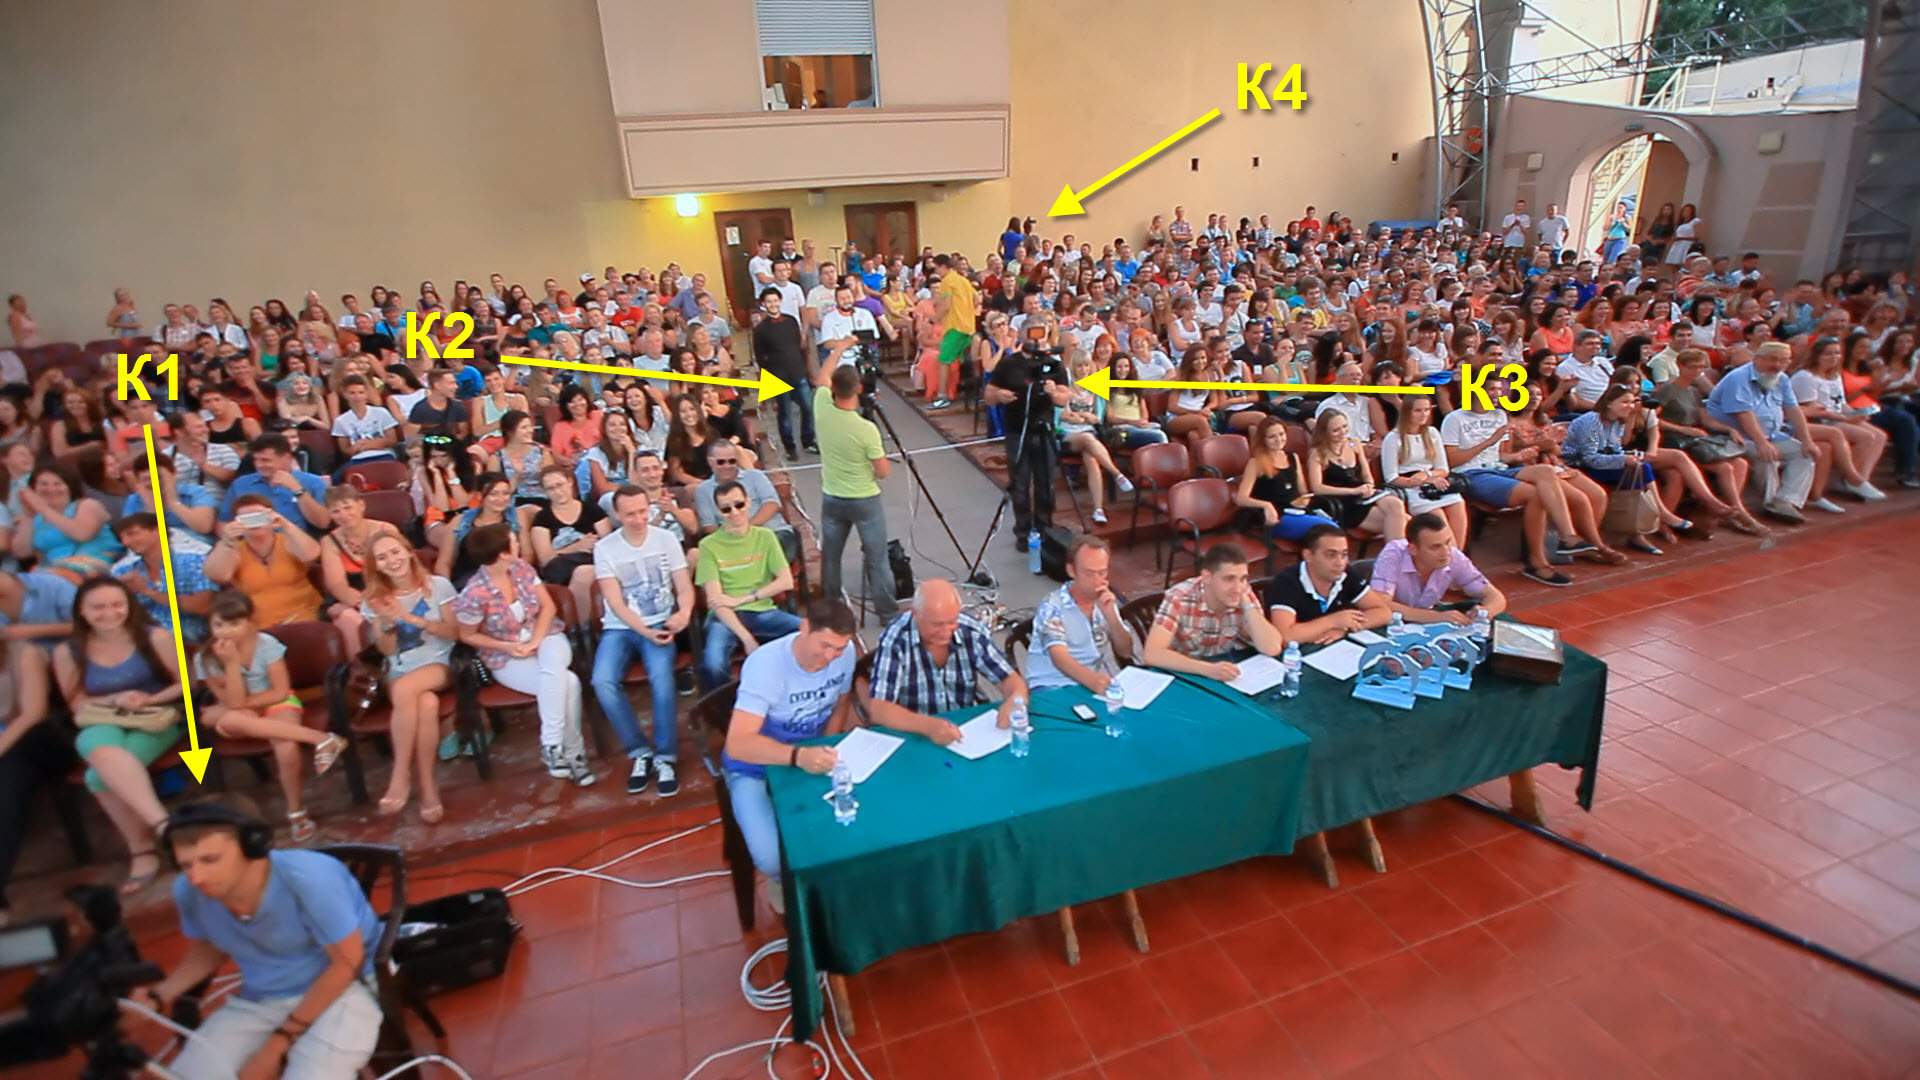
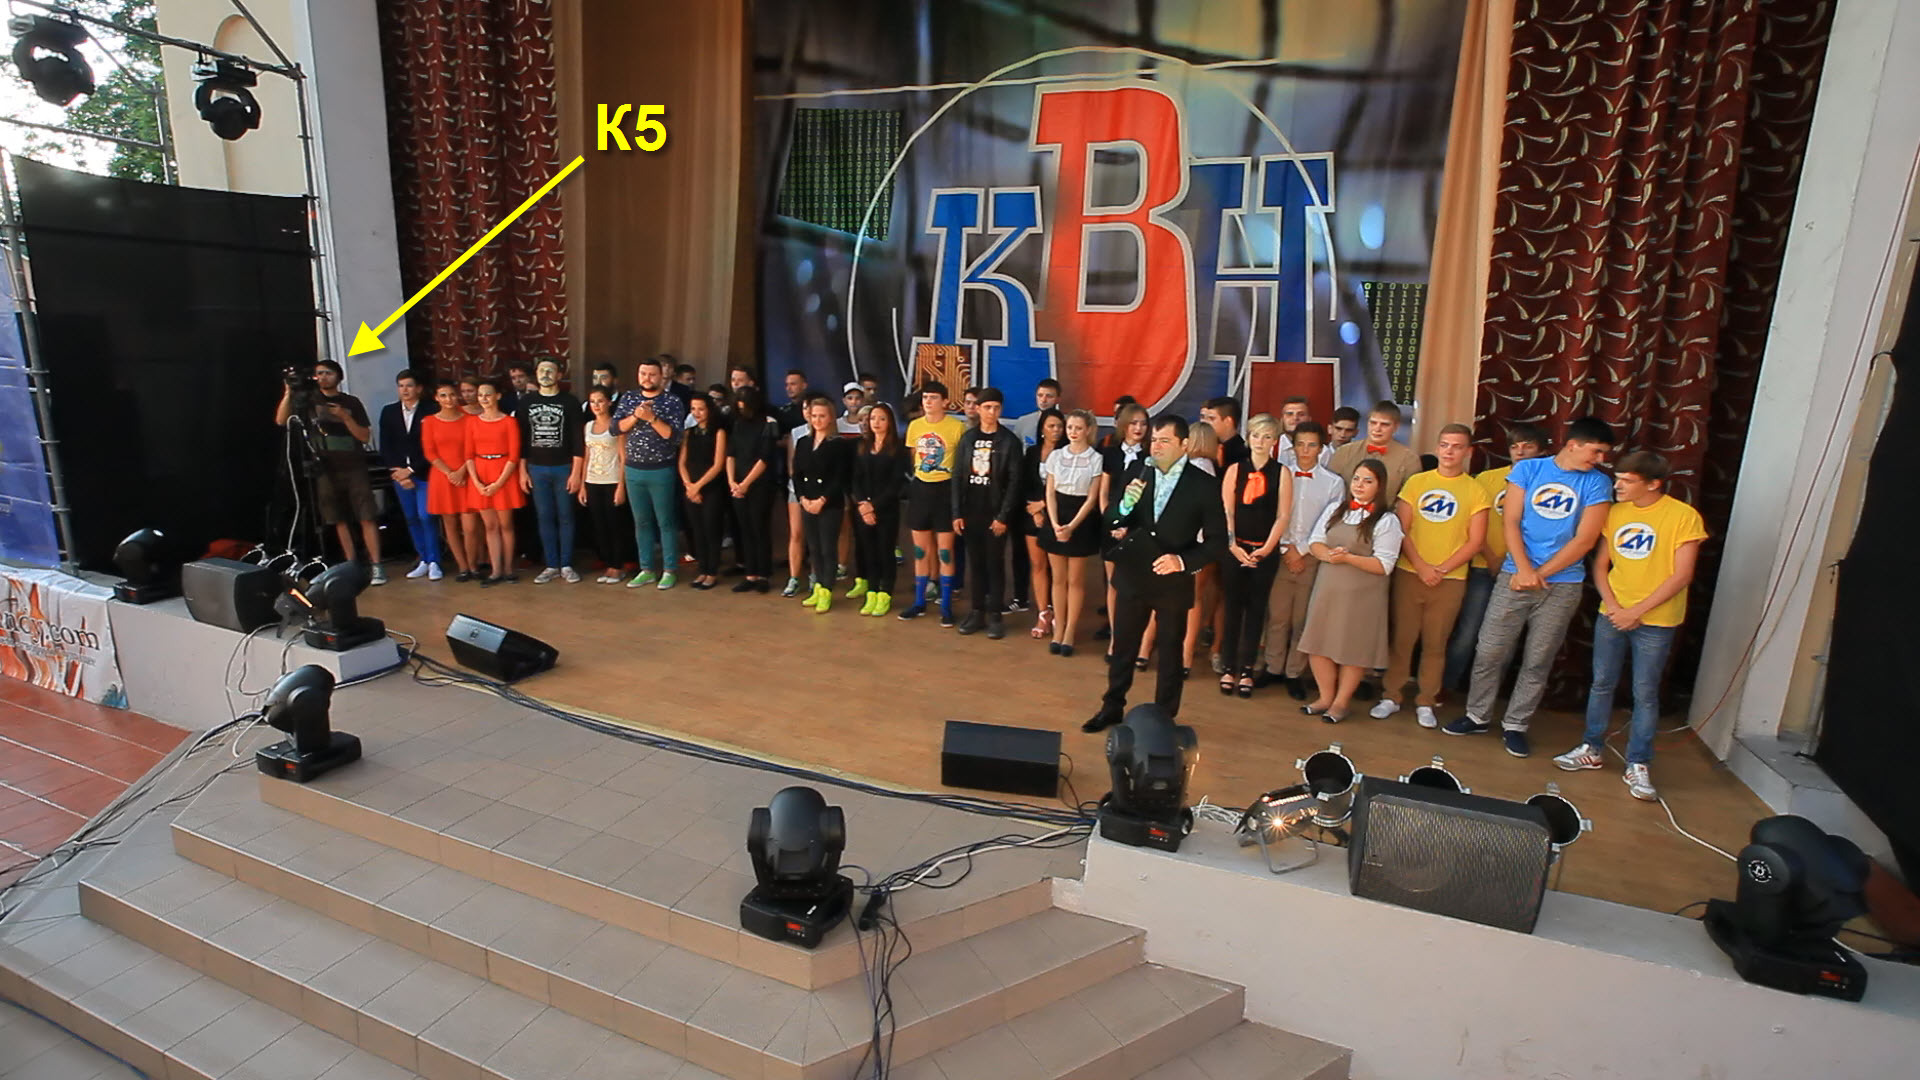
Pictures 4 and 5. Arrangement of operators on the ground.
If the budget allowed, then it would be possible to put one more camera and use it in the middle foregrounds. But in our case, the budget no longer provided for the 6th camera.
Of course, this is not the only possible arrangement, but for KVN it has proven itself quite well - that's why it is used by me.
Of course, all our 6 cameras (including the camera crane) along with the video write and sound. But to use it in the final video is to immediately hang the “low-quality” stamp on your video. If you want to make out what KVN players can say from the stage there, but the desire should not be small, since the sound is distorted by the echo from the audience. At vocal concerts, the situation becomes generally disastrous. Therefore, you need to remember it as an axiom - never at stage events can sound be written only on the microphone of the camera.
At stage events, in 99% of cases there is amplifying equipment with microphones and a mixing console. You need to agree in advance with your local sound engineer about the need to connect your sound recorder to the mixing console.
In the simplest case, such a device can be a regular laptop with a linear input. It can record two channels simultaneously (stereo), which is already much better than nothing.
In such cases, I prefer to write on one channel everything that goes to the Main Mix (as a rule, in the mixing console there is a “Rec Out” or “Tape Out” output for this), and on the second I record inter - noise using an additional microphone .
This method allows you to get synchronized with each other two audio tracks. With post-installation, it will be possible to balance them among themselves and assemble them into one channel. Yes, mono sound is not the ultimate dream, but it still sounds much better than stereo from an on-camera microphone.
In a more advanced case, you can use the Zoom H4Nor the like.
In the ideal case, it is best to record each channel separately. If there are 6 microphones on the stage, then each microphone is recorded in a separate channel. This opens up enormous opportunities for the subsequent processing of sound during post-installation. For example, on vocal numbers with several performers, you can completely translate the whole sound anew, rather than relying on a sound engineer who brought it all alive on the fly. In addition, in a hall with powerful amplification and in a large room, it is heard one at a time, and at home - in a completely different way.
At the KVN we are considering, we just had such an “ideal case”. To record sound, we rented a bunch of Digidesign 003 rack + Focusrite Octopre LE MKII + MacBook with the ability to record up to 16 channels. Recorded as follows:
For comparison, last year on a similar game we recorded on two channels on a laptop and a funny story was connected with this. And the thing is that on the KVN all the microphones that are on the stage are always on. This is done in order to prevent malfunctions when a person stepped on the scene, without checking whether the microphone was turned on, started talking, but he could not be heard. He frantically begins to search for the power button on the microphone, then repeatedly starts to speak his text. From the side, such hitches look extremely unprofessional. Therefore, always all KVN specialists are warned not to turn off the microphones. In turn, this adds to the incidents - so last year, when, probably, the team had some kind of hitch behind the curtains - one of the KVN officers backstage swore obscenely. Of course, he didn’t do it directly into the microphone, but nevertheless, on the record it was clearly audible. The situation was complicated by the fact that there was a dialogue between the actors on the stage and it was impossible to cut profanity beautifully. As a result, because of this, I had to cut out the entire number. And, unfortunately, such situations are not uncommon.
So, there’s nothing you can do with the recorded sound recording. But with multi-channel recording, removing this will not be any problem.
It is also necessary to mention that in our room there was extremely unsuccessful acoustics - a very strong echo. This added complexity when mixing with the 10th and 11th channels with inter-noise. Microphones sometimes “heard” better what sounded from the speakers than the applause (for which they were generally installed). Therefore, if the performing team did not disrupt the stormy aviation, then applause on the background of music sometimes is not heard at all.
As already mentioned, the shooting was budgetary - so the cameras used were those that were available. More precisely, an ad was posted on the site with vacancies about one-time work. In short, a beginner or experienced videographer with his FullHD video camera was required. Basically, the calculation was made on the response of wedding videographers. And the calculation turned out to be quite correct.
Together with the operators, the following fleet of video cameras was assembled:
The main criterion for selecting cameras was the ability to record 1080p, 25 fps. Since I planned to see what all the operators were shooting in real time, there were practically no selection criteria for the operators themselves - it was necessary for a person to be able to use his camera, know where to adjust white balance, exposure, etc. I looked at examples of work, but on the whole I did not pay much attention to them. For me, it was necessary and sufficient to have them in principle and their willingness to work for the established fee.
Of the desirable requirements was the presence of a tripod, camera light and headphones. I had all this in some quantity - so in case of absence I could have given it out for use from my stocks.
Perhaps, among all the equipment that is involved in multi-camera video shooting, the most expensive device is a video remote control. Its cost starts from several thousand dollars and can reach completely inadequate numbers. And, it would seem, what can be multi-camera shooting without a video remote control? But imagine - maybe. And it may not even have serious flaws. No, I do not claim that video consoles are not needed at all (for example, in a live broadcast, you really can’t do without it), but they are not something strictly necessary.
In our case, an 8-channel quadrator for analog video surveillance of an unknown brand of Chinese manufacture came up very well for our tasks. Pictures 6 and 7. Quadrator - front and rear view (pictures are clickable).


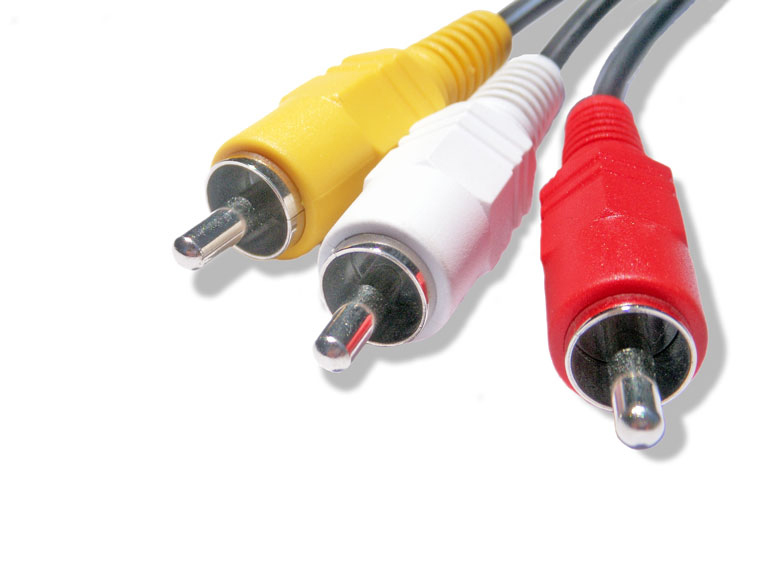
The idea is this: each camera writes FullHD video to its media. At the same time, an RCA connector with a coaxial cable is connected to it to the AV output (the so-called " yellow tulip "). Through this cable, the analog signal goes to the quad. Using the quadrator, we display 4 (or more) cameras on the screen. It looks something like this:
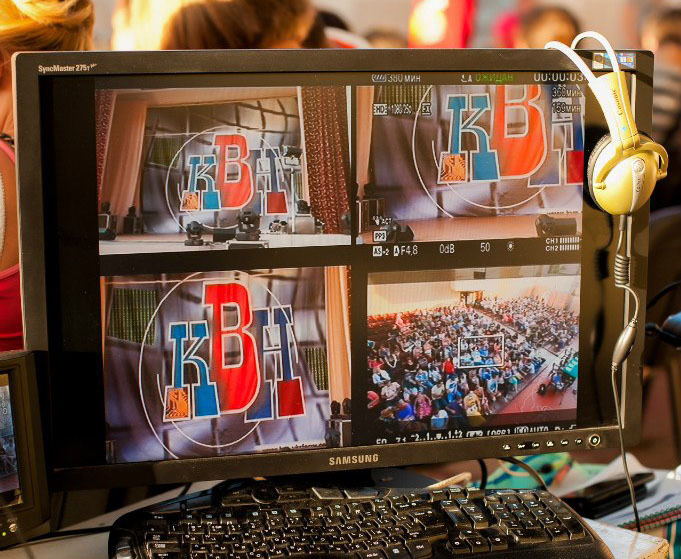
Picture 8. Photo of the image output from the quad.
The quality of the image displayed in this case, of course, was far from even average, but to distinguish who and what is shooting is quite enough. It is not convenient to display more than 4 cameras at a time even on a 27-inch monitor - very small. So 4 cameras using a quad were displayed on a 27-inch monitor (via composite analog input), another one on a small Chinese car 8-inch TV. The 6th camera could be viewed by switching the quad to it. But, since her task was to shoot a static picture (long-range plan), I hardly watched her.
Also important is the ability to communicate with operators. The simplest option - its complete absence - before the shooting begins, agree between the operators who shoots what plans and each operator shoots what they consider necessary. The advantages of this approach include perhaps the ability of the operators to show themselves and their vision. On this, the pros end. For the final viewer, this approach carries only definitive minuses - the operators very often shoot the same thing, plans are duplicated, etc. As a result, it’s practically impossible to assemble at least something worthwhile during installation. Although at the dawn of my amateur activity, I also did this. But I have a mitigating circumstance - then I did it generally for free.
Still returning to communications, the easiest option is to use walkie-talkies. The undoubted advantage of this approach is mobility - no wires need to be pulled. Also, with walkie-talkies, the connection will be two-way, which is also useful. On the downside of using walkie-talkies, you can record low communication stability (for relatively cheap walkie-talkies) - the interference is constantly coming out, as well as the inconvenience for the director to press the button all the time before saying anything. And, of course, you need to buy these walkie-talkies with headsets, which is not cheap (we remember that shooting is budgetary, right?). In general, the option, although with drawbacks, is quite working.
I took a slightly different path, or rather, chance helped me. At one time, when I came to the conclusion that it was no longer correct to work without a connection, and I did not know how to solder yet, I turned to one of the familiar engineers on the local television and radio company for advice on this issue. To my joy, he was sympathetic to my desire for growth in his amateur studies and gave to use (and later, as it turned out, forever) a home-made miracle machine. Picture 9. The appearance of the intercom (the picture is clickable). Actually, the scheme of its work is simple to disgrace - to receive a signal, amplify, apply to the outputs. I believe that finding an Internet scheme for its implementation will not be difficult.

The buttons on the device show that once it was possible to choose which output the sound would go to, but when it got to me, this function no longer worked - these buttons do not affect anything. Actually, I don’t need it.
The main disadvantage in this approach is the one-way communication. Everyone hears the director, but can only respond with gestures, nods, and other actions. But in general, this is quite enough.
At the entrance to the "negotiator" are connected to conventional multimedia headphones with a microphone. The output is a conventional power cable 2x1.0 m 2 (it is quite durable) of the required length with a BNC connector . At the other end of the cable is a 3.5 mm TRS jack to which headphones are connected.
Of course, the disadvantages of this approach can also be attributed to the lack of mobility, but since each camera already has a coaxial cable for video transmission, the addition of another cable does not play a special role.
As a third cable, I always supply power to each camera (normal carrying). This is done for insurance, since it is not always known in advance whether there is enough battery on each of the cameras.
In any video recording, an important point is the illumination of the subject. The lighting issue I mentioned at the beginning of the article - now a little more.
In short, there is not much light at a stage concert. We need ordinary warm white light for video recording. The more it will be and the more evenly it will be distributed across the stage - the better.
It was assumed that at the described event the main light on the stage would be stationary light, which was rented together with the hall. And just with this light we were grasped by a serious force majeure. 20 minutes before the start of the concert, it turned out that the dimmer, through which all the stationary lighting of the stage was fed, failed (although an hour before that everything worked correctly on the test) - that is, the stage was completely completely without light. Only the guns of colored light that were installed additionally remained to work. There’s no time to climb up to figure out why the dimmer suddenly failed (usually even when everything is prepared in advance, there is always something to do before the very start). As a result, a local electrician was urgently called with the expectation that the sun was still shining, then the stage lighting was not necessary, and by the time it got dark, perhaps an electrician will restore everything. Nevertheless, I personally did not count on it and decided to prepare “Plan B”. We had twospotlights of 1 kW each, which we planned to put on to illuminate the audience. Without hesitation, they decided to put them on racks and direct them to the stage. Given their insufficient power to illuminate the entire scene, they had to be set close enough to the stage - so with their appearance, when shooting, they spoiled the picture.
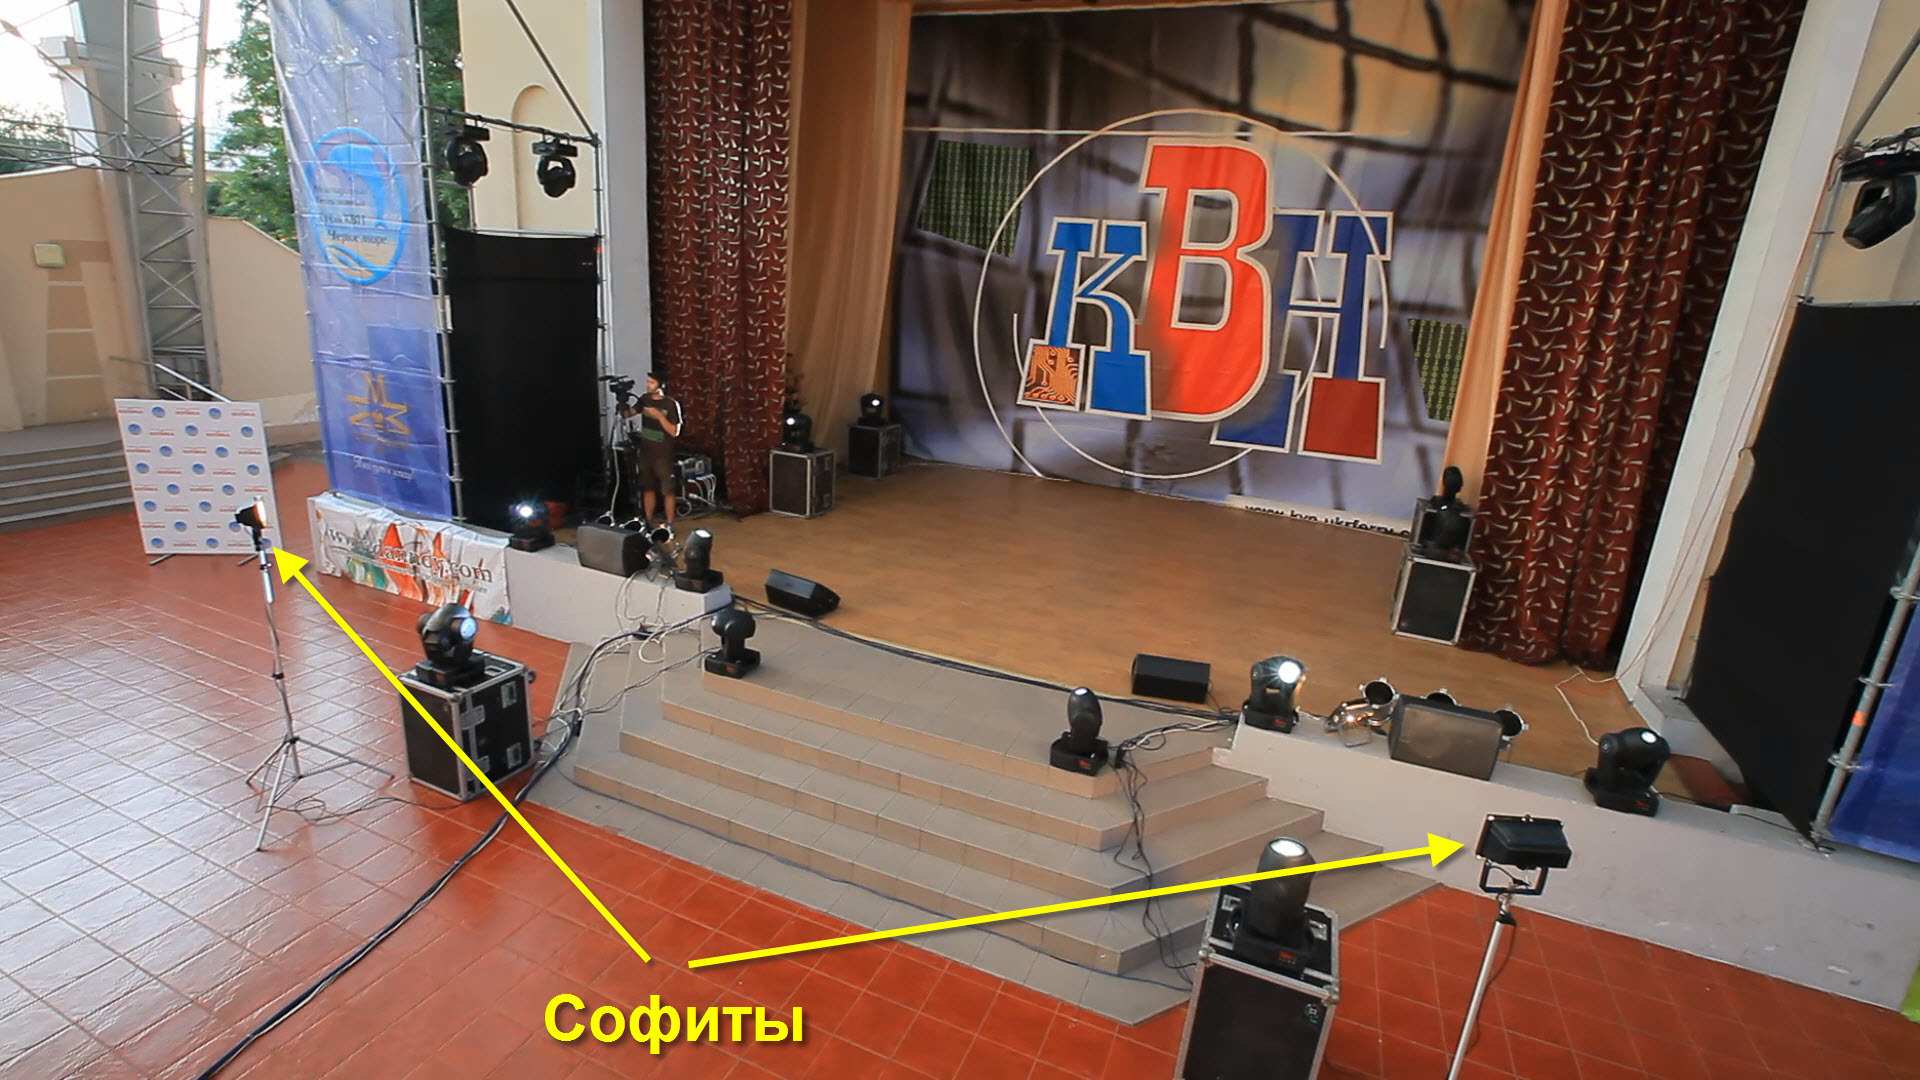
Picture 10. Location of spotlights.
We turned them on even before the concert, since running them on when it got dark was unprofitable.
Now we are left without lighting in the hall. But I had to put up with it - the scene is more important.
Is it necessary to say that a miracle did not happen and the electrician didn’t help us in any way?
Strange as it may seem, it didn’t work out the laws of physics either - on the backlight of the scene that was not illuminated, shadows were actively “wandering” from our two kilowatt spotlights:
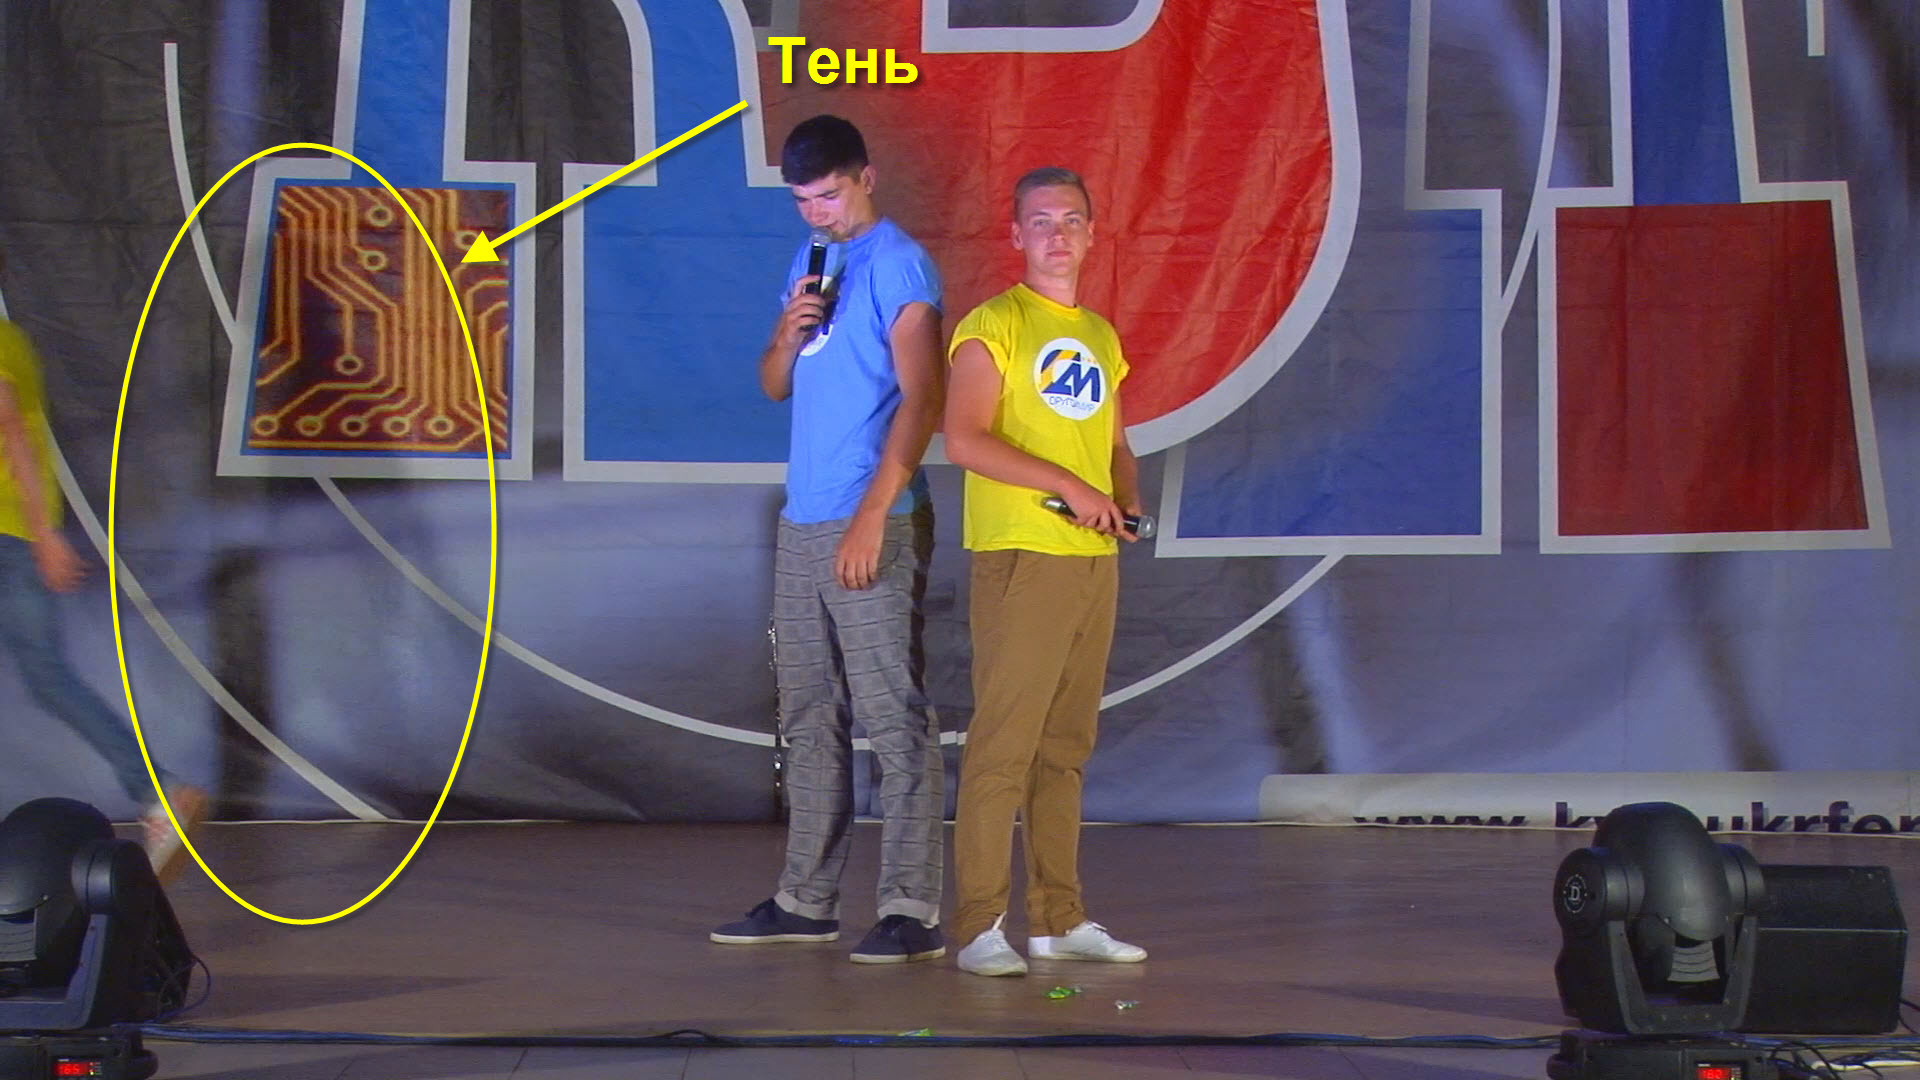
Figure 11. Illustration of the spotlight shadow.
Of course, there was a decent scandal due to such a flaw on the part of the landlords, but this, as expected, did not help turn on the stationary light.
If you put all the cameras in their places and just take them off at the automatic settings, then you will be disappointed when viewing the result. Stage events need to be shot only on the manual settings of the cameras. To do this, before the start of the event, we take an unemployed person in a white T-shirt or shirt and put on the stage. If the hall is closed, then the stage lighting is brought into a state as close as possible to the combat one. We direct all cameras to this person and build white balance on his face and T-shirt. We also set the exposure and saturation. Ideally, pictures from all cameras should be perfectly matched to each other in color and brightness. Achieving this is not always easy. Especially on non-professional video cameras, where in the settings you can select only “Auto” or presets.

In our case, the hall is open, the sun changes its position and brightness - so this is all to be adjusted during the concert, which causes a lot of difficulties.
All cameras start recording at the director’s command and, ideally, they don’t stop it at all during the event. The latter allows you to reduce the time spent on synchronizing cameras during post-installation.
If some of the cameras require replacement of the media during the concert, it is advisable to think in advance at what point it is best to make it, and also make sure that the “loss” of this camera is blocked by other cameras.
Also, to make life easier for you after editing after starting recording, but before the action itself, you can blink a flash from the scene from any camera. This allows you to have a clear point for synchronization.
If we did everything right in preparation, then the shooting itself should go quite smoothly.
Thanks to the notes made when viewing the dress rehearsal, we know what to look for, we see all the operators and all the operators hear us.
We deal with everything else along the way.
So, everything is removed, all the mess has already happened and this can not be changed. We pass to the longest-playing part of the project - installation.
There is nothing much to describe at this stage, since almost everything depends on what you managed to record and film earlier.
From my own experience, the first thing I usually do is mix the soundtrack. For this I use Adobe Audition .
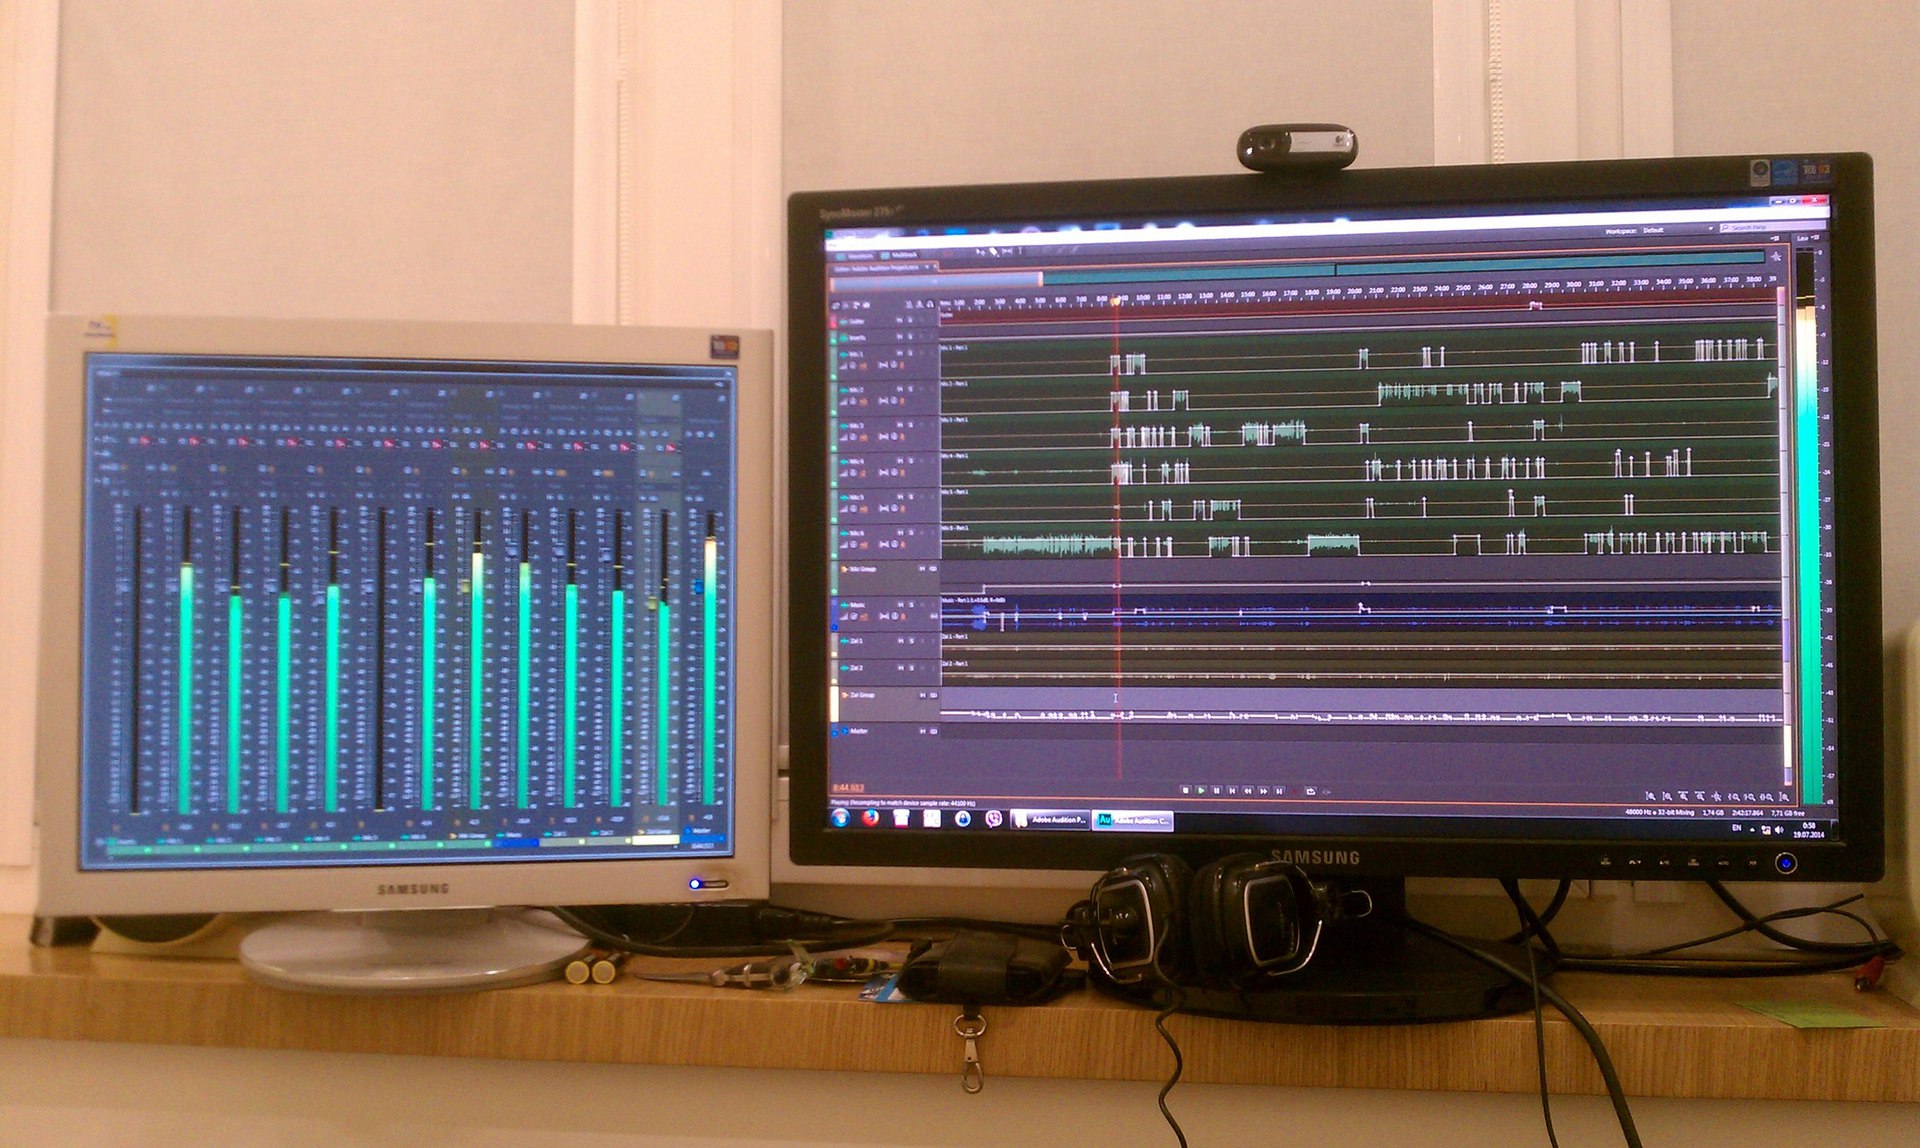
Picture 12. View of uncombined multichannel audio recording.
After that, it comes to the video. For video processing, I use Sony Vegas . We place all the cameras on a time-line and use the plugin " PluralEyes". The essence of this plugin is that it tries to synchronize cameras by sound. For a starting point when synchronizing, this is a good option. As a rule, it fails to synchronize everything correctly - it doesn’t find some video files, but it doesn’t place some . the effectiveness of the right of his work is usually about 70-80%, but for initial synchronization is not bad..
If you are not forgotten at the beginning of the shooting "blink" the scene flash - ischom this point on all cameras and synchronize for the outbreak is the most accurate. th (simple) method of synchronization. The remaining files are adjusted to those where there is an outbreak.
If you forgot / didn’t have time to specially blink the flash, then we are looking for any presentations or awards in the video — as a rule, photographers don’t doze off at these moments — they actively take pictures and blink the flashes. And we thus have a point (s) of synchronization.
If the flashes are completely trouble, and the concert is musical, then you can try to synchronize with the movements of the drummer (aka “drummer”). But this is not so convenient and the accuracy is less.
At the described event, we did not have time to “blink” the outbreak at the beginning, but at the end of the event there were a lot of outbreaks — the main synchronization was done on them.
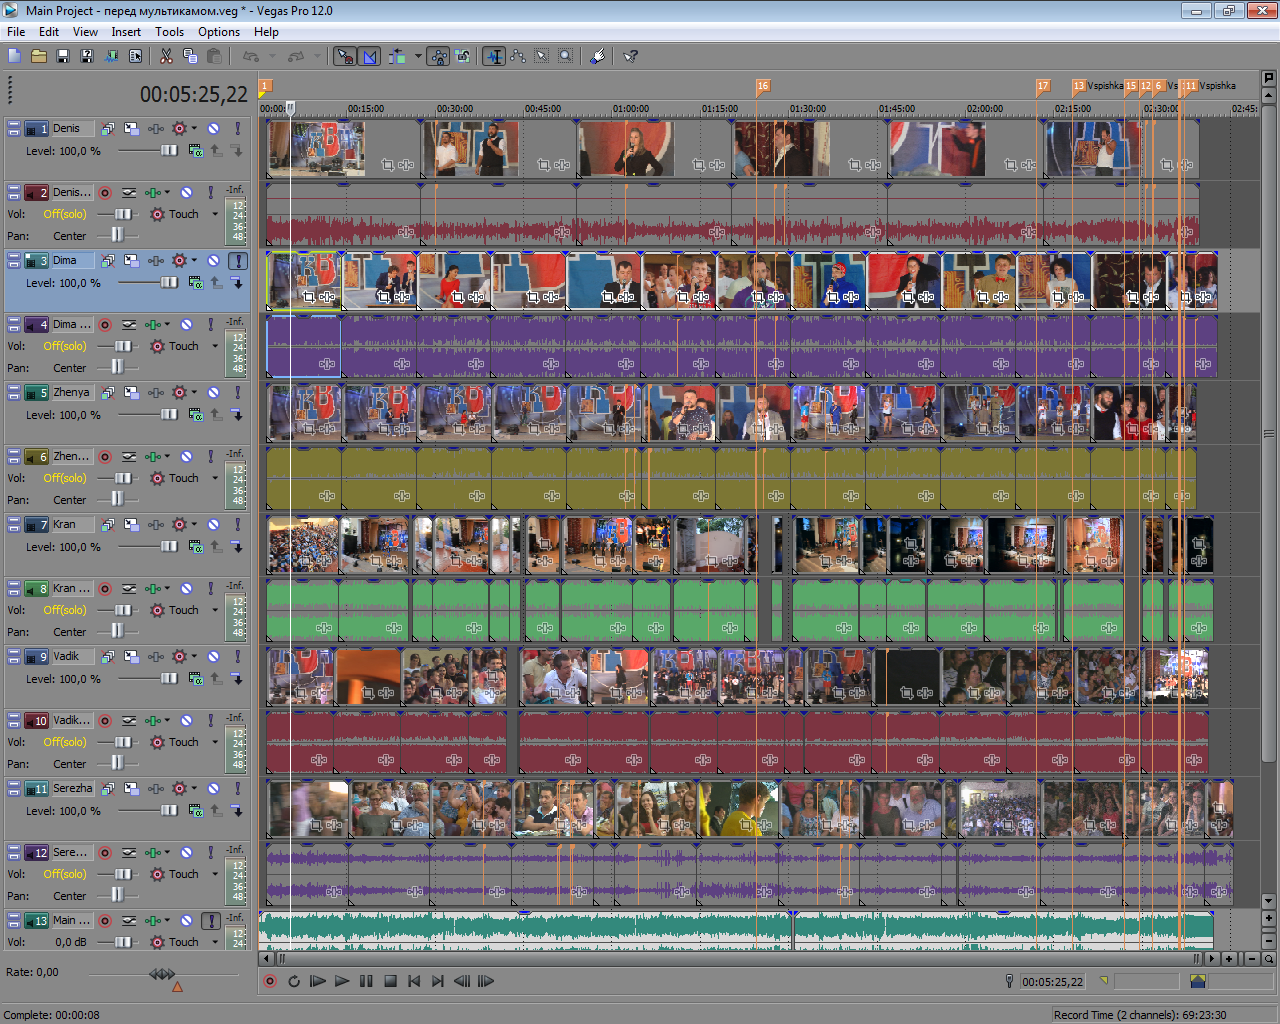
Picture 13. Project view after synchronization.
On the screenshot you can see the placed marks - so at the synchronization stage I mark these very synchronization points.
All further actions for video processing (the use of filters, color corrections, etc.) are already being done based on what we were able to shoot, that is, as needed.
After that, we bring all the video tracks into a multi-camera track, and then we arrange the switching between the cameras.

Picture 14. The final view of the project.
Again, here everything is already done by necessity.
The final version of what I managed to do can be found here:
or download the unencoded version here .
I hope this article will be useful to someone. If I didn’t understand something clearly, I ask you to ask questions and I will answer them with pleasure. Constructive criticism is also welcome.
Эта статья не претендует на роль мануала. Её назначение - поделиться своим личным опытом в организации и проведении бюджетной многокамерной видеосъёмки концерта с вменяемым результатом на выходе (причём степень вменяемости - это сугубо субъективная величина).

Так же сразу скажу, что подобная деятельность не является для меня основным источником дохода, а скорее хобби. Потому, я сам себя позиционирую в этом вопросе как "любитель-недопрофессионал".
Alfacam for an unknown amount of millions of dollars, which is “in service” with Channel One, but essentially intended specifically for these purposes, you understand how much it still managed to be done on a budget (although the result is, of course, also not very correct to compare).
In order to somehow clarify the topic under discussion, I will tell everything on the example of my video shooting of the Black Sea Cup of KVN, which takes place annually in the summer in Ilyichevsk (Odessa region, Ukraine).
Training
Any project needs preliminary planning. First of all, this is knowledge of the characteristics of the place where the event will take place. If the hall is not familiar, then it is highly desirable to make a sortie to the area at least a day before the event in order to reconnoiter the situation. In our case, the action took place in the open summer hall of the local PortClub. Picture 1. View from the hall to the stage (the picture is clickable) Picture 2. View from the stage to the hall (the picture is clickable)

An open area imposes additional difficulties on the shooting process. The biggest of which - during the concert, natural lighting changes. Our event began in the summer at 19 o’clock. At this time, the sun is already starting to set, but it is still actively shining. In addition, the location and configuration of our hall is such that when the sun sets, it shines from the left side to the stage. From here the first difficulty arises - if the speaker stands on the stage in the center or on the right - he is well lit by the sun. If on the left, then it is in the shade. We shot KVN - there are some movements of the actors around the scene every 5-15 seconds. So the constant transfer of the camera from the left side of the scene to the right and vice versa is inevitable. In this case, of course, the camera gives either overexposure, then a very dark picture. So close-up operators
The second difficulty, connected with the same changing natural light, on the cameras during the concert you need to tighten the white balance. Considering that the color rendition cameras should be at least approximately the same (and ideally not approximately, but quite the same), this is a rather difficult task for the director to manage to adjust the operators who need more "fun" and who on the contrary, "yellow." In any case, you need to be prepared that during post-installation you still have a lot of fun with this problem. And still, far from the fact that it will be possible to achieve a good result.
However, I was distracted. So, preliminary planning is needed.
The limited budget suggests that wireless devices will either be used to a minimum or not at all. And good old wire technologies will be used. The wires must first be deployed on the ground, and this already requires that planning.
When I first visit the new hall, I personally immediately sketch for myself where you can approximately place the cameras and how many they should be. Usually I take any household video camera or phone and I wonder what each camera can “see” from each point. What can she close the review and in which direction.
The halls can be of the most incredible (and even absurd and illogical) configurations - for example, one had to shoot in a hall where, almost at the very center a few meters from the stage, there was a support pillar supporting the roof. Obviously, it was necessary to get hungry in order to minimize the hit of this column in the frame.
In addition, depending on the specifics of the event, you need to make some corrections. For example, when shooting KVN, the public’s reaction to the joke is important - that’s why you need to place at least one camera on the stage or under the stage directed to the hall. For music concerts this is not an urgent need - it is enough that one of the operators at the end of the song / composition unfolds in the hall.
One of the important points (at least for KVN) is that the director must know in advance what will happen on stage. This is necessary in order to place emphasis - sometimes it is necessary at a certain moment to show the face or other parts of the body coarsely. Know who and when should run out (for example, in one of the teams, one of the team's actors was leaving the hall, and not from behind the curtains). To do this, give instructions to a particular operator what to do. The director must know all these and many other points in advance. And
Operator Arrangement
You need to immediately figure out the division of operators into plans (general plan, medium plan, etc.). It is acceptable for KVN to put one reference camera in the background, which shoots the whole scene the whole concert. In KVN, very often someone runs out from behind the curtains - so in these cases it is necessary to have a general picture.
We put the second camera on the general plan - it captures all those on stage.
We put two cameras in the middle second and middle foreground. They are used in dialogs and other sedentary scenes.
Also, one of them can sometimes be involved in close-ups. For example, someone made a poster from behind the curtains - you need to show it in full. In some scenes, too, sometimes there is the opportunity to grab a close-up. It is precisely to “seize”, since in KVN all the action takes place very dynamically.
Based on the foregoing and taking into account the features of this hall, the following arrangement is proposed:
Figure 3. Hall plan (K1-5 - camera locations, KR - location of the camera crane)
K1 - the operator sits on the side of the jury table. The main task is to shoot the scene, the average plans. During the announcement, the jury moves forward a bit and takes the jury off its knees.
K2- central camera. The main task is to shoot the scene, medium plans (rarely large). For the duration of the contest, the “Warm-up” takes place on a questioner.
K3 - the central camera. The main task is to shoot the scene, the overall plan. For the duration of the contest, “Warm Up” removes the average plan for answering questions.
K4 - rear safety camera. The main task is to shoot a scene, a long-range plan. During the performance of the teams - “walks” around the hall and removes the reaction of the audience in the hall.
K5 - camera on stage. The main task is to capture the audience’s reaction to jokes. At the submission of the jury - removes the members of the jury. During the “Warm up” contest, he “walks” around the stage and takes off the discussions of the teams.
KR- camera crane. It is mainly used only at the beginning and end of the performance of teams, as well as in songs and dances. At the competition, “Warm-up” runs over the audience and removes the reaction of the audience, because at this time, the K5 camera is engaged on stage.
How it looks on the ground:
Pictures 4 and 5. Arrangement of operators on the ground.
If the budget allowed, then it would be possible to put one more camera and use it in the middle foregrounds. But in our case, the budget no longer provided for the 6th camera.
Of course, this is not the only possible arrangement, but for KVN it has proven itself quite well - that's why it is used by me.
Sound recording
Of course, all our 6 cameras (including the camera crane) along with the video write and sound. But to use it in the final video is to immediately hang the “low-quality” stamp on your video. If you want to make out what KVN players can say from the stage there, but the desire should not be small, since the sound is distorted by the echo from the audience. At vocal concerts, the situation becomes generally disastrous. Therefore, you need to remember it as an axiom - never at stage events can sound be written only on the microphone of the camera.
At stage events, in 99% of cases there is amplifying equipment with microphones and a mixing console. You need to agree in advance with your local sound engineer about the need to connect your sound recorder to the mixing console.
In the simplest case, such a device can be a regular laptop with a linear input. It can record two channels simultaneously (stereo), which is already much better than nothing.
In such cases, I prefer to write on one channel everything that goes to the Main Mix (as a rule, in the mixing console there is a “Rec Out” or “Tape Out” output for this), and on the second I record inter - noise using an additional microphone .
This method allows you to get synchronized with each other two audio tracks. With post-installation, it will be possible to balance them among themselves and assemble them into one channel. Yes, mono sound is not the ultimate dream, but it still sounds much better than stereo from an on-camera microphone.
In a more advanced case, you can use the Zoom H4Nor the like.
In the ideal case, it is best to record each channel separately. If there are 6 microphones on the stage, then each microphone is recorded in a separate channel. This opens up enormous opportunities for the subsequent processing of sound during post-installation. For example, on vocal numbers with several performers, you can completely translate the whole sound anew, rather than relying on a sound engineer who brought it all alive on the fly. In addition, in a hall with powerful amplification and in a large room, it is heard one at a time, and at home - in a completely different way.
At the KVN we are considering, we just had such an “ideal case”. To record sound, we rented a bunch of Digidesign 003 rack + Focusrite Octopre LE MKII + MacBook with the ability to record up to 16 channels. Recorded as follows:
- 1-6 channels - radio microphones on stage;
- Channel 7 - a guitar with a pickup (one of the teams played the guitar);
- 8-9 channels - delivery from a laptop (music, beats, pads, savers, etc.);
- 10-11 channels - recording inter-noises from two panoramic microphones.
For comparison, last year on a similar game we recorded on two channels on a laptop and a funny story was connected with this. And the thing is that on the KVN all the microphones that are on the stage are always on. This is done in order to prevent malfunctions when a person stepped on the scene, without checking whether the microphone was turned on, started talking, but he could not be heard. He frantically begins to search for the power button on the microphone, then repeatedly starts to speak his text. From the side, such hitches look extremely unprofessional. Therefore, always all KVN specialists are warned not to turn off the microphones. In turn, this adds to the incidents - so last year, when, probably, the team had some kind of hitch behind the curtains - one of the KVN officers backstage swore obscenely. Of course, he didn’t do it directly into the microphone, but nevertheless, on the record it was clearly audible. The situation was complicated by the fact that there was a dialogue between the actors on the stage and it was impossible to cut profanity beautifully. As a result, because of this, I had to cut out the entire number. And, unfortunately, such situations are not uncommon.
So, there’s nothing you can do with the recorded sound recording. But with multi-channel recording, removing this will not be any problem.
It is also necessary to mention that in our room there was extremely unsuccessful acoustics - a very strong echo. This added complexity when mixing with the 10th and 11th channels with inter-noise. Microphones sometimes “heard” better what sounded from the speakers than the applause (for which they were generally installed). Therefore, if the performing team did not disrupt the stormy aviation, then applause on the background of music sometimes is not heard at all.
Shooting equipment
Camcorders
As already mentioned, the shooting was budgetary - so the cameras used were those that were available. More precisely, an ad was posted on the site with vacancies about one-time work. In short, a beginner or experienced videographer with his FullHD video camera was required. Basically, the calculation was made on the response of wedding videographers. And the calculation turned out to be quite correct.
Together with the operators, the following fleet of video cameras was assembled:
The main criterion for selecting cameras was the ability to record 1080p, 25 fps. Since I planned to see what all the operators were shooting in real time, there were practically no selection criteria for the operators themselves - it was necessary for a person to be able to use his camera, know where to adjust white balance, exposure, etc. I looked at examples of work, but on the whole I did not pay much attention to them. For me, it was necessary and sufficient to have them in principle and their willingness to work for the established fee.
Of the desirable requirements was the presence of a tripod, camera light and headphones. I had all this in some quantity - so in case of absence I could have given it out for use from my stocks.
Video remote control
Perhaps, among all the equipment that is involved in multi-camera video shooting, the most expensive device is a video remote control. Its cost starts from several thousand dollars and can reach completely inadequate numbers. And, it would seem, what can be multi-camera shooting without a video remote control? But imagine - maybe. And it may not even have serious flaws. No, I do not claim that video consoles are not needed at all (for example, in a live broadcast, you really can’t do without it), but they are not something strictly necessary.
In our case, an 8-channel quadrator for analog video surveillance of an unknown brand of Chinese manufacture came up very well for our tasks. Pictures 6 and 7. Quadrator - front and rear view (pictures are clickable).
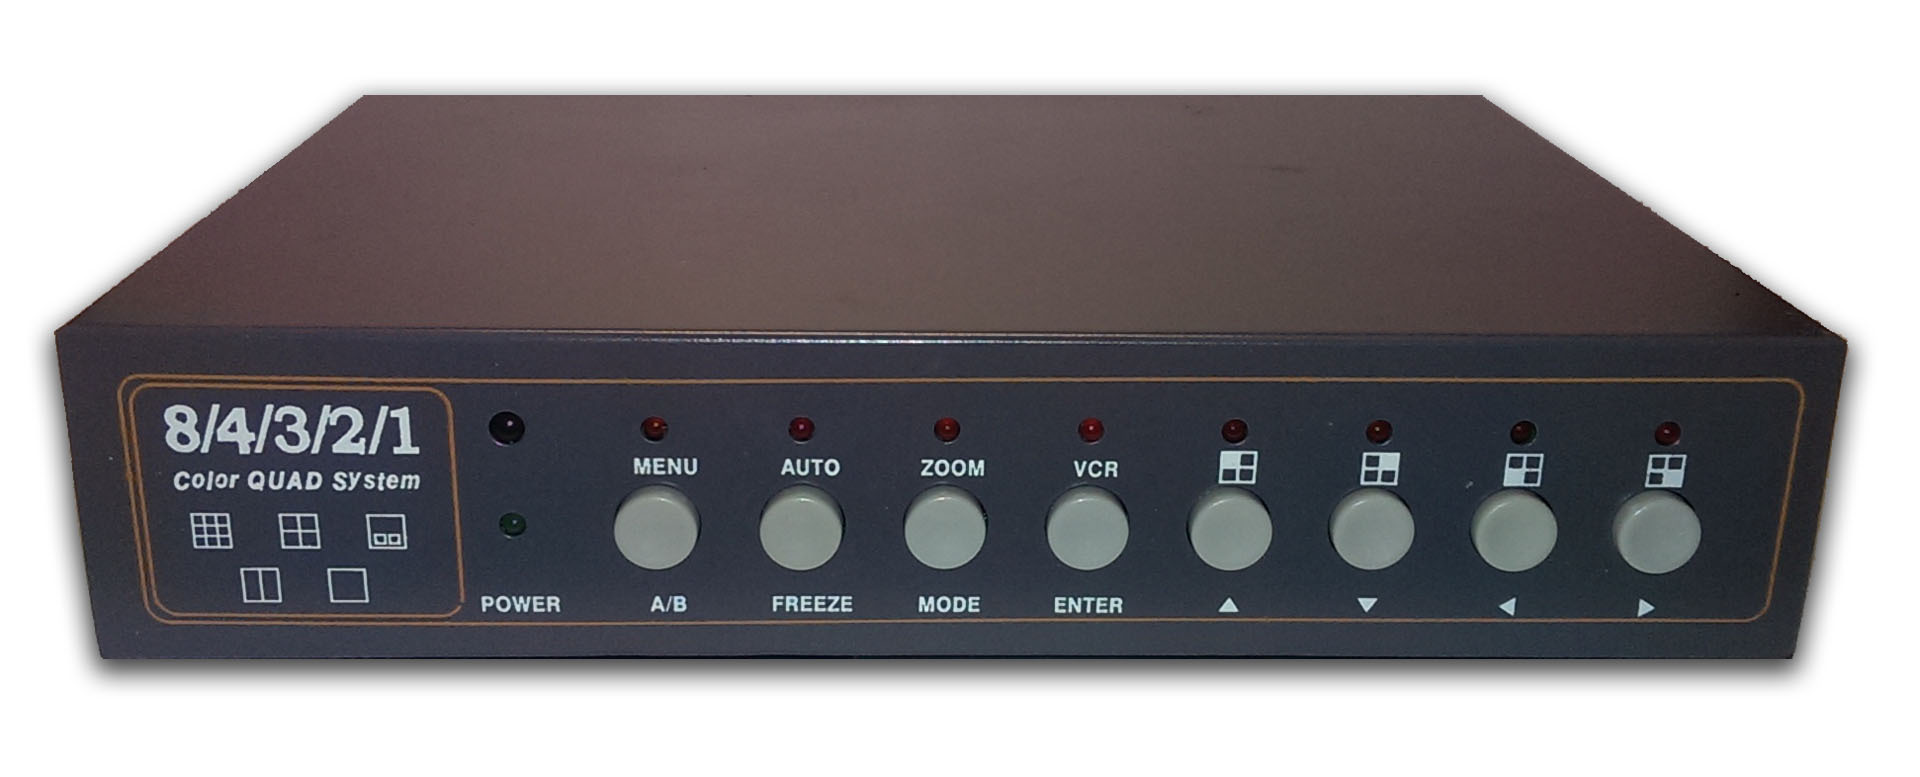
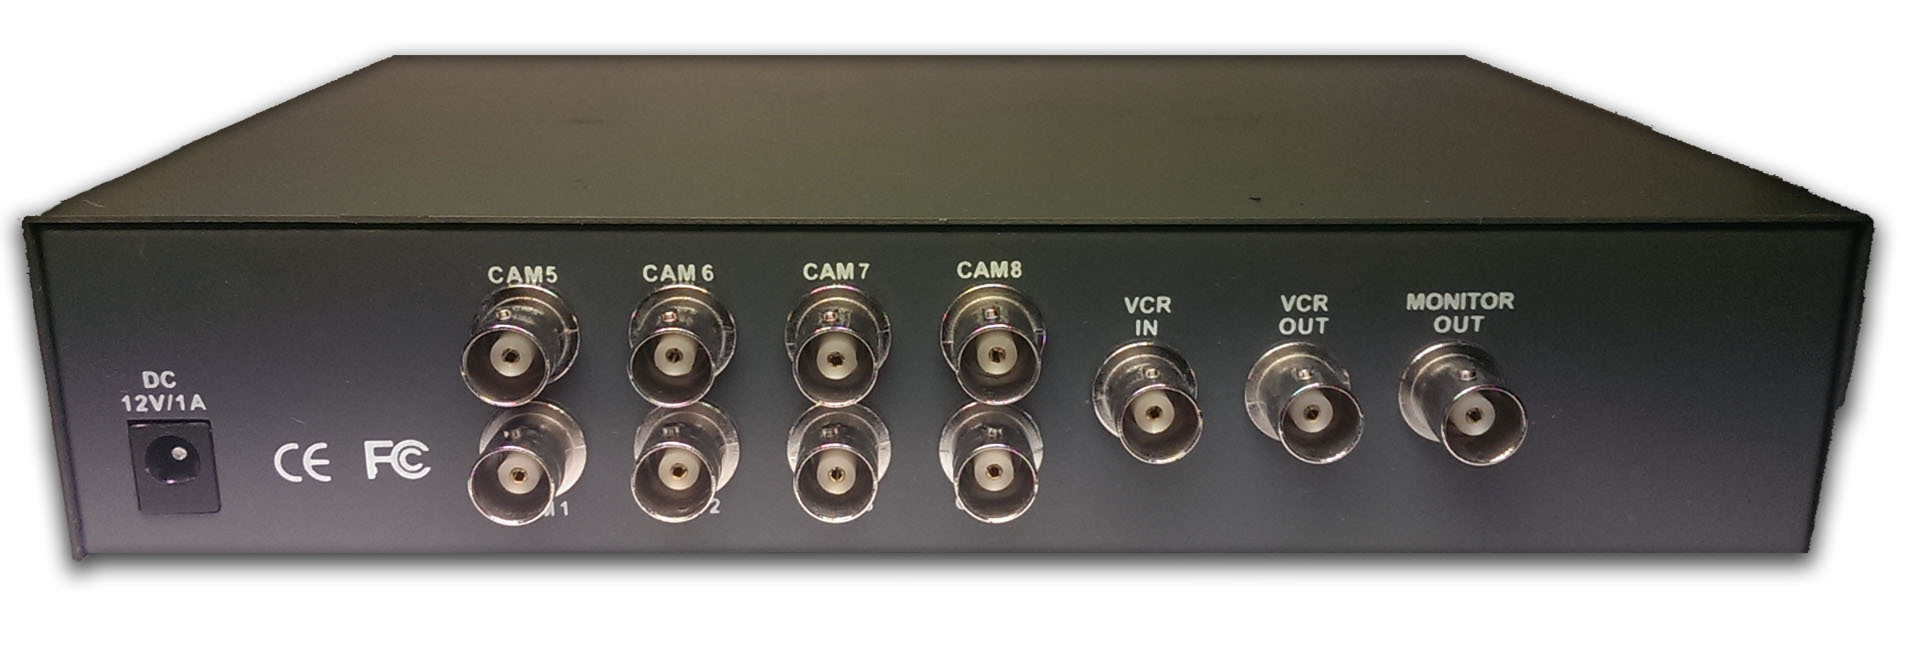
The idea is this: each camera writes FullHD video to its media. At the same time, an RCA connector with a coaxial cable is connected to it to the AV output (the so-called " yellow tulip "). Through this cable, the analog signal goes to the quad. Using the quadrator, we display 4 (or more) cameras on the screen. It looks something like this:
Picture 8. Photo of the image output from the quad.
The quality of the image displayed in this case, of course, was far from even average, but to distinguish who and what is shooting is quite enough. It is not convenient to display more than 4 cameras at a time even on a 27-inch monitor - very small. So 4 cameras using a quad were displayed on a 27-inch monitor (via composite analog input), another one on a small Chinese car 8-inch TV. The 6th camera could be viewed by switching the quad to it. But, since her task was to shoot a static picture (long-range plan), I hardly watched her.
Intercom
Also important is the ability to communicate with operators. The simplest option - its complete absence - before the shooting begins, agree between the operators who shoots what plans and each operator shoots what they consider necessary. The advantages of this approach include perhaps the ability of the operators to show themselves and their vision. On this, the pros end. For the final viewer, this approach carries only definitive minuses - the operators very often shoot the same thing, plans are duplicated, etc. As a result, it’s practically impossible to assemble at least something worthwhile during installation. Although at the dawn of my amateur activity, I also did this. But I have a mitigating circumstance - then I did it generally for free.
Still returning to communications, the easiest option is to use walkie-talkies. The undoubted advantage of this approach is mobility - no wires need to be pulled. Also, with walkie-talkies, the connection will be two-way, which is also useful. On the downside of using walkie-talkies, you can record low communication stability (for relatively cheap walkie-talkies) - the interference is constantly coming out, as well as the inconvenience for the director to press the button all the time before saying anything. And, of course, you need to buy these walkie-talkies with headsets, which is not cheap (we remember that shooting is budgetary, right?). In general, the option, although with drawbacks, is quite working.
I took a slightly different path, or rather, chance helped me. At one time, when I came to the conclusion that it was no longer correct to work without a connection, and I did not know how to solder yet, I turned to one of the familiar engineers on the local television and radio company for advice on this issue. To my joy, he was sympathetic to my desire for growth in his amateur studies and gave to use (and later, as it turned out, forever) a home-made miracle machine. Picture 9. The appearance of the intercom (the picture is clickable). Actually, the scheme of its work is simple to disgrace - to receive a signal, amplify, apply to the outputs. I believe that finding an Internet scheme for its implementation will not be difficult.
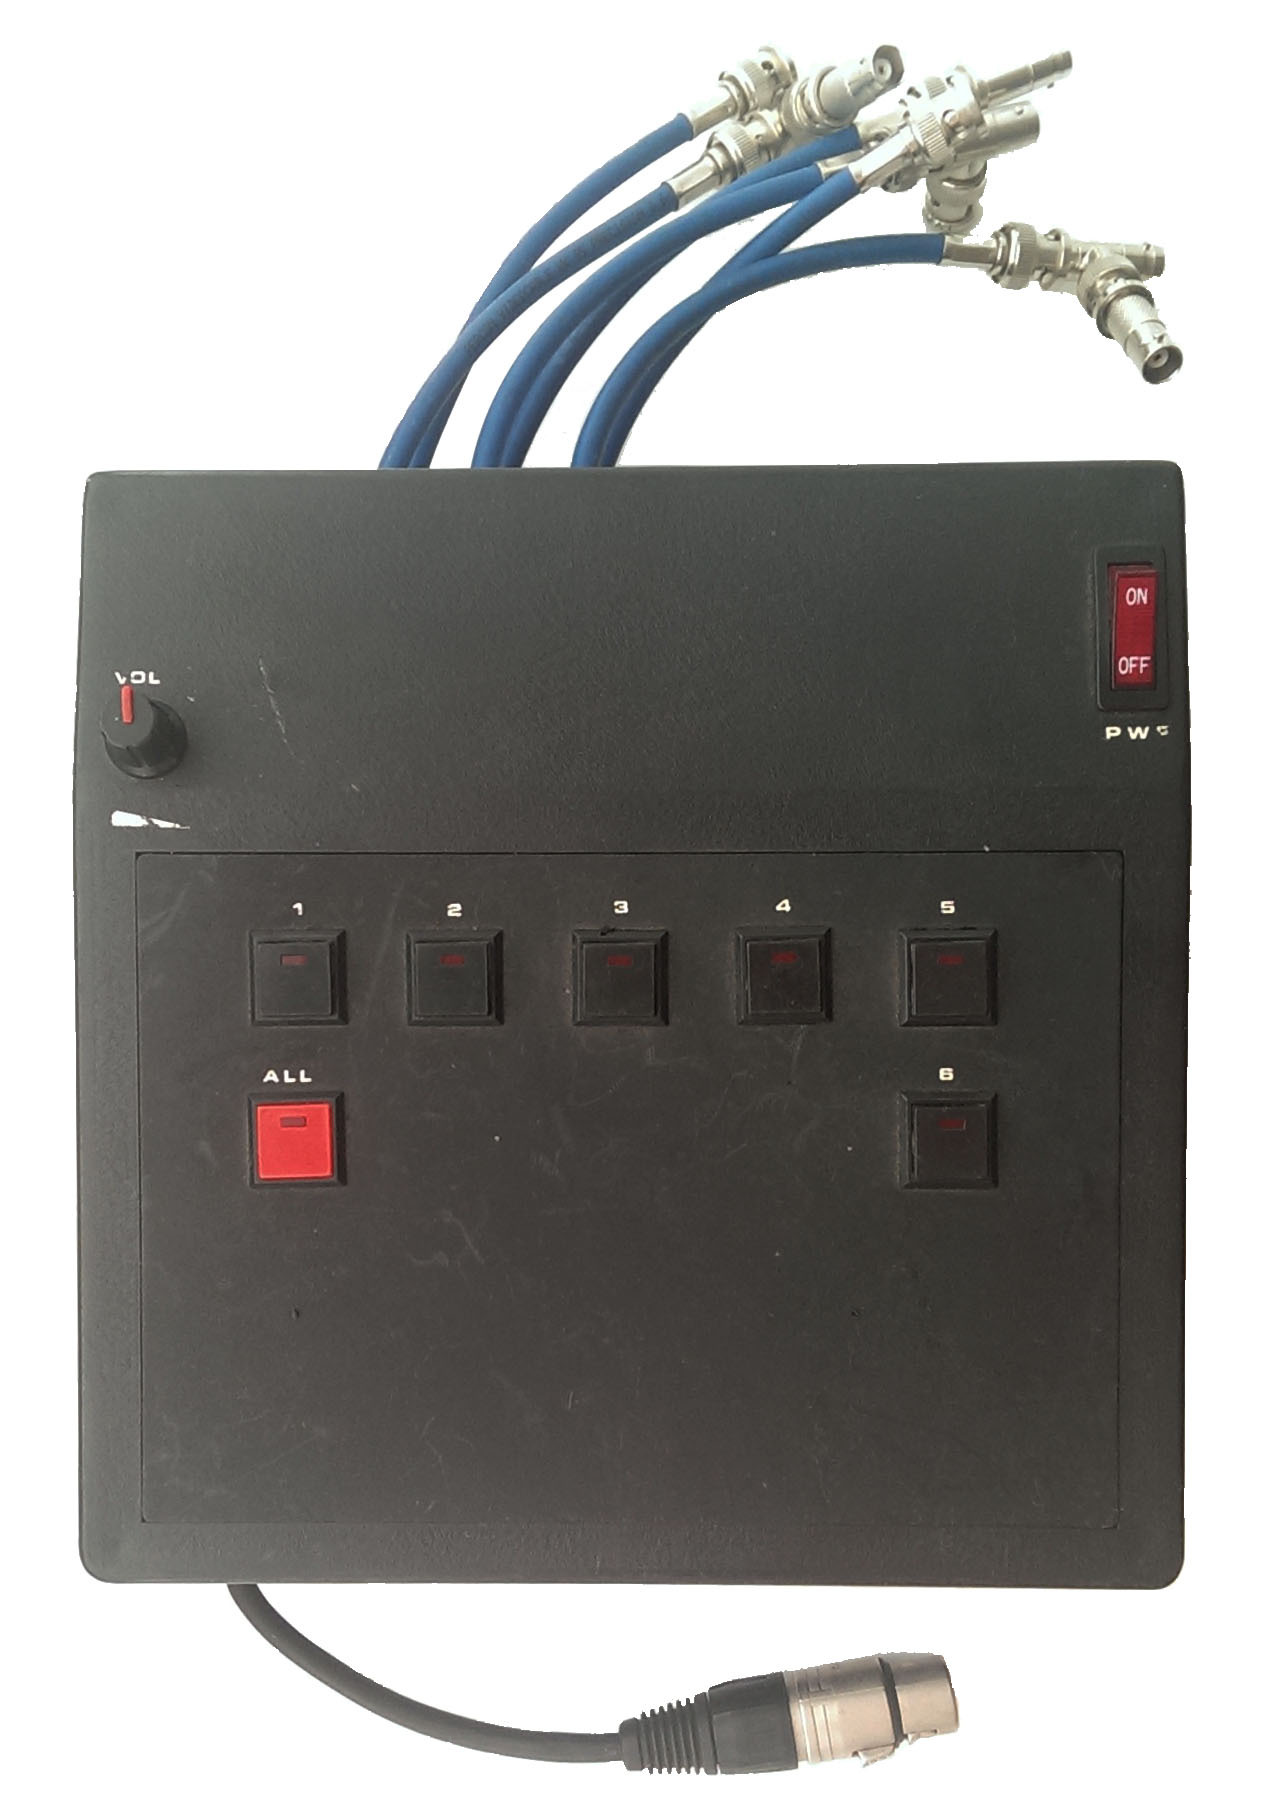
The buttons on the device show that once it was possible to choose which output the sound would go to, but when it got to me, this function no longer worked - these buttons do not affect anything. Actually, I don’t need it.
The main disadvantage in this approach is the one-way communication. Everyone hears the director, but can only respond with gestures, nods, and other actions. But in general, this is quite enough.
At the entrance to the "negotiator" are connected to conventional multimedia headphones with a microphone. The output is a conventional power cable 2x1.0 m 2 (it is quite durable) of the required length with a BNC connector . At the other end of the cable is a 3.5 mm TRS jack to which headphones are connected.
Of course, the disadvantages of this approach can also be attributed to the lack of mobility, but since each camera already has a coaxial cable for video transmission, the addition of another cable does not play a special role.
As a third cable, I always supply power to each camera (normal carrying). This is done for insurance, since it is not always known in advance whether there is enough battery on each of the cameras.
Lighting
In any video recording, an important point is the illumination of the subject. The lighting issue I mentioned at the beginning of the article - now a little more.
In short, there is not much light at a stage concert. We need ordinary warm white light for video recording. The more it will be and the more evenly it will be distributed across the stage - the better.
It was assumed that at the described event the main light on the stage would be stationary light, which was rented together with the hall. And just with this light we were grasped by a serious force majeure. 20 minutes before the start of the concert, it turned out that the dimmer, through which all the stationary lighting of the stage was fed, failed (although an hour before that everything worked correctly on the test) - that is, the stage was completely completely without light. Only the guns of colored light that were installed additionally remained to work. There’s no time to climb up to figure out why the dimmer suddenly failed (usually even when everything is prepared in advance, there is always something to do before the very start). As a result, a local electrician was urgently called with the expectation that the sun was still shining, then the stage lighting was not necessary, and by the time it got dark, perhaps an electrician will restore everything. Nevertheless, I personally did not count on it and decided to prepare “Plan B”. We had twospotlights of 1 kW each, which we planned to put on to illuminate the audience. Without hesitation, they decided to put them on racks and direct them to the stage. Given their insufficient power to illuminate the entire scene, they had to be set close enough to the stage - so with their appearance, when shooting, they spoiled the picture.
Picture 10. Location of spotlights.
We turned them on even before the concert, since running them on when it got dark was unprofitable.
Now we are left without lighting in the hall. But I had to put up with it - the scene is more important.
Is it necessary to say that a miracle did not happen and the electrician didn’t help us in any way?
Strange as it may seem, it didn’t work out the laws of physics either - on the backlight of the scene that was not illuminated, shadows were actively “wandering” from our two kilowatt spotlights:
Figure 11. Illustration of the spotlight shadow.
Of course, there was a decent scandal due to such a flaw on the part of the landlords, but this, as expected, did not help turn on the stationary light.
Shooting process
If you put all the cameras in their places and just take them off at the automatic settings, then you will be disappointed when viewing the result. Stage events need to be shot only on the manual settings of the cameras. To do this, before the start of the event, we take an unemployed person in a white T-shirt or shirt and put on the stage. If the hall is closed, then the stage lighting is brought into a state as close as possible to the combat one. We direct all cameras to this person and build white balance on his face and T-shirt. We also set the exposure and saturation. Ideally, pictures from all cameras should be perfectly matched to each other in color and brightness. Achieving this is not always easy. Especially on non-professional video cameras, where in the settings you can select only “Auto” or presets.

In our case, the hall is open, the sun changes its position and brightness - so this is all to be adjusted during the concert, which causes a lot of difficulties.
All cameras start recording at the director’s command and, ideally, they don’t stop it at all during the event. The latter allows you to reduce the time spent on synchronizing cameras during post-installation.
If some of the cameras require replacement of the media during the concert, it is advisable to think in advance at what point it is best to make it, and also make sure that the “loss” of this camera is blocked by other cameras.
Also, to make life easier for you after editing after starting recording, but before the action itself, you can blink a flash from the scene from any camera. This allows you to have a clear point for synchronization.
If we did everything right in preparation, then the shooting itself should go quite smoothly.
Thanks to the notes made when viewing the dress rehearsal, we know what to look for, we see all the operators and all the operators hear us.
We deal with everything else along the way.
Mounting
So, everything is removed, all the mess has already happened and this can not be changed. We pass to the longest-playing part of the project - installation.
There is nothing much to describe at this stage, since almost everything depends on what you managed to record and film earlier.
From my own experience, the first thing I usually do is mix the soundtrack. For this I use Adobe Audition .
Picture 12. View of uncombined multichannel audio recording.
After that, it comes to the video. For video processing, I use Sony Vegas . We place all the cameras on a time-line and use the plugin " PluralEyes". The essence of this plugin is that it tries to synchronize cameras by sound. For a starting point when synchronizing, this is a good option. As a rule, it fails to synchronize everything correctly - it doesn’t find some video files, but it doesn’t place some . the effectiveness of the right of his work is usually about 70-80%, but for initial synchronization is not bad..
If you are not forgotten at the beginning of the shooting "blink" the scene flash - ischom this point on all cameras and synchronize for the outbreak is the most accurate. th (simple) method of synchronization. The remaining files are adjusted to those where there is an outbreak.
If you forgot / didn’t have time to specially blink the flash, then we are looking for any presentations or awards in the video — as a rule, photographers don’t doze off at these moments — they actively take pictures and blink the flashes. And we thus have a point (s) of synchronization.
If the flashes are completely trouble, and the concert is musical, then you can try to synchronize with the movements of the drummer (aka “drummer”). But this is not so convenient and the accuracy is less.
At the described event, we did not have time to “blink” the outbreak at the beginning, but at the end of the event there were a lot of outbreaks — the main synchronization was done on them.
Picture 13. Project view after synchronization.
On the screenshot you can see the placed marks - so at the synchronization stage I mark these very synchronization points.
All further actions for video processing (the use of filters, color corrections, etc.) are already being done based on what we were able to shoot, that is, as needed.
After that, we bring all the video tracks into a multi-camera track, and then we arrange the switching between the cameras.
Picture 14. The final view of the project.
Again, here everything is already done by necessity.
Conclusion
The final version of what I managed to do can be found here:
or download the unencoded version here .
I hope this article will be useful to someone. If I didn’t understand something clearly, I ask you to ask questions and I will answer them with pleasure. Constructive criticism is also welcome.