Pebble + Marlight: controlling light with gestures

Hello, Habr and Khabrovites. I want to talk about one experiment that I conducted the other day. I really liked two devices from articles from Madrobots : Marlight lamps and Pebble watches . And they liked it precisely because they are configurable, i.e. subject to the will and imagination of the owner, so to speak. While the child was in the country, I decided to give him a surprise and show him a real modern "techno-magic", namely: control of light by gestures.
Task: with the help of certain movements, choose a room, and then with a wave of your hand either turn on or turn off the light in the selected room.
In the process of working on the task, several interesting solutions were used that can come in handy in a variety of home automation projects, who are interested - welcome under cat.
Many of the articles that I read here ... They are great! They are read in one breath and it seems that, my God, everything is just as simple, as I myself will not do the same. Actually, it was precisely such thoughts that prompted me to this is all that is described below. BUT! There is one important “but.” In addition to the final result, I wanted to describe my ordeals in areas in which, strictly speaking, I do not understand anything. I never wrote under php and js, and c ++ was at the institute for a very long time. It may seem to some that I pay a lot of attention to elementary things, or maybe even in some moments I am frankly mistaken or do not understand something correctly, but I achieved the task and wanted to demonstrate not only the result (maybe not so impressive) but also the path that I went to him.
So what we have from iron:
- pebble wristwatch with accelerometer
- iOS phone on board
- a computer with Windows that performs the functions of a server (i.e. included 24x7)
- wi-fi marlight connector connected to home wi-fi and having a static IP
- lighting in an apartment based on marlight lamps (8 pieces) in each room (3)
I bought everything at once. Here . Not cheap of course, but they are still economical in energy consumption, and changing it is all at once. So I have four lamps in a large room, three in the nursery and one in the bedroom (not enough! You need at least three - the luminous flux of one lamp at maximum brightness: 500 lumens, which does not even reach the 50-watt incandescent lamp). Each room has a separate channel on the connector , and even one remains on expansion: to the bathroom, for example (pebble is waterproof ... What’s bad: you lie in the bathroom and control the light! True, you will have to do more functions than just turn it on and off).
An easy hitch came out with the wifi connector: when it is turned on, it offers to choose the type of encryption and despite the presence of instructions that show WPA2 as an example, this option is not found in the selection list. However, the experts of those. The store’s support explained to me that you don’t need to choose the type of encryption - they say you specify the SSID, password and voila - the connector on the network. Actually, all this was and is in the instructions on their website.
Binding lamps to a specific channel also did not cause difficulties - since I already knew where the instruction was! (What is typical - in a piece of paper that went with the connector, the procedure was described somewhat differently - and so it works on the seller’s website).
After testing the full-time iOS application, I was convinced that I can control the lighting from the phone (which in itself is already amazing), and for this I do not need to switch the network, as it would be if the connector were in stand-alone mode. It’s time to move on to something I’ve never done before: setting up a web server.
Why a web server, you ask? But because in the article about bulbs mentioned above there was a linkto a php script, which, when receiving GET (and POST) requests, sends the corresponding udp packet to the connector, forcing it to perform one or another action with lighting. By the way, I completely admit, given the pebble architecture, which will be discussed below, that you could do without a server, but ... I was quite sure that you could initiate an http request from the clock, but I was not sure about everything else. This habr article
helped me run php under IIS7. In principle, nothing complicated, the main lesson I learned for myself: MS has a very peculiar idea of a user-frendly error screen. Only by disabling this option, I realized that php works for me, and errors should be looked for in the script (or rather, in the absence of the sockets library that the script uses). We try through localhost - bingo! Works.
Having installed the smartwatch + application on pebble / phone I try http-requests. Of course, I come across a firewall, after adding the necessary port to the exceptions - I can already control the light in the room using the clock. True, with a third-party application. So it's time for us to go to cloudpebble.net
 From this moment, Habr did not give answers to emerging questions, I had to google. I googled a lot and far from always productively, until I came across this wonderful resource . A quick look turned out to be enough to understand that this is what we need. And here a surprise awaited me! It turns out sdk pebble provides an opportunity to develop a solution that includes a bunch of code that runs on both the watch and the phone! Later I googled that they also have work on a js application that is fully executed on the phone, using pebble purely as an output device, but now it's not about that.
So, why do we need to use two devices and how it works. Well, as planned, we have an accelerometer on the watch, and it is precisely this that we want to use as a control device. And here is the http-request ... Even if we assume that this is possible directly (I use the phone as a conditional “router”), then this is unreasonably complicated. The question arises: why? If a messaging engine is implemented, and can code be executed on each side? As the practice of http request on the phone side has shown - not just, but very simple!
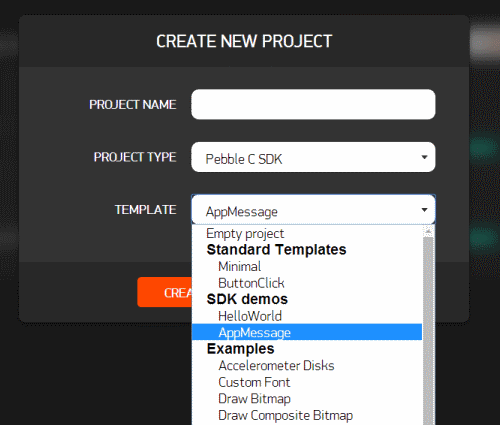
Let's start. As a template for the new application, we will use the demo from sdk pebble - appMessage. We will immediately create two sources - .c for the clock and .js for the phone. Yes, yes, java-ssript is used on the phone (remember, I mentioned that it is quite possible to send udp packets controlling directly to the connector? I'm just not strong in js, so I have no idea if this can be done and if possible, how , but ... Something tells me that if there is in php, then it should be in js. Unless the capabilities of the virtual machine in the pebble application can be greatly curtailed).
Here's what my .js file looks like (it differs not much from a destructive one, frankly, not much):
// Событие при запуске - можно протестировать доступность URL... Но я просто шлю сообщение
Pebble.addEventListener("ready",
                        function(e) {
                          Pebble.sendAppMessage({0: “Ready!”});
                        });
// Обработка входящих сообщений: отправляем GET запрос, посылаем "эхо" обратно на часы
Pebble.addEventListener("appmessage",
                        function(e) {
                          var msg = e.payload.message; // SETTINGS : PEBBLE KIT JS : MESSAGE KEYS
                          var req = new XMLHttpRequest();
                          req.open('GET', "http://srv:8080/marlight.php?command="+msg, true);
                          req.send(null);
                          Pebble.sendAppMessage({0: msg});
                        });
Do you know what I could not understand for a long time? What is e.payload.message. No seriously! I understand that we are somehow transmitting the message that this construction should be what we are transmitting to return, but ... How? As you can see from the source module for the clock, we essentially pass a dictionary where the values go by index ... It turns out this:
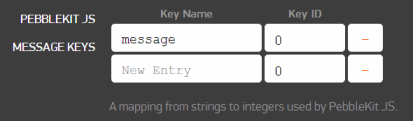
This is the settings for this project in the cloud IDE. And this is exactly what connects e.payload.message and MESSAGE_KEY in the line dict_write_cstring (iter, MESSAGE_KEY, command), a module for hours, and there and there there is some meaningful representation of the index.
In general, not the point. Everything is clear here - when we receive a message, we extract a command line from it, which should supplement the URL we have to receive a specific GET request that will force our script to ask the connector to switch the bulbs! Cool. Just in case, the helmet echoes back to the watch.
So, going to the .c module, which accordingly runs on the clock. The procedure for sending a message from the watch to the phone we have by default:
/* Запись сообщения (параметр command) в буфер и отправка на телефон */
void send_message(char* command){
	DictionaryIterator *iter; // создание словаря
	app_message_outbox_begin(&iter); // начало сообщения
	dict_write_cstring(iter, MESSAGE_KEY, command); // отправка команды на телефон
  dict_write_end(iter); // конец сообщения
  app_message_outbox_send(); //отправка
}
Well, almost by default ... All I did with this procedure was to add a command parameter and replace the type of packet being sent with a string ... Oh, these lines in C ++! Who did not work with pointers, who did not try to print a number in a string, that does not understand. But thanks to the examples and the SDK, I still found out that the snprintf function is supported, so displaying formatted text (converting a number to a string) on the screen, although not as simple as in the usual high-level languages, is still understandable:
  channel = 1; // по умолчанию у нас включен 1-ый канал
  snprintf(channel_s, sizeof("Channel: 0"), "Channel: %d", channel);
  text_layer_set_text(channel_layer, channel_s);  /* показываем сообщение при запуске программы */
I cited only the conversion and output of the text, the initialization of the text layer can be fully seen in the article about programming under Pebble or in the source, a link to which I will provide at the end of the article.

After trying to send a couple of static commands, and making sure that it works, I turned to the essence: the accelerometer. What exactly is an accelerometer? The SDK has an example of working with it - the tamer clock receives the acceleration value for each of the three axes and applies it to a couple of dozens of “disks” that have a conditional mass depending on size, and, consequently, inertia. All this is drawn on the watch screen.
Disks move when tilted in one direction or another - everything is beautiful ... But at once it is not even clear what follows from this and how to put it into practice. Then I took and stupidly displayed the data of the current acceleration along the axes in the log!
 /* структура для хранения значений ускорения по всем трем осям */
  AccelData accel = (AccelData) { .x = 0, .y = 0, .z = 0 };
  /* для начала получим текущее значение ускорений */
  accel_service_peek(&accel);
  APP_LOG(APP_LOG_LEVEL_DEBUG, "x:%d, y:%d, z:%d", accel.x, accel.y, accel.z);
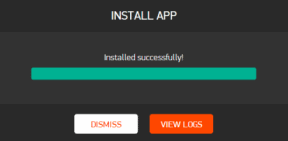
Lyrical digression: APP_LOG logging command (APP_LOG_LEVEL_DEBUG, “SPARTAAA !!!”); It is often found in the source, but it is not so obvious where is this very log! Well, firstly, this is the VIEW LOGS button after downloading the application to the phone:
And secondly, the log can be found in the menu: COMPILATION - VIEW APP LOGS.
But back to the accelerometer. While meditating on the results, I realized that there is one acceleration that is easy to diagnose - this is the acceleration of gravity. That’s why it’s easier to track the slope than moving in one direction or another - compared to gravity, other pulses are not so significant ... No, of course there are algorithms that can even track what figure the airman draws in the air, but we have an entry-level application , so we will take what is simpler.
So, the acceleration of gravity from the point of view of the pebble accelerometer is 1000 ± 100 points. I think this is exactly what was intended during calibration. This means that the response threshold can be considered 900 when the direction of the axis and acceleration coincide, and -900 when the axis and acceleration vector are completely opposite. We will not consider intermediate values for now.
We will create a structure for storing the state of the axes, describe the possible states, and also create a constant for gravity:
typedef struct Vector {
  int x, y, z;
} Vector;
static Vector current; 	//текущее состояние
/* Состояния осей акселерометра */
enum{
  HYRO_NN = 0, // нейтральное
  HYRO_UP = 1, // повернута вверх
  HYRO_DN = 2  // повернута вниз
};
#define GRAVITY 900 // Ускорение свободного падения с точки зрения акселерометра pebble 1000 +/- 100
Then the state initialization could be written as:
  if (accel.x > GRAVITY) current.x = HYRO_DN;
  else if (accel.x < -GRAVITY) current.x = HYRO_UP;
  else current.x = HYRO_NN;
  if (accel.y > GRAVITY) current.y = HYRO_DN;
  else if (accel.y < -GRAVITY) current.y = HYRO_UP;
  else new.y = HYRO_NN;
  if (accel.z > GRAVITY) current.z = HYRO_DN;
  else if (accel.z < -GRAVITY) current.z = HYRO_UP;
  else new.z = HYRO_NN;
Let's say. However, we need a trigger, i.e. an event to which it will be possible to issue a ONE-TIME reaction (say, they raised a hand, or turned a wrist). So we need not so much the state of the axes as their change. Therefore, we need to store the previous dimension, so that there is something to compare with, and update it only if it has changed:
static Vector old; 	    //старое
static Vector new; 	    //новое
  if (accel.x > GRAVITY) new.x = HYRO_DN;
  else if (accel.x < -GRAVITY) new.x = HYRO_UP;
  else new.x = HYRO_NN;
  if (accel.y > GRAVITY) new.y = HYRO_DN;
  else if (accel.y < -GRAVITY) new.y = HYRO_UP;
  else new.y = HYRO_NN;
  if (accel.z > GRAVITY) new.z = HYRO_DN;
  else if (accel.z < -GRAVITY) new.z = HYRO_UP;
  else new.z = HYRO_NN;
Now we can check whether the state has changed, and if so, how it has changed. If so, as intended, then perform the action:
  if (old.x!= new.x) { /* если оно изменилось по оси х */
    /* проверим, как именно изменилось */
    if (new.x == HYRO_UP){ // если руку подняли
      snprintf(command_s, sizeof("ON_0"), "ON_%d", channel); // то надо послать команду включения
      send_message(command_s);  /* посылаем сообщение */
      text_layer_set_text(command_layer, command_s);  /* показываем сообщение */
    }
    if (new.x == HYRO_DN){ // если руку опустили
      snprintf(command_s, sizeof("OFF_0"), "OFF_%d", channel); // то надо выключить
      send_message(command_s);  /* посылаем сообщение */
      text_layer_set_text(command_layer, command_s);  /* показываем сообщение */
    }
    /* зафиксируем изменение */
    old.x = new.x;
  }
  if (old.y!= new.y) { /* если оно изменилось по оси y */
    /* проверим, как именно изменилось */
    if (new.y == HYRO_DN){ // если повернули кисть влево
      channel++; // то следующий по порядку канал
      if (channel == 5) channel = 1; // по кругу
      snprintf(channel_s, sizeof("Channel: 0"), "Channel: %d", channel);
   		APP_LOG(APP_LOG_LEVEL_DEBUG, channel_s);
      text_layer_set_text(channel_layer, channel_s);  /* показываем сообщение */
    }
    if (new.y == HYRO_UP){ // если повернули кисть вправо
      channel--; // то предыдущий канал
      if (channel == 0) channel = 4; // по кругу
      snprintf(channel_s, sizeof("Channel: 0"), "Channel: %d", channel);
   		APP_LOG(APP_LOG_LEVEL_DEBUG, channel_s);
      text_layer_set_text(channel_layer, channel_s);  /* показываем сообщение */
    }
    /* зафиксируем изменение */
    old.y = new.y;
  }
  if (old.z!= new.z) {  /* если оно изменилось по оси z */
    /* пока просто зафиксируем изменение */
     old.z = new.z;
  }
We try:
It works !
Epilogue . The task set at the beginning is completed. I think many would like to know how functional it is - to switch the light with a gesture. Yes, in general, not really. Practice shows that in 80% of cases it is easiest to use a conventional switch. The need to remotely turn on / off / adjust the light can arise only when, for example, you are comfortable sitting at the TV, or went to bed and you are too lazy to get up ... In this case, control from the clock is more convenient than from a mobile phone (a mobile phone may not be at hand ), however, gestures ... Gestures are more likely a WOW effect. Even with the addition of pebblebits hotkeys(allows you to launch up to four applications not through the menu, but by pressing a combination of buttons), it would be much more practical to have a well-organized menu that provides quick and intuitive access to the main lighting functions. Nevertheless, I consider this project to be very successful. For several reasons. Firstly, a deployed web server controlled by GET requests is a very cool thing. He can receive a command not only and not so much from the clock, but from anything: from motion and / or light sensors to some kind of voice command processor. Also, by analogy with the marlight.php script, I can attach a script that performs actions that go far beyond lighting control. I fully admit that for the majority of those present here this is the basics, but for me the experience was useful. And of course pebble! During the project, I learned how to build applications for watches that can communicate with the outside world, which opens up really broad prospects for their use. Of course, the pebble programming articles that were on Habré earlier helped me a lot (and I installed MagicPebble on the clock on an ongoing basis), but all these examples leave smart watches a thing in themselves, despite the fact that the simplest code actually makes them part of the overall “ecosystem” of devices in the home.
References:
- Source for pebble on GitHub: PebbleToMarlight
- php script for server: marlight_php
- Generator of Russian firmware for pebble with add. options: pebblebits.com
- A good set of examples with explanations: try {work (); } finally {code (); }
- Articles on a habber on programming of pebble: one , two , three .
PS While I was writing this article, pebble firmware was updated twice. And for the first time - from 2.3 to 2.4, which made it impossible to upload your projects to non-updated watches, and since pebblebits.com didn’t have a Russian option - updating to 2.4 would mean abandoning the main pebble function: show calls, messages, events and other, because In the original firmware, the Russian text is displayed in squares. However, the guys posted a new platform a week after the official release, for which they have a deep respect!