Flight to the moon with landing at the lunar base
A long time ago I did not have new posts on Orbiter. Therefore, today we will talk about the regular apparatus of the game called Delta-glider, and also, taking off from Earth, fly to the lunar base. Despite the fantastic nature of the task, it should be quite curious - the task of braking and landing on the moon is not as simple as it might seem. The fact is that the moon does not have an atmosphere, so it will be necessary to slow down the engines.
Delta-glider

This ship is in the basic delivery of the game. It has fantastic parameters:
- Empty weight : 11 tons ordinary, 13 tons modification with hypersonic ramjet engines. About as much as an empty MiG-29.
- Fuel mass : 13 tons.
- Length : 17.76 m.
- Wing span : 17.86 m. Such length and wingspan are comparable to the average WWII bombers ( Do-17 ) or the A-10 attack aircraft .
- Propulsion thrusters : 2 * 160 kN (slightly more than RD-0124 )
- Specific impulse of marching engines : ~ 4000 s. These parameters are possessed by the NRE , not in vain on the model of the apparatus near the engine compartment the radiation hazard icon.
Such a combination of parameters allows you to independently start from the Earth, enter orbit, dock with the ISS and return back, not including the “endless fuel” mode. In fact, this is the very dream of SSTO , the implementation of which has not even loomed on the horizon.
The device also has lifting engines that allow vertical take-off and landing, and wings that allow maneuvering in the atmosphere. The combination of these properties makes the Delta Glider an excellent apparatus for training and flying for pleasure.
Flight preparation
In addition to Orbiter itself, no add-ons are needed.
Flight plan
Our mission will be divided into simple stages. Therefore, on the one hand, it will be very inefficient in terms of fuel (and we will turn on the “endless fuel” mode). Also, it will be unrealistic - ballistic collectives calculate the real apparatuses of the trajectory, which makes flights much more efficient. But, on the other hand, the individual steps will be simple and will clearly explain the physics of flight. Our flight plan will consist of the following steps:
- Start from the Earth and exit to a low circular orbit.
- Combination of orbital planes.
- Acceleration to the moon.
- Entering the orbit of the moon.
- Alignment of the plane of the orbit with the landing site.
- Braking and landing.
Definitions Used
Apocenter - the highest point of the orbit. For the orbit around the Earth, the name "apogee" is also used.
The pericenter is the lowest point in the orbit. For the orbit around the Earth, the name "perigee" is also used.
Orbital inclination - the angle between the orbital plane and another plane (the plane passing through the Earth's equator or the orbital plane of another body) An
ascending node is the point at which the orbit intersects the Earth’s equator plane or the orbit plane of another body, appearing “above” it. “Above” and “below” are defined by the conditional north and south poles.
Descending node- the point at which the orbit crosses the plane of the equator of the Earth or the plane of the orbit of another body, being "below" it. “Above” and “below” are defined by the conditional north and south poles.
For example, if we are talking about the orbit of the moon around the earth, the picture will be as follows:

Stage 1. Start from the Earth and exit to a low circular orbit
After starting the game, first of all, we will go to the “Parameters” section and set the endless fuel mode:

In addition to the obvious bonus of permissible errors for flight, this mode will give us constant acceleration of the ship, which will be very convenient for landing.
Then run the script “DG-S ready for takeoff”:

DG-S is a version with jet engines, we do not need them, but this scenario is convenient because we are already standing on the runway.

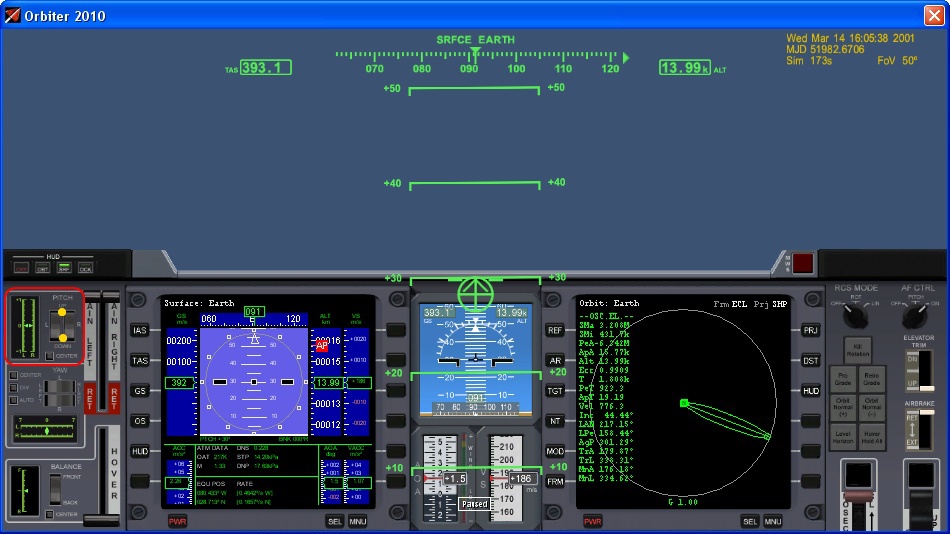
Switch to the view from the cab by pressing F1 . Pressing F8 sequentially switches the cockpit to the "glass cockpit" mode.

Both multifunction displays should be switched to something more convenient than landing indicators and a map. Switch the left MFD to Surface mode by pressingLeft Shift - F1 , Left Shift - S . Right MFD switches to the "Orbit" - right the Shift - the F1 , right the Shift - About . Check that the orbit of the ship is not projected onto the ecliptic (Required Proj: SHP mode, PRJ button on the MFD), and the orbit height is measured from the surface, not the center of the Earth (Required mode - small ApA and PeA values - pericenter and apocenter heights, DST button on MFD). The correct result would look like this:

To control the maneuvers of the ship, a numeric keypad is used. At the beginning of the scenario, the orientation engines are turned off, and the buttons on the numeric keypad control only aerodynamic surfaces — ailerons and rudders. Before take-off, set the elevator trimmer up to the stop by pressing and holding Delete over the block of cursor keys. We start the marching engine and fix it by pressing Num + and, without releasing, Ctrl . With the trimmer fully raised, the Delta Glider will take off on its own.

After take-off, remove the chassis ( G) and begin to turn to the azimuth of 90 °. Why 90 °? In this case, we will accelerate in the direction of the Earth’s rotation, and the inclination of our orbit will be equal to the latitude of the launch site (~ 30 ° for Cape Canaveral, from where we took off). After the turn, set the pitch angle of 30 °, manipulating the trimmer ( Insert - down, Delete - up).

With increasing height, the air will become less frequent, and trim tabs will not be enough to maintain a constant pitch of 30 °. We turn on the orientation engines by pressing the ROT button from the top left and maintaining the pitch angle in the stabilization mode KillRot ( Num 5) But at an altitude of ~ 20 km, this mode will cease to cope normally. You can help trimmers with active control (more convenient if you have a joystick). But the most elegant option is to turn the marching engines. The fact is that the Delta glider, like many modern missiles, the marching engines can rotate on a gimbal, creating a control moment. In order to change the angle of rotation of the engines, switch the cockpit to 2D mode (by pressing F8 ). Management of the vertical angle of the engines from left to top, clicking on the yellow dots changes the position of both engines at once:
Maintaining a pitch of 30 ° we continue acceleration. Above 50 km, you can leave only the KillRot mode by setting the engine angle to 0 ° with the Center button under the vertical engine angle keys and switch to the more convenient “glass cockpit” mode. At an altitude of ~ 70 km while maintaining a pitch angle of 30 ° there will be a section of slight decrease, no need to be scared. When the device rises to 70 km, the speed becomes insufficient to create any significant lifting force. But during the inertia ascent and a slight descent, the speed again begins to be enough to create lift force by the wings, and the second ascent cycle begins. You can visually look at this process by turning on the display of the forces acting on the device ( Ctrl - F9 , check the Forces tab).

We continue to accelerate until the apocenter is 200 km high on the orbital indicator. Upon reaching this parameter, turn off the engines by pressing Num * .

We put the indicator on the windshield into orbital mode (button H ) and take a position along the vector of orbital speed (nose forward) - the button [ or PROGRD below.

Near the apocenter point (a transparent circle on the Orbita MFD) we turn on the engines again. We accelerate to approximately circular orbit, the height of the pericenter should not be lower than 150 km. Result:

We will transfer the device to the orbital configuration. The fact is that the brake engines are located in the nose of the wing and at start are covered by aerodynamic fairings. They could be opened at the start - there are no damage models in Orbiter, but it’s more interesting. So, open the "control elements" menu ( Ctrl - Space ) and click the Retro Doors - Open button.

Now we can not only accelerate along Num +, but also slow down along Num- . Brake engines are less powerful than marching engines, but they are convenient to use for performing precise maneuvers.
So, we are in the low orbit of the Earth. This orbit is stable, therefore I recommend saving by pressing Ctrl-S . Saves lie in the Quicksave scripts folder:

Stage 2. Alignment of the planes of the orbits
To find the difference of inclinations of the orbits, switch the right MFD mode "Combination of orbital planes" - Right -F1 Shift , Right Shift - A . Choose the Moon with the target - Right Shift - T , select Celestial bodies - Moon from the menu :

The angle of 47 ° demonstrates the proverb "there is power - no mind." In real life, they try to launch vehicles to the moon into the so-called launch windows when the angle between the planes is minimal. The window to the moon opens once a lunar month. In addition, the ballistic team can calculate such a starting window that the angle between the planes of the orbits beautifully turns into the inclination of the orbit of the device around the moon. We use rather limited tools and, besides, we want to go to the Moon right now, without waiting. Therefore, it is necessary to combine the planes of the orbits, so that we can begin acceleration to the moon from anywhere in our orbit.
To combine the planes of the orbits, we must accelerate “up” on the descending node and “down” on the ascending one. The nearest node is a descending node (DN - Descending node), so we will take a position normal to the plane of the orbit. This will help us with automatic orientation. Button ; the keyboard or the NML + button on the screen below is an automatic occupation of the “up” position perpendicular to the plane of the orbit, ' aka e , or NML- on the screen - down.

In the area of the node, we start acceleration. Such a large angle means that it will take several maneuvers.

After the first maneuver, the angle decreased by half. Repeat on the upstream node. In order not to be bored to wait for the node, use the time acceleration - T buttonspeeds up time by 10 times, R - slows down by 10 times. Do not abuse acceleration, when the automatic orientation mode is on, the ship may spin over acceleration greater than 1000x.
After the second or third maneuver, the relative angle will tend to 0:

The stage is completed, do not forget to save.
Stage 3. Acceleration to the Moon
To disperse to the moon, we need the MFD "Transition". Turn it to the right - right the Shift - the F1 , right the Shift - the X . We choose the moon ( Right Shift - T , Celestial bodies - Moon). We turn on the maneuver planning mode - the HTO button on the MFD. HTO is Hohmann Transfer Orbit - a Hohman trajectory , a way to move between orbits with a minimum of fuel costs. A dotted radius will appear. This radius indicates the point of maneuver. We can move it with the Right Shift - < and > buttons . We can also adjust the calculated impulse using the Right Shift - + and - buttons .

Combine the point of our expected position with the point of the expected position of the moon.

The DTe parameter is the time before the start of the maneuver. DV is the necessary increment of speed. We should start acceleration some time before reaching the maneuver point in order to at least partially compensate for the lateral component of acceleration along the orbital velocity vector:

Do not forget to take a position along the orbital velocity vector in advance. Acceleration:

It is very important to remember our acceleration - 11.8 m / s ^ 2. This is the acceleration with which we will slow down near the Moon, and it will be useful to us for calculations.

Acceleration over. For the Earth-Moon flight, such accuracy is quite sufficient, additional correction is not required. Do not forget to save.
Stage 4. Entrance into the orbit of the moon
Getting ready to fly to the moon. We stabilize the device by the KillRot mode. It will turn off automatically, and we can calmly speed up time.
To not be bored, turn on the music:
In the process of flying to the moon, I recommend paying attention to the relative position of us and the moon. At first we will overtake it, but closer to the apocenter our speed will become almost invisible, and already the Moon will catch up with us. All according to Kepler’s second law . When approaching the moon, pay attention to the change in our orbit - the moon is behind us and inhibits our forward movement by its gravity.
When the distance to the moon is reduced, it is worth checking our orbit - if we aimed too accurately and if we crash into the moon. Switch the right MFD to the “Orbit” mode ( Right Shift - F1 , Right Shift - O) You need to make sure that the MFD is in orbit around the moon. If the MFD is in orbit around the Earth or the Sun, you must manually switch it to orbit around the Moon by pressing Right Shift - R , select Moon in the menu . If necessary, by pressing the HUD button on the MFD, put the indicator on the windshield into Orbit Moon mode . It is necessary to wait until the gravitational influence of the Moon becomes overwhelming - the G indicator at the bottom of the MFD is not less than 0.9-0.95. Otherwise, the influence of the Earth will greatly distort the final orbit. So, it turns out that we aimed too accurately and crashed into the moon if we didn't do anything:

It is necessary to make a maneuver of the path correction. To do this, turn the ship 90 ° to the right of the direction of movement (there are goniometric tools in the interface). Why right? The direction marker for our movement is to the right of the center of the moon, so we will have to maneuver less. But if you wish, you can move left, up or down. There is no autopilot for this mode, it will be necessary to keep the course 90 ° to the right manually. We begin the maneuver:

When the height of the pericenter is 40-80 km, we finish the maneuver.

Shortly before the pericenter, we occupy a position against the orbital velocity vector (stern forward) and slow down, moving into a circular orbit:

Well, we are in a low circular orbit around the moon. Do not forget to save.
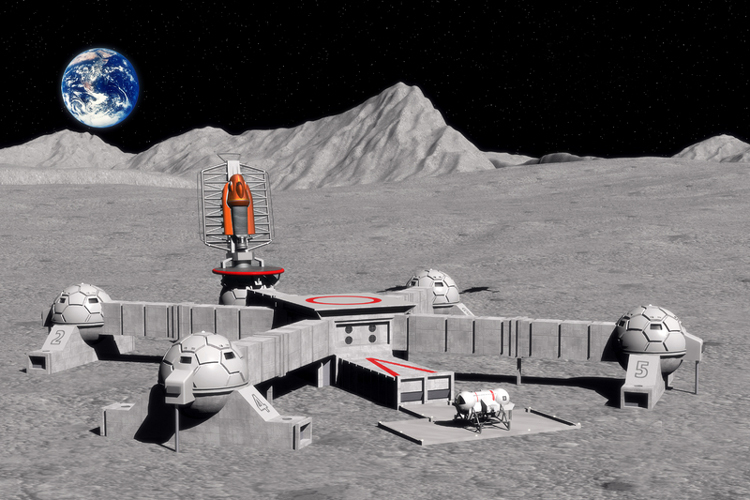
Stage 5. Alignment of the plane of the orbit with the landing site
Turn on the map mode on the right MFD ( Right Shift - F1 , Right Shift - M ). Choose the Brighton Beach lunar base as the target ( Right Shift - T , select Spaceports - Brighton Beach from the menu ): The

green line is our trajectory. Yeah, we won’t get to Brighton Beach. It is necessary to change the inclination of the orbit in order to fly over the base. To do this, we occupy the position of NML + or NML- normal to the orbital velocity vector up or down (for an orbit with an almost zero inclination, it does not matter) and change the inclination of the orbit until the green thread of the trajectory passes over the base. It is better to change the inclination of the orbit not at any point, but in the region of 90 ° latitude to the left or right of the base. One cell on the map is 30 ° latitude and longitude.

The result of the maneuver:

Unfortunately, the automation did not have time to hold the ship strictly perpendicular to the orbital velocity vector, and our orbit deteriorated. It will be necessary to switch to the MFD "Orbit" and return to a circular orbit. We spend another round on two tasks:
- Make sure we aim for sure.
- Reduce the orbit to 10-15 km.

The map scale is changed using the ZM + and ZM- buttons. Ship tracking mode is activated by the TRK button.
After that, do not forget to save. The fun begins - we are going to land.
Stage 6. Braking and accurate landing
By the way, judging by the coordinates, the Brighton Beach fantastic base is located in the southern part of the Rainbow Bay:

Lunokhod 1 is located not far to the south, and the Chinese Jade Hare is 400 km to the east.
By the way, if you want, you can enable the display of surface labels (Ctrl - F9, the Planetarium tab - Surface) and practice selenography:

What is the difficulty of landing on a celestial body without an atmosphere? There is no atmosphere to slow it down; wings and parachutes will not help us. It is necessary to extinguish one and a half kilometers per second of orbital speed and not to fall at the same time hundreds of kilometers from the target. If we start to slow down, then our pericenter is below the surface, and it is necessary to fend off the fall, while slowing down the speed, in order to eventually go into hovering near the target. In real flights, most of the maneuver was controlled by a computer, astronauts on the Apollo intervened in control at the end of the flight. And in our country the poverty of computing power is compensated by endless fuel. But without mathematics, it’s still nowhere. We need to find the distance from which to start braking in order to be in the base area. Acceleration and mass with us, praise endless fuel, constant,
How long will we slow down? The initial velocity is known - 1658 m / s. Ultimate - 0. We remembered the acceleration from the previous stages - 11.8 m / s. V = V 0 -a * t, therefore t = (VV 0 ) / a = (1658-0) / 11.8 = 140 seconds .
At what distance do you need to start braking? S = V 0 * t- (a * t 2 ) / 2 = 1658 * 140- (11.8 * 140 * 140) / 2 = 232120-115640 = 116480 m .
We will slow the stern forward, so it will be more convenient to fly over the base. Take a 10% margin and start braking for 106 km from the base.
We need to take the correct position for braking - against the vector of orbital speed, "belly" to the moon. To do this, turn on the “horizon level” mode - Lor the HORZ LVL button at the bottom of the screen and turn the ship stern forward manually: I

recommend saving for 500 kilometers from the base.
For 106 km we begin braking. After the vertical speed becomes noticeable, we begin to counter it with lifting motors ( Num 0 - increase traction, Num. - reduce traction). Avoid high vertical speed and large vertical acceleration!

Slowed down. Turn off the marching engines, continue to smoothly decline on lifting engines.

The base is already visible below. We aim with a marker of the direction of movement towards it, gradually reduce the translational and vertical speeds and release the chassis:

The main thing is to move smoothly, not to make sudden movements. Orientation motors can be switched to shift mode ( Num / ) for precise maneuvering.

The base is gradually emerging. A number of white stripes - this is not a runway, but a monorail, you do not need to land there. Our goal is landing sites, standing "daisy" around the main building: It

remains just a little. Please note that the speed is almost extinguished.

You can switch to F1 appearance to better control the landing process.

Have a landing!

I recommend saving the script - then you might want to fly, for example, to Mars, and taking off from the moon and getting into orbit is easier.
Conclusion
I don’t know if we will live to see a real lunar base, but such a virtual flight is an interesting adventure. And cognitive.
If you want to study something deeper, there is a manual translated into Russian . Well, other posts in the Orbiter series .