Juniper SRX: Upgrading JunOS Version
- Tutorial
Today I would like to tell you how you can upgrade the version of JunOS on your Juniper SRX. I will experiment with the SRX240B.
The post will be useful to novice administrators, seasoned gurus will not find anything interesting here.
Interested in? I ask for cat.
First you need to download the latest version of JunOS. You can do this on the official website or ... I
recommend looking at the SHA1 hash of the file to make sure its integrity:
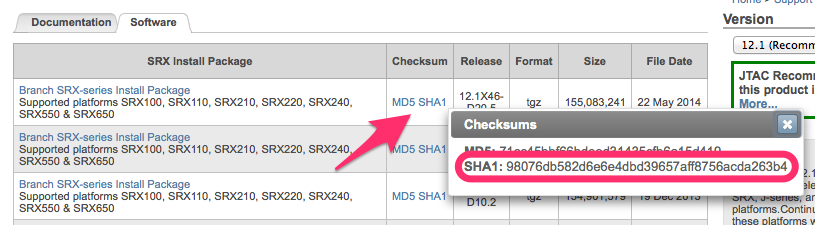
Take a regular USB flash drive, format it in FAT32 (JunOS only understands FAT16 / FAT32 on USB drives) and copy the image downloaded from the site there. Just in case, check its SHA1 hash:
We connect to the device through the console or SSH under the root account (for example, we connect via SSH not under root):
Let's see which devices are already created:
Now plug our USB flash drive into any free port and look at the list of devices again:
Comparing the output of the two commands, we find that the flash drive is defined as / dev / da1 , and the only partition on it is like / dev / da1s1 .
Now create a directory and mount our flash drive there (not using the root account, the mount command will not work):
The matter is left to the small, go to Operational Mode and install the firmware:
After entering this command in the console, the OS installation log will start to fall out, after which SRX will reboot.
Check that JunOS is updated:
If you like haiku, you can entertain yourself a little:
The post will be useful to novice administrators, seasoned gurus will not find anything interesting here.
Interested in? I ask for cat.
First you need to download the latest version of JunOS. You can do this on the official website or ... I
recommend looking at the SHA1 hash of the file to make sure its integrity:
Take a regular USB flash drive, format it in FAT32 (JunOS only understands FAT16 / FAT32 on USB drives) and copy the image downloaded from the site there. Just in case, check its SHA1 hash:
iMac:~ Cartman$ diskutil list /dev/disk1
/dev/disk1
   #:                       TYPE NAME                    SIZE       IDENTIFIER
   0:     FDisk_partition_scheme                        *1.0 GB     disk1
   1:                 DOS_FAT_32 PQI                     1.0 GB     disk1s1
iMac:~ Cartman$ ls -la /Volumes/PQI/
total 302912
drwxrwxrwx@ 1 Cartman  staff       4096 Jul 22 22:02 .
drwxrwxrwt@ 6 root     admin        204 Jul 22 22:01 ..
-rwxrwxrwx  1 Cartman  staff  155083241 Jun  5 02:09 junos-srxsme-12.1X46-D20.5-domestic.tgz
iMac:~ Cartman$ openssl sha1 /Volumes/PQI/junos-srxsme-12.1X46-D20.5-domestic.tgz
SHA1(/Volumes/PQI/junos-srxsme-12.1X46-D20.5-domestic.tgz)= 98076db582d6e6e4dbd39657aff8756acda263b4
We connect to the device through the console or SSH under the root account (for example, we connect via SSH not under root):
cartman@gw-jsrx240> start shell
% su -
Password: YOUR_ROOT_PASSWORD
root@gw-jsrx240% whoami
root
root@gw-jsrx240% id
uid=0(root) gid=0(wheel) groups=0(wheel), 5(operator), 10(field), 31(guest), 73(config)
root@gw-jsrx240%
Let's see which devices are already created:
root@gw-jsrx240% ls /dev/da*
/dev/da0        /dev/da0s1a     /dev/da0s2      /dev/da0s2c     /dev/da0s3c     /dev/da0s3f     /dev/da0s4a     /dev/da0s4e
/dev/da0s1      /dev/da0s1c     /dev/da0s2a     /dev/da0s3      /dev/da0s3e     /dev/da0s4      /dev/da0s4c
Now plug our USB flash drive into any free port and look at the list of devices again:
root@gw-jsrx240% ls /dev/da*
/dev/da0        /dev/da0s1c     /dev/da0s2c     /dev/da0s3e     /dev/da0s4a     /dev/da1
/dev/da0s1      /dev/da0s2      /dev/da0s3      /dev/da0s3f     /dev/da0s4c     /dev/da1s1
/dev/da0s1a     /dev/da0s2a     /dev/da0s3c     /dev/da0s4      /dev/da0s4e
Comparing the output of the two commands, we find that the flash drive is defined as / dev / da1 , and the only partition on it is like / dev / da1s1 .
Now create a directory and mount our flash drive there (not using the root account, the mount command will not work):
root@gw-jsrx240% mkdir /var/tmp/usbflash
root@gw-jsrx240% mount -t msdos /dev/da1s1 /var/tmp/usbflash
root@gw-jsrx240% cd /var/tmp/usbflash/
root@gw-jsrx240% ls -l
total 302912
-rwxr-xr-x  1 root  wheel  155083241 Jun  5 06:09 junos-srxsme-12.1X46-D20.5-domestic.tgz
The matter is left to the small, go to Operational Mode and install the firmware:
root@gw-jsrx240% cli
cartman@gw-jsrx240> request system software add junos-srxsme-12.1X46-D20.5-domestic.tgz
After entering this command in the console, the OS installation log will start to fall out, after which SRX will reboot.
Check that JunOS is updated:
cartman@gw-jsrx240> show version
Hostname: gw-jsrx240
Model: srx240b
JUNOS Software Release [12.1X46-D20.5]
If you like haiku, you can entertain yourself a little:
cartman@gw-jsrx240> show version and haiku
Hostname: gw-jsrx240
Model: srx240b
JUNOS Software Release [12.1X46-D20.5]
        IS-IS sleeps.
        BGP peers are quiet.
        Something must be wrong.