Measuring temperature: TEMPer + Python + Windows
Hello.
It seemed to be a trivial task to write a post - monitoring the temperature in the server room. There are quite a few different solutions on this subject (for example, hanging a video camera and a thermometer in front of it), but most of them are cool monitoring systems, automatic control of air conditioners, etc. worth decent money. The difference of the proposed option is the budget. About 250 Russian rubles and a little brain (priceless).
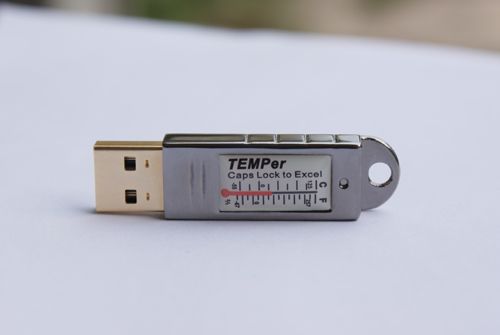 The solution to the problem began, naturally, with the search for a temperature sensor. Cheap, because there are a lot of expensive ones, and it’s a long time to explain to the management. Also, in order to save money, the option of a USB sensor was selected (LAN - more expensive). Where are the cheapest sensors? Right, on ebay. We go there and at the request of "usb thermometer" we quickly find just such a toy, as in the picture. We order, arrange, wait for delivery.
This ends the financial waste and begins the work of the brain.
The sensor comes with a CD with TEMPer 24.4.4. Despite the impressive version number, it is impossible to look at this miracle of programmer’s thought without tears. Yes, it has a bunch of functions: temperature graph, sending messages by email, msn and skype, a log to a text file, setting critical temperatures for alarm. And it all works. There is not only the most important thing - starting in service mode or command line. And that means - there is no sane automation capability (parsing logs does not count).
So, the program proposed by the developers does not fit in all respects. Which alternative? Own software for obtaining temperature. In the basic version, I needed a program that outputs the temperature from the sensor. All further processing like entering into the database, sending letters on alarm, analysis of the situation, etc. easily hung on a scheduler polling a sensor every minute.
A web search easily outputs to a module for python called temper-python . Excellent! Already normal software with a cross-platform interpreter. Figs there. This module works only under linux. And it’s not in vain that another OS was taken out in the title. My application server runs on Windows. But this is python! This means that the script can certainly be redone to work in Windows. This is what we will do.
First, insert the sensor itself into the usb port of the computer (server). This is enough for the experiment, but in practice it is much better to supplement the sensor with an external extension stand. It can be ordered along with a sensor from China, bought in any store or found in any server room - like a trophy from various transmitters or flash drives. Windows will automatically install standard drivers on the sensor and identify it as a “Composite USB device”.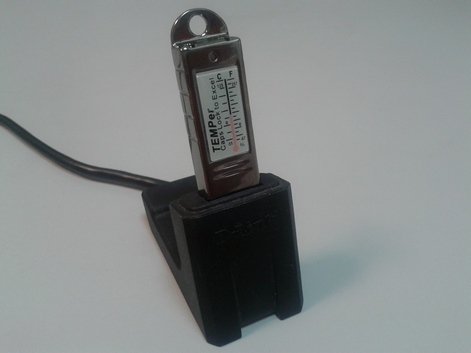
I didn’t care which python to work with, so I took the latest available version - 3.4.1 . Actually, if this is important for someone, remaking the script for a lower version is not a problem at all - here and there to remove brackets and quotation marks. Download, install , rejoice: www.python.org .
Immediately to the python you need to put the library to work with USB. There are no problems either. It is called pyusb . We take it from the project page on sourceforge.net . There is a setup.py file in the archive . We start it from the command line:
Pyusb works with the system libraries of access to usb - libusb 0.1 , libusb 1.0 , libusbx , libusb-win32 and OpenUSB . For Windows users, the libusb-win32 option is available , which also needs to be installed and configured. Download the archive from the project page on sourceforge.net . And don't let win32 bother youin the name - the driver works fine under x64 .
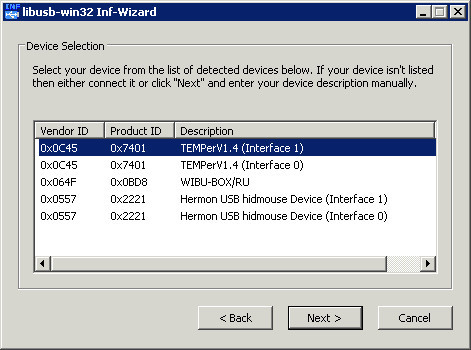
Unpack, go to the bin folder and run the inf-wizard.exe file . This program will automatically generate a driver folder for a specific device and install them.
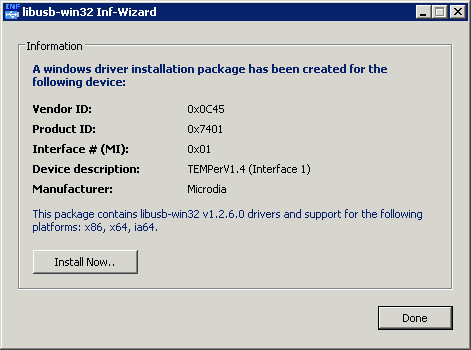
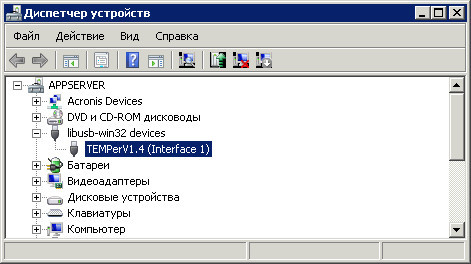
In the list of devices for installing the driver, select TEMPerV1.4 (Interface 1) . Click Next , agree with everything we can agree with, and get to the driver save window. Here it is better to create a separate folder for temper , where the utility will put all the necessary drivers. After that it will be offered to install the created driver. We do this with the Install Now button ...
If everything went well, then "The composite USB device in the Device Manager will disappear, and TEMPerV1.4 (Interface 1) will appear .
In the bin / amd64 folder of the libusb-win32 distribution there is a testlibusb-win.exe utility . Run it to make sure that the device we need is visible to the system. If everything is fine and the device is visible, the most interesting thing remains - the python script.
As already written above, I took the temper-python module as a basis . This is a tricked-out module that needs to be installed, which has a config for corrections, the choice of Celsius or Fahrenheit, and even SNMP support.This is all cool, but I don’t need.Therefore, we simplify everything to one th script that displays the temperature in the console.temper-python there is also a bunch of lines that are needed only in linux, while in windows they simply do not work.
Let's start by setting global variables:
By VENDOR_ID and PRODUCT_ID, the script will find Temper among all devices and use it. TIMEOUT and OFFSET, in general, are understandable without explanation - the timeout for access to the sensor and temperature correction. A correction is needed, since a cheap Chinese sensor can make mistakes within a few degrees, but it is enough to determine it once using a room thermometer and forget it.
The remaining variables refer to the api of the sensor and do not need to be touched.
Now the most important thing is the class for accessing the sensor.
_control_transfer is responsible for sending commands to the sensor, _interrupt_read - for reading the response. In get_temperature, we actually send all these commands, read the answer and convert the set of numbers to a human-readable temperature.
To make this work at startup, a few lines to initialize:
The first line searches for our TEMPer among devices, the second and third - request temperature.
That, in fact, is all. You can check the script operation using the standard command in the console:
The temperature from the sensor will be displayed on the screen. What to do with it - let everyone decide for himself.
It seemed to be a trivial task to write a post - monitoring the temperature in the server room. There are quite a few different solutions on this subject (for example, hanging a video camera and a thermometer in front of it), but most of them are cool monitoring systems, automatic control of air conditioners, etc. worth decent money. The difference of the proposed option is the budget. About 250 Russian rubles and a little brain (priceless).
The solution to the problem began, naturally, with the search for a temperature sensor. Cheap, because there are a lot of expensive ones, and it’s a long time to explain to the management. Also, in order to save money, the option of a USB sensor was selected (LAN - more expensive). Where are the cheapest sensors? Right, on ebay. We go there and at the request of "usb thermometer" we quickly find just such a toy, as in the picture. We order, arrange, wait for delivery. This ends the financial waste and begins the work of the brain.
The sensor comes with a CD with TEMPer 24.4.4. Despite the impressive version number, it is impossible to look at this miracle of programmer’s thought without tears. Yes, it has a bunch of functions: temperature graph, sending messages by email, msn and skype, a log to a text file, setting critical temperatures for alarm. And it all works. There is not only the most important thing - starting in service mode or command line. And that means - there is no sane automation capability (parsing logs does not count).
So, the program proposed by the developers does not fit in all respects. Which alternative? Own software for obtaining temperature. In the basic version, I needed a program that outputs the temperature from the sensor. All further processing like entering into the database, sending letters on alarm, analysis of the situation, etc. easily hung on a scheduler polling a sensor every minute.
A web search easily outputs to a module for python called temper-python . Excellent! Already normal software with a cross-platform interpreter. Figs there. This module works only under linux. And it’s not in vain that another OS was taken out in the title. My application server runs on Windows. But this is python! This means that the script can certainly be redone to work in Windows. This is what we will do.
First, insert the sensor itself into the usb port of the computer (server). This is enough for the experiment, but in practice it is much better to supplement the sensor with an external extension stand. It can be ordered along with a sensor from China, bought in any store or found in any server room - like a trophy from various transmitters or flash drives. Windows will automatically install standard drivers on the sensor and identify it as a “Composite USB device”.
I didn’t care which python to work with, so I took the latest available version - 3.4.1 . Actually, if this is important for someone, remaking the script for a lower version is not a problem at all - here and there to remove brackets and quotation marks. Download, install , rejoice: www.python.org .
Immediately to the python you need to put the library to work with USB. There are no problems either. It is called pyusb . We take it from the project page on sourceforge.net . There is a setup.py file in the archive . We start it from the command line:
cd C:\Downloads\pyusb-1.0.0a2C:\Python34\python.exe setup.py installPyusb works with the system libraries of access to usb - libusb 0.1 , libusb 1.0 , libusbx , libusb-win32 and OpenUSB . For Windows users, the libusb-win32 option is available , which also needs to be installed and configured. Download the archive from the project page on sourceforge.net . And don't let win32 bother youin the name - the driver works fine under x64 .
Unpack, go to the bin folder and run the inf-wizard.exe file . This program will automatically generate a driver folder for a specific device and install them.
In the list of devices for installing the driver, select TEMPerV1.4 (Interface 1) . Click Next , agree with everything we can agree with, and get to the driver save window. Here it is better to create a separate folder for temper , where the utility will put all the necessary drivers. After that it will be offered to install the created driver. We do this with the Install Now button ...
If everything went well, then "The composite USB device in the Device Manager will disappear, and TEMPerV1.4 (Interface 1) will appear .
In the bin / amd64 folder of the libusb-win32 distribution there is a testlibusb-win.exe utility . Run it to make sure that the device we need is visible to the system. If everything is fine and the device is visible, the most interesting thing remains - the python script.
As already written above, I took the temper-python module as a basis . This is a tricked-out module that needs to be installed, which has a config for corrections, the choice of Celsius or Fahrenheit, and even SNMP support.This is all cool, but I don’t need.Therefore, we simplify everything to one th script that displays the temperature in the console.temper-python there is also a bunch of lines that are needed only in linux, while in windows they simply do not work.
Let's start by setting global variables:
import sys, usb
VENDOR_ID = 0x0c45
PRODUCT_ID = 0x7401
TIMEOUT = 5000
OFFSET = 0
INTERFACE = 1
REQ_INT_LEN = 8
ENDPOINT = 0x82
COMMANDS = {
    'temp': b'\x01\x80\x33\x01\x00\x00\x00\x00',
    'ini1': b'\x01\x82\x77\x01\x00\x00\x00\x00',
    'ini2': b'\x01\x86\xff\x01\x00\x00\x00\x00',
}
By VENDOR_ID and PRODUCT_ID, the script will find Temper among all devices and use it. TIMEOUT and OFFSET, in general, are understandable without explanation - the timeout for access to the sensor and temperature correction. A correction is needed, since a cheap Chinese sensor can make mistakes within a few degrees, but it is enough to determine it once using a room thermometer and forget it.
The remaining variables refer to the api of the sensor and do not need to be touched.
Now the most important thing is the class for accessing the sensor.
class TemperDevice(object):
	def __init__(self, device):
		self._device = device
	def get_temperature(self):
		if self._device is None:
			return "Device not ready"
		else:
			try:
				self._device.set_configuration()
				ret = self._device.ctrl_transfer(bmRequestType=0x21, bRequest=0x09, wValue=0x0201, wIndex=0x00, data_or_wLength=b'\x01\x01', timeout=TIMEOUT)
				self._control_transfer(COMMANDS['temp'])
				self._interrupt_read()
				self._control_transfer(COMMANDS['ini1'])
				self._interrupt_read()
				self._control_transfer(COMMANDS['ini2'])
				self._interrupt_read()
				self._interrupt_read()
				self._control_transfer(COMMANDS['temp'])
				data = self._interrupt_read()
				self._device.reset()
				temp = (data[3] & 0xFF) + (data[2] << 8)
				temp_c = temp * (125.0 / 32000.0)
				temp_c = temp_c + OFFSET
				return temp_c
			except usb.USBError as err:
				if "not permitted" in str(err):
					return "Permission problem accessing USB."
				else:
					return err
			except:
				return "Unexpected error:", sys.exc_info()[0]
				raise
	def _control_transfer(self, data):
		ret = self._device.ctrl_transfer(bmRequestType=0x21, bRequest=0x09, wValue=0x0200, wIndex=0x01, data_or_wLength=data, timeout=TIMEOUT)
	def _interrupt_read(self):
		data = self._device.read(ENDPOINT, REQ_INT_LEN, interface=INTERFACE, timeout=TIMEOUT)
		return data
_control_transfer is responsible for sending commands to the sensor, _interrupt_read - for reading the response. In get_temperature, we actually send all these commands, read the answer and convert the set of numbers to a human-readable temperature.
To make this work at startup, a few lines to initialize:
dev = usb.core.find(idVendor=VENDOR_ID, idProduct=PRODUCT_ID)
TDev = TemperDevice(dev)
output = TDev.get_temperature()
print(output)
The first line searches for our TEMPer among devices, the second and third - request temperature.
That, in fact, is all. You can check the script operation using the standard command in the console:
C:\Python34\python.exe temper.pyThe temperature from the sensor will be displayed on the screen. What to do with it - let everyone decide for himself.