Intercom multi-key and all about the imitation of “pills”
Yes, this is a terribly hackneyed topic. Probably every second person who started to study microcontrollers made a universal intercom key “pill”. There are a lot of articles on the Internet and ready-made solutions on the Internet. However, the interest in this does not cease to fade even with the massive transition to RFID. This is not surprising, because many people want to assemble such a device that performs not only a very interesting task, but also always with itself. In addition, it is not so difficult to manufacture.
In this post I would like to collect in one place all the necessary information for those who want to make such a key. Now I will try to talk about what contact doorphone keys are, how they work, how to simulate them, what pitfalls are, and also about my implementation of such a device and how you can assemble a similar one.
Attention! This key does not allow illegal entry anywhere. This device is only to carry one key instead of several.
In fact, such keys in the MicroCAN case are of different types, although they look almost the same in appearance. The only thing that unites them is that the key has two contacts - ground and data, while parasitic power is used, i.e. The key is powered directly from the data line. To open the door, use the serial number given at the factory. That is, this is not a key programmed to open the intercom, but a list of keys that can open it is entered into the intercom memory. Let's consider them in more detail.
The most popular type of intercom keys is iButton, namely DS1990A from Dallas, operates on the 1-Wire protocol. The protocol is very tricky, it implies two-way interaction - you can send various commands to the key, to which it reacts differently. The serial number is six bytes in size, which gives 2 8 * 6 = 281474976710656 different combinations and implies that all issued keys must be unique. If you are lucky and you have the original iButton, then this number in hexadecimal should be laser engraved on it:

That is, theoretically, such a stranger's key can be faked if you just write it down somewhere or photograph these numbers!
To interact with iButton it’s enough to connect it to the microcontroller and pull the data line to the power supply (2.8-5 volts) through the resistor:

Most likely, for many this is already as old as the world, but still I’ll briefly tell you how 1-Wire works. Data is exchanged by alternately pressing the line to the ground, the information being encoded by the duration of such signals. It goes something like this:
Further, it all depends on the command sent. Usually it is 33h - " READ ROM ", reading the serial number, after which the master reads 64 bits (1 byte - the type of device, 6 byte - the number itself, 1 byte - CRC). Reading of each bit is initialized by the master, for this it sends an impulse of 1-15 microseconds. If after this the line is pressed to the ground from the side of the key for 60-120 microseconds, then zero is read, otherwise it is one.
As you can see, reading the key is easy enough. It is much more difficult to imitate a key, especially since many intercoms use different tricks. Here are the main pitfalls:
About SEARCH ROM(F0h) is a search command for all 1-Wire devices on the bus. The fact is that theoretically it is possible to connect a lot of keys in parallel and get a list of all serial numbers. In reality, this is not used for iButton, because only one key is always applied to the intercom. However, some intercoms send this command, expecting to find one single serial number. The algorithm is very interesting. Each of the devices on the bus simultaneously sends a bit of its serial number, moreover, twice (that is, the master must read two bits). First, in the usual way, and then inverted. What is the result? If the unit has a unit in the serial number, then "10" is sent. If zero, then "01". And everything is fine, as long as on all devices these bits match. And if not ... Above, I wrote that when reading, the presence of a long signal is 0, and the absence is 1, i.e. 0 is dominant. Thus, when conflicts arise, two zeros are read. After receiving “10”, “01” or “00”, the master should send the just read bit to the line. In the case of "00", he thus chooses which group of devices to work with next. As a result, after N iterations, a binary tree of N serial numbers is obtained.
It’s a bit more difficult to answer such a command than a regular READ ROM . It is necessary to send each bit twice - normal and inverted, and then check whether the response received from the master matches with it, and if it does not, then ignore further commands.
The key "Digital DC-2000A" is a domestic development. Interacting with them is much easier, because they are very stupid - they don’t accept any commands. It is enough just to apply power to the key, and it will immediately begin to send the code endlessly, changing its resistance. If you give it 5 volts by connecting it through a 1 kOhm resistor, you can see something like this on the oscilloscope: The

key changes its resistance between about 800 Ohms and 400 Ohms, if I'm not mistaken, and therefore the current consumption. We can say that the signal is analog, and this complicates things a bit from the hardware point of view. Although sometimes it can simplify. For example, a key can be read by simply connecting it to the microphone input of a computer and recording an audio file.
And yes, the intercom can then be opened with the most ordinary MP3 player. But we are interested in more civilized methods, right?
The coding is a bit strange. The key cyclically sends nine nibbles (four bits), changing its resistance. If it remains low for about 50 microseconds, then it is a logical zero, and if 100 microseconds is a unit. But the data is encoded not by logical zeros and ones, but by the position of the units among the zeros! That is, the key when sending the code can only give out one of four combinations: "1000", "0100", "0010" and "0001". However, the combination “0111” is also used as the starting sequence. As a result, the key data may look something like this: "0111 1000 0100 0010 0001 1000 0100 0010 0001", where "0111" indicates the beginning. There is no checksum - the code is simply read several times to be sure.
A total of eight sequences in which four combinations are possible. It is not difficult to calculate that this gives us 65,536 key options. Not so much, they are obviously often repeated. Theoretically, if there are 50 apartments in the entrance, each of which has three keys, you can choose one of them by sorting through a total of 436 combinations. But I didn’t do that.
What's the best way to read Cyfral keys? As I said, the levels are analog. There are two options: analog-to-digital converter and comparator. The latter seems to me more reliable. Everything works fine if you connect a data line pulled to a Vdd with a 650 Ohm resistor to one of the comparator inputs and exactly half of the Vdd to the second, for which you can use a voltage divider from two identical resistors. After that, the result of the output of the comparator can be confidently perceived as a high and low key resistance.
How to imitate such a key? At first glance it seems that resistance must also be changed, but the results showed that intercoms do not need such accuracy - you can safely close the line to the ground instead of low resistance and completely let it go when you need high.
Another domestic development is Metacom intercoms and K1233KT2 keys. Like Cyfral, it simply sends the code endlessly, changing its resistance / current consumption. Fortunately, official documentation is available on the Internet:


This is all you need to know to work with this key. It sends four bytes of data, but in each of them one bit goes to parity. A total of 28 useful bits come out, and 2 28 = 268435456 combinations.
Alas, I could not find any such key to experiment with it. However, it’s easy to find a universal code on the Internet that opens 99% of Metacom's intercoms. One of them is just in the staircase next to me. I wrote a program sending this code based only on technical documentation. The neighboring entrance opened on the first attempt. It seems that the exact resistance is not that important to this intercom either. On this I left Metacus alone and decided that reading their keys was not so necessary.
In fact, universal keys to intercoms are more of a myth. Developers almost never make for themselves any special code for all doors, the exception is only Vizit.
But there is a legend that says that after reading the key code, many intercoms check it with all the codes that are recorded in the memory cells. However, in cells where nothing has been written yet, there are FFs or zeros. Thus, the intercom can be opened by sending the key only from zeros or only from FFok.
It sounds like complete nonsense. How should I be a programmer to allow such a bug? But ... it really does work often. Yes, in fresh firmware this is usually fixed, but many intercoms have remained unchanged for years. Unbelievable, but it is a fact.
Any other key codes issued as universal are usually just service keys for employees of the post office, ZhKO, or the intercom company itself, and they work only in individual settlements.
Let's move on to practice! Yes, I tried to combine in one device both imitation of keys, and their reading (except for Metakom), and synchronization with a computer via USB. Here is a diagram of what happened (clickable): Components and their purpose:

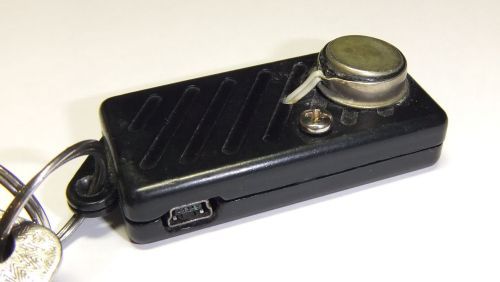
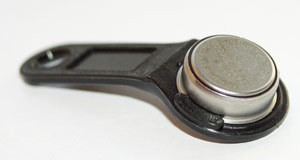
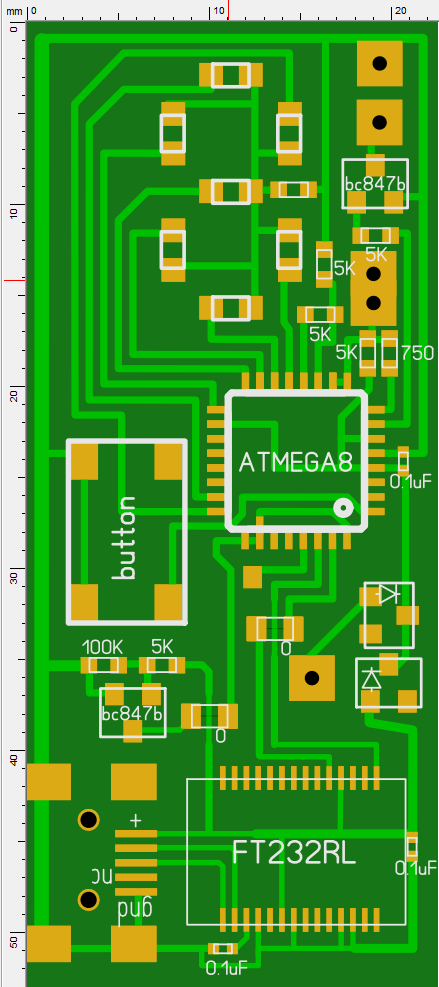
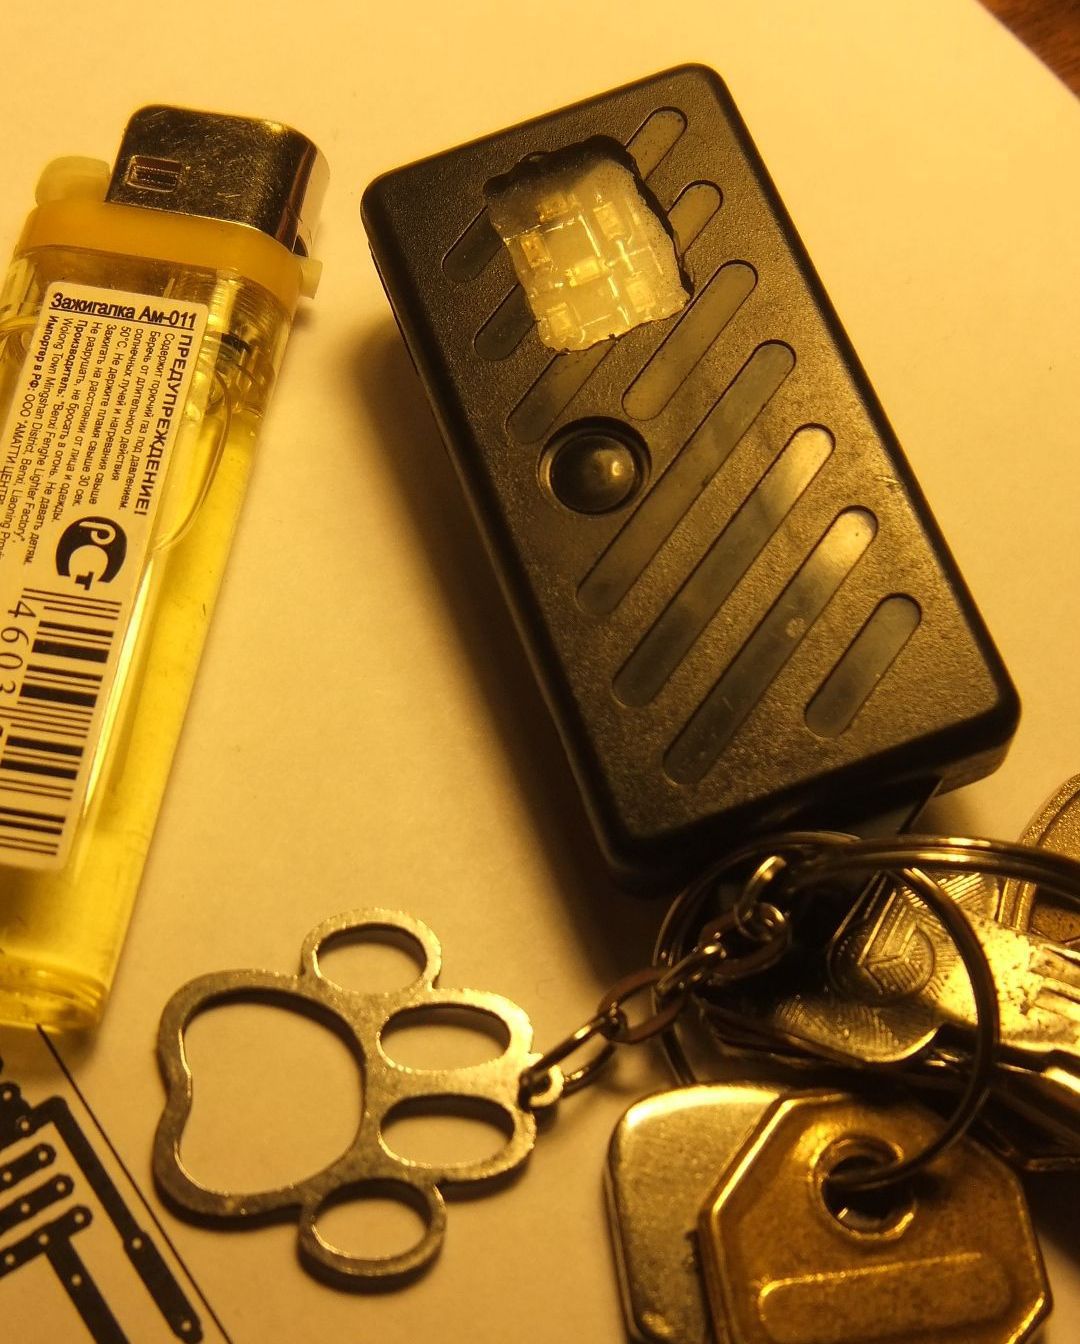
Printed circuit board (clickable): It was still time before buying a 3D printer, when I designed the device for the case, not the case for the device. A very nice copy in the form of a keychain and with a button fell into my hands. Just perfect, it only remained to make holes for USB and LEDs. Alas, I still can not find on sale exactly the same case. As a result, it turned out somehow like this: Batteries under the board. By the way, they were enough for me for a year, until I accidentally climbed to swim, forgetting to pull out the keys. Management is done with just one button. When you first press it, the device turns on. A short press of the button selects the key, the number of which is displayed by LEDs. When the desired key is selected, just attach the contacts to the intercom reader.


A long press on the button puts the device into key reading mode, while the middle LED flashes. At this moment, you need to attach the key to the contacts of the key reader (that's why I have a screw screwed in from below). If the reading was successful, the number under which the key is stored is displayed.
When connected via USB, the device is seen as a virtual COM port. For simplicity of work, a client was written under Windows:

It allows you to read keys from the device, while automatically entering them into the database. Of course, keys can be written down.
Firmware sources are here: github.com/ClusterM/ibutton
Client sources are here: github.com/ClusterM/ibutton_client
It is very convenient in one device to have the keys to the house, relatives, work and porches of friends. It is especially important for those who have not conducted an intercom handset in an apartment. But creating a multi-key was not so much useful as interesting. This is a great practice for learning about microcontrollers. Yes, it was from this that I began at one time. In addition, each new non-opening staircase caused a storm of interest. Running around the city and solving logic tasks to open some kind of door is like a video game in real life! Damn exciting. All that is missing is the fight with the gopniks and grannies at the porches in the form of bosses;)
In this post I would like to collect in one place all the necessary information for those who want to make such a key. Now I will try to talk about what contact doorphone keys are, how they work, how to simulate them, what pitfalls are, and also about my implementation of such a device and how you can assemble a similar one.
Attention! This key does not allow illegal entry anywhere. This device is only to carry one key instead of several.
Although nothing prevents you from writing in it universal codes for opening intercoms.
Types of intercom keys "tablets"
In fact, such keys in the MicroCAN case are of different types, although they look almost the same in appearance. The only thing that unites them is that the key has two contacts - ground and data, while parasitic power is used, i.e. The key is powered directly from the data line. To open the door, use the serial number given at the factory. That is, this is not a key programmed to open the intercom, but a list of keys that can open it is entered into the intercom memory. Let's consider them in more detail.
iButton
The most popular type of intercom keys is iButton, namely DS1990A from Dallas, operates on the 1-Wire protocol. The protocol is very tricky, it implies two-way interaction - you can send various commands to the key, to which it reacts differently. The serial number is six bytes in size, which gives 2 8 * 6 = 281474976710656 different combinations and implies that all issued keys must be unique. If you are lucky and you have the original iButton, then this number in hexadecimal should be laser engraved on it:
That is, theoretically, such a stranger's key can be faked if you just write it down somewhere or photograph these numbers!
To interact with iButton it’s enough to connect it to the microcontroller and pull the data line to the power supply (2.8-5 volts) through the resistor:
Most likely, for many this is already as old as the world, but still I’ll briefly tell you how 1-Wire works. Data is exchanged by alternately pressing the line to the ground, the information being encoded by the duration of such signals. It goes something like this:
- Reset - the master presses the line to the ground for at least 480 microseconds, this indicates the beginning of data transfer.
- Presence - after a while, the key responds with an impulse of about 120 microseconds, which confirms its presence on the line.
- Command - the master sends a command of eight bits, while the logical unit is 1-15 microseconds, and zero is 60-120.
Further, it all depends on the command sent. Usually it is 33h - " READ ROM ", reading the serial number, after which the master reads 64 bits (1 byte - the type of device, 6 byte - the number itself, 1 byte - CRC). Reading of each bit is initialized by the master, for this it sends an impulse of 1-15 microseconds. If after this the line is pressed to the ground from the side of the key for 60-120 microseconds, then zero is read, otherwise it is one.
As you can see, reading the key is easy enough. It is much more difficult to imitate a key, especially since many intercoms use different tricks. Here are the main pitfalls:
- You must always respond to reset , even if it is sent during data transfer. A pulse longer than 480 microseconds suggests that you need to start all over again.
- From his point of view, the moment of applying the key is also reset , because before that there was no power. Therefore, theoretically, the intercom may not send a reset , and you should periodically respond with a presence signal on your own initiative.
- The keys can also respond to other commands: 0Fh as an alternative to 33h, SKIP ROM (CCh), MATCH ROM (55h) and the most tricky one, which I will discuss separately below - SEARCH ROM (F0h). Some doorphones can send a variety of combinations of such commands to make sure that the key is real.
- There is a reverse situation - the intercom sends a command to which the key should not respond. The fact is that some programmable keys still react to them, and another test is performed this way. It is necessary to completely ignore everything that follows these commands until a reset is sent .
- To count the time, it is better to use an asynchronous timer in the microcontroller, because The account goes to microseconds. However, the installation of quartz will be unnecessary.
About SEARCH ROM(F0h) is a search command for all 1-Wire devices on the bus. The fact is that theoretically it is possible to connect a lot of keys in parallel and get a list of all serial numbers. In reality, this is not used for iButton, because only one key is always applied to the intercom. However, some intercoms send this command, expecting to find one single serial number. The algorithm is very interesting. Each of the devices on the bus simultaneously sends a bit of its serial number, moreover, twice (that is, the master must read two bits). First, in the usual way, and then inverted. What is the result? If the unit has a unit in the serial number, then "10" is sent. If zero, then "01". And everything is fine, as long as on all devices these bits match. And if not ... Above, I wrote that when reading, the presence of a long signal is 0, and the absence is 1, i.e. 0 is dominant. Thus, when conflicts arise, two zeros are read. After receiving “10”, “01” or “00”, the master should send the just read bit to the line. In the case of "00", he thus chooses which group of devices to work with next. As a result, after N iterations, a binary tree of N serial numbers is obtained.
It’s a bit more difficult to answer such a command than a regular READ ROM . It is necessary to send each bit twice - normal and inverted, and then check whether the response received from the master matches with it, and if it does not, then ignore further commands.
Cyfral
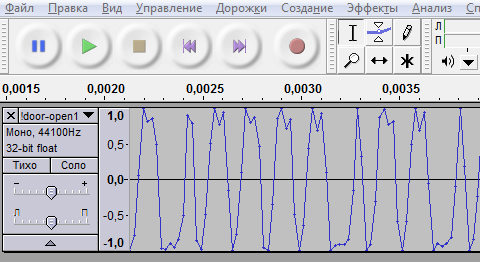
The key "Digital DC-2000A" is a domestic development. Interacting with them is much easier, because they are very stupid - they don’t accept any commands. It is enough just to apply power to the key, and it will immediately begin to send the code endlessly, changing its resistance. If you give it 5 volts by connecting it through a 1 kOhm resistor, you can see something like this on the oscilloscope: The
key changes its resistance between about 800 Ohms and 400 Ohms, if I'm not mistaken, and therefore the current consumption. We can say that the signal is analog, and this complicates things a bit from the hardware point of view. Although sometimes it can simplify. For example, a key can be read by simply connecting it to the microphone input of a computer and recording an audio file.
And yes, the intercom can then be opened with the most ordinary MP3 player. But we are interested in more civilized methods, right?
The coding is a bit strange. The key cyclically sends nine nibbles (four bits), changing its resistance. If it remains low for about 50 microseconds, then it is a logical zero, and if 100 microseconds is a unit. But the data is encoded not by logical zeros and ones, but by the position of the units among the zeros! That is, the key when sending the code can only give out one of four combinations: "1000", "0100", "0010" and "0001". However, the combination “0111” is also used as the starting sequence. As a result, the key data may look something like this: "0111 1000 0100 0010 0001 1000 0100 0010 0001", where "0111" indicates the beginning. There is no checksum - the code is simply read several times to be sure.
A total of eight sequences in which four combinations are possible. It is not difficult to calculate that this gives us 65,536 key options. Not so much, they are obviously often repeated. Theoretically, if there are 50 apartments in the entrance, each of which has three keys, you can choose one of them by sorting through a total of 436 combinations. But I didn’t do that.
What's the best way to read Cyfral keys? As I said, the levels are analog. There are two options: analog-to-digital converter and comparator. The latter seems to me more reliable. Everything works fine if you connect a data line pulled to a Vdd with a 650 Ohm resistor to one of the comparator inputs and exactly half of the Vdd to the second, for which you can use a voltage divider from two identical resistors. After that, the result of the output of the comparator can be confidently perceived as a high and low key resistance.
How to imitate such a key? At first glance it seems that resistance must also be changed, but the results showed that intercoms do not need such accuracy - you can safely close the line to the ground instead of low resistance and completely let it go when you need high.
Metacom
Another domestic development is Metacom intercoms and K1233KT2 keys. Like Cyfral, it simply sends the code endlessly, changing its resistance / current consumption. Fortunately, official documentation is available on the Internet:
This is all you need to know to work with this key. It sends four bytes of data, but in each of them one bit goes to parity. A total of 28 useful bits come out, and 2 28 = 268435456 combinations.
Alas, I could not find any such key to experiment with it. However, it’s easy to find a universal code on the Internet that opens 99% of Metacom's intercoms. One of them is just in the staircase next to me. I wrote a program sending this code based only on technical documentation. The neighboring entrance opened on the first attempt. It seems that the exact resistance is not that important to this intercom either. On this I left Metacus alone and decided that reading their keys was not so necessary.
Universal Key Codes
In fact, universal keys to intercoms are more of a myth. Developers almost never make for themselves any special code for all doors, the exception is only Vizit.
But there is a legend that says that after reading the key code, many intercoms check it with all the codes that are recorded in the memory cells. However, in cells where nothing has been written yet, there are FFs or zeros. Thus, the intercom can be opened by sending the key only from zeros or only from FFok.
It sounds like complete nonsense. How should I be a programmer to allow such a bug? But ... it really does work often. Yes, in fresh firmware this is usually fixed, but many intercoms have remained unchanged for years. Unbelievable, but it is a fact.
Any other key codes issued as universal are usually just service keys for employees of the post office, ZhKO, or the intercom company itself, and they work only in individual settlements.
Creating a multi-key
Let's move on to practice! Yes, I tried to combine in one device both imitation of keys, and their reading (except for Metakom), and synchronization with a computer via USB. Here is a diagram of what happened (clickable): Components and their purpose:
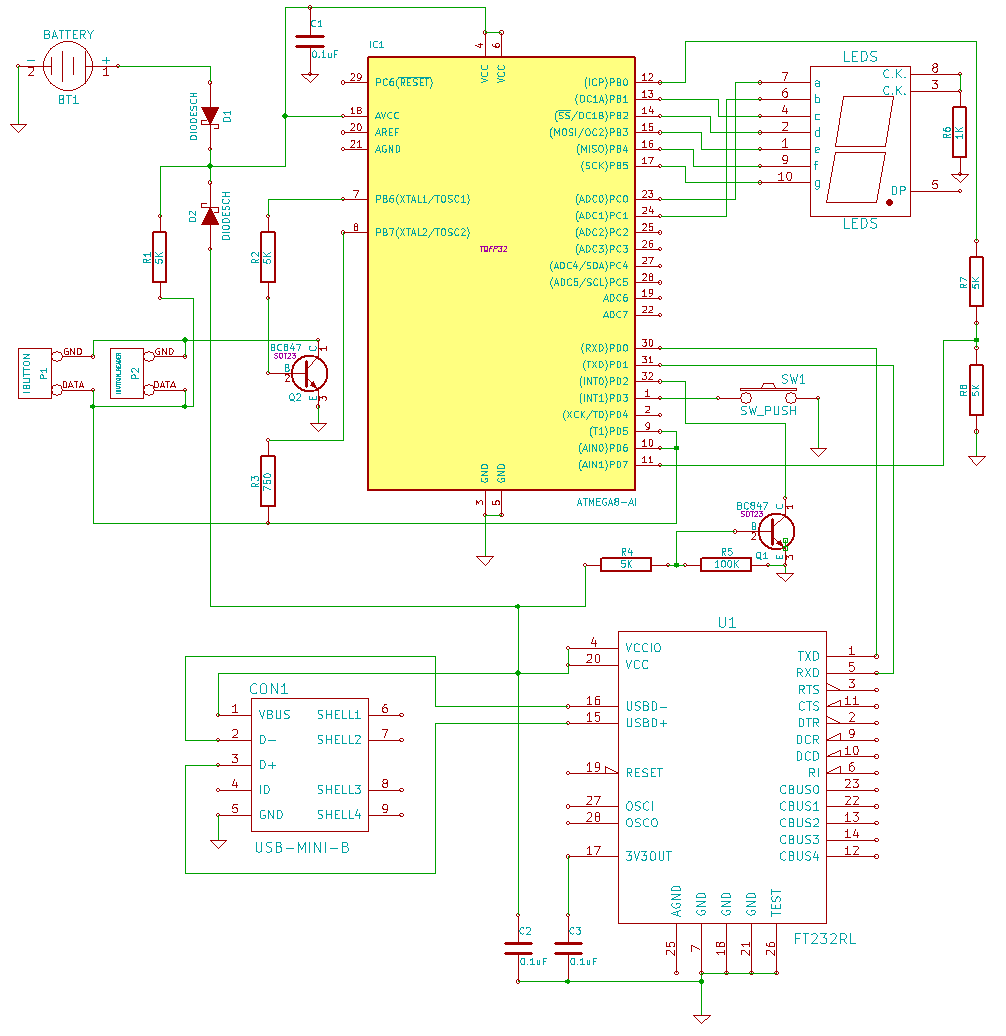
- IC1 - microcontroller ATMEGA8 / ATMEGA8A / ATMEGA8L;
- U1 - FT232RL USB controller, needed to connect the device to a computer;
- CON1 - miniUSB connector;
- BT1 - batteries giving 3-5 volts;
- D1 and D2 - diodes (preferably Schottky) that isolate battery power from USB power;
- P1 - “tablet” iButton, used to connect to intercoms;
- P2 - key reader contacts, used to connect to keys;
- R1 is a resistor pulling a 1-wire line to VCC;
- R2 - current-reducing resistor for controlling transistor Q2;
- R3 - a resistor that pulls the line even further to VCC for reading Cyfral keys;
- R4 - current-reducing resistor, used to open Q1 and determine the connection to USB;
- R5 - pulls the Q1 base to the ground to close it when there is no USB connection;
- R6 - current-reducing resistor for LEDs, one is enough, because at the same time they do not burn;
- R7 and R8 - voltage divider for one of the inputs of the comparator to read Cyfral keys;
- Q1 - transistor for determining the connection to USB;
- Q2 - a transistor to turn on the ground on the reader and emulator, so as not to put the batteries, accidentally closing the contacts in your pocket;
- C1 , C2 and C3 - capacitors for power filtering;
- SW1 - the only button to control the device;
- LEDS - seven LEDs in the form of an eight to display the key number.
Printed circuit board (clickable): It was still time before buying a 3D printer, when I designed the device for the case, not the case for the device. A very nice copy in the form of a keychain and with a button fell into my hands. Just perfect, it only remained to make holes for USB and LEDs. Alas, I still can not find on sale exactly the same case. As a result, it turned out somehow like this: Batteries under the board. By the way, they were enough for me for a year, until I accidentally climbed to swim, forgetting to pull out the keys. Management is done with just one button. When you first press it, the device turns on. A short press of the button selects the key, the number of which is displayed by LEDs. When the desired key is selected, just attach the contacts to the intercom reader.

A long press on the button puts the device into key reading mode, while the middle LED flashes. At this moment, you need to attach the key to the contacts of the key reader (that's why I have a screw screwed in from below). If the reading was successful, the number under which the key is stored is displayed.
When connected via USB, the device is seen as a virtual COM port. For simplicity of work, a client was written under Windows:
It allows you to read keys from the device, while automatically entering them into the database. Of course, keys can be written down.
Firmware sources are here: github.com/ClusterM/ibutton
Client sources are here: github.com/ClusterM/ibutton_client
Conclusion
It is very convenient in one device to have the keys to the house, relatives, work and porches of friends. It is especially important for those who have not conducted an intercom handset in an apartment. But creating a multi-key was not so much useful as interesting. This is a great practice for learning about microcontrollers. Yes, it was from this that I began at one time. In addition, each new non-opening staircase caused a storm of interest. Running around the city and solving logic tasks to open some kind of door is like a video game in real life! Damn exciting. All that is missing is the fight with the gopniks and grannies at the porches in the form of bosses;)