Securing .NET Applications with Sentinel LDK Envelope
The Sentinel LDK Envelope utility, which will be discussed in this article, is intended to install hinged protection on executable modules (EXE and DLL) for the Win32, Windows x64, .NET platforms, as well as on Java applications (JAR and WAR). Protection is carried out by “binding” the application code to the Sentinel security key (a new generation of HASP keys), moreover, the key can be either hardware (HL) or software (SL). An executable module processed in this way will work only in the presence of the required key with all necessary licenses. In addition to checking for the presence of a key, the security code embedded in the application will also provide active opposition to debugging and make reverse engineering of the application difficult, including static code analysis.
The purpose of this article is to consider methods and features of protection for .NET applications, and with emphasis on the maximum automation of the protection installation process. Therefore, further we will consider only that Envelope functionality which concerns protection of .NET applications.
From the point of view of automating the application security process, the best option would be to implement security at the source code level of the application using the Sentinel LDK API functions. With such an implementation, the developer independently decides how this or that class or method will be protected, and when reassembling the project, if changes are made to the source code, all previously done work to implement the protection is automatically taken into account naturally, without requiring alteration. However, the features of the .NET platform do not allow the use of many protection techniques that can be used in native code, for example, dynamic encryption of the code while the application is running, code integrity control, code recovery using noise-protected encoding, etc. Rather, let’s say, it’s possible to realize all this, but it will already be,
On the other hand, you can use the hinged protection. This will require much less time for implementation, the qualifications of the developer may not be so high (knowledge of other programming languages, knowledge of CIL, ... are not needed). However, here, too, not everything is cloudless; it is difficult to achieve complete automation of the installation of protection. First, we will consider in detail the use of hinged protection during normal use, after which we will think about how to automate all this as much as possible. Suppose we create an initially insecure application without using the Sentinel LDK API, and then process the assembly using Envelope. The technological cycle of creating a secure application in this case will look like this:
1) Building an insecure assembly in a development environment, for example, in Visual Studio.
2) Protection of the built assembly during the interactive work with Envelope.
Let's take a closer look at the second stage and see what security methods Envelope can provide us with. The protection process consists of the following operations:
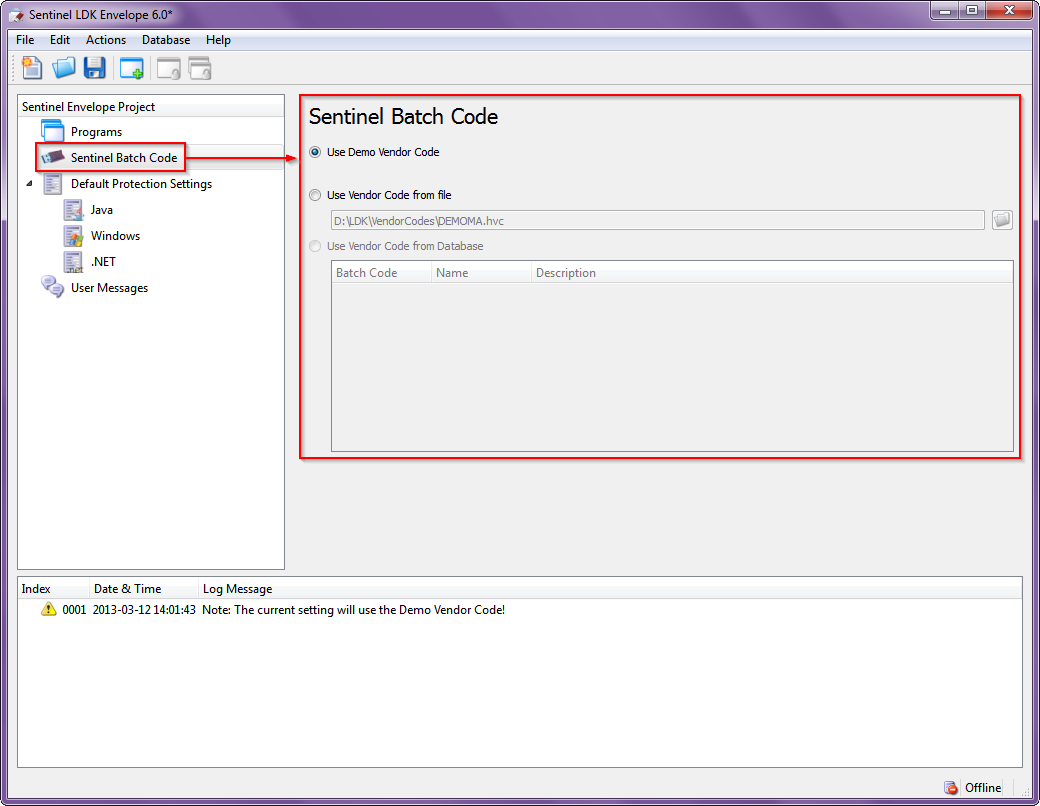
1. After downloading Envelope for the first time, we will see an empty project. We’ll immediately point out which series of keys our secure assembly will work with (see Figure 1):
2. Set the general protection parameters that will be applied to all assemblies included in the project to be protected (see Fig. 2):

The purpose of the parameters is as follows:
• String encryption - encryption of all data stored in the #US heap, which contains in the UNICODE standard all the strings that the developer defined in his source code. Here, for example, in .NET Reflector, a code looks like with unencrypted strings:

And so it looks with encrypted strings :

• Periodic Background checks - background polling of a key with a specified interval.
• Apply compression - compression when placing bodies of classes and methods marked as protected in the assembly. Actually, it does not affect the resistance of protection, .NET Reflector, for example, does not notice this compression at point blank range, regardless of the parameters of this option.
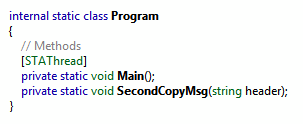
• Obfuscate Symbols- Obfuscation of data stored in the #Strings heap containing symbolic information, such as class names, methods, fields, etc. Full obfuscation or partial is possible when the resource names are not changed.
Program class before obfuscation:
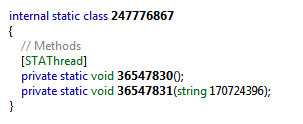
After obfuscation:
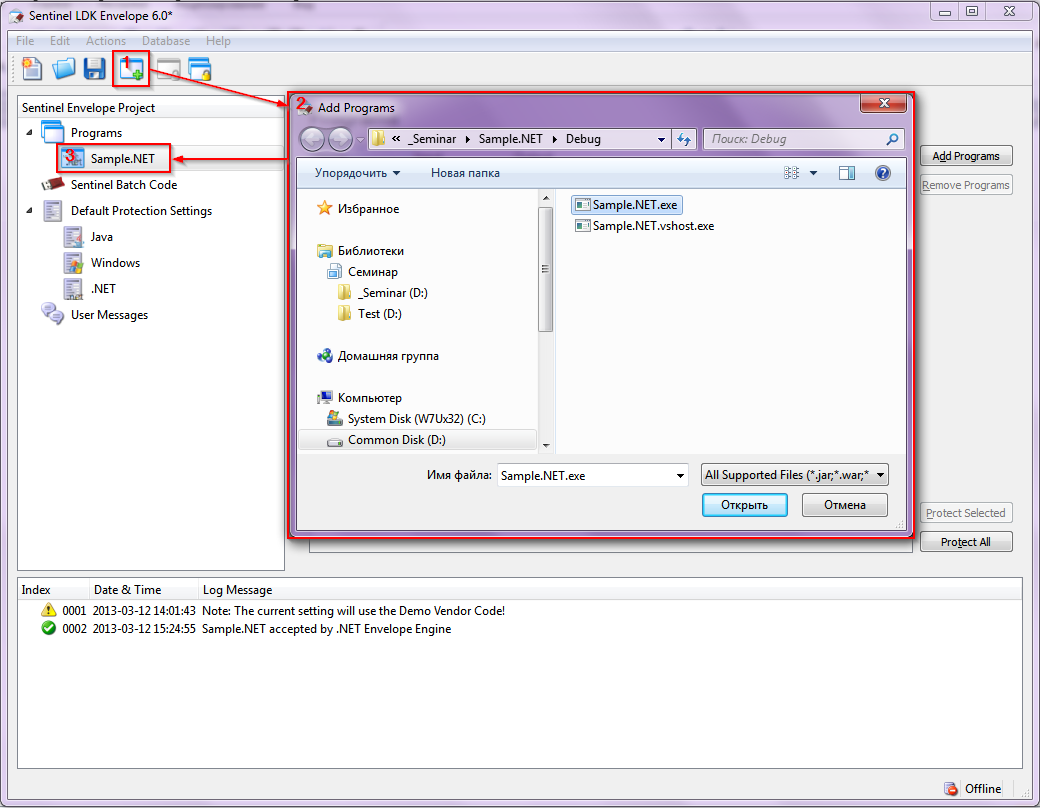
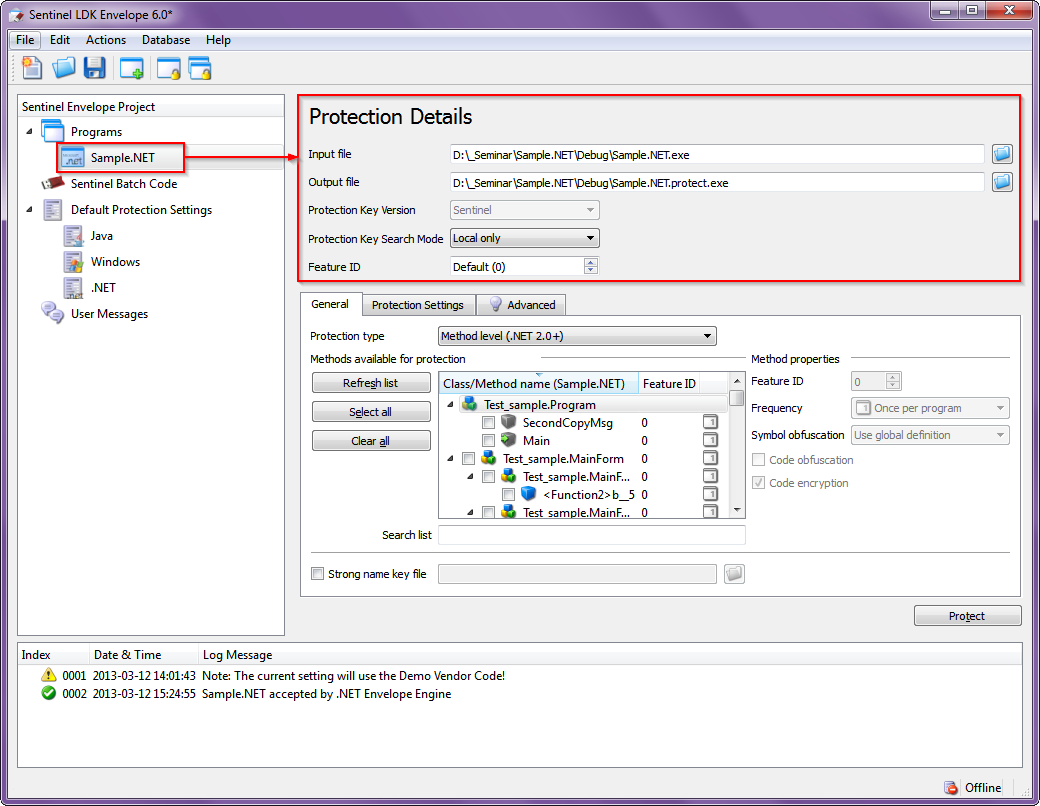
3. We will include one or several ready-made assemblies in the Envelope utility project (see Figure 3).
4. For each assembly included in the project, we set the paths (where to get the source file from and where to put the protected one), with which keys and how to work, which license to use (see Figure 4):
5. If necessary, for each specific assembly, you can set your own protection parameters that overlap the general ones (see. Fig. 5), and more finely configure the operation of the protective mechanisms (see. Fig. 6):
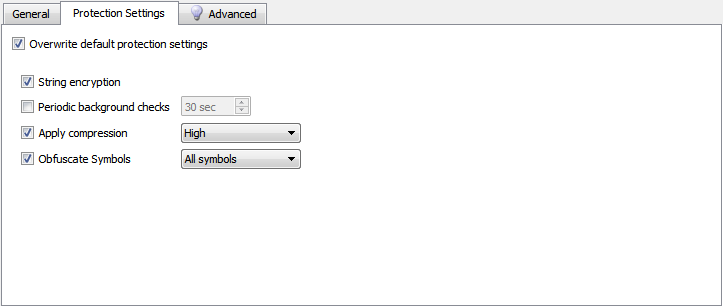
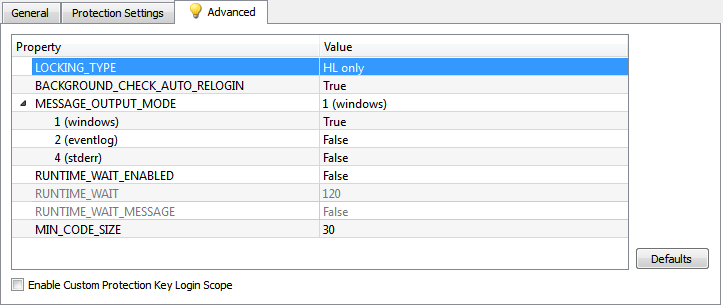
The parameters in fig. 5 have already been considered in paragraph 2. Of the parameters of interest (from the point of view of protection) in Fig. 6, the following can be noted:
• LOCKING_TYPE - defines the types of keys with which the protection of this assembly will work. Possible options:

where:
- HL - hardware key
- SL-UserMode - software key that can work without a driver
- SL-AdminMode - software key that works with the driver
- SL - SL-UserMode + SL-AdminMode
• MIN_CODE_SIZE- the minimum size of the CIL code of the method in bytes, starting from which it will be protected by Envelope in case of a group operation, for example, when the entire class is marked for protection.
6. The most time-consuming part of the work remains - to determine the classes and methods to be protected (Fig. 7-1), and for each selected class / method, set the parameters of the protective mechanisms (Fig. 7-2):
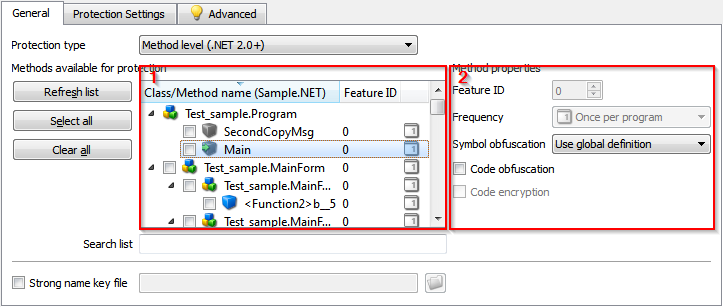
To select a class or method for protection, simply check the box next to its name in window 1. At the same time, window 2 displays the current protection settings for the selected object. Assignment of security settings:
• Feature ID - license number from the key. For different classes / methods may vary if they are licensed separately.
• Frequency - how often the key for the protected class / method will be checked. Possible options:

where:
- Once per program - once for the entire duration of the application
- Once per class instance - every time you create an instance of the class
- Every time - each time the control passes through the protected code
• Symbol obfuscation - obfuscation of symbolic information, can be applied to the method, even if it is not marked as subject to protection, because not associated with a key. Possible options:
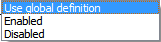
where:
- Use global definition - the current value of the Obfuscate Symbols parameter is used, see p. 2 and p. 5.
- Enabled - obfuscation is always performed, regardless of global settings.
- Disabled - obfuscation is never performed, regardless of global settings.
• Code obfuscation - control_flow-obfuscation of the CIL code, can be applied to the method, even if it is not marked as subject to protection, because not associated with a key. This is how the IDA code snippet looks after obfuscation:
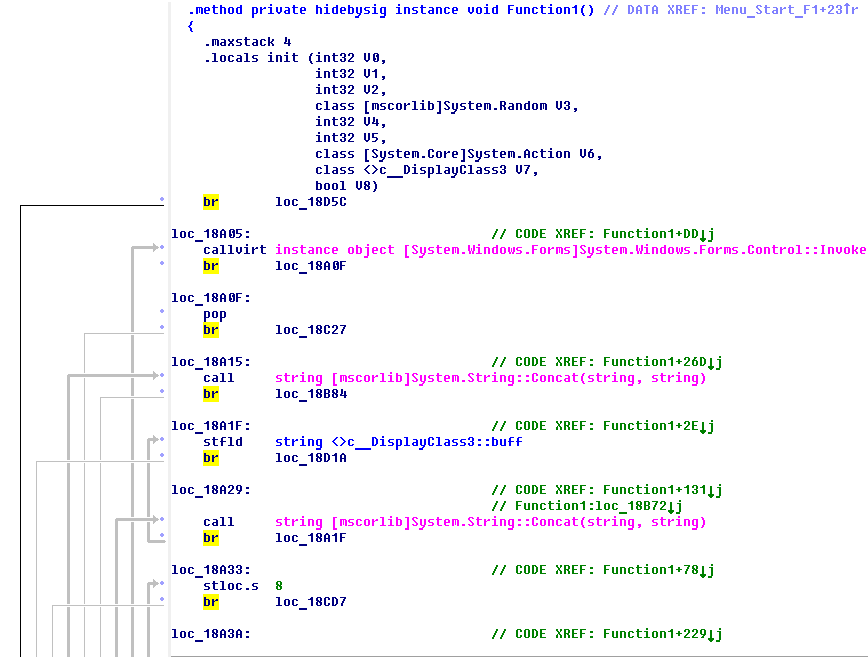
And this is the graph of control transfer in the function after obfuscation: It is
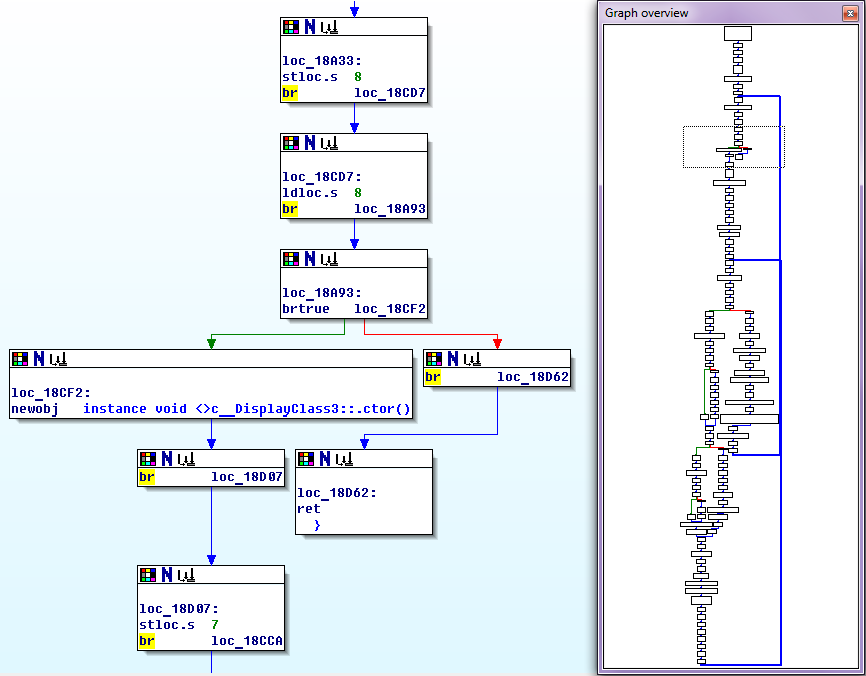
clearly seen that obfuscation consists in the fact that the code literally breaks according to one instruction, and all of them are mixed, and in order to preserve the previous order of their execution, an additional jump instruction is inserted after each instruction (opcode br) to the desired address. Obviously, the speed of a function protected in this way can drop significantly, and the code can significantly increase in size. Therefore, use this protection method with caution.
• Code encryption- encryption of the CIL code of the selected method through the key, using the AES algorithm. With this method of protection, the original CIL code is extracted from the method body, encrypted using the key, and placed in the assembly resources in encrypted form. A short adapter is inserted in its place, which provides loading, decryption, dynamic compilation and transfer of control to the code of the protected method. After the completion of the method, its code is deleted from memory. This is how the body fragment of the protected method in the IDA looks like:

The call class instruction [mscorlib] System.Reflection.Emit.DynamicMethod defines and represents a dynamic method that will be compiled in memory, executed, and subsequently deleted. The instruction callvirt instance object [mscorlib] System.Reflection.MethodBase :: Invoke transfers control to the method if it is successfully compiled. This method of protection practically does not affect the speed of the protected code, providing quite decent durability.
7. After all the necessary classes / methods are marked as intended for protection, it remains only to save the results of the work in the form of a project file and click the Protect button. As a result, we get a secure assembly. The end of the work.
Now back to the issue of process automation. Obviously, the work just done by us is poorly automated. Yes, we saved everything that we did in the form of a project, and the next time you need to protect the assembly, you can use it by immediately downloading it to Envelope. However, the entire technological cycle of creating a secure application, as before, consists of two loosely coupled stages that are performed in different programs. Let's try to connect them, making the protection a transparent process for the developer. To do this, we will use the console version of Envelope, which is called envelope.com (let the extension not scare you, this is a normal exe file, and not greetings from the ancient ms-dos). So, when starting with the –h switch, we are informed that:

We will use the utility with the –p switch at the “event after construction” stage in Visual Studio. You can do, for example, this way:
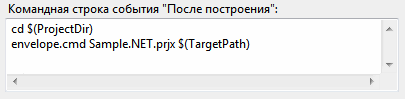
All work with envelope.com is transferred to the envelope.cmd batch file located in the project directory and containing the following commands:
In order for everything to work correctly, you need to specify the correct path to the directory with the envelope.com utility ( you can use an absolute path, not a relative one, like here), and make a small change to the protection project in Envelope by changing the extension of the output file in order for the move command to work normally:

The utility can be checked by log in the Visual Studio output window:
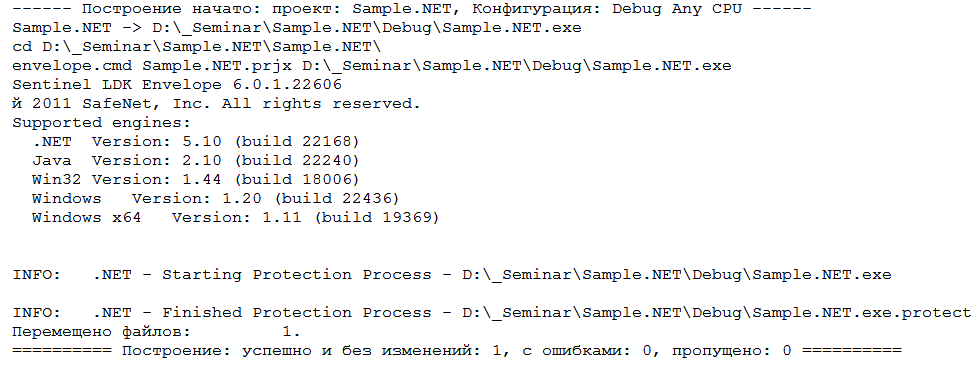
After end of the creation process I build in Visual Studio, we immediately get a secure application without unnecessary gestures.
It seems to have worked out well, but what if significant changes are made to the application source code? For example, if new classes / methods to be protected appear, are old ones deleted, or is it planned to change the way of protecting existing classes / methods? In the traditional approach, you will have to open the protection project in Envelope and make all the accumulated changes, as previously described in section 6, which is sad, since this puts an end to the automation of the protection process in case of any serious changes in the application source code.
However, it is possible to automate the updating of such changes in the source code. This can be done by using custom attributes in the source code of the application. The object of protection using custom attributes can be a method, class, or the entire assembly, depending on where this or that set of attributes is located. The list of available attributes for protecting the object completely repeats the set of protection parameters for classes / methods described in clause 6. Here is the list of available attributes:
• Protect - type BOOL, possible values - TRUE / FALSE, indicates whether to protect the object using the key.
• FeatureId- type int, possible values - [0; 65535], indicates the license number (Feature ID), which will be used to protect the object. Accepted only if Protect == TRUE.
• Encrypt - type BOOL, possible values - TRUE / FALSE, indicates whether the object's CIL code should be encrypted. Accepted only if Protect == TRUE.
• CodeObfuscation - type BOOL, possible values - TRUE / FALSE, indicates whether to control_flow obfuscation of the object CIL code. Accepted regardless of the value of Protect. This protection method reduces the speed of the protected code.
• Frequency- enumerated type EnvelopeMethodProtectionFrequency, indicates how often the license for the protected object will be checked. Accepted only if Protect == TRUE. Possible values:
- CheckOncePerApplicaton - a single check during application operation.
- CheckOncePerInstance - a single check for each instance of the object.
- CheckEveryTime - check at each control pass through the object code.
• SymbolObfuscation - Enumerated type EnvelopeSymbolObfuscation, indicates the method of obfuscation of symbolic information in the protected object. Accepted regardless of the value of Protect. Possible Values:
-ObfuscateSkip - a complete ban on obfuscation of all symbolic information.
- ObfuscateForce - forced obfuscation for all symbolic information.
- ObfuscateDefault - perform obfuscation for all symbolic information, except for public names, as well as objects with virtual and protected modifiers.
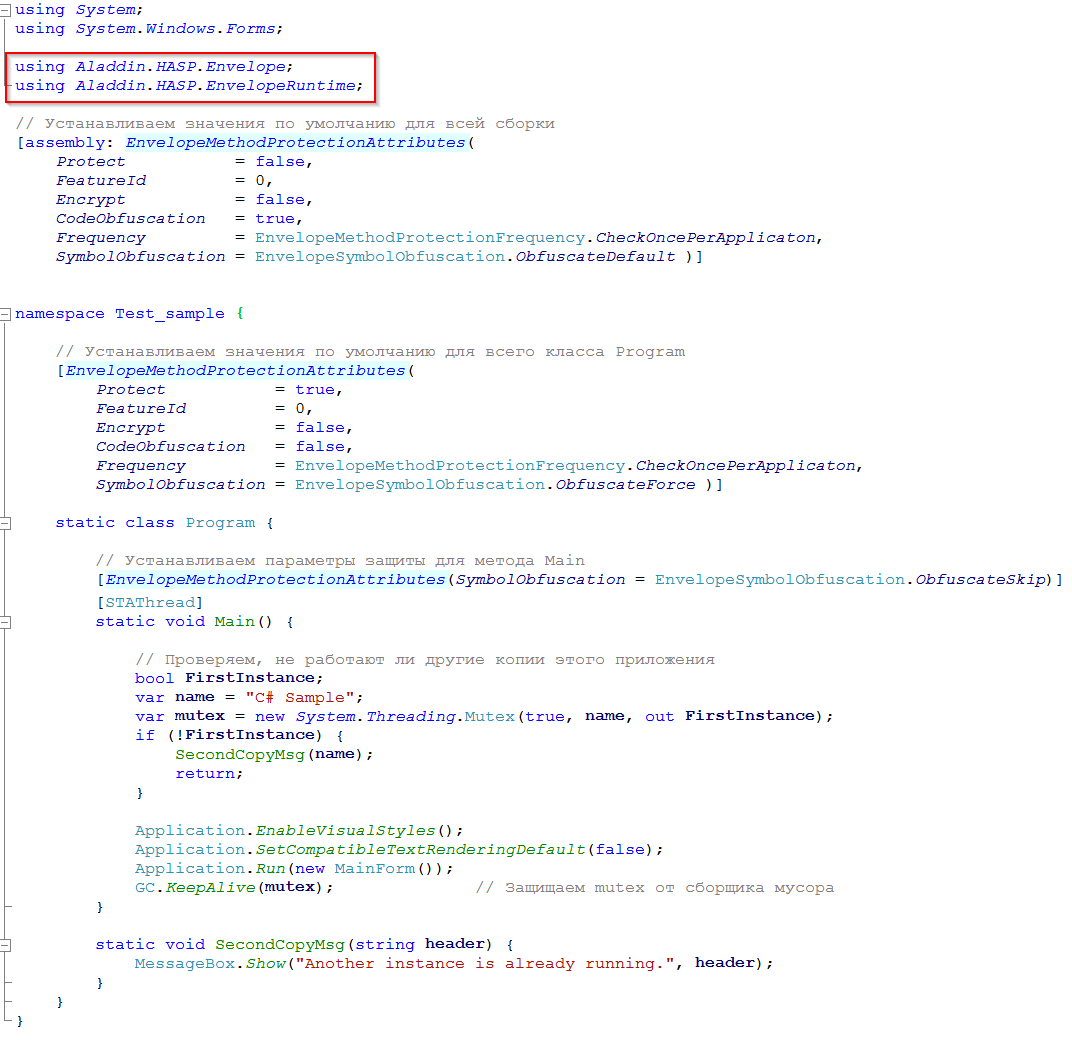
In order for Envelope to get attributes from the source code, you must use the using directive to include the Aladdin.HASP.Envelope and Aladdin.HASP.EnvelopeRuntime namespaces in it. Naturally, before that, you need to add the Aladdin.HASP.Envelope.DLL and Aladdin.HASP.EnvelopeRuntime.DLL files to the links of the Visual Studio project. It is not necessary to distribute these files with a protected application; they are required only at the stage of installing protection on the assembly. The following is an example of protection from source code using custom attributes:
Generally speaking, all changes related to assembly protection can be conditionally divided into two categories:
1. Global changes that occur quite rarely. Described in paragraphs 1 - 5, it is impossible to manage them from the source code.
2. Changes in the source code associated with the appearance or removal of classes / methods to be protected occur much more often. Described in paragraph 6. Now you can completely update such changes from the source code without having to edit the protection project in Envelope.
And now, summing up all of the above, we can say that the developer fully controls the protection from the source code, as well as in the case of using the Sentinel LDK API. You will only have to upload the security project to Envelope and correct its parameters if there are any global changes, for example, changing a series of keys, changing the assembly name, or setting a different value for the interval for background polling of a key, which is incomparably less common.
The purpose of this article is to consider methods and features of protection for .NET applications, and with emphasis on the maximum automation of the protection installation process. Therefore, further we will consider only that Envelope functionality which concerns protection of .NET applications.
From the point of view of automating the application security process, the best option would be to implement security at the source code level of the application using the Sentinel LDK API functions. With such an implementation, the developer independently decides how this or that class or method will be protected, and when reassembling the project, if changes are made to the source code, all previously done work to implement the protection is automatically taken into account naturally, without requiring alteration. However, the features of the .NET platform do not allow the use of many protection techniques that can be used in native code, for example, dynamic encryption of the code while the application is running, code integrity control, code recovery using noise-protected encoding, etc. Rather, let’s say, it’s possible to realize all this, but it will already be,
On the other hand, you can use the hinged protection. This will require much less time for implementation, the qualifications of the developer may not be so high (knowledge of other programming languages, knowledge of CIL, ... are not needed). However, here, too, not everything is cloudless; it is difficult to achieve complete automation of the installation of protection. First, we will consider in detail the use of hinged protection during normal use, after which we will think about how to automate all this as much as possible. Suppose we create an initially insecure application without using the Sentinel LDK API, and then process the assembly using Envelope. The technological cycle of creating a secure application in this case will look like this:
1) Building an insecure assembly in a development environment, for example, in Visual Studio.
2) Protection of the built assembly during the interactive work with Envelope.
Let's take a closer look at the second stage and see what security methods Envelope can provide us with. The protection process consists of the following operations:
1. After downloading Envelope for the first time, we will see an empty project. We’ll immediately point out which series of keys our secure assembly will work with (see Figure 1):
Fig. 1 - Choosing a key series code
2. Set the general protection parameters that will be applied to all assemblies included in the project to be protected (see Fig. 2):
Fig. 2 - Setting general security settings
The purpose of the parameters is as follows:
• String encryption - encryption of all data stored in the #US heap, which contains in the UNICODE standard all the strings that the developer defined in his source code. Here, for example, in .NET Reflector, a code looks like with unencrypted strings:
And so it looks with encrypted strings :
• Periodic Background checks - background polling of a key with a specified interval.
• Apply compression - compression when placing bodies of classes and methods marked as protected in the assembly. Actually, it does not affect the resistance of protection, .NET Reflector, for example, does not notice this compression at point blank range, regardless of the parameters of this option.
• Obfuscate Symbols- Obfuscation of data stored in the #Strings heap containing symbolic information, such as class names, methods, fields, etc. Full obfuscation or partial is possible when the resource names are not changed.
Program class before obfuscation:
After obfuscation:
3. We will include one or several ready-made assemblies in the Envelope utility project (see Figure 3).
Fig. 3 - Adding target files to the project
4. For each assembly included in the project, we set the paths (where to get the source file from and where to put the protected one), with which keys and how to work, which license to use (see Figure 4):
Fig. 4 - Setting assembly parameters
5. If necessary, for each specific assembly, you can set your own protection parameters that overlap the general ones (see. Fig. 5), and more finely configure the operation of the protective mechanisms (see. Fig. 6):
Fig. 5
Fig. 6
The parameters in fig. 5 have already been considered in paragraph 2. Of the parameters of interest (from the point of view of protection) in Fig. 6, the following can be noted:
• LOCKING_TYPE - defines the types of keys with which the protection of this assembly will work. Possible options:
where:
- HL - hardware key
- SL-UserMode - software key that can work without a driver
- SL-AdminMode - software key that works with the driver
- SL - SL-UserMode + SL-AdminMode
• MIN_CODE_SIZE- the minimum size of the CIL code of the method in bytes, starting from which it will be protected by Envelope in case of a group operation, for example, when the entire class is marked for protection.
6. The most time-consuming part of the work remains - to determine the classes and methods to be protected (Fig. 7-1), and for each selected class / method, set the parameters of the protective mechanisms (Fig. 7-2):
Fig. 7 - Protection management of methods and classes
To select a class or method for protection, simply check the box next to its name in window 1. At the same time, window 2 displays the current protection settings for the selected object. Assignment of security settings:
• Feature ID - license number from the key. For different classes / methods may vary if they are licensed separately.
• Frequency - how often the key for the protected class / method will be checked. Possible options:
where:
- Once per program - once for the entire duration of the application
- Once per class instance - every time you create an instance of the class
- Every time - each time the control passes through the protected code
• Symbol obfuscation - obfuscation of symbolic information, can be applied to the method, even if it is not marked as subject to protection, because not associated with a key. Possible options:
where:
- Use global definition - the current value of the Obfuscate Symbols parameter is used, see p. 2 and p. 5.
- Enabled - obfuscation is always performed, regardless of global settings.
- Disabled - obfuscation is never performed, regardless of global settings.
• Code obfuscation - control_flow-obfuscation of the CIL code, can be applied to the method, even if it is not marked as subject to protection, because not associated with a key. This is how the IDA code snippet looks after obfuscation:
And this is the graph of control transfer in the function after obfuscation: It is
clearly seen that obfuscation consists in the fact that the code literally breaks according to one instruction, and all of them are mixed, and in order to preserve the previous order of their execution, an additional jump instruction is inserted after each instruction (opcode br) to the desired address. Obviously, the speed of a function protected in this way can drop significantly, and the code can significantly increase in size. Therefore, use this protection method with caution.
• Code encryption- encryption of the CIL code of the selected method through the key, using the AES algorithm. With this method of protection, the original CIL code is extracted from the method body, encrypted using the key, and placed in the assembly resources in encrypted form. A short adapter is inserted in its place, which provides loading, decryption, dynamic compilation and transfer of control to the code of the protected method. After the completion of the method, its code is deleted from memory. This is how the body fragment of the protected method in the IDA looks like:
The call class instruction [mscorlib] System.Reflection.Emit.DynamicMethod defines and represents a dynamic method that will be compiled in memory, executed, and subsequently deleted. The instruction callvirt instance object [mscorlib] System.Reflection.MethodBase :: Invoke transfers control to the method if it is successfully compiled. This method of protection practically does not affect the speed of the protected code, providing quite decent durability.
7. After all the necessary classes / methods are marked as intended for protection, it remains only to save the results of the work in the form of a project file and click the Protect button. As a result, we get a secure assembly. The end of the work.
Now back to the issue of process automation. Obviously, the work just done by us is poorly automated. Yes, we saved everything that we did in the form of a project, and the next time you need to protect the assembly, you can use it by immediately downloading it to Envelope. However, the entire technological cycle of creating a secure application, as before, consists of two loosely coupled stages that are performed in different programs. Let's try to connect them, making the protection a transparent process for the developer. To do this, we will use the console version of Envelope, which is called envelope.com (let the extension not scare you, this is a normal exe file, and not greetings from the ancient ms-dos). So, when starting with the –h switch, we are informed that:
We will use the utility with the –p switch at the “event after construction” stage in Visual Studio. You can do, for example, this way:
All work with envelope.com is transferred to the envelope.cmd batch file located in the project directory and containing the following commands:
..\..\LDK\VendorTools\VendorSuite\envelope.com -n --protect %1move /Y %2.protect %2In order for everything to work correctly, you need to specify the correct path to the directory with the envelope.com utility ( you can use an absolute path, not a relative one, like here), and make a small change to the protection project in Envelope by changing the extension of the output file in order for the move command to work normally:
The utility can be checked by log in the Visual Studio output window:
After end of the creation process I build in Visual Studio, we immediately get a secure application without unnecessary gestures.
It seems to have worked out well, but what if significant changes are made to the application source code? For example, if new classes / methods to be protected appear, are old ones deleted, or is it planned to change the way of protecting existing classes / methods? In the traditional approach, you will have to open the protection project in Envelope and make all the accumulated changes, as previously described in section 6, which is sad, since this puts an end to the automation of the protection process in case of any serious changes in the application source code.
However, it is possible to automate the updating of such changes in the source code. This can be done by using custom attributes in the source code of the application. The object of protection using custom attributes can be a method, class, or the entire assembly, depending on where this or that set of attributes is located. The list of available attributes for protecting the object completely repeats the set of protection parameters for classes / methods described in clause 6. Here is the list of available attributes:
• Protect - type BOOL, possible values - TRUE / FALSE, indicates whether to protect the object using the key.
• FeatureId- type int, possible values - [0; 65535], indicates the license number (Feature ID), which will be used to protect the object. Accepted only if Protect == TRUE.
• Encrypt - type BOOL, possible values - TRUE / FALSE, indicates whether the object's CIL code should be encrypted. Accepted only if Protect == TRUE.
• CodeObfuscation - type BOOL, possible values - TRUE / FALSE, indicates whether to control_flow obfuscation of the object CIL code. Accepted regardless of the value of Protect. This protection method reduces the speed of the protected code.
• Frequency- enumerated type EnvelopeMethodProtectionFrequency, indicates how often the license for the protected object will be checked. Accepted only if Protect == TRUE. Possible values:
- CheckOncePerApplicaton - a single check during application operation.
- CheckOncePerInstance - a single check for each instance of the object.
- CheckEveryTime - check at each control pass through the object code.
• SymbolObfuscation - Enumerated type EnvelopeSymbolObfuscation, indicates the method of obfuscation of symbolic information in the protected object. Accepted regardless of the value of Protect. Possible Values:
-ObfuscateSkip - a complete ban on obfuscation of all symbolic information.
- ObfuscateForce - forced obfuscation for all symbolic information.
- ObfuscateDefault - perform obfuscation for all symbolic information, except for public names, as well as objects with virtual and protected modifiers.
In order for Envelope to get attributes from the source code, you must use the using directive to include the Aladdin.HASP.Envelope and Aladdin.HASP.EnvelopeRuntime namespaces in it. Naturally, before that, you need to add the Aladdin.HASP.Envelope.DLL and Aladdin.HASP.EnvelopeRuntime.DLL files to the links of the Visual Studio project. It is not necessary to distribute these files with a protected application; they are required only at the stage of installing protection on the assembly. The following is an example of protection from source code using custom attributes:
Generally speaking, all changes related to assembly protection can be conditionally divided into two categories:
1. Global changes that occur quite rarely. Described in paragraphs 1 - 5, it is impossible to manage them from the source code.
2. Changes in the source code associated with the appearance or removal of classes / methods to be protected occur much more often. Described in paragraph 6. Now you can completely update such changes from the source code without having to edit the protection project in Envelope.
And now, summing up all of the above, we can say that the developer fully controls the protection from the source code, as well as in the case of using the Sentinel LDK API. You will only have to upload the security project to Envelope and correct its parameters if there are any global changes, for example, changing a series of keys, changing the assembly name, or setting a different value for the interval for background polling of a key, which is incomparably less common.