Navigation Editor - a new tool in Android Studio
Android Studio has an interesting tool for quickly prototyping activity screens. As the authors say on their page , this is only a preliminary test of the pen and this tool will still be finalized. The editor can be useful to both designers and novice developers.
I decided to play a little with the editor.
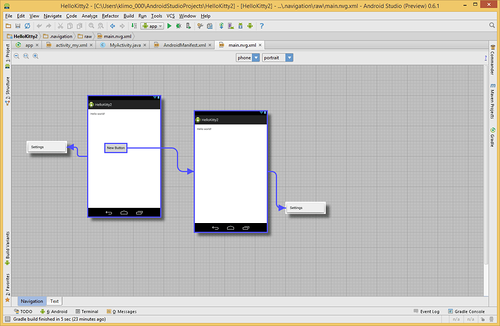
So, you launched Android Studio and created a simple one-button example. Go to the menu and select Tools | Android | Navigation Editor . A new tab for the main.nvg.xml file and the editor itself will appear on the screen , on which you can see the form of your activity with a button and an arrow that connects to the Settings menu item . Nothing interesting so far.
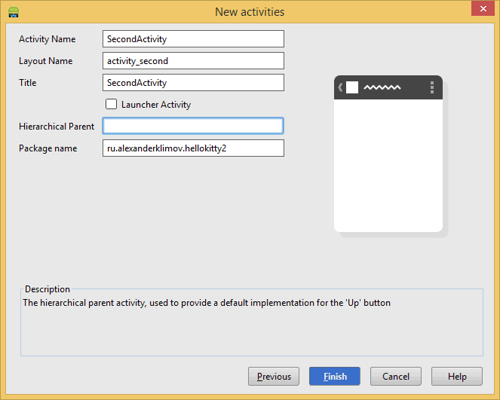
Then the magic begins. Right click anywhere in the editor and call the context menu of the New ... the Activity . The standard wizard for creating a new activity appears. We fill in the fields and move on. As soon as we clicked the Finish button , an image of the second activity will appear in the editor. Moreover, an arrow comes from the button from the first activity. If you go into the class code, you will see that there was generated a blank for a button click.

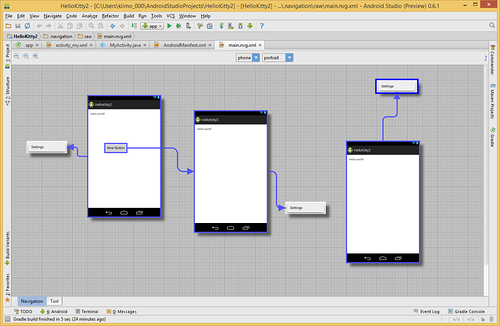
However, we continue. We wanted to make a transition from the second activity to the third. Again, call the context menu and create a new screen. But this time there will be no connection between the second and third activity. No problem. Double-click on the second screen and find ourselves in the markup editor. Add a button and go back to the Navigation Editor. Changes are automatically applied and we will see the added button. Now select this button, hold down the Shift key and drag the button to the third activity. When you release the mouse, an arrow will appear, going from the button to the third screen. Moreover, in the middle there will be a drop-down list of two elements - swipe and press. Although I chose the swipe option
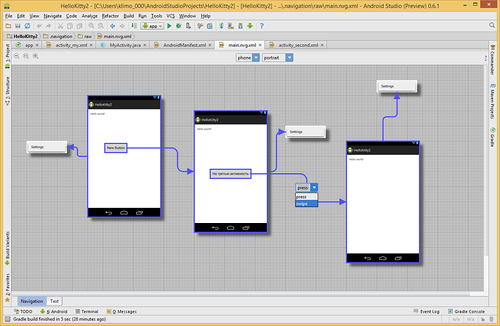
, in the code I still got the same template with onClick. In principle, it is logical for the button. But how to get the code for the swipe, I still do not understand. Can someone tell me?
Here is such an interesting tool. I must say that the product is still damp. During the experiments, the studio cursed a couple of times for a mistake. Yes, and use with no habit is not entirely comfortable.
I must admit, for a year I was not used to the studio and still prefer the good old Eclipse. But Google is doing everything possible to force developers to switch to a new development environment. I’m writing down new products for myself on a separate page , but I don’t dare to completely switch to the camp of Android Studio / IntelliJ fans
I decided to play a little with the editor.
So, you launched Android Studio and created a simple one-button example. Go to the menu and select Tools | Android | Navigation Editor . A new tab for the main.nvg.xml file and the editor itself will appear on the screen , on which you can see the form of your activity with a button and an arrow that connects to the Settings menu item . Nothing interesting so far.
Then the magic begins. Right click anywhere in the editor and call the context menu of the New ... the Activity . The standard wizard for creating a new activity appears. We fill in the fields and move on. As soon as we clicked the Finish button , an image of the second activity will appear in the editor. Moreover, an arrow comes from the button from the first activity. If you go into the class code, you will see that there was generated a blank for a button click.
        findViewById(R.id.button).setOnClickListener(new View.OnClickListener() {
            @Override
            public void onClick(View v) {
                MyActivity.this.startActivity(new Intent(MyActivity.this, SecondActivity.class));
            }
        });
However, we continue. We wanted to make a transition from the second activity to the third. Again, call the context menu and create a new screen. But this time there will be no connection between the second and third activity. No problem. Double-click on the second screen and find ourselves in the markup editor. Add a button and go back to the Navigation Editor. Changes are automatically applied and we will see the added button. Now select this button, hold down the Shift key and drag the button to the third activity. When you release the mouse, an arrow will appear, going from the button to the third screen. Moreover, in the middle there will be a drop-down list of two elements - swipe and press. Although I chose the swipe option
, in the code I still got the same template with onClick. In principle, it is logical for the button. But how to get the code for the swipe, I still do not understand. Can someone tell me?
Here is such an interesting tool. I must say that the product is still damp. During the experiments, the studio cursed a couple of times for a mistake. Yes, and use with no habit is not entirely comfortable.
I must admit, for a year I was not used to the studio and still prefer the good old Eclipse. But Google is doing everything possible to force developers to switch to a new development environment. I’m writing down new products for myself on a separate page , but I don’t dare to completely switch to the camp of Android Studio / IntelliJ fans