Create callback scripts quickly with Voximplant
- Tutorial
 It is not surprising that in many business processes, one way or another, there is such a problem as calling one phone number and then connecting it to another number. Most often, such a service is called a callback or callback, sometimes - a call order. Many met him on the sites of online stores, but in most cases this is not an automated callback, but a regular application that falls to the manager by email or appears in CRM, after which the manager dials the client’s number and talks to him. Some large companies implement automated callbacks and even integrate it with queues in the contact center. In this post, we will look at how to literally create a callback script in a few minutes using the VoxImplant platform,
To begin with, we’ll duplicate the scheme in a larger size so that it is easier to explain what, how and with what interacts when implementing our callback service.
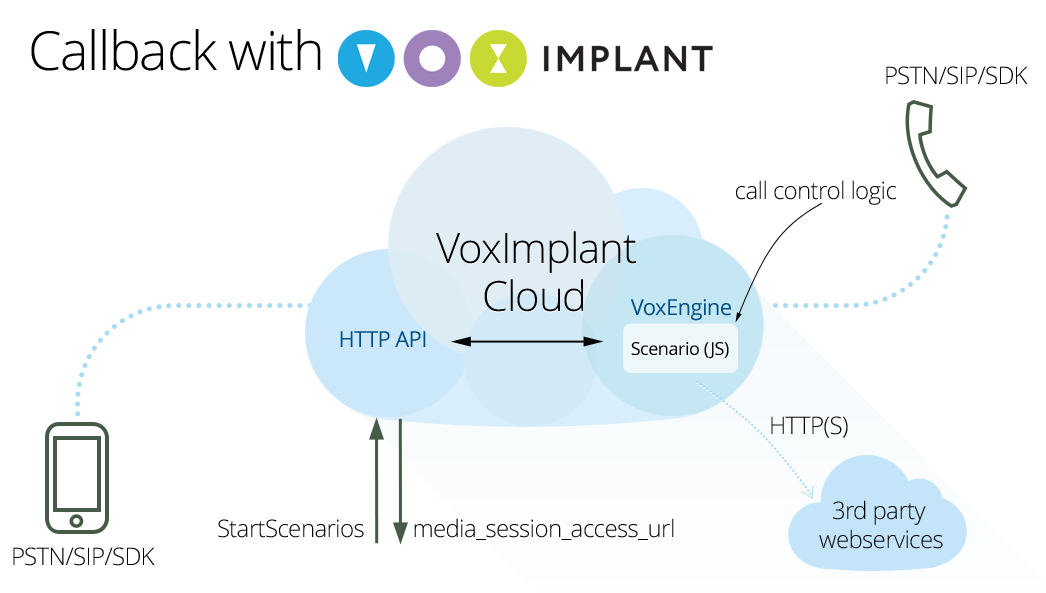
It looks a bit cumbersome, but in reality everything is very simple and convenient. Developer VoxImplant (to get a developer account you need to register on the site, it’s absolutely free) through the HTTP API makes a request to the VoxImplant cloud, after which the script server launches a script written in advance in JS that describes the logic for making calls, connecting them, and also, if desired, business logic. Before making an HTTP request to run a script, obviously, you need to write it and also attach it to the application via a rule, the id of this rule will then need to be specified in the HTTP request so that it is clear which script should be run. So, in order:
- We create the VoxImplant application.
- Create a script.
- Bind the script to the application using the rule.
- We make an HTTP request to run the script.
After making an HTTP request to run the script, if everything is done correctly, the response will be media_session_access_url, which allows you to continue to remotely control its operation after running the script. For example, if you want to finish the script at some specific moment, then you can write the following in the script:
VoxEngine.addEventListener(AppEvents.HttpRequest, handleHttpRequest);
function handleHttpRequest(e) {
  VoxEngine.terminate();
}
In this case, making a request for media_session_access_url, you will stop the script. We return to the implementation of our callback to phone numbers. We create the application in the Applications section of the control panel, call it corny callback (in the end, the full name will be callback.account_name.voximplant.com), and in the Scenarios section we create a new script of the following form:
var call1, call2, data;
const callerId = "+1234567890"; // Арендованный или верифицированный номер телефона
VoxEngine.addEventListener(AppEvents.Started, handleScenarioStart);
function handleScenarioStart(e) {
  // в сценарий можно передать данные с помощью механизма customData,
  // параметр script_custom_data в HTTP-запросе StartScenarios
  // передадим в нем номера в виде строки номер1:номер2
  data = VoxEngine.customData();
  data = data.split(":");
  // начало выполнения сценария - звоним на номер 1
  call1 = VoxEngine.callPSTN(data[0], callerId);
  // обработчики событий
  call1.addEventListener(CallEvents.Connected, handleCall1Connected);
  call1.addEventListener(CallEvents.Failed, function(e) { VoxEngine.terminate(); });
  call1.addEventListener(CallEvents.Disconnected, function(e) { VoxEngine.terminate(); });
}
function handleCall1Connected(e) {
  // первый звонок соединен успешно, проигрываем сообщение
  call1.say("Здравствуйте, это звонок от сервиса Колбэк, ожидайте соединения", Language.RU_RUSSIAN_FEMALE);
  call1.addEventListener(CallEvents.PlaybackFinished, function(e1) {
     // после проигрывания сообщения пытаемся дозвониться до номера 2
    call2 = VoxEngine.callPSTN(data[1], callerId);
    // обработчики событий
    call2.addEventListener(CallEvents.Connected, handleCall2Connected);
    call2.addEventListener(CallEvents.Failed, function(e2) {
        call1.say("К сожалению, соединение не может быть установлено", Language.RU_RUSSIAN_FEMALE);
        call1.addEventListener(CallEvents.PlaybackFinished, function(e3) { VoxEngine.terminate(); });
    });
    call2.addEventListener(CallEvents.Disconnected, function(e2) { VoxEngine.terminate(); });
  });
}
function handleCall2Connected(e) {
  // соединяем два звонка - звук
  VoxEngine.sendMediaBetween(call1, call2);
  // и сигнализацию
  VoxEngine.easyProcess(call1, call2);
}
In short, this script calls the numbers that we pass through the special request parameter StartScenarios script_custom_data in the form of a string number1: number2. First, dial the number 1 and play the message using TTS, then dial the number 2 and connect the two calls to each other. In this scenario, we do not work out some cases in any way, for example, if you did not reach the number 1, then we simply complete the script. If a little magic, then you can notify the outside world that something went wrong, change
call1.addEventListener(CallEvents.Failed, function(e) { VoxEngine.terminate(); });
on the
call1.addEventListener(CallEvents.Failed, handleCall1Failed);
and describe handleCall1Failed:
function handleCall1Failed(e) {
  // тут можно узнать причину
  var code = e.code,
      reason = e.reason;
  // и отправить ее во внешний мир с помощью HTTP-запроса
  Net.httpRequest("http://somewebservice", function(e1) {
    // информация по реузльтатам запроса - e1.code, e1.text, e1.data, e1.headers
    // убиваем сессию
    VoxEngine.terminate();
  });
}
This is the simplest example with a GET request. The HttpRequestOptions class is available to configure and manage the HTTP request from the side of the script .
In the same way, using Date, you can measure the duration of individual calls or sessions inside the script and send data to the outside world, if for some reason you go into the call history to get this information does not match the logic of the service / application. As you probably already understood, we tried to make a very flexible system so that the developer could choose the mechanism for solving particular problems himself.
After the script is ready, we need to save it under some name, for example, CallbackHabr and go to the Applications section to hook the script to the rule and finally get its ID.
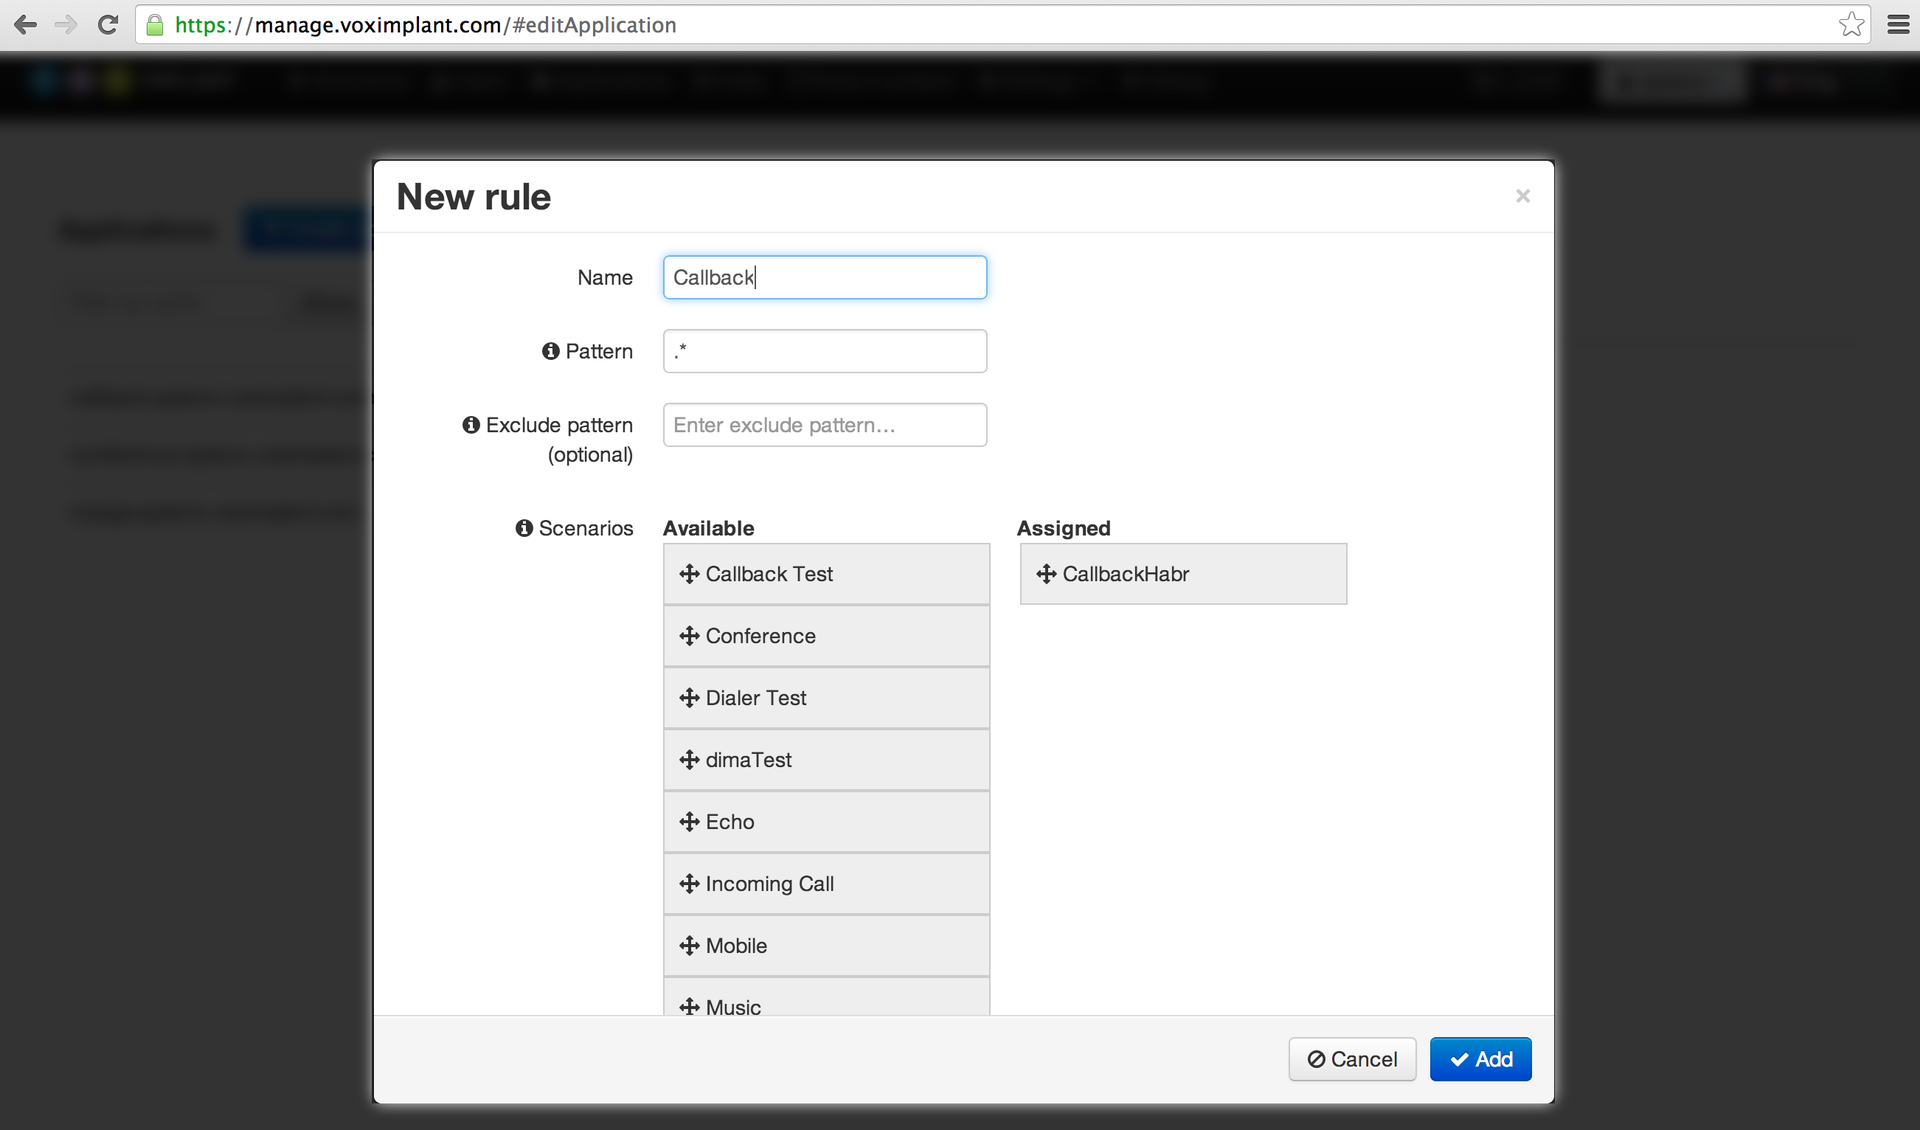
To get the rule ID, you need to play a little (in the future we will try to eliminate this drawback of the control panel) - after creating the rule, you need to save the application (the application, not the rule order), that is, go to the General tab and click Save there. Then again open the application for editing and open the Rules tab, where the rule ID is displayed (it can also be obtained via the HTTP API):

Well, that's all, now you can make an HTTP request to StartScenarios, which will require a number of parameters, you can use your api_key find out in the Profile section. The query as a result will look something like this:
https://api.voximplant.com/platform_api/StartScenarios/?account_id=1&api_key=eec36d6c-a0eb-46b5-a006-1c2b65343bac&rule_id=55033&script_custom_data=number1%3Anumber2
As a result of success, something in the spirit will come back:
{
	"result" : 1,
	"media_session_access_url" : "http:\/\/1.2.3.4:12092\/request?id=93e41c6e20811b9b.1380201554.0@1.2.3.4&token=36bc7ce95edc679e32d83bb6f3ad985f"
}
Through this media_session_access_url, you can continue to communicate with the session if necessary. To debug the script, the logs are always available, which are located in the Calls section (arrow in the upper right corner), as well as our Uberdebager, available here . For convenience, we uploaded the script from this post on GitHub so that we can quickly experiment.
GitHub Callback Script
Only registered users can participate in the survey. Please come in.
Was this material helpful to you?
- 85.7% Yes 48
- 14.2% No 8