Automated installation of WordPress on VPS using Ansible
- Tutorial
- Recovery mode
Good afternoon, Habr.
Not so long ago, I began to deal with a wonderful tool for any DevOps - Ansible. Today I want to present to your exacting court a small introductory article on the use of this, in many ways, a wonderful tool. So, let's begin.
Ansible is a tool for automating system administrator tasks and more. If in your own words - this is the thing that allows you to automatically configure the server bundles.
Someone will say that it is not needed, because have Chef, Puppet, etc. I absolutely agree with these people. If you can use these tools, great. I am writing this article for those who want to understand a little how Ansible works and how a lot of automation can be done with it.
If you have not experienced Ansible general, I advise you to read the article of Selektel . Great article.
Let's decide what we need to run Wordpress on a VPS server with Ubuntu installed:
In this order, we will write roles for configuring the server.
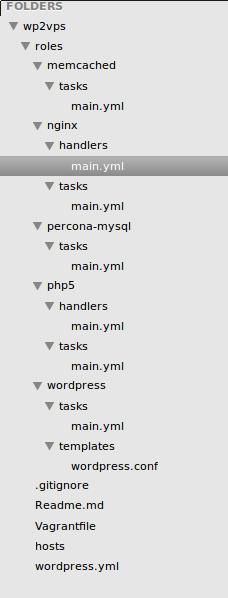
The directory structure for our task will be as follows:
In the roles / nginx / tasks directory, create main.yml with the following contents:
Everything that starts with a new line as "- name" is a separate task for Ansible. We analyze what is written in steps:
In the roles / nginx / handlers directory, create the main.yml file with the following contents:
This is a description of the service for rebooting Nginx. We will need it after installing the config for our Wordpress.
That's all with Nginx. Two simple files will allow us to install the repository into the system, install the web server, remove its default settings and determine the service for rebooting it.
We go further.
I'm used to installing Percona MySQL server. Better or worse - you can argue for a long time. I'm used to it and use it.
The principle is absolutely the same. File roles / percona-mysql / tasks / main.yml:
Now the steps:
We will indicate the variables in the main yml file below. The name of the database, user with a password, etc. will also be indicated there.
Since we do not use Apache, we will use php with php-fpm. To do this, we describe the php5-fpm service in the roles / php5 / handlers / main.yml file:
We will call it after configuring php5-fpm to restart the daemon.
Contents roles / php5 / tasks / main.yml:
The first step is to install the necessary packages. Everything is simple here.
But the second step is more interesting. Let's take a closer look. In Nginx we will use communication with php5-fmp via unix socket. To do this, we need to specify in the config of the www pool of the php5-fpm daemon that he listen to the socket on the path we need. The lineinfile module allows us to do this:
With this service, everything is very simple. You need to install it and that's it. Contents roles / memcached / tasks / main.yml:
Here we will automatically install Wordpress, create a database and nginx configuration for it. Why exactly here? Everything is simple. You can take any role and use it in your other ansible projects. Or create another role and deploy not wordpress, but your own project next to wordpress. Those. it is made for commonplace convenience.
So roles / wordpress / tasks / main.yml:
Now let's go through each item:
Now the Nginx server configuration template roles / wordpress / templates / wordpress.conf:
Describing Nginx configuration principles is a topic for a separate article and not even one. Leave this matter for homework.
In order for Ansible to know what and how to run, we need to write a playbook wordpress.yml:
This file tells Ansible what, on which servers, in what sequence and with what rights to execute.
And it remains for us to describe only the list of servers for installing everything in the hosts file:
The block in the first line indicates the list of hosts that is specified in wordress.yml. Further each server from a new line.
The server domain is the first one.
The second indicates the IP address of the server where Ansible should go over ssh. This parameter is optional if your domain is already configured on the desired server.
The third parameter is the username with which Ansible will login to the server via ssh.
Now you can start the installation:
After finishing work, you can access the server via HTTP and configure Wordpress to work.
The finished recipe can be taken on github .
Hope this helps you a little to automate the routine at work (and at home). Thanks for reading.
Not so long ago, I began to deal with a wonderful tool for any DevOps - Ansible. Today I want to present to your exacting court a small introductory article on the use of this, in many ways, a wonderful tool. So, let's begin.
What is Ansible
Ansible is a tool for automating system administrator tasks and more. If in your own words - this is the thing that allows you to automatically configure the server bundles.
Someone will say that it is not needed, because have Chef, Puppet, etc. I absolutely agree with these people. If you can use these tools, great. I am writing this article for those who want to understand a little how Ansible works and how a lot of automation can be done with it.
If you have not experienced Ansible general, I advise you to read the article of Selektel . Great article.
Maximum automation
Let's decide what we need to run Wordpress on a VPS server with Ubuntu installed:
- Nginx
- Mysql
- PHP5
- Memcached to use the W3Total Cache plugin
- Wordpress
In this order, we will write roles for configuring the server.
The directory structure for our task will be as follows:
Nginx
In the roles / nginx / tasks directory, create main.yml with the following contents:
- name: Add nginx repository
  apt_repository: repo='ppa:nginx/stable'
- name: Install nginx
  action: apt pkg=nginx-extras state=installed update_cache=true
- name: Disable default site
  file:
    path: /etc/nginx/sites-enabled/default
    state: absent
Everything that starts with a new line as "- name" is a separate task for Ansible. We analyze what is written in steps:
- Add the nginx repository (ppa: nginx / stable)
- Install nginx-extras (If necessary, it contains the SPDY module and it can be enabled in the config)
- Delete the symlink to the default config
In the roles / nginx / handlers directory, create the main.yml file with the following contents:
- name: restart nginx
  service:
    name: nginx
    state: restarted
This is a description of the service for rebooting Nginx. We will need it after installing the config for our Wordpress.
That's all with Nginx. Two simple files will allow us to install the repository into the system, install the web server, remove its default settings and determine the service for rebooting it.
We go further.
MySQL
I'm used to installing Percona MySQL server. Better or worse - you can argue for a long time. I'm used to it and use it.
The principle is absolutely the same. File roles / percona-mysql / tasks / main.yml:
- name: Add GPG key for repository
  command: apt-key adv --keyserver keyserver.ubuntu.com --recv CD2EFD2A
- name: Add Percona repository
  shell:
    echo "deb http://repo.percona.com/apt {{ ansible_lsb['codename'] }} main" | tee /etc/apt/sources.list.d/percona.list
    creates=/etc/apt/sources.list.d/percona.list
- name: Install Percona MySQL server
  apt:
    pkg: "{{ item }}"
    update_cache: true
  with_items:
    - percona-server-server-5.5
    - percona-server-client-5.5
    - python-mysqldb
- name: Change root password (fail is not a problem)
  mysql_user:
    name: root
    password: "{{ mysql_root_password}}"
  ignore_errors: yes
Now the steps:
- Add repository key
- We add the repository itself with the verification that the file /etc/apt/sources.list.d/percona.list was created
- Install three packages:
- percona-server-server-5.5
- percona-server-client-5.5
- python-mysqldb (needed to control mysql server from ansible)
- Change the root password to the one specified in the variables (see below)
We will indicate the variables in the main yml file below. The name of the database, user with a password, etc. will also be indicated there.
PHP5
Since we do not use Apache, we will use php with php-fpm. To do this, we describe the php5-fpm service in the roles / php5 / handlers / main.yml file:
- name: restart php5-fpm
  service:
    name: php5-fpm
    state: restarted
We will call it after configuring php5-fpm to restart the daemon.
Contents roles / php5 / tasks / main.yml:
- name: install php5
  apt: pkg={{ item }}
  with_items:
    - php5
    - php5-cgi
    - php5-fpm
    - php5-memcache
    - php5-memcached
    - php5-mcrypt
    - php5-mysql
    - php5-gd
    - php5-curl
    - php5-xmlrpc
- name: change listen socket
  lineinfile:
    dest: '/etc/php5/fpm/pool.d/www.conf'
    insertafter: 'listen = 127.0.0.1:9000'
    line: 'listen = /var/run/fpm.socket'
  notify: restart php5-fpm
The first step is to install the necessary packages. Everything is simple here.
But the second step is more interesting. Let's take a closer look. In Nginx we will use communication with php5-fmp via unix socket. To do this, we need to specify in the config of the www pool of the php5-fpm daemon that he listen to the socket on the path we need. The lineinfile module allows us to do this:
- “Dest” is the way to make edits.
- “Insertafter” - find the line “listen = 127.0.0.1:9000” in the specified file and insert the specified in “line” after it
- “Notify” - Send a notification to the “restart php5-fpm” service (this is why the description of the php5-fpm service was needed)
Memcached
With this service, everything is very simple. You need to install it and that's it. Contents roles / memcached / tasks / main.yml:
- name: install memcached server
  apt:
    pkg: memcached
Wordpress
Here we will automatically install Wordpress, create a database and nginx configuration for it. Why exactly here? Everything is simple. You can take any role and use it in your other ansible projects. Or create another role and deploy not wordpress, but your own project next to wordpress. Those. it is made for commonplace convenience.
So roles / wordpress / tasks / main.yml:
- name: creating database
  mysql_db:
    name: "{{ db_name }}"
    state: "present"
    login_user: "root"
    login_password: "{{ mysql_root_password }}"
- name: creating database user
  mysql_user:
    name: "{{ db_user }}"
    password: "{{ db_password }}"
    priv: "{{ db_name }}.*:ALL"
    state: "present"
    login_user: "root"
    login_password: "{{ mysql_root_password }}"
- name: install nginx configuration
  template:
    src: wordpress.conf
    dest: /etc/nginx/sites-available/wordpress.conf
  notify: restart nginx
- name: activate site configuration
  file:
    src: '/etc/nginx/sites-available/wordpress.conf'
    dest: '/etc/nginx/sites-enabled/wordpress.conf'
    state: 'link'
- name: download WordPress
  get_url:
    url: "{{ download_url }}"
    dest: "/tmp/latest.tar.gz"
- name: creating directory for WordPress
  file:
    path: "{{ wpdirectory }}"
    state: "directory"
    owner: "www-data"
    group: "www-data"
- name: unpack WordPress installation
  shell: "tar xvfz /tmp/latest.tar.gz -C {{ wpdirectory }} && chown -R www-data:www-data {{ wpdirectory }}"
Now let's go through each item:
- We create the database by specifying the connection parameters (root login and password)
- We create a database user with a password, while specifying his rights to the newly created database
- We create the server configuration in Nginx using a pre-prepared template (see below) and send a signal to restart the Nginx service
- We activate the server in Nginx, creating a symlink
- Download the Wordpress version specified in the variables
- Create a directory for Wordpress
- Unpack the downloaded archive and set the necessary rights to files and directories
Now the Nginx server configuration template roles / wordpress / templates / wordpress.conf:
server {
  listen 80 default_server;
  root {{ wpdirectory }}/wordpress;
  index index.php index.html index.htm;
  server_name {{ domain }};
  location / {
    try_files $uri $uri/ /index.php?q=$uri&$args;
  }
  error_page 404 /404.html;
  error_page 500 502 503 504 /50x.html;
  location = /50x.html {
    root /usr/share/nginx/www;
  }
  # pass the PHP scripts to FastCGI server listening on 127.0.0.1:9000
  location ~ \.php$ {
    try_files $uri =404;
    fastcgi_pass unix:/var/run/php5-fpm.sock;
    fastcgi_index index.php;
    include fastcgi_params;
  }
}
server {
  listen 80;
  server_name www.{{ domain }};
  location / {
    return 301 http://{{ domain }};
  }
}
Describing Nginx configuration principles is a topic for a separate article and not even one. Leave this matter for homework.
Putting it together and starting up the installation
In order for Ansible to know what and how to run, we need to write a playbook wordpress.yml:
- hosts: appservers-php
  sudo: yes
  vars:
    - mysql_root_password: "SuperP@S$w0rd"
    - domain: "example.com"
    - download_url: "http://wordpress.org/latest.tar.gz"
    - wpdirectory: "/var/www"
    - db_name: "wordpress"
    - db_user: "wordpress"
    - db_password: "wordpress"
  roles:
  - { role: nginx }
  - { role: percona-mysql }
  - { role: memcached }
  - { role: php5 }
  - { role: wordpress }
This file tells Ansible what, on which servers, in what sequence and with what rights to execute.
- hosts is a list of hosts from the hosts file (see below) on which all actions should be performed;
- sudo - whether to perform all actions from under sudo;
- vars - variables that are used in roles:
- mysql_root_password - what password to set to root user in MySQL
- domain - the domain of the site, which is specified in the nginx configuration
- wpdirectory - in which directory to install Wordpress
- db_ * - relevant parameters for MySQL
- roles - performed tasks (roles)
And it remains for us to describe only the list of servers for installing everything in the hosts file:
[appservers-php]
example.com ansible_ssh_host=10.0.0.2 ansible_ssh_user=ubuntu
The block in the first line indicates the list of hosts that is specified in wordress.yml. Further each server from a new line.
The server domain is the first one.
The second indicates the IP address of the server where Ansible should go over ssh. This parameter is optional if your domain is already configured on the desired server.
The third parameter is the username with which Ansible will login to the server via ssh.
Now you can start the installation:
ansible-playbook -i hosts wordpress.yml -kK
- k - request ssh password.
- K - request sudo password
After finishing work, you can access the server via HTTP and configure Wordpress to work.
The finished recipe can be taken on github .
Hope this helps you a little to automate the routine at work (and at home). Thanks for reading.
Only registered users can participate in the survey. Please come in.
What do you use to automate routine server setup tasks?
- 47.9% Ansible 59
- 14.6% Chef 18
- 12.1% Puppet 15
- 33.3% Self-written scripts 41
- 10.5% Other (indicate in the comments) 13