Iron Budget Habramerka (ZHBK) of karma, habratopik rating and other parameters on arduino + openwrt
Hi Habr!
I present to the public my Iron Budget Habramer.
ZHBK allows you to measure and display the parameters of karma, rating and position in the overall rating. In addition, it compares favorably with software analogues and allows you to monitor a fresh habratopik, showing how many plus, minus, added to your favorites and the total number of views. All this disgrace is implemented on arduin (yes, a dull arduin, but there is a twist here, read on) and the TP-link wr1043nd router with openWRT firmware was used as an Internet gate (Any router that supports openwrt_ will go through the router)
Hands have already been combed to collect such a thing?
We need only a few things, LCD 1602 screen, a variable resistor of any nominal value, arduino pro mini and cheap usb-ttl adapter to pl-2303. A very budget set for creativity. LCD screen - 80 rubles, resistor - for nothing, arduino about mini - 100 rubles, usb-ttl - 30 rubles, experience is priceless.
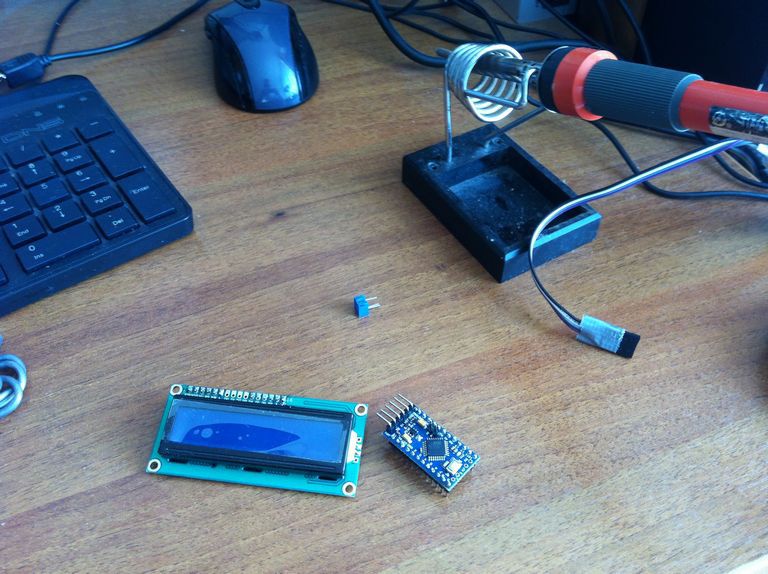
The screen is connected using the standard instructions in pictures found on the Internet, brightness is adjusted, USB is connected.
The second important thing is the router. Everyone will find a list of supported hardware here wiki.openwrt.org/toh/start
The firmware of each router is individual, but it is detailed in the Wiki on the OpenWRT website, so I will not describe it. I note that it’s best to immediately bring the internal UART connector out, and you can bring it back to life, and using putty makes it easier to debug scripts - ALL data is output via the serial port, while not all is visible on ssh. During the tests, I have already restored the firmware several times through the COM + ttftp server. All manuals for working with iron and initial installation are on the site.
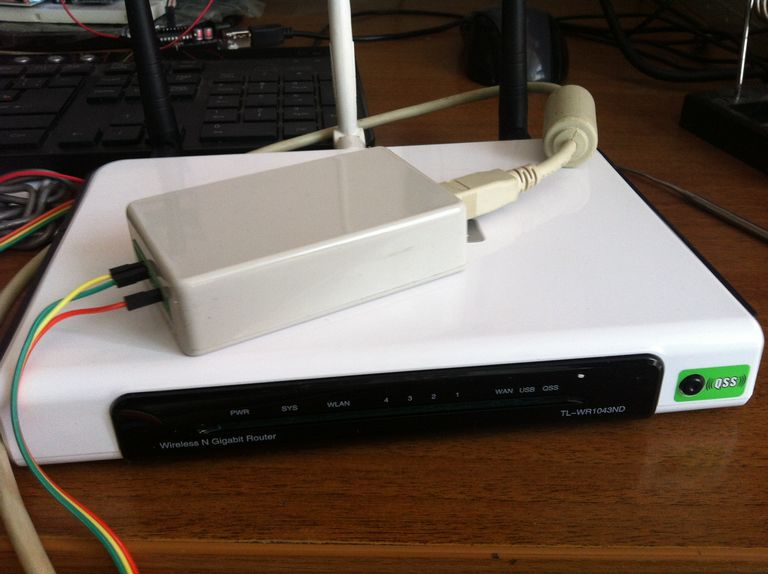
After the firmware we configure the Internet, it is usually enough to insert the cable from the home router into the WAN router with openWRT and the Internet is already in the device. I myself set up the Internet via wi-fi, using the Web interface. Not all firmware has a web interface right away, see the documentation for your router.
So, we’ll assume that half a day has passed, Openwrt is on the router, the Internet is configured on the router, through Putty we have logged in and are ready to execute any commands.
Add the necessary packages. (I had to update wget - the version on the router did not support cookies - more on that later)
If you use another usb adapter for arduins - you will need to put your package under this adapter. As a result of the actions, the device / dev / ttyUSB0 should appear (It may be called differently, it depends on the firmware and the package for the USB-com adapter)
We go into / usr / and create a script, for example up.sh with the following contents (dear Khabrovtsy, in the code you need to remove 0000 (four zeros) - it turned out that the text of the Habratopik is parsed incorrectly due to the presence of triggers on which values were selected, redo laziness so that the Habrameter works, added zeros)
Explanations are needed here.
1) Authorization on Habré is something with something. Without authorization, the data on the habratopik rating, i.e. the guest simply will not see the desired numbers. Therefore, cookies saved from the browser are used after successfully logging into the hub. I used Cookie Exporter 1.5 - an add-on for FF that exports ALL cookies in a format that Wget understands. From the file with all the cookies I deleted everything that does not belong to the hub, the file itself I uploaded through WinSCP to the router in the / usr folder / I highly recommend not transferring my cookies to someone outsiders.
2) Parsing the necessary values is done through awk - a gorgeous thing, but completely alien to the simple user =). For a long time I suffered from awk, made funny crutches, as a result I got the result, I’m sure it can be better, but, for me it works (c)
3) I took the values of karma from an official source, although it was possible to parse in the same way as the data on habratopik.
4) Data is transferred to arduino in a very interesting way! After connecting the arduins via USB to the router, communication on both sides of the port becomes available at a speed of 9600 (didn’t I change this default speed for my package for pl-2303, there is no need) We could send a data line to the arduino, arduino would pars a line and display. But! Successfully stumbled upon this bitlash.net(If anyone sees for the first time, be sure to look, a chic thing.) If in a nutshell - this is an interpreter of commands. Allows you to program arduino through the command line. In my case, transmit the values of the variables and display them on the screen. I advise you to read the docks, for me it was a revelation. Before starting the code, download and install the bitlash library.
Code for arduins
It remains to start the execution of the up.sh script through the crowns, connect the arduino to the router via USB and the habromer is ready!
I present to the public my Iron Budget Habramer.
ZHBK allows you to measure and display the parameters of karma, rating and position in the overall rating. In addition, it compares favorably with software analogues and allows you to monitor a fresh habratopik, showing how many plus, minus, added to your favorites and the total number of views. All this disgrace is implemented on arduin (yes, a dull arduin, but there is a twist here, read on) and the TP-link wr1043nd router with openWRT firmware was used as an Internet gate (Any router that supports openwrt_ will go through the router)
Hands have already been combed to collect such a thing?
We need only a few things, LCD 1602 screen, a variable resistor of any nominal value, arduino pro mini and cheap usb-ttl adapter to pl-2303. A very budget set for creativity. LCD screen - 80 rubles, resistor - for nothing, arduino about mini - 100 rubles, usb-ttl - 30 rubles, experience is priceless.
The screen is connected using the standard instructions in pictures found on the Internet, brightness is adjusted, USB is connected.
The second important thing is the router. Everyone will find a list of supported hardware here wiki.openwrt.org/toh/start
The firmware of each router is individual, but it is detailed in the Wiki on the OpenWRT website, so I will not describe it. I note that it’s best to immediately bring the internal UART connector out, and you can bring it back to life, and using putty makes it easier to debug scripts - ALL data is output via the serial port, while not all is visible on ssh. During the tests, I have already restored the firmware several times through the COM + ttftp server. All manuals for working with iron and initial installation are on the site.
After the firmware we configure the Internet, it is usually enough to insert the cable from the home router into the WAN router with openWRT and the Internet is already in the device. I myself set up the Internet via wi-fi, using the Web interface. Not all firmware has a web interface right away, see the documentation for your router.
So, we’ll assume that half a day has passed, Openwrt is on the router, the Internet is configured on the router, through Putty we have logged in and are ready to execute any commands.
Add the necessary packages. (I had to update wget - the version on the router did not support cookies - more on that later)
opkg update
opkg install wget
opkg install kmod-usb-acm
opkg install kmod-usb-serial-pl2303
If you use another usb adapter for arduins - you will need to put your package under this adapter. As a result of the actions, the device / dev / ttyUSB0 should appear (It may be called differently, it depends on the firmware and the package for the USB-com adapter)
We go into / usr / and create a script, for example up.sh with the following contents (dear Khabrovtsy, in the code you need to remove 0000 (four zeros) - it turned out that the text of the Habratopik is parsed incorrectly due to the presence of triggers on which values were selected, redo laziness so that the Habrameter works, added zeros)
Hidden text
wget --load-cookies  /usr/cookies.txt -U "User-Agent: Mozilla/5.0 (Windows NT 6.1; WOW64; rv:28.0) Gecko/20100101 Firefox/28.0" http://habrahabr.ru/post/220893/ -O /tmp/index.html
awk -F ';' '/&ua0000rr;/ {print substr($2,0,index($2," " ))}' /tmp/index.html>/usr/up.txt
UP=`awk 'NR == 1' /usr/up.txt`
echo 'u='$UP > /dev/ttyUSB0
awk -F ';' '/&ua0000rr;/ {print substr($3,0,5)}' /tmp/index.html>/usr/down.txt
sed 's/\"/ /g' /usr/down.txt>/usr/down2.txt
DOWN=`awk 'NR == 1{print$1}' /usr/down2.txt`
echo 'd='$DOWN > /dev/ttyUSB0
VW=`awk -F '>' '/pageviews/ {print substr($2,0,index($2,"<" )-1)}' /tmp/index.html`
echo 'v='$VW > /dev/ttyUSB0
FW=`awk -F '>' '/favs_count/ {print substr($2,0,index($2,"<" )-1)}' /tmp/index.html`
echo 'f='$FW > /dev/ttyUSB0
wget http://habrahabr.ru/api/profile/romanvl/ -O /tmp/index2.html
KARMA=`awk -F '>' '/karma/ {print int(substr($2,0,index($2,"<" )-1))}' /tmp/index2.html`
echo 'k='$KARMA > /dev/ttyUSB0
RATE=`awk -F '>' '/rating>/ {print int(substr($2,0,index($2,"<" )-1))}' /tmp/index2.html`
echo 'r='$RATE > /dev/ttyUSB0
POS=`awk -F '>' '/ratingPosition/ {print substr($2,0,index($2,"<" )-1)}' /tmp/index2.html`
echo 'p='$POS > /dev/ttyUSB0
Explanations are needed here.
1) Authorization on Habré is something with something. Without authorization, the data on the habratopik rating, i.e. the guest simply will not see the desired numbers. Therefore, cookies saved from the browser are used after successfully logging into the hub. I used Cookie Exporter 1.5 - an add-on for FF that exports ALL cookies in a format that Wget understands. From the file with all the cookies I deleted everything that does not belong to the hub, the file itself I uploaded through WinSCP to the router in the / usr folder / I highly recommend not transferring my cookies to someone outsiders.
2) Parsing the necessary values is done through awk - a gorgeous thing, but completely alien to the simple user =). For a long time I suffered from awk, made funny crutches, as a result I got the result, I’m sure it can be better, but, for me it works (c)
3) I took the values of karma from an official source, although it was possible to parse in the same way as the data on habratopik.
4) Data is transferred to arduino in a very interesting way! After connecting the arduins via USB to the router, communication on both sides of the port becomes available at a speed of 9600 (didn’t I change this default speed for my package for pl-2303, there is no need) We could send a data line to the arduino, arduino would pars a line and display. But! Successfully stumbled upon this bitlash.net(If anyone sees for the first time, be sure to look, a chic thing.) If in a nutshell - this is an interpreter of commands. Allows you to program arduino through the command line. In my case, transmit the values of the variables and display them on the screen. I advise you to read the docks, for me it was a revelation. Before starting the code, download and install the bitlash library.
Code for arduins
Hidden text
#include "bitlash.h"
#include
LiquidCrystal lcd(12, 11, 5, 4, 3, 2);
byte UP[8] = {
0b00100,
0b01010,
0b10001,
0b11011,
0b01010,
0b01010,
0b01010,
0b01110
};
byte DWN[8] = {
0b01110,
0b01010,
0b01010,
0b01010,
0b11011,
0b10001,
0b01010,
0b00100
};
byte FW[8] = {
0b00100,
0b10101,
0b11111,
0b01110,
0b01110,
0b11011,
0b10001,
0b00000
};
byte VW[8] = {
0b00000,
0b00000,
0b01110,
0b10001,
0b10101,
0b10001,
0b01110,
0b00000
};
void setup(void) {
lcd.createChar(0, UP);
lcd.createChar(1, DWN);
lcd.createChar(2, FW);
lcd.createChar(3, VW);
initBitlash(9600);
lcd.begin(16, 2);
}
void loop(void) {
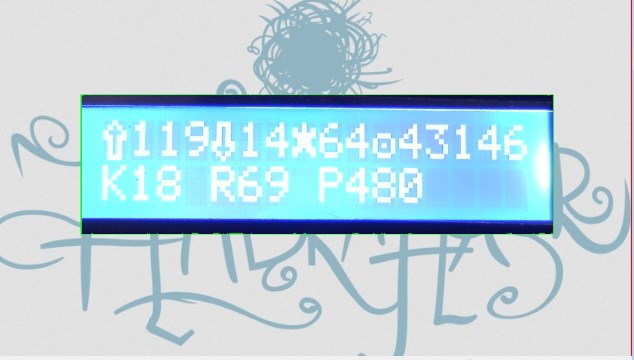
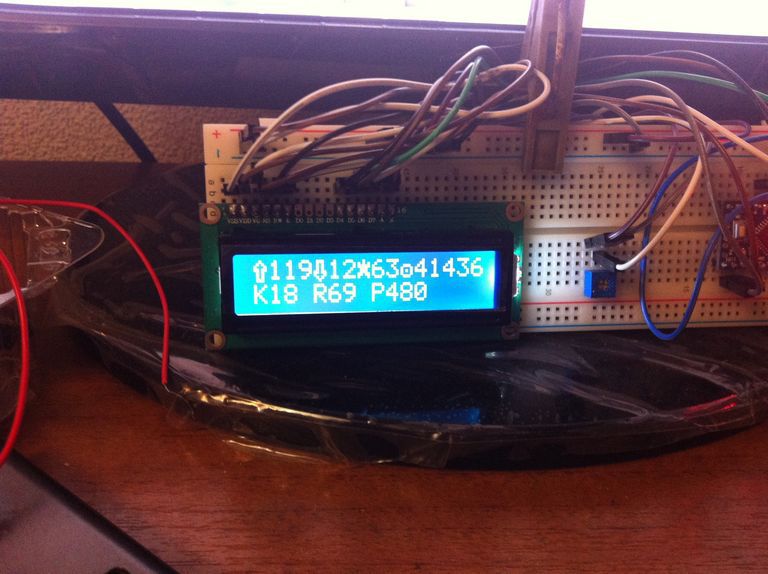
lcd.setCursor(0,0);
// lcd.print("U");
lcd.write((uint8_t)0);
lcd.print(getVar(20));
// lcd.print("D");
lcd.write((uint8_t)1);
lcd.print(getVar(3));
// lcd.print("F");
lcd.write((uint8_t)2);
lcd.print(getVar(5));
//lcd.print("V");
lcd.write((uint8_t)3);
lcd.print(getVar(21));
lcd.setCursor(0, 1);
lcd.print("K");
lcd.print(getVar(10));
lcd.print(" R");
lcd.print(getVar(17));
lcd.print(" P");
lcd.print(getVar(15));
runBitlash();
}
It remains to start the execution of the up.sh script through the crowns, connect the arduino to the router via USB and the habromer is ready!