Sample Transpose Quality in Ableton Live 8 Instruments and Free Plugins
Did you notice, after adjusting the pitch of the sample loaded in the sampler or drum machine, that dirt and dissonance harmonics have been added? Such degradation of sound occurs when the sampling frequency changes, which inevitably occurs when transposing or warping an audio file, and is associated with the aliasing effect - the reflection of the spectral components from the Nyquist frequency. To avoid this, interpolation and filtering algorithms are used.
In this article, using an elementary test, we compare such algorithms in the Impulse, Simpler, Sampler tools and the Ableton Live 8 sequencer itself, as well as with some popular free Vst plugins.
Experimental technique
The experiment was conducted on a Lenovo R500 laptop: Intel Core 2 Duo T8570 processor, 2 Gb RAM. The sampling rate in the settings for Ableton Live, the test sample, and the exported file is 44100 Hz. The test file is a sinusoidal signal at a frequency of 15 kHz, a bit width of 16 bits, which is loaded into the sampler, is tied to the C3 note, and the playback area extends to the entire keyboard range. Each tested sampler plays the same MIDI sequence - gamma C major by two octaves up, and then two down from C3. In the case of loading a sample onto the audio track of a sequencer or Impulse, by automating the tune parameter, an equivalent sequence is played with synchronization of the start of the sample and the corresponding midi note of the sequence. The output volumes of the tested tracks are set with an accuracy of ± 0, 1 dB, with such a margin that there is no overload on the master channel. Sound files resulting from playing a MIDI sequence or equivalent to each instrument in solo mode are exported with 24-bit resolution and loaded into Adobe Audition. In the spectral frequency display mode, spectrograms are compared, showing the change in the sound spectrum with time. The readings of the CPU utilization indicator in Ableton Live when this or that tool is running are shown in the results. showing the change in sound spectrum over time. The readings of the CPU utilization indicator in Ableton Live when this or that tool is running are shown in the results. showing the change in sound spectrum over time. The readings of the CPU utilization indicator in Ableton Live when this or that tool is running are shown in the results.
Results and its discussion
For comparison, the ideal sound is taken, and, accordingly, the export spectrogram from the DiscoDSP HighLife sampler in mastering mode. The black background (lack of noise) corresponds to ideality, at each moment of time only one frequency is visible and audible, with the exception of frequencies exceeding half the sampling frequency - they should not be. Unfortunately, this ideality has its drawbacks, as it is intended only for export. I tried in real time to play a test sequence of notes. The CPU utilization indicator is up to 380%. I did not think that this happens.
Now imagine that we loaded percussion samples into Impulse or into Drum Rack, which uses Simpler, and tried and changed a bit of their pitch. The result is obvious, judging by the spectrograms, and by ear, noticeable distortions will appear. Impulse is a little worse, as it slightly spreads the spectrum of the sample. Apparently this is why Ableton developers recommend using Drum Rack instead of Impulse.
Well, we will use Drum Rack, and it seems that every Simpler located in its cell can be converted to Sampler. In this case, it will be possible to set the interpolation algorithm. By default, it takes the value normal, which, as the test shows, corresponds to Simpler. Switching to Good mode provided improvements, but the hearing distortion is still noticeable. The Best algorithm pleased almost inaudible distortions, on a complex signal, they will be invisible than in comparison with a pure sine wave. The absence of an interpolation algorithm can be an effective creative tool for creating glitches and dissonant dirty digital textures, but not for high-quality reproduction of a transposed sample.
The algorithm for interpolating the audio track of the sequencer in the HQ On mode turned out to be interesting, it is more favorable by ear than the Best Samplera algorithm, and as you can see in the spectrogram, it is noticeably different: weaker tones reflected from the Nyquist frequency, but at the same time higher background noise, which additionally disguises, but adds general dirt.
It is worth noting that the two-core laptop six years ago did not notice an increase in the load on the processor, and in all cases the indicator did not exceed the 7% barrier, which confirms the positioning of Live as a tool for live performance. The second purely personal conclusion is that it is better to use the audio track directly to download samples than any native program tool. Of course, if there is no goal to noticeably change its sound using ADSR amplitude, pitch, filter, frequency modulation (present in Sampler), etc. ... But you can achieve a cleaner sound using third-party tools, which we will go over to review.
Probably the first most popular on the network is the Cakewalk Sfz + plugin, positioned for downloading from SoundFont banks. It has been distributed for free for a long time (the version number of the program is 1.0). Apparently, the “greats” knew a lot about aliasing, in the era of computers that are quite primitive from our point of view. Therefore, Sfz + has nine levels of complexity of the sample algorithm, and a weak processor can handle the simplest. Nowadays, you can safely use the option "quality: 72", which corresponds to the highest quality playback, the result of its action is shown in the figure. It does not reach the ideal a bit (DiscoDSP HighLife in mastering mode), but by ear everything is fine. The disadvantage of Sfz + is the presence of only basic tools for working with the sample, among which there is no possibility of setting the place of its start, loop points and options for playing. There are also problems using the plugin on 64 bit OS.
DiscoDSP HighLife is a role model in our tests. The second bounce mode interpolation algorithm is not much inferior in quality, but it is also difficult to use it in real time due to the heavy load on the processor. The “realtime mode” algorithm, judging by the spectrograms, coincides with the “good” algorithm in Sampler. The functionality of the plugin is slightly wider than that of Sfz +.
Next contender: Vember Audio Shorcircuit 1. Distortion is not heard during transposition and, judging by the spectrogram, its algorithm takes place somewhere between the ideal and the Good Sampler algorithm. The plugin has a huge set of filters of excellent quality, which even Native Instrument's Kontakt cannot boast of. The interface is very simple and easy to learn. Almost a barrel of honey, if not a fly in the ointment, which can be read onuser forum . This plugin gives a delay and eats the sample attack. And in version 1.0.15 this was not (so if you know where to get this particular version and are ready to share it, I will be very grateful to you). But it is worth noting that the delay of about 32 samples is not critical. In Live, this can be compensated. The greased attack cannot be fixed, but it is not noticeable by ear. The next version of Shorcircuit 2, pleased with an improved graphical interface. Tests showed that there was no smeared attack, but the delay was still in place. It is a pity that the developers left this beautiful thing unfinished. By the way, if I'm not mistaken, then one of the developers of this sampler was in the Ableton team, and now he is in a new collaboration working on a project with a similar ideological approach, but with some additional and very convenient functions:bitwig.com .
Conclusion
I hope that this article will help in creating better-sounding phonograms and in no case will become an object for disputes and regular holivars on the topic of plug-ins and music software.
If you want more comparisons with other samplers, then in the end there will be links to the methodology and results that are not reflected in this article. It is not practical to do tests of all existing plug-ins, and some are deliberately not included in the article (for example, Kontakt and Battery), because I want to encourage the reader to conduct the experiment himself. To do this, just load the 15 kHz sine or any high-frequency audio file into your favorite sampler and run two octaves up the keys. Your hearing will not fail.
Those who carefully examined the spectrograms noticed that when transposing the sample to an octave, it leads to less distortion, because the interpolation algorithm is simplified due to a change in the sampling frequency of the sample in a multiple of two times the number of times. If the sampling rate of the sample and in the program settings do not match, this effect will disappear, and in general the test results will be worse. The solution may be to use codecs for offline conversion of the sampling rate of audio files before using them in the project. There are many tools to do this, and one of the best is the free plugin from Voxengo r8brain free .
I want to encourage the study of the math part, at least at the level at which it is available to you, those who have not yet dealt with it (this is common among digital composers). You should start with the Nyquist theorem and read the manual for software, or other documents, such as Ableton's “Audio Engine Fact Sheet”, which describe the operations that lead to sound degradation. Having the appropriate knowledge will avoid undesirable sound degradation when creating compositions.
Pure sound to you!
Reference
Methods and tests samplers:
www.discodsp.com/highlife/aliasing
jeskola.net/xs1/content/test
www.maz-sound.de/resampling
www.simonv.com/tutorials/quality.php
Methodology and test results of algorithms for converting the sampling rate of programs for working with audio:
src.infinitewave.ca
Mat part:
www.digital-recordings.com/publ/pubneq.html - Nyquist theorem in the context of sound application
en.wikipedia.org/wiki/ Aliasing - aliasing
kunz.corrupt.ch/dsp - something else useful for digital synthesis and creating effects for the savvy
In this article, using an elementary test, we compare such algorithms in the Impulse, Simpler, Sampler tools and the Ableton Live 8 sequencer itself, as well as with some popular free Vst plugins.
Experimental technique
The experiment was conducted on a Lenovo R500 laptop: Intel Core 2 Duo T8570 processor, 2 Gb RAM. The sampling rate in the settings for Ableton Live, the test sample, and the exported file is 44100 Hz. The test file is a sinusoidal signal at a frequency of 15 kHz, a bit width of 16 bits, which is loaded into the sampler, is tied to the C3 note, and the playback area extends to the entire keyboard range. Each tested sampler plays the same MIDI sequence - gamma C major by two octaves up, and then two down from C3. In the case of loading a sample onto the audio track of a sequencer or Impulse, by automating the tune parameter, an equivalent sequence is played with synchronization of the start of the sample and the corresponding midi note of the sequence. The output volumes of the tested tracks are set with an accuracy of ± 0, 1 dB, with such a margin that there is no overload on the master channel. Sound files resulting from playing a MIDI sequence or equivalent to each instrument in solo mode are exported with 24-bit resolution and loaded into Adobe Audition. In the spectral frequency display mode, spectrograms are compared, showing the change in the sound spectrum with time. The readings of the CPU utilization indicator in Ableton Live when this or that tool is running are shown in the results. showing the change in sound spectrum over time. The readings of the CPU utilization indicator in Ableton Live when this or that tool is running are shown in the results. showing the change in sound spectrum over time. The readings of the CPU utilization indicator in Ableton Live when this or that tool is running are shown in the results.
Results and its discussion
| Ableton Live 8 Tools | Free Vst Samplers |
Sampler: algorithm best CPU <7%  Sampler: algorithm good CPU <7%  Sampler: algorithm normal CPU <7% (same as in Simpler and Sequencer the HQ algorithm is disabled)  Sampler: algorithm no interpolation CPU <7%  Impulse CPU <7%  Sequencer: HQ algorithm enabled CPU <7%  | DiscoDSP: mastering CPU algorithm> 350% 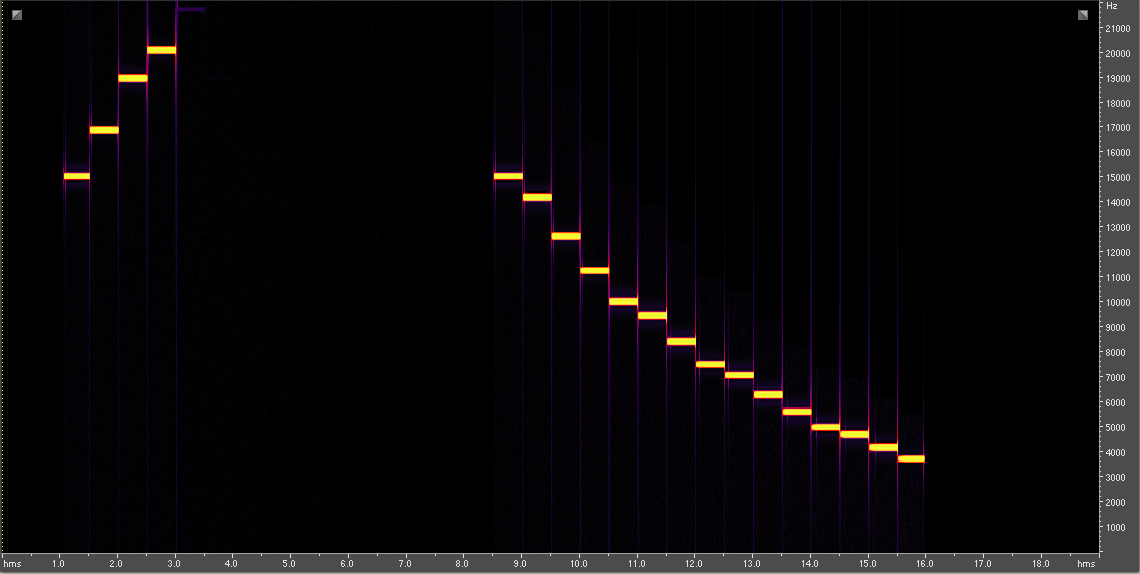 DiscoDSP: bounce CPU algorithm> 50%  DiscoDSP: realtime CPU algorithm <7%  Cakewalk (rgc audio) Sfz +: algorithm 72 CPU <7%  Vember audio Shortcircuit 1 CPU <7%  |
For comparison, the ideal sound is taken, and, accordingly, the export spectrogram from the DiscoDSP HighLife sampler in mastering mode. The black background (lack of noise) corresponds to ideality, at each moment of time only one frequency is visible and audible, with the exception of frequencies exceeding half the sampling frequency - they should not be. Unfortunately, this ideality has its drawbacks, as it is intended only for export. I tried in real time to play a test sequence of notes. The CPU utilization indicator is up to 380%. I did not think that this happens.
Now imagine that we loaded percussion samples into Impulse or into Drum Rack, which uses Simpler, and tried and changed a bit of their pitch. The result is obvious, judging by the spectrograms, and by ear, noticeable distortions will appear. Impulse is a little worse, as it slightly spreads the spectrum of the sample. Apparently this is why Ableton developers recommend using Drum Rack instead of Impulse.
Well, we will use Drum Rack, and it seems that every Simpler located in its cell can be converted to Sampler. In this case, it will be possible to set the interpolation algorithm. By default, it takes the value normal, which, as the test shows, corresponds to Simpler. Switching to Good mode provided improvements, but the hearing distortion is still noticeable. The Best algorithm pleased almost inaudible distortions, on a complex signal, they will be invisible than in comparison with a pure sine wave. The absence of an interpolation algorithm can be an effective creative tool for creating glitches and dissonant dirty digital textures, but not for high-quality reproduction of a transposed sample.
The algorithm for interpolating the audio track of the sequencer in the HQ On mode turned out to be interesting, it is more favorable by ear than the Best Samplera algorithm, and as you can see in the spectrogram, it is noticeably different: weaker tones reflected from the Nyquist frequency, but at the same time higher background noise, which additionally disguises, but adds general dirt.
It is worth noting that the two-core laptop six years ago did not notice an increase in the load on the processor, and in all cases the indicator did not exceed the 7% barrier, which confirms the positioning of Live as a tool for live performance. The second purely personal conclusion is that it is better to use the audio track directly to download samples than any native program tool. Of course, if there is no goal to noticeably change its sound using ADSR amplitude, pitch, filter, frequency modulation (present in Sampler), etc. ... But you can achieve a cleaner sound using third-party tools, which we will go over to review.
Probably the first most popular on the network is the Cakewalk Sfz + plugin, positioned for downloading from SoundFont banks. It has been distributed for free for a long time (the version number of the program is 1.0). Apparently, the “greats” knew a lot about aliasing, in the era of computers that are quite primitive from our point of view. Therefore, Sfz + has nine levels of complexity of the sample algorithm, and a weak processor can handle the simplest. Nowadays, you can safely use the option "quality: 72", which corresponds to the highest quality playback, the result of its action is shown in the figure. It does not reach the ideal a bit (DiscoDSP HighLife in mastering mode), but by ear everything is fine. The disadvantage of Sfz + is the presence of only basic tools for working with the sample, among which there is no possibility of setting the place of its start, loop points and options for playing. There are also problems using the plugin on 64 bit OS.
DiscoDSP HighLife is a role model in our tests. The second bounce mode interpolation algorithm is not much inferior in quality, but it is also difficult to use it in real time due to the heavy load on the processor. The “realtime mode” algorithm, judging by the spectrograms, coincides with the “good” algorithm in Sampler. The functionality of the plugin is slightly wider than that of Sfz +.
Next contender: Vember Audio Shorcircuit 1. Distortion is not heard during transposition and, judging by the spectrogram, its algorithm takes place somewhere between the ideal and the Good Sampler algorithm. The plugin has a huge set of filters of excellent quality, which even Native Instrument's Kontakt cannot boast of. The interface is very simple and easy to learn. Almost a barrel of honey, if not a fly in the ointment, which can be read onuser forum . This plugin gives a delay and eats the sample attack. And in version 1.0.15 this was not (so if you know where to get this particular version and are ready to share it, I will be very grateful to you). But it is worth noting that the delay of about 32 samples is not critical. In Live, this can be compensated. The greased attack cannot be fixed, but it is not noticeable by ear. The next version of Shorcircuit 2, pleased with an improved graphical interface. Tests showed that there was no smeared attack, but the delay was still in place. It is a pity that the developers left this beautiful thing unfinished. By the way, if I'm not mistaken, then one of the developers of this sampler was in the Ableton team, and now he is in a new collaboration working on a project with a similar ideological approach, but with some additional and very convenient functions:bitwig.com .
Conclusion
I hope that this article will help in creating better-sounding phonograms and in no case will become an object for disputes and regular holivars on the topic of plug-ins and music software.
If you want more comparisons with other samplers, then in the end there will be links to the methodology and results that are not reflected in this article. It is not practical to do tests of all existing plug-ins, and some are deliberately not included in the article (for example, Kontakt and Battery), because I want to encourage the reader to conduct the experiment himself. To do this, just load the 15 kHz sine or any high-frequency audio file into your favorite sampler and run two octaves up the keys. Your hearing will not fail.
Those who carefully examined the spectrograms noticed that when transposing the sample to an octave, it leads to less distortion, because the interpolation algorithm is simplified due to a change in the sampling frequency of the sample in a multiple of two times the number of times. If the sampling rate of the sample and in the program settings do not match, this effect will disappear, and in general the test results will be worse. The solution may be to use codecs for offline conversion of the sampling rate of audio files before using them in the project. There are many tools to do this, and one of the best is the free plugin from Voxengo r8brain free .
I want to encourage the study of the math part, at least at the level at which it is available to you, those who have not yet dealt with it (this is common among digital composers). You should start with the Nyquist theorem and read the manual for software, or other documents, such as Ableton's “Audio Engine Fact Sheet”, which describe the operations that lead to sound degradation. Having the appropriate knowledge will avoid undesirable sound degradation when creating compositions.
Pure sound to you!
Reference
Methods and tests samplers:
www.discodsp.com/highlife/aliasing
jeskola.net/xs1/content/test
www.maz-sound.de/resampling
www.simonv.com/tutorials/quality.php
Methodology and test results of algorithms for converting the sampling rate of programs for working with audio:
src.infinitewave.ca
Mat part:
www.digital-recordings.com/publ/pubneq.html - Nyquist theorem in the context of sound application
en.wikipedia.org/wiki/ Aliasing - aliasing
kunz.corrupt.ch/dsp - something else useful for digital synthesis and creating effects for the savvy