Building the server: from ordering components to testing
What happens when our client orders an arbitrary configuration server? How reliable are tailor-made servers? Today we will discuss these and other issues in detail in a new article.
Server order
Despite the fact that there are several dozens of different configurations in the section available for ordering servers, some clients require special configuration servers. Most often this is necessary to create a server with very high performance or with a large number of disk drives.
To satisfy such a need, the service “ Dedicated server of arbitrary configuration ” was provided . The configurator on the site allows you to create a server of any complexity and rent it in a couple of minutes. However, few people think exactly how these servers are going.
After the client has decided on the desired configuration, placed an order and paid for it, the system automatically creates a ticket in the control panel. Such a ticket goes to the assembly department, and the experts proceed to checking the order and, in fact, the actual assembly of the server.
Assembly process
Order check
The configurator on the site most often chooses the “right” version of the components, but in some cases, customers may not choose the most optimal combination of hardware components. For example, a RAID controller that cannot deliver maximum performance in such a configuration, or an odd number of rails of RAM in multiprocessor systems. Therefore, the engineers first check the order and in the event of identifying potential problems, they will necessarily warn the customer on the ticket.
If the client agrees that the configuration is not optimal, you can easily cancel the order and create a new one. Cash at cancellation is returned to the balance of the control panel in full. After the order is checked, we proceed to the preparation of components and the assembly of the server.
Accessories
Each server consists of the following components:
- housing (comes immediately with the power supply);
- motherboard ;
- random access memory ;
- processors ;
- drives ;
- disk controllers (if there is an order);
- video cards (if there is an order).
The engineer responsible for the assembly prepares all the components and records them in the accounting system, using the serial numbers as identifiers. Now we will tell about all the stages that each server of an arbitrary configuration goes through.
Body preparation
We usually use Supermicro enclosures, which should be prepared for the installation of the motherboard with the help of supplied hardware. Different motherboard models have different attachment points, so the number of hardware and bolts for each specific assembly should be determined.
While the number of orders was small, we simply took a set of fasteners designed for the hull, and unused fasteners were put off. At a certain point, it became clear that a very long time was being spent on finding the right bolt and we decided to put up all the fasteners that are in stock.
 Prepackaged fasteners
After the last package with fasteners was packaged, it became clear that we had not done this work in vain. Now, every bolt and every hardware lies in a strictly designated place and this saves a huge amount of time.
To ensure that the contacts of the motherboard are not in contact with the metal case and there is no short circuit, use a special plastic layer. Without it, the assembly is prohibited. In addition, it is necessary to carefully break off (yes, this is provided by the manufacturer) the holes for the ports in the plug from the back of the server. Performed elementary with a flat screwdriver.
After that, stickers with the order identifier and the serial number of the future server are put on the case. For convenience, in addition to the alphanumeric identifier on the label contains bar codes that allow you to quickly read the information using a scanner.
Motherboard installation
Immediately before installing the motherboard, engineers perform some preparatory actions:
- wear thin gloves;
- put on a grounding bracelet.
First of all, it is necessary not to hurt your hands. The most frequent injury is cuts. The grounding bracelet will not allow accidental damage to the electronic components of the board due to static electricity.
After the motherboard has been put in place, the fastening bolts are tightened. It should be remembered that the textolite is quite fragile, and do not make excessive efforts. To save time, engineers use cordless screwdrivers.
Now the power cables and cooling fans are connected to the motherboard. The important thing here is that sometimes the length of the cables is longer than necessary, so they are carefully tied down with the help of thin nylon ties. In the absence of the possibility to fasten the ties to the body, the manufacturer supplies convenient fastening platforms on double-sided adhesive tape. The ends are carefully bite off with side cutters.
Then the front panel and backplane are connected using appropriate cables. Now you can begin to install processors and other elements.
Processor installation
This operation is perhaps the most subtle and demanding care. Just 10 years ago, the processors had comfortable legs, and the sockets were a plastic matrix with holes. Because of this, it was enough just to gently insert the processor into the socket and close the latch. Starting with the socket LGA 775 processors have lost the "legs", there were only flat contact pads. Sockets, on the contrary, now have contacts, but they are so small and fragile that any operation with the installation of the processor must be as accurate as possible.
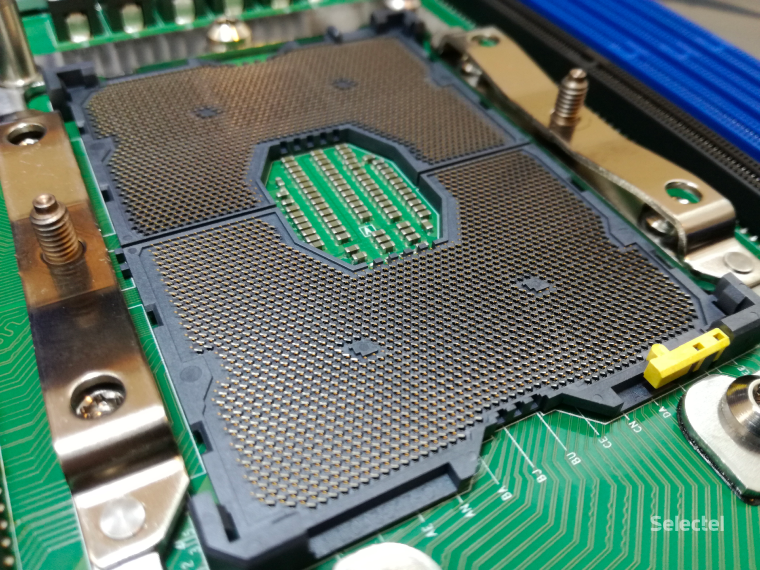 Modern socket FCLGA3647
 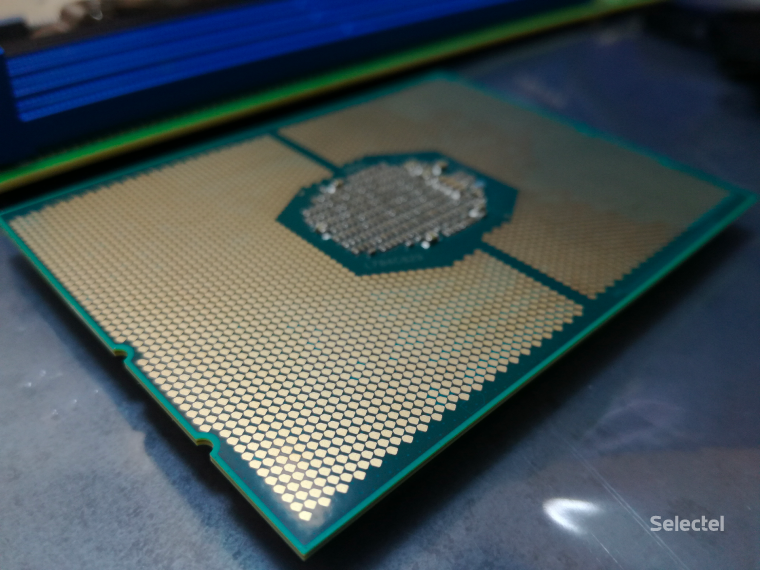 Intel Xeon Scalable processor line
After the processors are installed in their places comes the turn of the installation of cooling radiators. As a rule, passive radiators are used, but before that thermal grease is applied - a layer of thermally conductive material separating the processor and radiator. Most often for this purpose use silicone paste, such as KPT-8.
It should be remembered here that the main task of thermal paste is to close microscopic defects both on the surface of the processor and on the surface of the radiator, ensuring the largest contact area. Therefore, it is applied in a very thin and even layer. To do this, use either a special spatula, or in the old manner an unnecessary plastic card. Excess cleaned with cotton swabs.
Install RAM
Each motherboard manufacturer independently determines the correct order for installing RAM modules, depending on its type and speed. For Supermicro, this installation procedure is specified in the instructions for each motherboard model. Nevertheless, there are some fairly universal rules that work in most cases:
- It is undesirable to use an odd number of slats (relevant for Intel Xeon processors of the E5 line);
- memory should be allocated per channel so that the system can use all possible modes of control mechanisms;
- in one server, it is desirable to use memory with the same latency, voltage and frequency , in the range supported by the motherboard.
Before installation, engineers check that there are no foreign particles of dust or paper in the slots. If necessary, use compressed air for cleaning.
Drive installation
It's simple. Disk drives are fixed in a regular sled, and then inserted into the server. If disk controllers or additional network cards were ordered, they are installed in the appropriate PCI-E slots and secured with screws. After everything is set into place, the assembly department engineer once again checks the conformity of all components to the order and sends the server to the stand for firmware and testing.
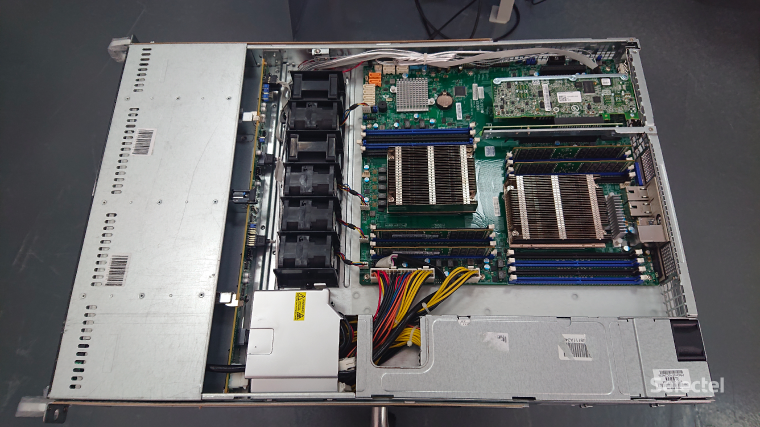
Cable management
Let's touch on a topic like cable management inside the server. Here, too, has its own nuances, the main of which is the limited space. Most servers are designed to take up minimal rack space. The height of one mounting unit is 43.7 mm. Because of this, space for cables after installing the motherboard and other peripherals remains quite small.
Fun fact: one mounting unit in height is exactly equal to one inch (Old Russian unit of length).
It should always be borne in mind that the air must pass through the server unhindered to effectively cool the components. Any obstacles in its path will worsen heat dissipation and, consequently, increase power consumption due to the increased load on the cooling system. This is especially important for servers with multiple GPUs, the temperature of which under load reaches 80 degrees.
 The air flow is divided equally between all GPUs.
Therefore, all cables are laid so as not to block the air path. The excess with the help of screeds are fixed to the standard eyelets, and in case of their absence, to plastic pads with double-sided tape.
 Cables are laid so as not to interfere with the passage of air flow.
Firmware components
To begin with, let's answer a frequently asked question - why is this necessary? The answer is simple - this procedure is necessary for all server components to work without errors, as well as to increase the level of security.
Most server components are built with the expectation that they can be reprogrammed. After leaving the assembly line, in the process of testing and operation, in most cases errors and software vulnerabilities are detected. If the possibility of reprogramming the components were not envisaged, then to eliminate these software problems would have to withdraw all products. Much cheaper was to create the possibility of replacing the firmware.
Flashing IPMI
The remote control module (IPMI / iLO / iDrac) is one of the most important server elements. It is an independent microcomputer that works whenever there is an operating voltage on the motherboard.
Even when there are no components in the server, this microcomputer works by performing the task of interpreting and correcting data from the server's sensors. The module is closely connected with all power management subsystems and allows you to perform almost any operation remotely. Therefore, the issue of security when accessing such a device is very serious. Timely firmware update allows you to save the module from hacking.
Installing the firmware is usually done directly from the web interface, but in some cases it can be done over the network by sending firmware to the module with the appropriate software.
Flashing BIOS
The basic I / O system, in addition to the security reasons already listed, requires updating for another important point. The BIOS firmware contains microcodes for processors supported by the motherboard, as well as microcodes for network interfaces and chipsets. When a new version of the processor comes out, motherboard manufacturers release new versions of firmware that contain the required microcode. Without this, the new processor will simply not be able to start.
In addition, the release of new firmware prevents conflicts arising from the interaction of various components (both embedded in the motherboard and third-party devices). Together with the BIOS firmware, the related modules are often updated, for example, Intel ME (Management Engine).
In order not to be unfounded, we give an example. Take the Supermicro X10SRi / X10DRi / X10DRW motherboards, which support Intel Xeon E5-XXXXv3 processors. If you put in a processor of the next version of E5-XXXXv4, the board starts, however, it will give out strange errors in the failure memory “Failing DIMM” in different slots. And the problem here is not at all in the memory, but in the fact that the memory controller is located in the processor. Therefore, incorrect recognition of the processor by the motherboard leads to the fact that such problems arise. Re-flashing using a supported processor completely solves this situation.
In some cases, hardware manufacturers artificially stop supporting newer motherboard models with older hardware. A prime example is the Supermicro X11DPi motherboard, which with any BIOS firmware version will not work with Adaptec 7th series HBA controllers . The disk controller is simply not initialized, causing the server to completely hang. And at the moment this problem has no solution.
Flashing Disk Controllers
Errors in the software of important devices such as disk controllers can not only cause trouble, but also become a source of very large problems. In most cases, the process is very simple, flashing occurs using a native utility built directly into the controller itself.
It should be remembered that the old firmware of the disk controller can not only correct errors, but also drastically change the way metadata is stored. To avoid unpleasant situations and keep the data intact, you should read the list of the changes made to the functionality before performing the flashing. This information is always present on the site of the equipment manufacturer and is most often duplicated in the archive with the firmware itself.
Flashing Network Cards
Not less serious problems, extremely difficult in diagnostics, can deliver network cards with errors at the level of the embedded software. In addition to eliminating errors, network card software can directly affect performance. So this is another mandatory item for engineers who build servers.
Important
I would like to separately note that all the operations for reflashing components are potentially dangerous for the equipment, therefore, they can only be performed by qualified specialists. If you are already our client and have found the need to reflash any component of the server, then in no case do not try to do it yourself . Just write to us in the ticket, which component should be reflashed, and this will be done with all the precautions.
Testing
Having finished updating the software, the assembly engineer proceeds to load test the assembled server. Such testing allows you to identify most of the problems before the server is handed over to the client.
Memory test
In order to check the operability of all RAM modules installed in the server, a very popular tool called memtester is launched. Immediately before testing, the assembly engineer checks that all memory modules installed in the server are correctly displayed in the BIOS.
When testing is started, the process of reading and writing data into RAM, using a different sequence of data and the order of filling the cells, occurs. The speed of execution of all tests directly depends on the volume. Our minimum requirements are one complete test cycle.
If the testing process reveals errors, then we are looking for a faulty RAM module and exclude it from the configuration, replacing it with a similar one. Then the testing process is repeated in its entirety. Only when all the test iterations are completed without errors, the server is sent for stress testing.
CPU and disk test
The load test simulates the maximum server load for at least 6 hours for a server with magnetic drives. In the case of solid-state drives such a long test can dramatically increase the wear of the drive, therefore, similar testing with a shorter execution time is carried out for them.
Load testing for Intel processors is performed using the original Intel IPDT utility (Processor Diagnostic Tool). This process causes the processor temperature to rise to the maximum allowable operating temperature, and the cooling system must effectively remove all this heat. Assembly engineers constantly monitor that the server passes this test, and the temperature of all components does not exceed the stated operational limits.
After testing is complete, the SMART parameters of all installed disks are checked. If at least one parameter declared by the manufacturer as a reason for replacing the drive has a non-zero value, the disk is replaced with another one and is also tested to eliminate the possibility of problems in the “battle mode”.
Conclusion
Each server of arbitrary configuration that we rent out is tested and tested many times, so they can be safely used for any projects at once, without wasting time on re-testing and verification. Each server ordered will have the most up-to-date firmware version of each component, which gives good protection against existing vulnerabilities and errors.
Tell us about your build or testing server experience. What interesting features did you come across? We are waiting for your stories in the comments.