3CX webinar plugin for your WordPress site
- Tutorial
Introducing the new 3CX Webinars plugin for WordPress!
The plugin allows you to publish on your site a list of webinars that are created in the 3CX web client . Site visitors register for webinars via the online plugin form. The appearance of the plugin can be customized through templates (Javascript and HTML). The webinars themselves are conducted on the WebMeeting platform integrated into the 3CX PBX.
Here are the benefits of the plugin:

The webinar organizer just needs to schedule a webinar in the 3CX web client interface . And visitors to your site can register, receive reminders and connect to the event from anywhere in the world. However, you can offer certain webinars only to pre-registered users of the site. The organizer can also track the registration of participants in the “Schedule a Conference” section of the 3CX web client.
Video conferencing and webinars have proven to be an e-learning tool. Using 3CX WebMeeting to conduct technical, corporate and other training provides significant cost savings, because does not require any subscription and purchase of equipment other than webcams and headsets. It is enough to create a webinar in the 3CX v16 Pro web client and information about it will immediately appear on your website. The built-in recording of conferences further increases the value of the solution, allowing you to go back to past webinars and archive them for future use.

To install the plugin, go to the CMS WordPress management interface and go to Plugins> Add New . Search for the 3CX Webinars plugin and click Install Now .

Then go to the 3CX management interface (v16 and higher) in the Options> WordPress> Plugin for Webmeeting / webinars section and click Generate to create a new Webmeeting API token to authorize the plugin’s requests to publish a list of webinars on the site. Click Show to see the API token and Copy to copy it to the clipboard.
After installing the plugin on the site, create Webinar form objects (Webinars form). They are used on certain Pages and Blog entries or on the entire site to host a table with a list of scheduled webinars.
To create an object, go to the 3CX Webinars section in the WordPress admin panel , click Add New and enter the name of the object.
In the WebMeeting FQDN field, enter the FQDN of the WebMeeting server as indicated on the right side of the 3CX management interface in the Home section.
To customize the appearance of the Form, the following parameters are used:
To place the webinar form in the right place of the site, copy the appropriate shortcode from the list of Webinar form objects.
Placement on all pages of the site: go to Appearance> Widgets and drag the Text widget into the widget area that is displayed throughout the site, for example, at the bottom (footer) of a WordPress theme. Then add a shortcode, for example,

Placement on selected pages: create a blog entry or a page, and then add a shortcode to the content area. Click Preview Changes to see the webinar page.
The plugin allows you to publish on your site a list of webinars that are created in the 3CX web client . Site visitors register for webinars via the online plugin form. The appearance of the plugin can be customized through templates (Javascript and HTML). The webinars themselves are conducted on the WebMeeting platform integrated into the 3CX PBX.
Here are the benefits of the plugin:
- Quick registration - site visitors browse the list of webinars and quickly register using their name and e-mail, which receives a link to the connection.
- Simple connection - invited participants connect to the webinar via a link that opens a browser window with a conference interface. The WebRTC conferencing technology is integrated into the browser, so participants do not need to install additional applications.
- Extensive WebMeeting conferencing : call recording, flipchart, screen sharing, presentations, etc.
The webinar organizer just needs to schedule a webinar in the 3CX web client interface . And visitors to your site can register, receive reminders and connect to the event from anywhere in the world. However, you can offer certain webinars only to pre-registered users of the site. The organizer can also track the registration of participants in the “Schedule a Conference” section of the 3CX web client.
Benefits of 3CX WebMeeting for webinars
Video conferencing and webinars have proven to be an e-learning tool. Using 3CX WebMeeting to conduct technical, corporate and other training provides significant cost savings, because does not require any subscription and purchase of equipment other than webcams and headsets. It is enough to create a webinar in the 3CX v16 Pro web client and information about it will immediately appear on your website. The built-in recording of conferences further increases the value of the solution, allowing you to go back to past webinars and archive them for future use.
Install and configure the plugin
To install the plugin, go to the CMS WordPress management interface and go to Plugins> Add New . Search for the 3CX Webinars plugin and click Install Now .
Then go to the 3CX management interface (v16 and higher) in the Options> WordPress> Plugin for Webmeeting / webinars section and click Generate to create a new Webmeeting API token to authorize the plugin’s requests to publish a list of webinars on the site. Click Show to see the API token and Copy to copy it to the clipboard.
Creating a Webinar form object
After installing the plugin on the site, create Webinar form objects (Webinars form). They are used on certain Pages and Blog entries or on the entire site to host a table with a list of scheduled webinars.
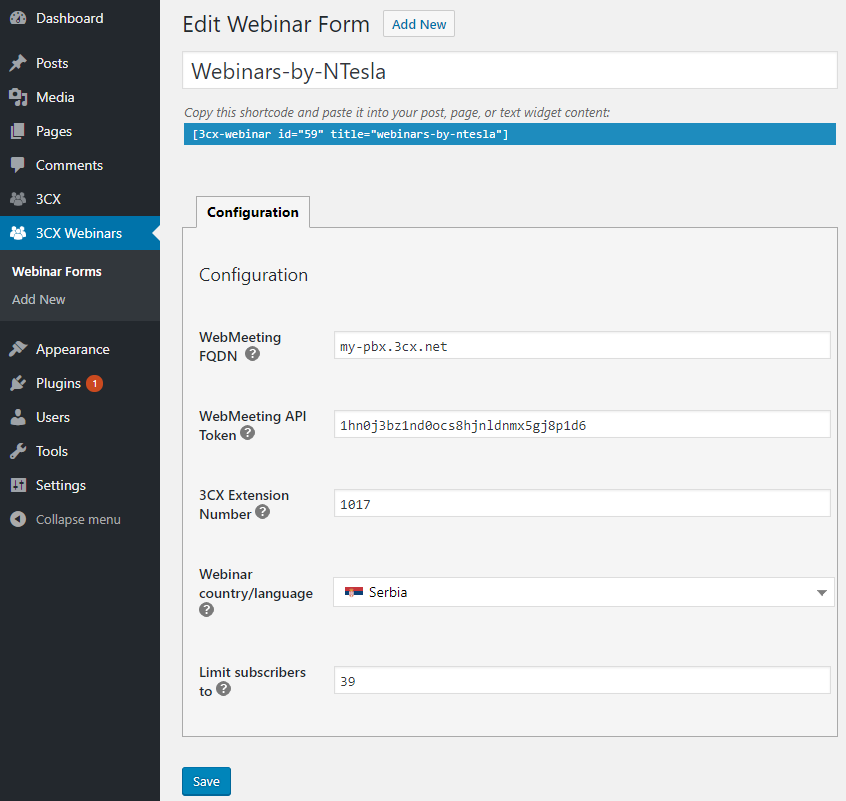
To create an object, go to the 3CX Webinars section in the WordPress admin panel , click Add New and enter the name of the object.
In the WebMeeting FQDN field, enter the FQDN of the WebMeeting server as indicated on the right side of the 3CX management interface in the Home section.
To customize the appearance of the Form, the following parameters are used:
- WebMeeting API Token - insert the token generated in the 3CX interface section Options> WordPress> Plugin for Webmeeting / webinars .
- 3CX Extension Number — укажите добавочный номер пользователя 3CX, который будет публиковать список вебинаров.
- Webinar country/language — выберите язык / страну проведения вебинаров.
- Limit subscribers to — максимальное количество участников (мест), которые могут зарегистрироваться на вебинар.
Размещение формы вебинаров на сайте WordPress
To place the webinar form in the right place of the site, copy the appropriate shortcode from the list of Webinar form objects.
Placement on all pages of the site: go to Appearance> Widgets and drag the Text widget into the widget area that is displayed throughout the site, for example, at the bottom (footer) of a WordPress theme. Then add a shortcode, for example,
[3cx-webinar id="9" title="Ближайшие вебинары"]in the content area and click Save. Placement on selected pages: create a blog entry or a page, and then add a shortcode to the content area. Click Preview Changes to see the webinar page.