Very simple screen slider
When I started to study android, I really wanted to add a beautiful flipping of screens - as in popular applications. I just wanted some kind of LinearLayout, the contents of which can be scrolled. However, in order to write the simplest slider using ViewPager, it took me several hours to parse, as well as a whole page of code. In addition, there were some limitations - adding an object inside the tagdid not add it to the list of widgets.
Having figured it out, I decided to write my own ScreenPager class, which inherits from ViewPager and works very simply. And it works both in xml and in pure code.
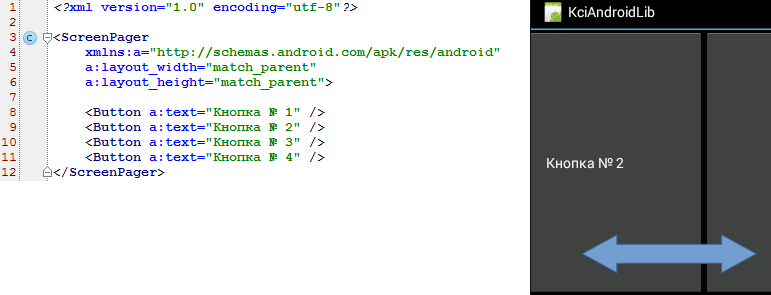
Now you can create a screenpager.xml file in your res / layout and put the following code there
If you manually create a file, then do not forget to save it in UTF-8 encoding. And don't forget that strings need to be stored in string resources, not inserted directly. In this article, I intentionally did not do this to simplify the code.
Now in MainActivity.onCreate add one line
All! The slider is working. But the long name com.example.testapp is ugly. But we want to make everything as simple as possible, right?
It turned out that the system allows you to use short names only for classes from android.view or android.widget. If we want to do this for our class, we should redefine Factory for LayoutInflater. I wrote the getShortNameFactory method, which returns a special factory that allows us to use the short name for our class. Set it in the onCreate method, and you need to do this before setContentView:
Also import LayoutInflater if your IDE does not do this for you:
Now we can use the abbreviated name of our class:
But that is not all! You can build your screens in code, and this is also simple:
Use on health. Instead of buttons, you can embed your layout managers or any other is-a View objects. True, your development environment (in my case this is Android Studio) may swear at the lack of layout_width and layout_height, but this warning can be easily turned off.
I post the full source code of the example.
The ScreenPager class inherits from ViewPager and includes a non-static nested class - ScreenPagerAdapter, which inherits from PagerAdapter. If you need to get it - this can be done through getAdapter (). Also inside ScreenPager is a list of View, with which it should work.
When the xml code is processed, addView is called for each object inside the ScreenPager tag. We redefined this function and it redirects the View to addScreen to put it in the collection and notify the adapter about it. Thus, both cases - and the creation of a slider through the code, and through xml - pass through addScreen.
Next, I added a small static function that returns LayoutInflater.Factory. We simply check the short name of our class - how much it matches the tag name - and if successful, return our object.
And now for the fun part. You probably noticed that, for example, LinearLayout forces all layouts to specify layout_width and layout_height. And GridLayout does not require this. I really wanted to free the users of my widget from such redundant code, which in this case also does not make sense. I had to read a lot about creating custom container components. But there was no necessary information there. And only a study of the GridLayout sources gave the answer to this question. It turns out that just overriding generateLayoutParams and returning ViewGroup.LayoutParams (LayoutParams.MATCH_PARENT, LayoutParams.MATCH_PARENT) is enough. And that’s all - now all child widgets can be specified without height and width attributes.
Finally, I’ll tell you about one interesting feature that I came across. You can achieve reduced use of ScreenPager without LayoutInflater.from (this) .setFactory. Let's reason logically. Android is looking for abbreviated names in the android.view package. Actually, nothing prevents us from creating an android folder in our src folder along with the com folder. And it already has a view folder and place the ScreenPager.java file there, without forgetting to change the name of the package inside the file itself. And it compiles and runs fine! Give it a try. However, putting your classes in other people's packages is not a very good approach. Rather, just an interesting point.
Having figured it out, I decided to write my own ScreenPager class, which inherits from ViewPager and works very simply. And it works both in xml and in pure code.
Using
To get started, create a simple application. Let its MainActivity class be in com.example.testapp and have the onCreate method. Now create the ScreenPager class in the same directory and add the following code there, without delving into it for now:ScreenPager.java
package com.example.testapp;
import android.content.Context;
import android.support.v4.view.PagerAdapter;
import android.support.v4.view.ViewPager;
import android.util.AttributeSet;
import android.view.LayoutInflater;
import android.view.View;
import android.view.ViewGroup;
import java.util.ArrayList;
import java.util.List;
public class ScreenPager extends ViewPager {
    private PagerAdapter adapter = new ScreenPagerAdapter();
    private List viewList = new ArrayList();
    public ScreenPager(Context context) {
        super(context);
        init();
    }
    public ScreenPager(Context context, AttributeSet attrs) {
        super(context, attrs);
        init();
    }
    @Override
    public ViewGroup.LayoutParams generateLayoutParams(AttributeSet attrs) {
        return new ViewGroup.LayoutParams(LayoutParams.MATCH_PARENT, LayoutParams.MATCH_PARENT);
    }
    private void init() {
        setAdapter(adapter);
    }
    @Override
    public void addView(View child, ViewGroup.LayoutParams params) {
        addScreen(child);
    }
    public void addScreen(View screen) {
        viewList.add(screen);
        adapter.notifyDataSetChanged();
    }
    private class ScreenPagerAdapter extends PagerAdapter {
        @Override
        public int getCount() {
            return viewList.size();
        }
        @Override
        public boolean isViewFromObject(View view, Object o) {
            return view.equals(o);
        }
        @Override
        public Object instantiateItem(ViewGroup container, int position) {
            View view = viewList.get(position);
            container.addView(view);
            return view;
        }
        @Override
        public void destroyItem(ViewGroup container, int position, Object object) {
            container.removeView((View) object);
        }
    }
    /**
     * Use - in MainActivity.onCreate add:
     * LayoutInflater.from(this).setFactory(ScreenPager.getShortNameFactory());
     *
     * @return
     */
    static LayoutInflater.Factory getShortNameFactory() {
        return new LayoutInflater.Factory() {
            @Override
            public View onCreateView(String name, Context context, AttributeSet attrs) {
                if (ScreenPager.class.getSimpleName().equals(name)) {
                    return new ScreenPager(context, attrs);
                }
                return null;
            }
        };
    }
}
Now you can create a screenpager.xml file in your res / layout and put the following code there
If you manually create a file, then do not forget to save it in UTF-8 encoding. And don't forget that strings need to be stored in string resources, not inserted directly. In this article, I intentionally did not do this to simplify the code.
Now in MainActivity.onCreate add one line
setContentView(R.layout.screenpager);All! The slider is working. But the long name com.example.testapp is ugly. But we want to make everything as simple as possible, right?
It turned out that the system allows you to use short names only for classes from android.view or android.widget. If we want to do this for our class, we should redefine Factory for LayoutInflater. I wrote the getShortNameFactory method, which returns a special factory that allows us to use the short name for our class. Set it in the onCreate method, and you need to do this before setContentView:
LayoutInflater.from(this).setFactory(ScreenPager.getShortNameFactory());Also import LayoutInflater if your IDE does not do this for you:
import android.view.LayoutInflater;Now we can use the abbreviated name of our class:
But that is not all! You can build your screens in code, and this is also simple:
ScreenPager screenPager = new ScreenPager(this);
Button button1 = new Button(this);
button1.setText("Кнопка №1");
screenPager.addScreen(button1);
Button button2 = new Button(this);
button2.setText("Кнопка №2");
screenPager.addScreen(button2);
//...
setContentView(screenPager);
Use on health. Instead of buttons, you can embed your layout managers or any other is-a View objects. True, your development environment (in my case this is Android Studio) may swear at the lack of layout_width and layout_height, but this warning can be easily turned off.
I post the full source code of the example.
Details
You can read how ViewPager and PagerAdapter work in this article . Actually, I studied them using it.The ScreenPager class inherits from ViewPager and includes a non-static nested class - ScreenPagerAdapter, which inherits from PagerAdapter. If you need to get it - this can be done through getAdapter (). Also inside ScreenPager is a list of View, with which it should work.
When the xml code is processed, addView is called for each object inside the ScreenPager tag. We redefined this function and it redirects the View to addScreen to put it in the collection and notify the adapter about it. Thus, both cases - and the creation of a slider through the code, and through xml - pass through addScreen.
Next, I added a small static function that returns LayoutInflater.Factory. We simply check the short name of our class - how much it matches the tag name - and if successful, return our object.
And now for the fun part. You probably noticed that, for example, LinearLayout forces all layouts to specify layout_width and layout_height. And GridLayout does not require this. I really wanted to free the users of my widget from such redundant code, which in this case also does not make sense. I had to read a lot about creating custom container components. But there was no necessary information there. And only a study of the GridLayout sources gave the answer to this question. It turns out that just overriding generateLayoutParams and returning ViewGroup.LayoutParams (LayoutParams.MATCH_PARENT, LayoutParams.MATCH_PARENT) is enough. And that’s all - now all child widgets can be specified without height and width attributes.
Finally, I’ll tell you about one interesting feature that I came across. You can achieve reduced use of ScreenPager without LayoutInflater.from (this) .setFactory. Let's reason logically. Android is looking for abbreviated names in the android.view package. Actually, nothing prevents us from creating an android folder in our src folder along with the com folder. And it already has a view folder and place the ScreenPager.java file there, without forgetting to change the name of the package inside the file itself. And it compiles and runs fine! Give it a try. However, putting your classes in other people's packages is not a very good approach. Rather, just an interesting point.