Transferring data between servers using LVM and iSCSI

The issue of scaling the resources of dedicated servers is fraught with a number of difficulties: adding memory or disks is impossible without downtime, and upgrading the disk subsystem often involves the complete transfer of all data (the amount of which can be very large) from the old server to the new one. Simply moving disks from one server to another very often also becomes impossible: the reason for this may be incompatibility of interfaces, the use of different RAID controllers, the geographic distance of the servers from each other, etc. Copying data over the network can take a very long time, during which the service is idle. How can I transfer data to a new server, minimizing the downtime of services?
We thought about this issue for a long time and today we present to the attention of a wide audience a solution that seems to us the most successful.
The data transfer procedure using the method discussed in this article consists of the following steps:
- the new server is loaded from external media, block devices are prepared: disks are marked up, RAID arrays are created;
- block devices of the new server are exported via iSCSI - iSCSI targets are created;
- on the old server, the iSCSI initiator starts and connects to the targets on the new server. On the old server, block devices of the new server appear and become available;
- on the old server, the block device of the new server is added to the LVM group;
- data is copied to the block device of the new server using data mirroring in LVM;
- the old server shuts down;
- on the new server, still loaded from external media, the transferred FS is mounted on it, the necessary changes are made to the settings;
- the new server reboots from the disks, after which all services start.
If problems are detected with the new server, it shuts down. The old server is turned on, all services continue to work on the old server.
Our proposed technique is suitable for all operating systems where LVM is used for logical partitions and the iSCSI target and initiator can be set. Debian Wheezy was installed on the server on which we tested the proposed method. In other operating systems, other programs and commands may be used, but the procedure will be similar.
All operations were carried out on a server with disk layout, standard for our servers during automatic installation of the OS. If your server uses a different disk layout, the parameters of some commands will need to be changed.
Our method of data transfer is designed for experienced users who know well what LVM, mdraid, iSCSI are. We warn you that errors in the commands can lead to complete or partial loss of data. Before proceeding with data transfer, you must back up important information to an external storage device or storage.
Preparing a new server
If you transfer data to a server with a different hardware configuration (special attention should be paid to the disk controller), install the same OS distribution on the new server as on the old one, as well as the drivers necessary for work. Verify that all devices are detected and operational. Save / write down the necessary actions, in the future they will need to be performed on the transferred system so that the new server can boot after the transfer.
Then boot the new server from external media. We recommend our customers to boot into Selectel Rescue using the server boot control menu.
When the download is complete, connect to the new server via SSH. Set the new server to its future hostname. This is necessary if you intend to use mdraid on the new server: when creating a RAID array, hostname will be saved in the metadata of the RAID array on all the disks included in it.
# hostname cs940
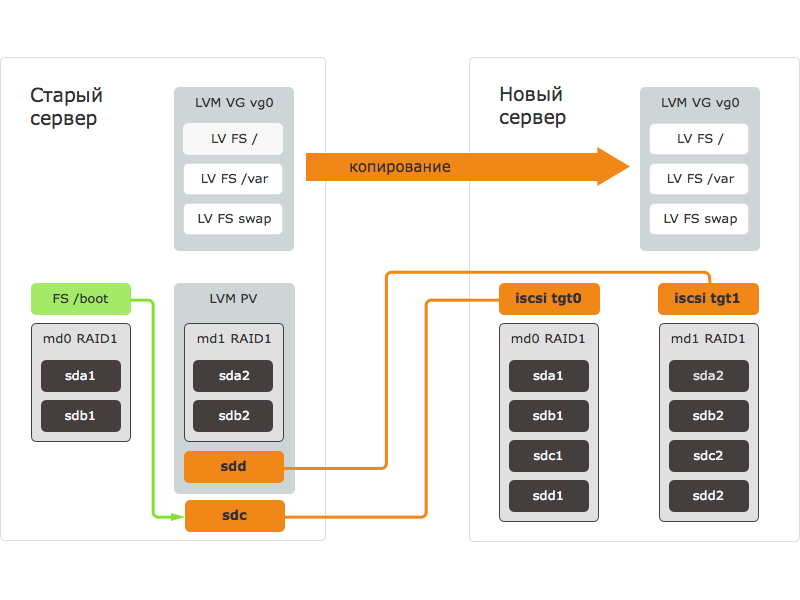
Next, mark the disks. In our case, two main partitions on each disk will be created on each server. The first sections will be used to build RAID1 for / boot, the second - to build RAID10 for LVM Physical Volume, on which the main data will be placed.
# fdisk / dev / sda
Command (m for help): p
...
Device Boot Start End Blocks Id System
/ dev / sda1 * 2048 2099199 1048576 fd Linux raid autodetect
/ dev / sda2 2099200 1953525167 975712984 fd Linux raid autodetect
Command (m for help): w
To make everything simpler and faster, you can only mark the first disk, and copy its layout to the rest. Then create the RAID arrays using the mdadm utility.
# sfdisk -d / dev / sda | sfdisk / dev / sdb -f
# mdadm --create / dev / md0 --level = 1 --raid-devices = 4 / dev / sda1 / dev / sdb1 / dev / sdc1 / dev / sdd1
# mdadm --create / dev / md1 --level = 10 --raid-devices = 4 / dev / sda2 / dev / sdb2 / dev / sdc2 / dev / sdd2
# mdadm --examine --scan
 ARRAY / dev / md / 0 metadata = 1.2 UUID = e9b2b8e0: 205c12f0: 2124cd91: 35a3b4c8 name = cs940: 0
 ARRAY / dev / md / 1 metadata = 1.2 UUID = 4be6fb41: ab4ce516: 0ba4ca4d: e30ad60b name = cs940: 1
Then set and configure the iSCSI target for copying RAID arrays over the network. We used tgt.
# aptitude update
# aptitude install tgt
If you encounter errors loading the missing kernel modules when you run tgt, do not worry: we will not need them.
# tgtd
librdmacm: couldn't read ABI version.
librdmacm: assuming: 4
CMA: unable to get RDMA device list
(null): iser_ib_init (3263) Failed to initialize RDMA; load kernel modules?
(null): fcoe_init (214) (null)
(null): fcoe_create_interface (171) no interface specified.
The next step is to configure LUNs. When creating the LUN, you need to specify the IP of the old server, from which connection to the target will be allowed.
# tgt-setup-lun -n tgt0 -d / dev / md0 10.0.0.1
# tgt-setup-lun -n tgt1 -d / dev / md1 10.0.0.1
# tgt-admin -s
The new server is ready, let's move on to preparing the old server.
Preparing the old server and copying data
Now connect to the old server via SSH. Install and configure the iSCSI initiator, and then connect the block devices exported from the new server to it:
# apt-get install open-iscsi
Add authorization data to the configuration file: without them, the initiator will not work.
# nano /etc/iscsi/iscsid.conf
node.startup = automatic
node.session.auth.username = MY-ISCSI-USER
node.session.auth.password = MY-ISCSI-PASSWORD
discovery.sendtargets.auth.username = MY-ISCSI-USER
discovery.sendtargets.auth.password = MY-ISCSI-PASSWORD
Further operations take a lot of time; to avoid unpleasant consequences if they are interrupted when SSH is closed, we will use the screen utility. With its help, we will create a virtual terminal, which can be connected via SSH and disconnected without completing the running commands:
# apt-get install screen
# screen
Then we connect to the portal and get a list of available targets; specify the current IP address of the new server:
# iscsiadm --mode discovery --type sendtargets --portal 10.0.0.2
10.0.0.2:3260,1 iqn.2001-04.com.cs940-tgt0
10.0.0.2:3260,1 iqn.2001-04.com.cs940-tgt1
Then we connect all available targets and LUNs; as a result of this command, we will see a list of new block devices:
# iscsiadm --mode node --login
Logging in to [iface: default, target: iqn.2001-04.com.cs940-tgt0, portal: 10.0.0.2,3260] (multiple)
Logging in to [iface: default, target: iqn.2001-04.com.cs940-tgt1, portal: 10.0.0.2,3260] (multiple)
Login to [iface: default, target: iqn.2001-04.com.cs940-tgt0, portal: 10.0.0.2,3260] successful.
Login to [iface: default, target: iqn.2001-04.com.cs940-tgt1, portal: 10.0.0.2,3260] successful.
iSCSI devices on the system have the same names as regular SATA / SAS. But at the same time, the name of the manufacturer is different for the two types of devices: for iSCSI devices it is indicated as IET.
# cat / sys / block / sdc / device / vendor
IET
Now you can begin to transfer data. First, unmount the boot and copy it to the new server:
# umount / boot
# cat / sys / block / sdc / size
1999744
# cat / sys / block / md0 / size
1999744
# dd if = / dev / md0 of = / dev / sdc bs = 1M
976 + 1 records in
976 + 1 records out
1023868928 bytes (1.0 GB) copied, 19.6404 s, 52.1 MB / s
Attention! From now on, do not activate VG and do not run any LVM utilities on the new server. Simultaneous operation of two LVMs with the same block device can cause data corruption or loss.
Now we begin to transfer data. Add a RAID10 array exported from the new server to VG:
# vgextend vg0 / dev / sdd
# pvs
 PV VG Fmt Attr PSize PFree
 / dev / md1 vg0 lvm2 a-- 464.68g 0
 / dev / sdd vg0 lvm2 a-- 1.82t 1.82t
Do not forget that / dev / sdd is / dev / md1 exported from a new server loaded into Rescue:
# lvs
 LV VG Attr LSize Pool Origin Data% Move Log Copy% Convert
 root vg0 -wi-ao-- 47.68g
 swap_1 vg0 -wi-ao-- 11.44g
 var vg0 -wi-ao-- 405.55g
Now create a copy for each logical volume on the new server with the lnconvert command. The --corelog option will allow you to do without a separate block device under the mirror logs.
# lvconvert -m1 vg0 / root --corelog / dev / sdd
 vg0 / root: Converted: 0.0%
 vg0 / root: Converted: 1.4%
 ...
 vg0 / root: Converted: 100.0%
Since when creating a mirrored copy of LVM, all write operations are performed synchronously, the speed of the channel between the servers, open-iSCSI performance (500 mb / s), and network latency will affect the recording speed. After making copies of all logical volumes, make sure that they are all synchronized:
# lvs
 LV VG Attr LSize Pool Origin Data% Move Log Copy% Convert
 root vg0 mwi-aom- 47.68g 100.00
 swap_1 vg0 mwi-aom- 11.44g 100.00
 var vg0 mwi-aom- 405.55g 100.00
At this stage, all the data is copied and the data of the old server is being synchronized with the new remote server. To minimize changes in the file system, you need to stop all application services (database service, web server, etc.).
Having stopped all important services, we disconnect iSCSI devices and exclude the copy of LVM which has become inaccessible. After disconnecting iSCSI devices on the old server, numerous I / O error messages will be displayed, but this should not be a cause for concern: all data is stored on the LVM, which is located above the block devices.
# iscsiadm --mode session -u
# vgreduce vg0 --removemissing --force
# lvs
 LV VG Attr LSize Pool Origin Data% Move Log Copy% Convert
 root vg0 -wi-ao-- 47.68g
 swap_1 vg0 -wi-ao-- 11.44g
 var vg0 -wi-ao-- 405.55g
Now you can turn off the old server. All data remained on it, and in case of any problems with the new server, you can always use it.
# poweroff
Starting a new server
After transferring the data, the new server must be prepared for self-loading and started.
We connect via ssh, stop the iSCSI target and activate the LVM copy:
# tgtadm --lld iscsi --mode target --op delete --tid 1
# tgtadm --lld iscsi --mode target --op delete --tid 2
# pvscan
Now we exclude a copy from the old server from LVM; we do not pay attention to reports of the absence of the second half.
# vgreduce vg0 --removemissing --force
 Couldn't find device with uuid 1nLg01-fAuF-VW6B-xSKu-Crn3-RDJ6-cJgIax.
 Unable to determine mirror sync status of vg0 / swap_1.
 Unable to determine mirror sync status of vg0 / root.
 Unable to determine mirror sync status of vg0 / var.
 Wrote out consistent volume group vg0
After making sure that all logical volumes are in place, activate them:
# lvs
 LV VG Attr LSize Pool Origin Data% Move Log Copy% Convert
 root vg0 -wi ----- 47.68g
 swap_1 vg0 -wi ----- 11.44g
 var vg0 -wi ----- 405.55g
# vgchange -ay
 3 logical volume (s) in volume group "vg0" now active
It is also advisable to check file systems on all logical volumes:
# fsck / dev / mapper / vg0-root
Next, we will chroot the copied system and make the final changes. This can be done using the infiltrate-root script available in Selectel Rescue:
# infiltrate-root / dev / mapper / vg0-root
Next, we perform all actions on the server from chroot. Mount all file systems from fstab (by default, chroot mounts only the root file system):
Chroot: / # mount -a
Now update the information about the RAID arrays on the new server in the mdadm configuration file. We will remove all the data about the old RAID arrays (lines starting with "ARRAY") and add new ones:
Chroot: / # nano /etc/mdadm/mdadm.conf
Chroot: / # mdadm --examine --scan >> /etc/mdadm/mdadm.conf
Example of valid mdadm.conf:
Chroot: / # cat /etc/mdadm/mdadm.conf
DEVICE partitions
# auto-create devices with Debian standard permissions
CREATE owner = root group = disk mode = 0660 auto = yes
# automatically tag new arrays as belonging to the local system
Homehost
# instruct the monitoring daemon where to send mail alerts
MAILADDR root
# definitions of existing MD arrays
ARRAY / dev / md / 0 metadata = 1.2 UUID = 2521ca82: 2a52a408: 565fab6c: 43ba944e name = cs940: 0
ARRAY / dev / md / 1 metadata = 1.2 UUID = 6240c2db: b4854bd7: 4c4e1510: d37e5010 name = cs940: 1
After that, you need to update initramfs so that it can find and boot from the new RAID arrays. We also install the GRUB bootloader on the disks and update its configuration:
Chroot: / # update-initramfs -u
Chroot: / # grub-install / dev / sda --recheck
Installation finished. No error reported.
Chroot: / # grub-install / dev / sdb --recheck
Installation finished. No error reported.
Chroot: / # update-grub
Generating grub.cfg ...
Found linux image: /boot/vmlinuz-3.2.0-4-amd64
Found initrd image: /boot/initrd.img-3.2.0-4-amd64
done
Delete the udev file with the matching names of the network interfaces and MAC addresses (it will be recreated at the next boot):
Chroot: / # rm /etc/udev/rules.d/70-persistent-net.rules
Now the new server is ready to boot:
Chroot: / # umount -a
Chroot: / # exit
Change the boot order to boot from the first hard drive in the server management menu and reboot it:
# reboot
Now, using the KVM console, we’ll verify that the server has booted and verify access to the server by IP address. If there are any problems with the new server, you can return to the old server.
Do not load the old and new servers into the working OS at the same time: they will be loaded with the same IP, which can lead to loss of access and other problems.
Adapting the file system after migration
All data has been transferred, all services are working and further actions can be carried out slowly. In the example we are considering, data was migrated to a server with a large amount of disk space. All this disk space now needs to be used. To do this, first expand the physical partition, then the logical partition, and finally the file system as a whole:
# pvresize / dev / md1
# pvs
 PV VG Fmt Attr PSize PFree
 / dev / md1 vg0 lvm2 a-- 1.82t 1.36t
# vgs
 VG #PV #LV #SN Attr VSize VFree
 vg0 1 3 0 wz - n- 1.82t 1.36t
# lvextend / dev / vg0 / var / dev / md1
 Extending logical volume var to 1.76 TiB
 Logical volume var successfully resized
# lvs
 LV VG Attr LSize Pool Origin Data% Move Log Copy% Convert
 root vg0 -wi-ao-- 47.68g
 swap_1 vg0 -wi-ao-- 11.44g
 var vg0 -wi-ao-- 1.76t
# xfs_growfs / var
meta-data = / dev / mapper / vg0-var isize = 256 agcount = 4, agsize = 26578176 blks
         = sectsz = 512 attr = 2
data = bsize = 4096 blocks = 106312704, imaxpct = 25
         = sunit = 0 swidth = 0 blks
naming = version 2 bsize = 4096 ascii-ci = 0
log = internal bsize = 4096 blocks = 51910, version = 2
         = sectsz = 512 sunit = 0 blks, lazy-count = 1
realtime = none extsz = 4096 blocks = 0, rtextents = 0
data blocks changed from 106312704 to 472291328
# df -h
Filesystem Size Used Avail Use% Mounted on
rootfs 47G 660M 44G 2% /
udev 10M 0 10M 0% / dev
tmpfs 1.6G 280K 1.6G 1% / run
/ dev / mapper / vg0-root 47G 660M 44G 2% /
tmpfs 5.0M 0 5.0M 0% / run / lock
tmpfs 3.2G 0 3.2G 0% / run / shm
/ dev / md0 962M 36M 877M 4% / boot
/ dev / mapper / vg0-var 1.8T 199M 1.8T 1% / var
Conclusion
Despite its complexity, the approach we described has several advantages. Firstly, it allows you to avoid long server downtime - all services continue to work while copying data. Secondly, in case of any problems with the new server, the old one, ready for a quick start, remains in reserve. Thirdly, it is universal and does not depend on what services are running on the server.
In a similar way, you can migrate under other operating systems - CentOS, OpenSUSE, etc. Naturally, in this case there may be differences in some nuances (preparing the OS to start on a new server, setting up the bootloader, initrd, etc.).
We are well aware that our proposed technique can hardly be considered ideal. We will be grateful for any comments and suggestions for its improvement. If any of our readers can offer their own version of the solution to the problem of data transfer without stopping the servers, we will be glad to familiarize ourselves with it.
Readers who are not able to comment on posts on Habré are welcome to our blog .