Quantization matrix manipulations. Part 2
This is a continuation of the article , in which I will talk more about the theory and practice of video coding using Xvid, as well as present an improved version of my matrix, in which the quality / size indicator has become larger. Details under the cut.
Recently, the Xvid codec has turned 7 years old, but in general this principle of video compression has existed for 15 years, but there is not much way information on encoding on the Internet in Russian. For seed you can read this: video compression , MPEG-4 , Xvid .
I’ll only touch briefly on the theory (I don’t know much more honestly). Before encoding, the picture is divided into 8x8 blocks, for each block there are average values of brightness and color, and all pixels are converted into a mathematical dependence on average values. A discrete cosine transform using quantization matrices is applied to the resulting matrix. Intra matrix for key frames, Inter for everyone else. The upper left corner of the matrices is used to quantize values that differ little from the average value, respectively, the lower right corner - for values that differ greatly from the average value. The larger the coefficient in the matrix, the greater the coarsening of the brightness and color values. Odds are in the range of 8-255. The quantization is not over, Before the final packaging, all block values are divided by the quantizer specified in the Xvid codec setting. In the photo Target quantizer (highlighted in red, photo after photo matrix).
Quantization is the coarsening of a signal. When encoding, the signal value is divided by a certain number, and when decoding is multiplied. Since the fractional part is discarded, with large values of the quantizer many details are lost and 8x8 blocks become too noticeable. But the file size is also very small. Therefore, the encoding task is to reduce the squareness in small files. And developing your own matrix is a must.
Frame types. Simply put, frames are key and non-key. Non-key ones depend on the key ones; they show a change in the picture (movement). The Xvid settings photo shows the standard value of the keyframe interval 300, the settings are called up by the lower “more” button in the main Xvid settings window. Since a non-key frame takes 5 times less space than a key frame, we owe it to the small file size. A value greater than 300 is usually not used, because this interval is enough for 10-12 seconds of viewing. In terms of volume, key frames with this setting will occupy 5-7% of your file excluding audio.
In the photographs below, I will show how the coefficients of the quantization matrix and quantizer affect the quality of the image.
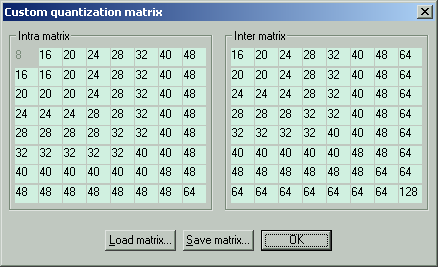
For the experiment, I used the following Intra matrix:

As you can see, I made the first coefficients maximal to see in which places there will be the greatest distortions.
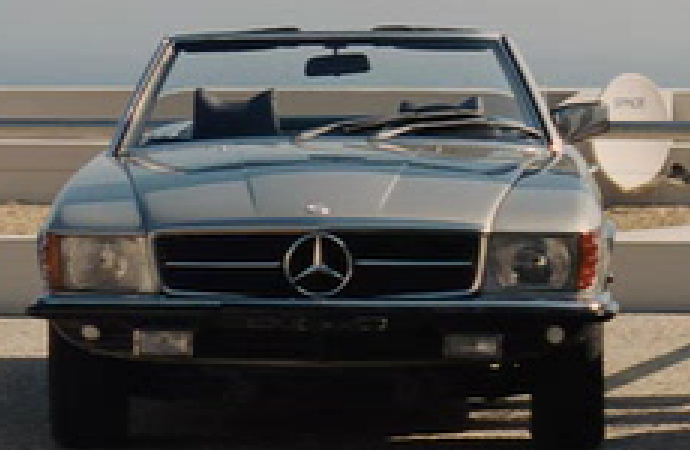
All pictures in a scale of 300%. This is a picture before compression:
This is compression with quantizer 2:
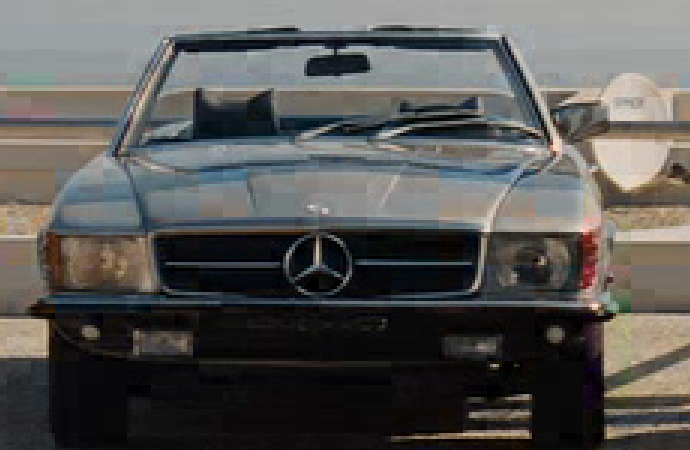
This is compression with quantizer 4:

As you can see, quantizer 4 makes the squares more visible, and the coefficients 255 in the matrix coarsen most of the brightness and color values, so the block spreads out into a square spot. If the blocks were round, then it would look like bokeh - a background that is out of focus. And the fact that the details of the picture are still visible, is because we left the remaining coefficients minimal. It is strongly discouraged to use quantizer 1 categorically because of the peculiarities of the codec, and I do not use more than 4 because the blocks are greatly distorted.
Now about my matrix. Her new look is this:
It can be applied in three modes. The settings for all modes are the same, except for one parameter, the main quantizer Target quantizer (highlighted in red).
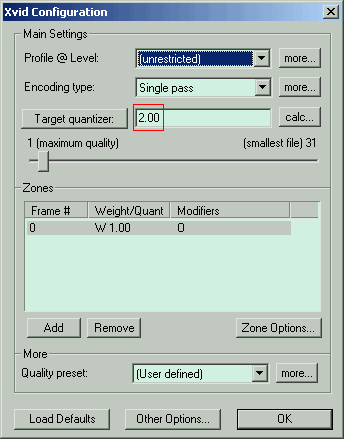
It is recommended to set the important settings highlighted in red as in the photo (in detail in the first post).

1. Quality. Target quantizer 2. The quality is excellent, the file size is 80% (the file size is taken as 100% when encoding with the standard H263 matrix with the same settings. From this size we “dance” in all modes).
2. Compromise. Target quantizer 3. Quality is normal, size is 54%.
3. Compressed. Target quantizer 4. The quality is satisfactory, size 40%.
As you can see, in the third mode we have a file 2 times smaller than in the first (without audio), but significantly sacrifice quality. Although the word "significant" has a very relative meaning. The fact is that I compared samples that were simultaneously opened in separate VirtualDub windows, frame-by-frame at 200% and 300% scales. If you encode a movie with a resolution of 1280x720 in the third mode and just watch it in the player, you may not notice the difference. The first mode is recommended for low-resolution videos or for videos that are very dear to the heart. The second mode is suitable for most films, and the third for high-resolution videos or for videos where the quality is not important, but the material itself.
When choosing the third mode, do not forget about the sound quality, because audio in the 5: 1 384 Kbit format takes up a lot of space (usually 300 MB in a movie). For transferring audio from any format to mp3 I recommend Format Factory. It is free, encodes video and audio. For information: the minimum mp3 audio format at which normal sound is preserved is mono 48 Kbit 44 KHz. Do not encode at 22 KHz, because it is much worse at any bitrate. Also, do not encode at 48 KHz if you have a lower frequency source code or you do not know it. Changing the frequency usually leads to distortion. 44 KHz is the safest frequency.
Many will have a question: why should we code with a constant quantizer? Because in any other mode (two-pass mode, constant bit rate) you do not control the quantizer. Namely, the quantizer is primarily responsible for the squareness (see experiment above). Also read in the first post about advanced Xvid settings, without them, using my matrix will not be effective.
Code for health!
Recently, the Xvid codec has turned 7 years old, but in general this principle of video compression has existed for 15 years, but there is not much way information on encoding on the Internet in Russian. For seed you can read this: video compression , MPEG-4 , Xvid .
I’ll only touch briefly on the theory (I don’t know much more honestly). Before encoding, the picture is divided into 8x8 blocks, for each block there are average values of brightness and color, and all pixels are converted into a mathematical dependence on average values. A discrete cosine transform using quantization matrices is applied to the resulting matrix. Intra matrix for key frames, Inter for everyone else. The upper left corner of the matrices is used to quantize values that differ little from the average value, respectively, the lower right corner - for values that differ greatly from the average value. The larger the coefficient in the matrix, the greater the coarsening of the brightness and color values. Odds are in the range of 8-255. The quantization is not over, Before the final packaging, all block values are divided by the quantizer specified in the Xvid codec setting. In the photo Target quantizer (highlighted in red, photo after photo matrix).
Quantization is the coarsening of a signal. When encoding, the signal value is divided by a certain number, and when decoding is multiplied. Since the fractional part is discarded, with large values of the quantizer many details are lost and 8x8 blocks become too noticeable. But the file size is also very small. Therefore, the encoding task is to reduce the squareness in small files. And developing your own matrix is a must.
Frame types. Simply put, frames are key and non-key. Non-key ones depend on the key ones; they show a change in the picture (movement). The Xvid settings photo shows the standard value of the keyframe interval 300, the settings are called up by the lower “more” button in the main Xvid settings window. Since a non-key frame takes 5 times less space than a key frame, we owe it to the small file size. A value greater than 300 is usually not used, because this interval is enough for 10-12 seconds of viewing. In terms of volume, key frames with this setting will occupy 5-7% of your file excluding audio.
In the photographs below, I will show how the coefficients of the quantization matrix and quantizer affect the quality of the image.
For the experiment, I used the following Intra matrix:
As you can see, I made the first coefficients maximal to see in which places there will be the greatest distortions.
All pictures in a scale of 300%. This is a picture before compression:
This is compression with quantizer 2:
This is compression with quantizer 4:
As you can see, quantizer 4 makes the squares more visible, and the coefficients 255 in the matrix coarsen most of the brightness and color values, so the block spreads out into a square spot. If the blocks were round, then it would look like bokeh - a background that is out of focus. And the fact that the details of the picture are still visible, is because we left the remaining coefficients minimal. It is strongly discouraged to use quantizer 1 categorically because of the peculiarities of the codec, and I do not use more than 4 because the blocks are greatly distorted.
Now about my matrix. Her new look is this:
It can be applied in three modes. The settings for all modes are the same, except for one parameter, the main quantizer Target quantizer (highlighted in red).
It is recommended to set the important settings highlighted in red as in the photo (in detail in the first post).
1. Quality. Target quantizer 2. The quality is excellent, the file size is 80% (the file size is taken as 100% when encoding with the standard H263 matrix with the same settings. From this size we “dance” in all modes).
2. Compromise. Target quantizer 3. Quality is normal, size is 54%.
3. Compressed. Target quantizer 4. The quality is satisfactory, size 40%.
As you can see, in the third mode we have a file 2 times smaller than in the first (without audio), but significantly sacrifice quality. Although the word "significant" has a very relative meaning. The fact is that I compared samples that were simultaneously opened in separate VirtualDub windows, frame-by-frame at 200% and 300% scales. If you encode a movie with a resolution of 1280x720 in the third mode and just watch it in the player, you may not notice the difference. The first mode is recommended for low-resolution videos or for videos that are very dear to the heart. The second mode is suitable for most films, and the third for high-resolution videos or for videos where the quality is not important, but the material itself.
When choosing the third mode, do not forget about the sound quality, because audio in the 5: 1 384 Kbit format takes up a lot of space (usually 300 MB in a movie). For transferring audio from any format to mp3 I recommend Format Factory. It is free, encodes video and audio. For information: the minimum mp3 audio format at which normal sound is preserved is mono 48 Kbit 44 KHz. Do not encode at 22 KHz, because it is much worse at any bitrate. Also, do not encode at 48 KHz if you have a lower frequency source code or you do not know it. Changing the frequency usually leads to distortion. 44 KHz is the safest frequency.
Many will have a question: why should we code with a constant quantizer? Because in any other mode (two-pass mode, constant bit rate) you do not control the quantizer. Namely, the quantizer is primarily responsible for the squareness (see experiment above). Also read in the first post about advanced Xvid settings, without them, using my matrix will not be effective.
Code for health!