Fukami, ch. 1.1: We bring the scene to the theme of the project
Hello!
In the last article , the concept of a “genetically modified organism" was introduced, but the scene was used inappropriately. In this article I want to tell how and with the help of which tools the art scene was redone. The main changes are as follows:
As the main workstation, a PC with Ubuntu 13.10 OS is used. For work on graphics, GIMP and Inkscape are used in conjunction with the Wacom Bamboo Pen & Touch graphics tablet. Ubuntu has Wacom support out of the box, though you have to configure the buttons through the console ( there are instructions on the network, so no problem). Also based on Ubuntu it is planned to establish work with sound and video. In particular, Record My Desktop was used to record video for this article.
included in the Ubuntu repository. The sound for the last demo was written from a stereo mixer using Audacity. Video in OGV format and recorded sound were mixed in the OpenShot Video Editor. Exported the video to the OGG Theora format, as For some reason, the mentioned editor refused to see the libx264 installed on the system. But OGG Theora is accepted by Youtube without much trouble.
To work with Unity3D yet (I hope so far) you have to use a station with Windows (laptop). I tried to run the editor for Wine according to the instructions from Ask Ubuntu - it did not start (failed to initialize the license service).
Ubuntu One (Canonical cloud storage, if anyone does not know) I use to exchange data between workstations. BtSync, apparently due to problems with the firewall, did not start immediately (there is no time to understand it yet). Perhaps I will go to him in the future.
Ubuntu One has created a demo build directory. If anyone is interested, send email addresses registered in Ubuntu One, I will send an invite to this directory in response. There I will try to lay out assemblies for at least Windows and Linux. I can’t test on a Mac, but on Android I’ll try in the future.
I'll start, perhaps, with how I redrawn the kernel sprite. Used for this so-called " Draloscopy " method . A certain origami figure (like these ) is taken for the sample and imported into the vector drawing as a substrate.

A draft vector skeleton (wireframe) is created on the substrate. Immediately turn on the magnetization of the input nodes to existing ones, so that the contours are closed, because then we will need to fill them.

If spatial thinking skills are developed, then you no longer need a pattern. You can correct the location of nodes and go to fill closed loops.
The fill tool (Fill bounded area) was used. It fills the polygon with the selected color (in this case 70% gray) and adds a slightly darker border at the border between the fill and the border of the polygon. Fill the polygons at the same screen scale, because the thickness of the border of the fill depends on the scale. The brightness of the selected polygon fill is conveniently adjusted by the fill transparency (RMB on the fill -> Fill and Strokes -> Fill tab).

Inkscape was also used to create a scene sprite atlas. At first the scene was drawn:

Then parts of it were scattered along the canvas and exported to PNG.
For experimental striped-filled clouds, the Objects to Pattern tool in Inkscape was used.
To create the edging of trees in the background landscape, I used the Outset tool in Inkscape.
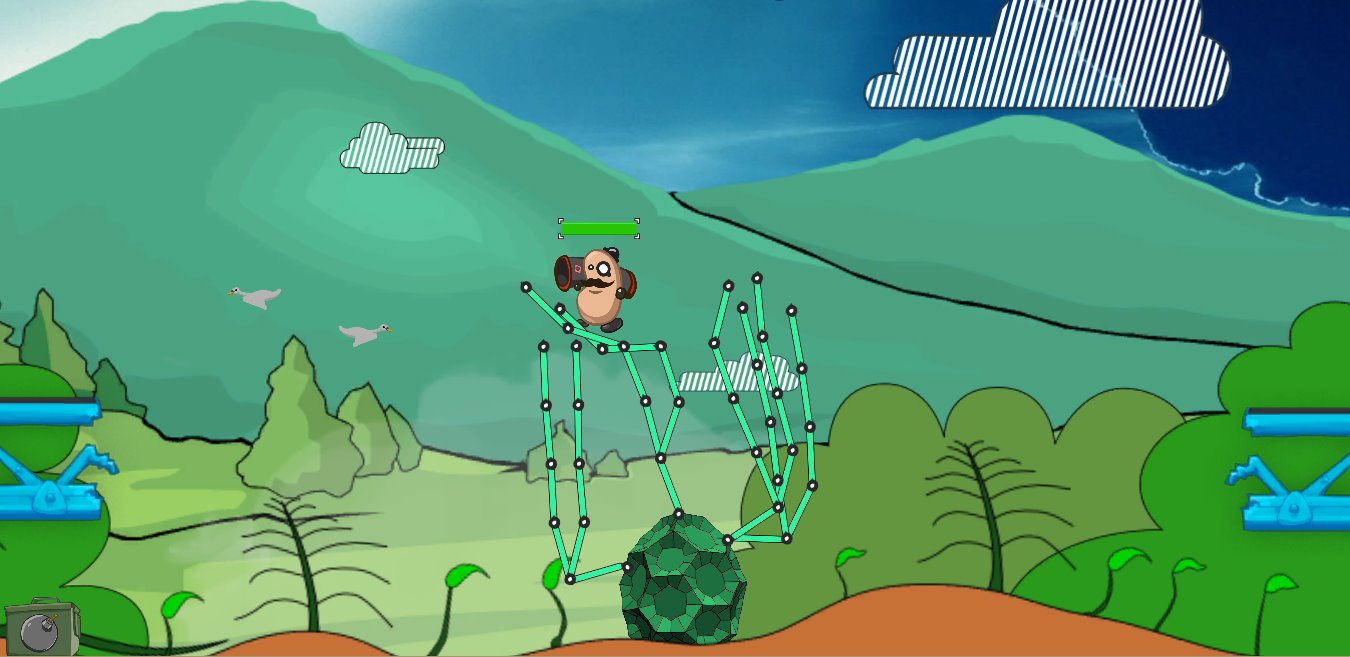
Script parallax implemented in the Unity3d 2D demo project uses scaling to simulate the removal of an object from the camera. This is an extra computing load. Therefore, it was decided to abandon it and simply spread the background layers along the Z-axis. Changing the main camera mode from orthogonal to perspective, I got honest parallax for background layers and a side effect for avatar sprites and rockets. In the demo project from Unity3D, the body parts of the avatar and rockets were already spaced along the Z-axis. In orthogonal camera mode, this was not visible. Also, the entire animation of the character, NPCs and missiles is also tied to the Z-coordinates of the parts. I had to redirect everything by replacing the Z-coordinate in zero in animated frames. The structure of the resulting scene is presented in the animation below.
In the foreground are blue platforms with fungi (Sorting Layer: Foreground in the Sprite Renderer component). Below the Foreground layer is the Character layer, which contains the avatar itself, our GMO with other plants, land, and also bushes floating in the background. SpriteRenderer to determine which sprite to place on top of which is guided by the Sorting Layer and Order in Layer specified in the parameters. Accordingly, sprites with a larger Z-coordinate value can still be drawn on top of other sprites. Be careful when choosing Sorting Layer and Order in Layer.
So in our scene, if in the Sprite Renderer of background bushes indicate Order in Layer is more than one or change Sorting Layer to Foreground, then the bushes will be drawn on top of the ground, avatar and vegetation despite the fact that they are further from the camera.
The form for assessing the prospects is presented below.
The work, of course, is still a wagon and how many small carts. I will highlight a couple of immediate priorities.
After the first article about the project, two developers contacted me. Therefore, another important task is to establish processes so that it is comfortable to work in your free time. As I wrote above, Ubuntu One is still used for data exchange. Communication via Skype. A task tracker has not yet been selected. Perhaps this will be the formation of the tasks themselves in the near future. When will the next update on the project I can’t say.
I hope someone will find my experience useful. I will share as much as possible.
THANKS FOR ATTENTION!
In the last article , the concept of a “genetically modified organism" was introduced, but the scene was used inappropriately. In this article I want to tell how and with the help of which tools the art scene was redone. The main changes are as follows:
- Urban theme, buildings and flying saucer replaced by plants, views of the vegetative landscape; replaced background (sky).
- Added experimental cloud sprites (those in the strip on the KDPV above)
- The main camera mode is changed to perspective (3D); background sprites are scattered along the Z axis to replace script parallax with an honest 3D perspective.
- Cloud and fog animations redone
- The plant core sprite has been replaced with a more technologically drawn hexagonal sprite.
- The animation of the player’s avatar and the breakdown of its parts by the Z-coordinate have been redone.
Instruments
As the main workstation, a PC with Ubuntu 13.10 OS is used. For work on graphics, GIMP and Inkscape are used in conjunction with the Wacom Bamboo Pen & Touch graphics tablet. Ubuntu has Wacom support out of the box, though you have to configure the buttons through the console ( there are instructions on the network, so no problem). Also based on Ubuntu it is planned to establish work with sound and video. In particular, Record My Desktop was used to record video for this article.
included in the Ubuntu repository. The sound for the last demo was written from a stereo mixer using Audacity. Video in OGV format and recorded sound were mixed in the OpenShot Video Editor. Exported the video to the OGG Theora format, as For some reason, the mentioned editor refused to see the libx264 installed on the system. But OGG Theora is accepted by Youtube without much trouble.
To work with Unity3D yet (I hope so far) you have to use a station with Windows (laptop). I tried to run the editor for Wine according to the instructions from Ask Ubuntu - it did not start (failed to initialize the license service).
Ubuntu One (Canonical cloud storage, if anyone does not know) I use to exchange data between workstations. BtSync, apparently due to problems with the firewall, did not start immediately (there is no time to understand it yet). Perhaps I will go to him in the future.
Ubuntu One has created a demo build directory. If anyone is interested, send email addresses registered in Ubuntu One, I will send an invite to this directory in response. There I will try to lay out assemblies for at least Windows and Linux. I can’t test on a Mac, but on Android I’ll try in the future.
Inkscape
I'll start, perhaps, with how I redrawn the kernel sprite. Used for this so-called " Draloscopy " method . A certain origami figure (like these ) is taken for the sample and imported into the vector drawing as a substrate.
A draft vector skeleton (wireframe) is created on the substrate. Immediately turn on the magnetization of the input nodes to existing ones, so that the contours are closed, because then we will need to fill them.
If spatial thinking skills are developed, then you no longer need a pattern. You can correct the location of nodes and go to fill closed loops.
The fill tool (Fill bounded area) was used. It fills the polygon with the selected color (in this case 70% gray) and adds a slightly darker border at the border between the fill and the border of the polygon. Fill the polygons at the same screen scale, because the thickness of the border of the fill depends on the scale. The brightness of the selected polygon fill is conveniently adjusted by the fill transparency (RMB on the fill -> Fill and Strokes -> Fill tab).
Inkscape was also used to create a scene sprite atlas. At first the scene was drawn:
Then parts of it were scattered along the canvas and exported to PNG.
For experimental striped-filled clouds, the Objects to Pattern tool in Inkscape was used.
To create the edging of trees in the background landscape, I used the Outset tool in Inkscape.
Honest 3D perspective
Script parallax implemented in the Unity3d 2D demo project uses scaling to simulate the removal of an object from the camera. This is an extra computing load. Therefore, it was decided to abandon it and simply spread the background layers along the Z-axis. Changing the main camera mode from orthogonal to perspective, I got honest parallax for background layers and a side effect for avatar sprites and rockets. In the demo project from Unity3D, the body parts of the avatar and rockets were already spaced along the Z-axis. In orthogonal camera mode, this was not visible. Also, the entire animation of the character, NPCs and missiles is also tied to the Z-coordinates of the parts. I had to redirect everything by replacing the Z-coordinate in zero in animated frames. The structure of the resulting scene is presented in the animation below.
In the foreground are blue platforms with fungi (Sorting Layer: Foreground in the Sprite Renderer component). Below the Foreground layer is the Character layer, which contains the avatar itself, our GMO with other plants, land, and also bushes floating in the background. SpriteRenderer to determine which sprite to place on top of which is guided by the Sorting Layer and Order in Layer specified in the parameters. Accordingly, sprites with a larger Z-coordinate value can still be drawn on top of other sprites. Be careful when choosing Sorting Layer and Order in Layer.
So in our scene, if in the Sprite Renderer of background bushes indicate Order in Layer is more than one or change Sorting Layer to Foreground, then the bushes will be drawn on top of the ground, avatar and vegetation despite the fact that they are further from the camera.
The form for assessing the prospects is presented below.
What's next?
The work, of course, is still a wagon and how many small carts. I will highlight a couple of immediate priorities.
- Of course, instead of rough sprites of vegetation, you need to draw something more decently, more vividly.
- Add insect sprites of exotic appearance.
- To concoct finally a more appropriate soundtrack.
- Remake genetics so that you can “shoot genes” wherever you want.
- To realize objects attached to the skeleton of the plant - walls, supports, shooting-bullets and what else comes into your head.
- To realize the sun radiating heat and radiation; realize clouds that provide water and electricity.
- Implement UI with the display of accumulated resources and available genes.
P.S
After the first article about the project, two developers contacted me. Therefore, another important task is to establish processes so that it is comfortable to work in your free time. As I wrote above, Ubuntu One is still used for data exchange. Communication via Skype. A task tracker has not yet been selected. Perhaps this will be the formation of the tasks themselves in the near future. When will the next update on the project I can’t say.
I hope someone will find my experience useful. I will share as much as possible.
THANKS FOR ATTENTION!