How to make code readable
- Transfer

Someday we all wrote (and some write) bad code, and hopefully we all work on improving our skills, and not just reading articles like this.
Why do we need to write good code, and not just productive code?
Although the performance of your product or site is important, so is how your code looks. The reason for this is that not only the machine reads your code .
First, sooner or later you will have to re-read your own code, and when that time comes, only well-written code will help you understand what you wrote, or figure out how to fix it.
Secondly, if you work in a team or collaborate with other developers, all team members will read your code and try to interpret it as they understand it. To make it easier for them, it is important to follow certain rules when naming variables and functions, limit the length of each line, and preserve the structure of your code.
Finally, let's look at a specific example.
Part 1: How to identify bad code?
The easiest way to identify bad code, in my opinion, is to try to read the code as if it were a sentence or a phrase .
For example, take a look at this code:
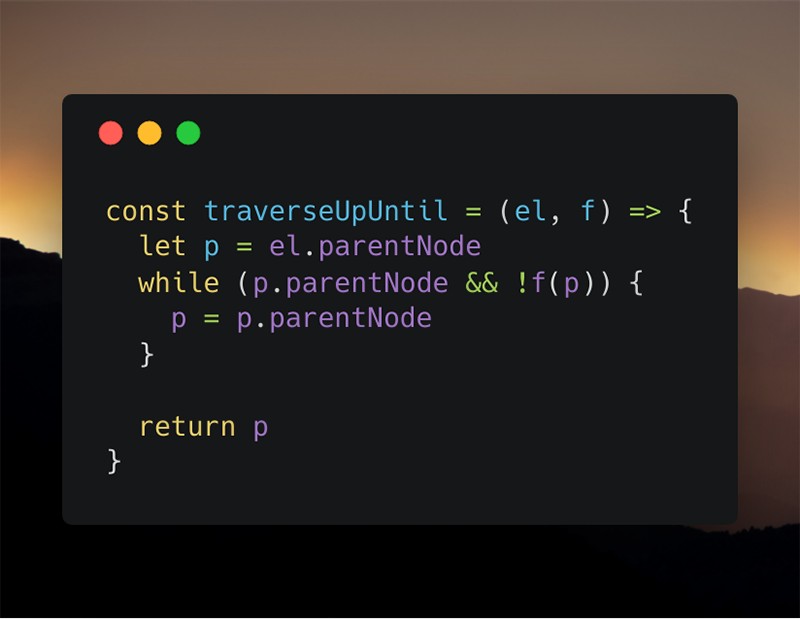
Screenshot of the bad version of the traverseUpUntil function
The above function takes an element and a conditional function and returns the closest parent node that satisfies the conditional function.
const traverseUpUntil = (el, f) => {Based on the fact that the code should be read as plain text, the first line has three gross deficiencies.
- Function parameters are not read as words .
- Suppose
elyou can understand, since such a name is usually used to designate an element, but the parameter namefdoes not explain anything at all. - The name of the function can be read like this: “go until el passes f”, which is probably better to read as “go until f passes for el”. Of course, the best way to do this is to allow functions to be called as
el.traverseUpUntil(f), but this is another problem.
let p = el.parentNodeThis is the second line. Again the problem with the names, this time with the variable. If someone looked at the code, then, most likely, they would understand what it is p. This is a parentNodeparameter el. However, what happens when we look at p, used elsewhere, we no longer have a context that explains what it is .
while (p.parentNode && !f(p)) {In the next line, the main problem we are facing is a misunderstanding of what it means or does !f(p), because “f” can mean anything . It is assumed that the person reading the code should understand that !f(p)- this is checking the current node for satisfaction of a particular condition. If it passes, then the cycle is interrupted.
p = p.parentNodeEverything is clear here.
return pIt is not entirely obvious what is returned due to an incorrect variable name.
Part 2: Let's refactor
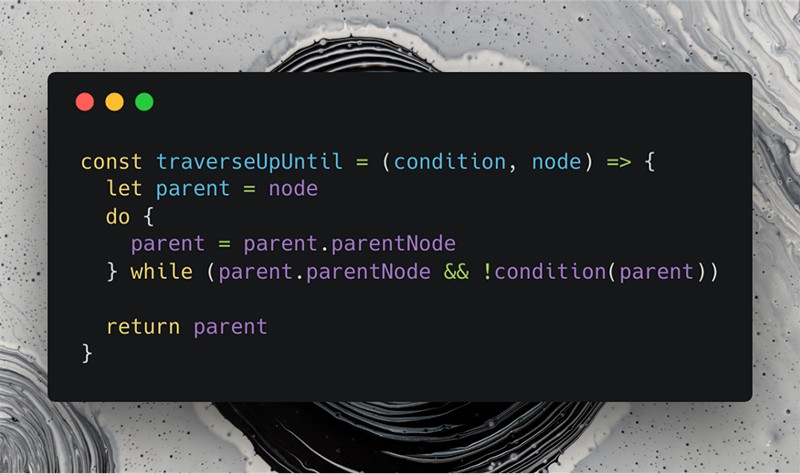
Screenshot of the good version of the traverseUpUntil function
First we change the parameter names and their order: (el, f) =>c (condition, node) =>.
Perhaps you wonder why, instead of “element (Russian element ), I used“ node ”(Russian node ). I used it for the following reasons:
- We write code in terms of nodes, for example
.parentNode, so why not make it consistent. - “Node” is shorter than “element”, and the meaning is not lost .
Then we go to the variable names:
let parent = nodeIt is very important to reveal the full value of your variable in its name , so the «p» is now «parent» (eng. The parent ). You may also have noticed that now we are not starting with getting the parent node node.parentNode, instead we get only the node.
Go ahead:
do {
    parent = parent.parentNode
} while (parent.parentNode && !condition(parent))
Instead of the usual loop, whileI chose the loop do ... while. This means that we need to get the parent node every time before checking the condition, and not vice versa. Using the loop do ... whilealso helps to read the code as plain text.
Let's try to read: "Assign the parent node to the parent to the parent, as long as the parent has the parent node, and the condition function does not return true . " Already much clearer.
return parentOften, developers prefer to use some kind of common variable ret(or returnValue), but this is a pretty bad practice . If you correctly name your returned variables, it becomes obvious what is being returned. However, sometimes the functions can be long and complex, which leads to great confusion. In this case, I would suggest dividing your function into several functions , and if it is still too complex, then perhaps adding comments can help.
Part 3: Simplify the code
Now that you've made the code readable, it's time to remove the unnecessary code . I’m sure some of you have noticed that we don’t need a variable at all parent.
const traverseUpUntil = (condition, node) => {
    do {
        node = node.parentNode
    } while (node.parentNode && !condition(node))
    return node
}
I simply removed the first line and replaced “parent” with “node”. So I skipped the unnecessary step of creating a “parent” and went straight into the loop.
But what about the variable name?
Although “node” is not the best description for this variable, it is satisfactory. But let's not dwell on this, let's rename it. How about "currentNode"?
const traverseUpUntil = (condition, currentNode) => {
    do {
        currentNode = currentNode.parentNode
    } while (currentNode.parentNode && !condition(currentNode))
    return currentNode
}
That's better! Now, when we read the method, we know that it currentNodealways represents the node in which we are now, instead of being “some” node.