How to get rid of errors with Active Object tables when restoring Jira from backup

In this article we will talk about how to get rid of errors with Active Objects tables when restoring Jira from backup and write a plugin to remove unnecessary Active Objects tables from the backup archive file.
What are Active Objects tables?
The Jira database contains two types of tables: system tables, such as jiraissue, cwd_user, changegroup, and tables added by plugins installed in Jira. These tables are Active Objects tables. They are easy to distinguish from system tables by the prefix AO_XXXXXX.
AO means Active Objects, and XXXXXX is the hashcode that Jira generates for each plug-in. Hashcode is needed in order to be able to create tables with identical names in different plugins. Since after adding the prefix AO_XXXXXX to tables with the same name, the table names start to differ, and therefore they can be created in the database.
Active Objects is an ORM layer in Atlassian products. Read more about it here .
In Jira, you can view information about all the tables created by each plug-in, if you go to Gear -> System -> Plugin Data Storage. For example, on my Jira instance, the information on plugins looks like this:
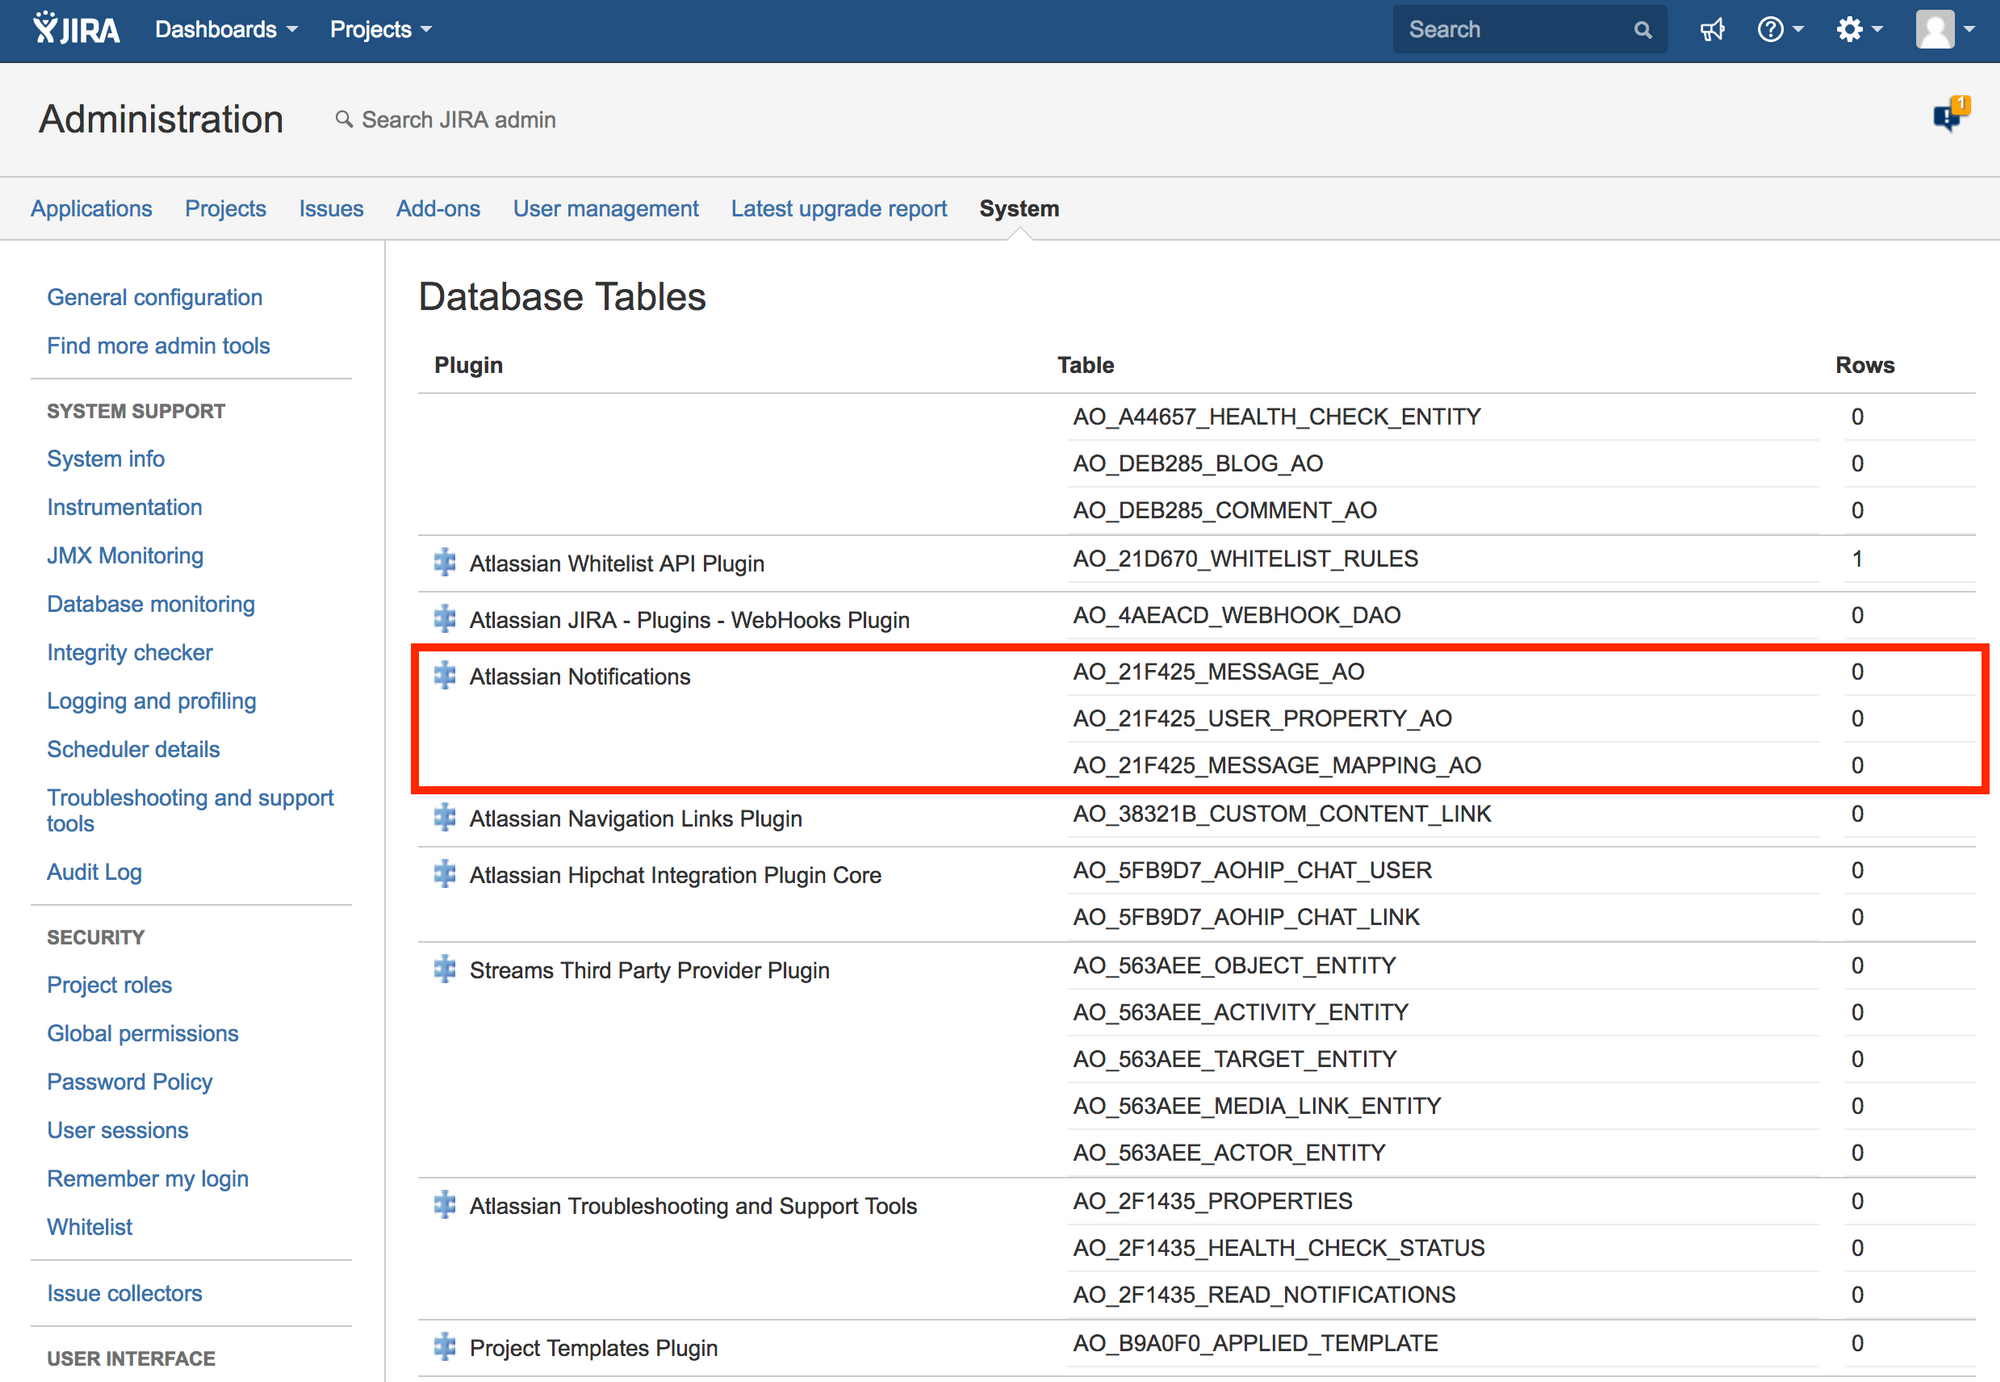
The screenshot shows that Atlassian Notifications plugin has created three tables that have hashcode 21F425
AO errors
Now let's see how these errors look in real time. Here is an example of the "unsupported field encountered: binary" error:
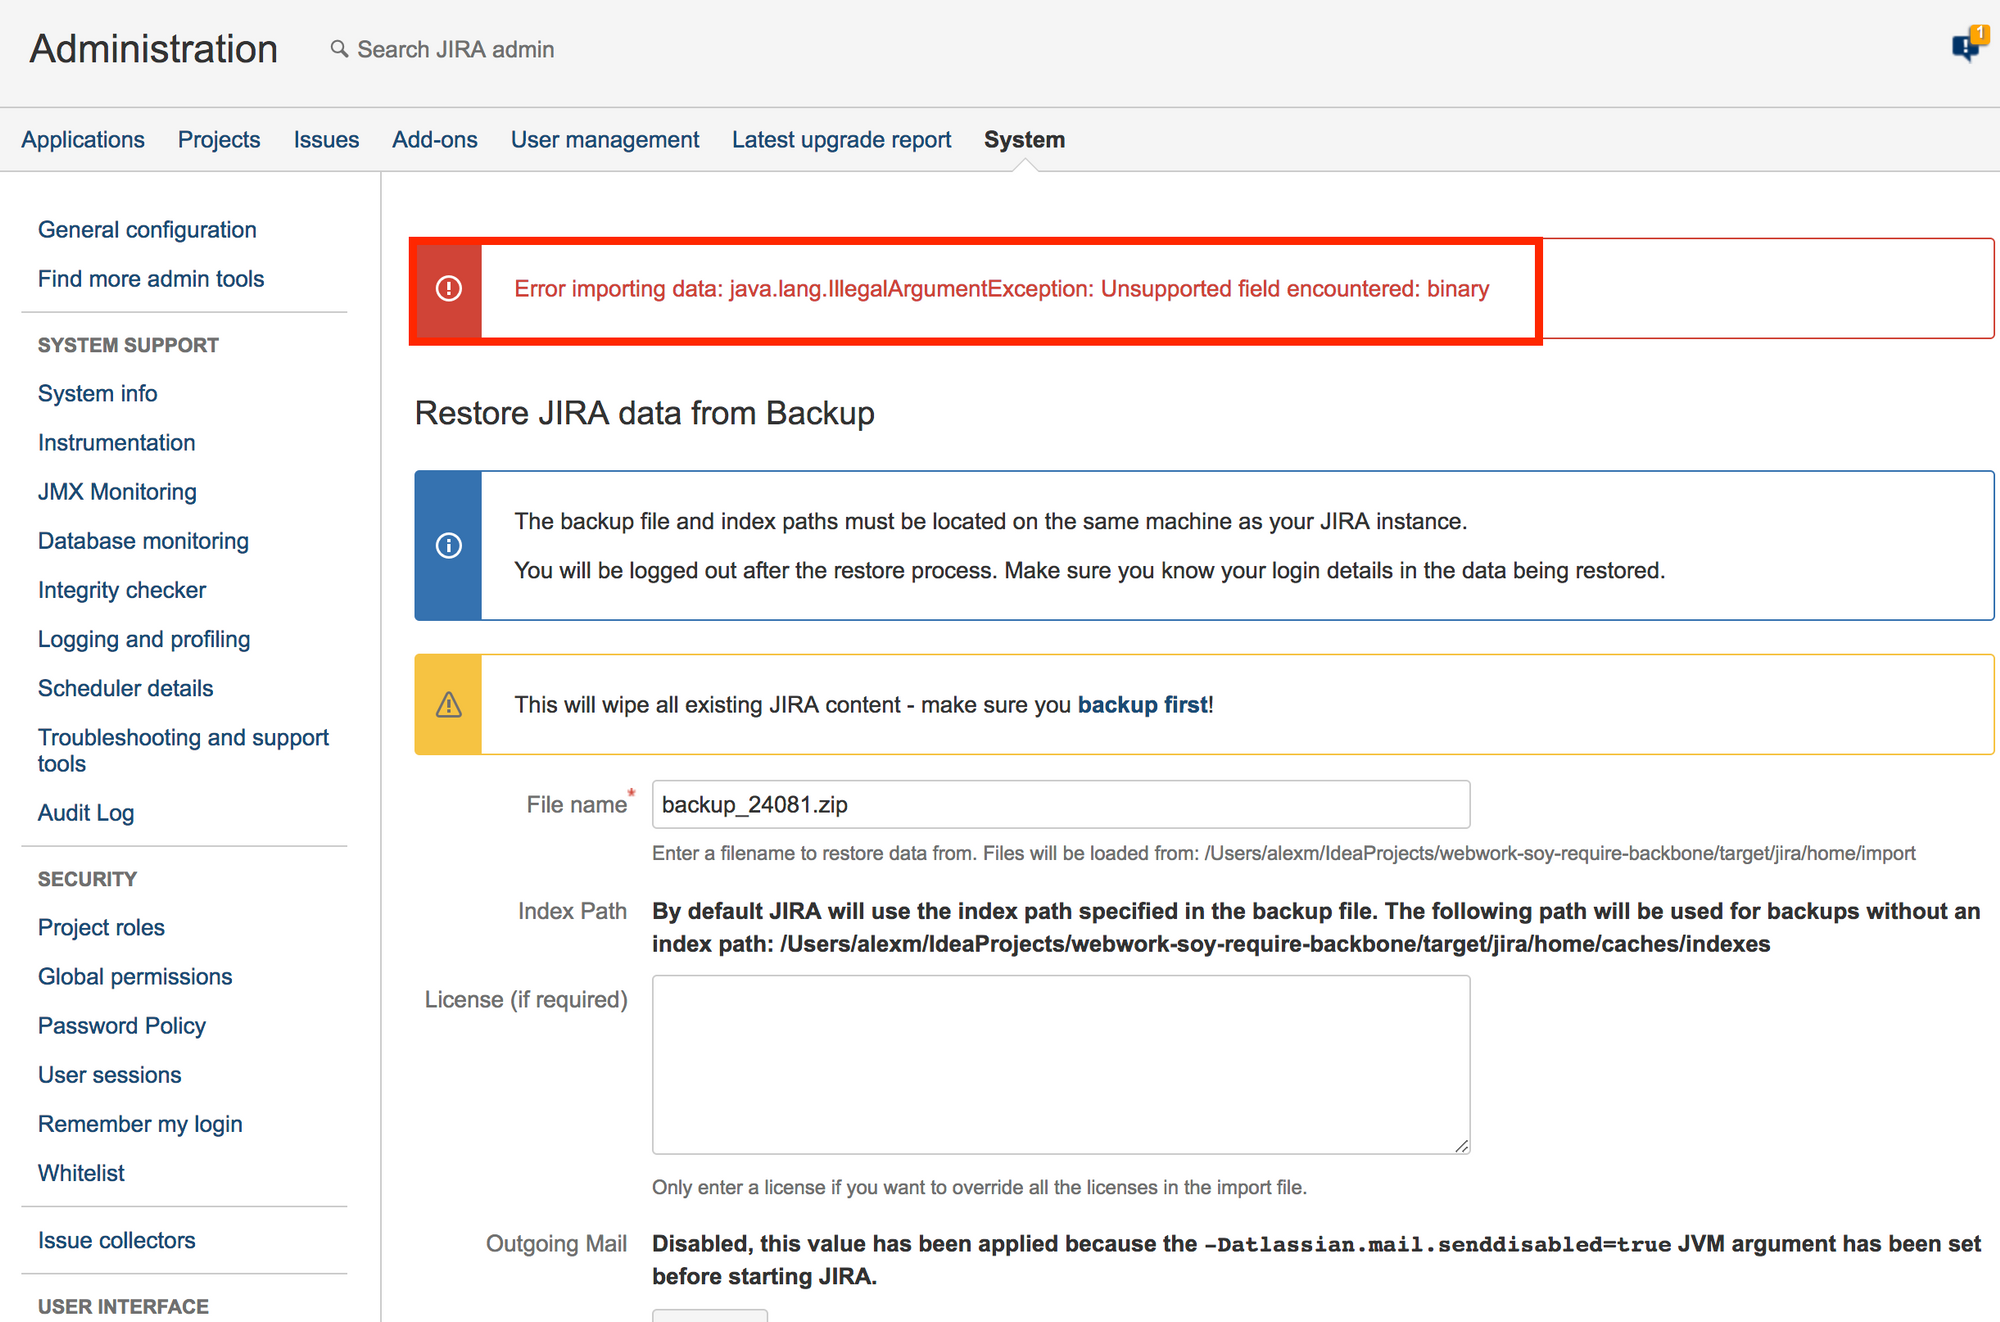
Fix the error "unsupported field encountered: binary"
Let's try to fix this error. To do this, unzip the backup file. Inside we will see two files: entities.xml and activeobjects.xml.
The entities.xml file contains system table data. The file activeobjects.xml contains data from Active Objects tables. We just need the activeobjects.xml file.
Open the file activeobjects.xml file and look for the word “binary” in the file. In my case, found 10 matches. These coincidences look like this:
<row><string>Alexey Matveev</string><string>alexey.matveev@aaa.com</string><integer>1</integer><timestampxsi:nil="true"/><stringxsi:nil="true"/><integerxsi:nil="true"/><binaryxsi:nil="true"/><stringxsi:nil="true"/><stringxsi:nil="true"/><integerxsi:nil="true"/><string>Europe/Moscow</string><string>alexey</string><string>alexey</string></row>Delete all the lines <binary xsi: nil = "true" /> in the file activeobjects.xml file and try to restore Jira again.
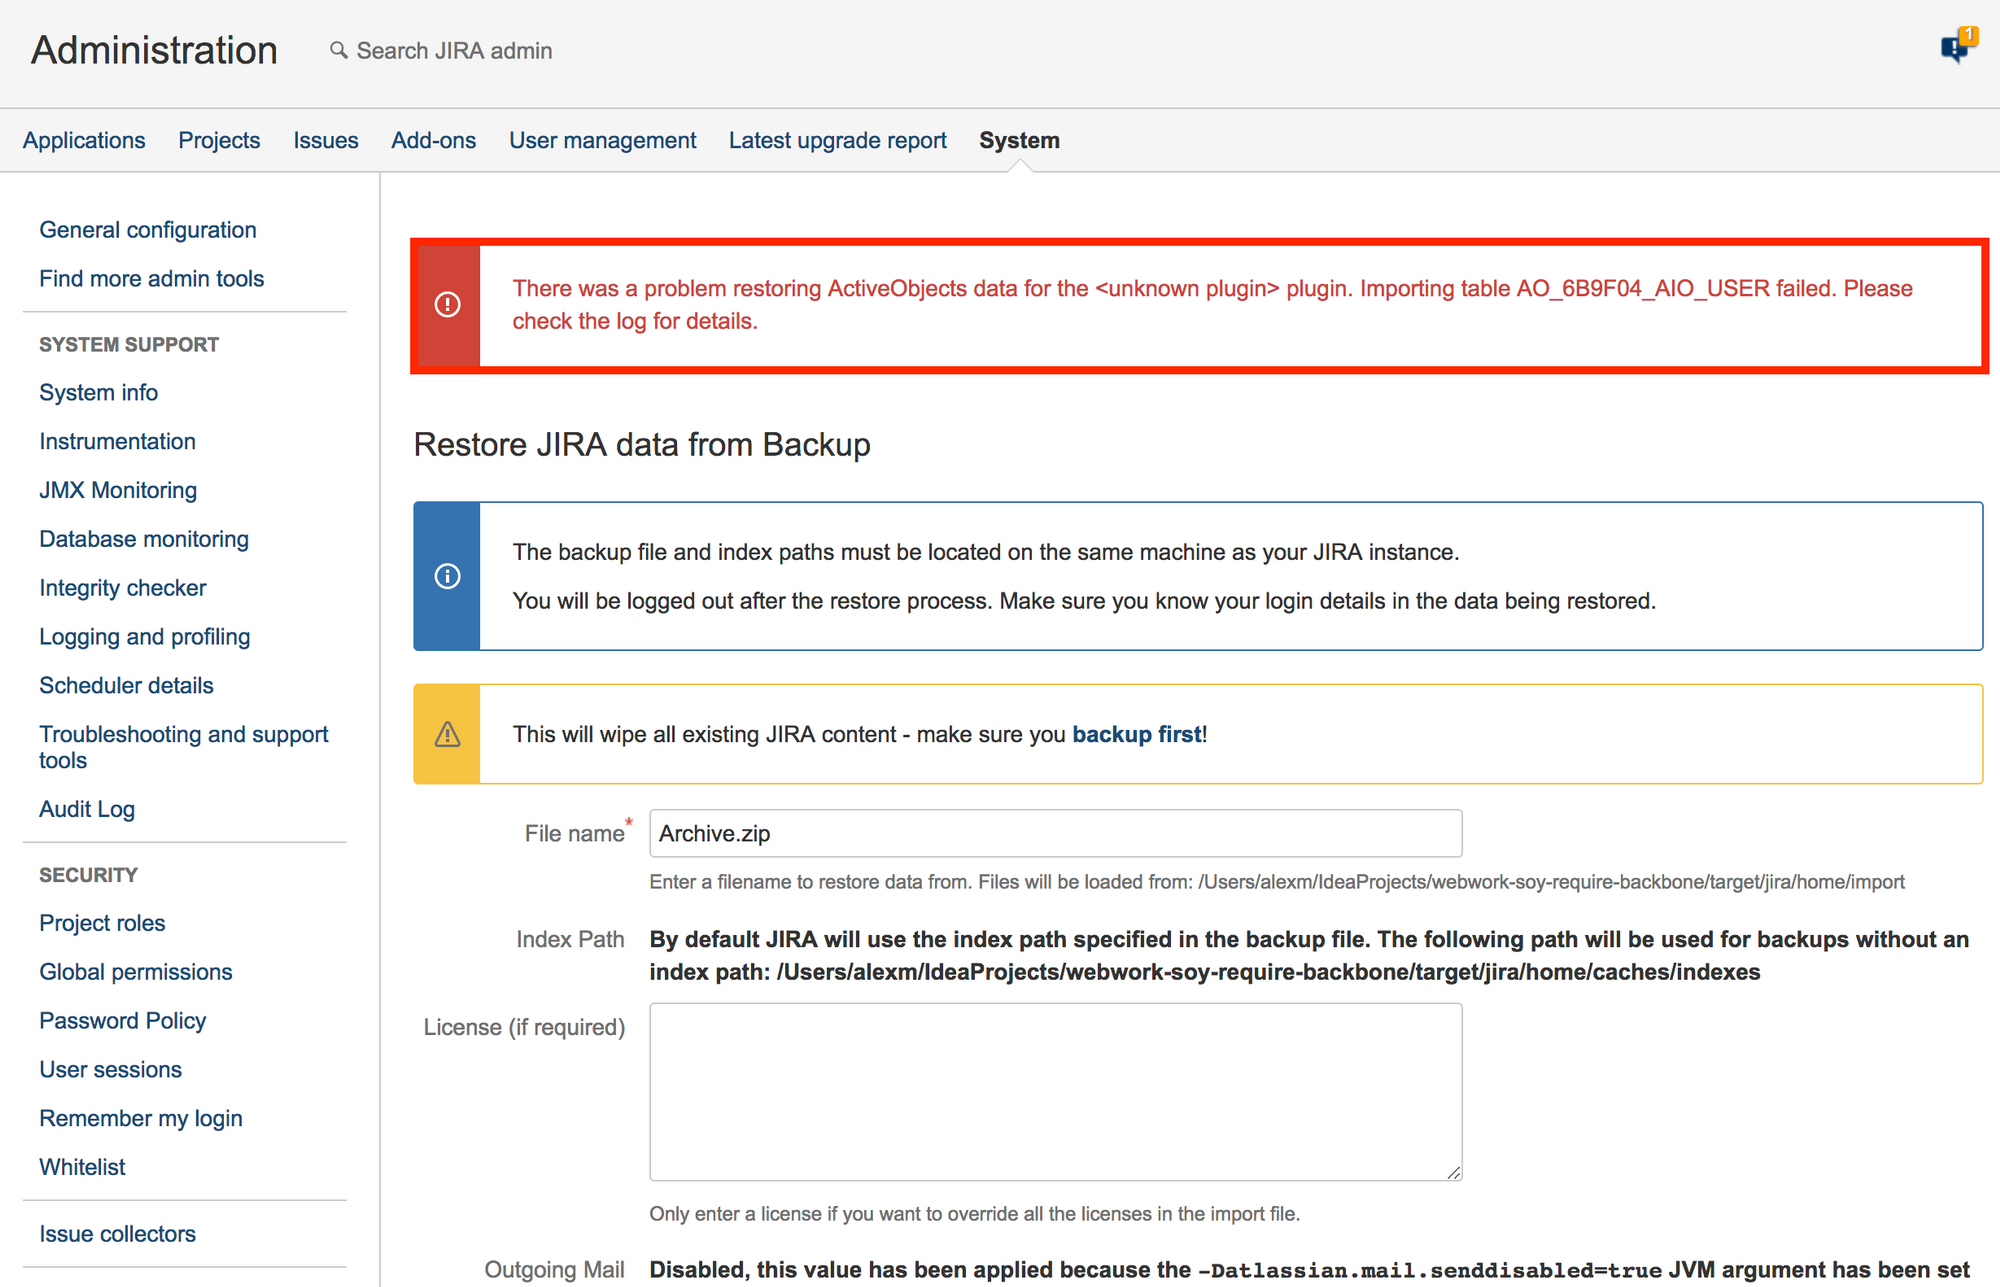
This time, the error “unsupported field encountered: binary” is fixed, but we see a new error:
Let's look at the contents of the atlassian-jira.log file:
[INFO] [talledLocalContainer] com.atlassian.activeobjects.spi.ActiveObjectsImportExportException: There was an error during import/export with <unknown plugin> (table AO_6B9F04_AIO_USER):Could not import data in table 'AO_6B9F04_AIO_USER' column #10, value is too big for column which size limit is 10, value is:
[INFO] [talledLocalContainer] Europe/Moscow
If you search for information about this error on the Internet, then we will find just such a KB .
In this KB it is proposed to change the dimension of the field No. 10 to -1. Let's try.
<tablename="AO_6B9F04_AIO_USER"><columnname="DISPLAY_NAME"primaryKey="false"autoIncrement="false"sqlType="-9"precision="255"/><columnname="EMAIL_ADDRESS"primaryKey="false"autoIncrement="false"sqlType="-9"precision="255"/><columnname="ID"primaryKey="true"autoIncrement="true"sqlType="4"precision="10"/><columnname="LAST_LOGIN_DATE"primaryKey="false"autoIncrement="false"sqlType="93"precision="23"scale="3"/><columnname="LOCALE"primaryKey="false"autoIncrement="false"sqlType="-9"precision="255"/><columnname="LOGIN_DAYS_COUNT"primaryKey="false"autoIncrement="false"sqlType="4"precision="10"/><columnname="O_AUTH_TOKEN"primaryKey="false"autoIncrement="false"sqlType="-4"precision="2147483647"/><columnname="O_AUTH_TOKEN_SECRET"primaryKey="false"autoIncrement="false"sqlType="-9"precision="255"/><columnname="TABLEAU_KEY"primaryKey="false"autoIncrement="false"sqlType="-9"precision="255"/><columnname="TENANT_ID"primaryKey="false"autoIncrement="false"sqlType="4"precision="10"/><columnname="TIME_ZONE"primaryKey="false"autoIncrement="false"sqlType="-9"precision="255"/><columnname="USERKEY"primaryKey="false"autoIncrement="false"sqlType="-9"precision="255"/><columnname="USERNAME"primaryKey="false"autoIncrement="false"sqlType="-9"precision="255"/><foreignKeyfromTable="AO_6B9F04_AIO_USER"fromColumn="TENANT_ID"toTable="AO_6B9F04_AIO_TENANT"toColumn="ID"/></table>Change:
<columnname="TENANT_ID"primaryKey="false"autoIncrement="false"sqlType="4"precision="10"/>on
<columnname="TENANT_ID"primaryKey="false"autoIncrement="false"sqlType="4"precision="-1"/>and try to restore Jira from our backup.
In the log we see again the same errors. KB did not help.
uknown plugin
Let's once again carefully read the error. We will see that the data from the UKNOWN PLUGIN plugin cannot be imported. Why from an unknown plugin (UKNOWN PLUIGN)?
If you look at the screenshot below, you can see that some Active Objects do not have plug-in names, to which they belong:

You can see that there is a plug-in name in the red box, and there is no plug-in in the blue box. This can happen if we installed the plugin, then deleted it and restarted Jira with the deletion of the .osgi_plugins folder. This type of Jira restart is recommended if there are any problems with the work of plug-ins.
Our table AIO_USER does not have a plugin name, so we can simply delete the table.
Let's find the definition of this table in the file activeobjects.xml, delete the found definition and try to restore Jira from the backup.
We will see another error:
[INFO] [talledLocalContainer] com.atlassian.activeobjects.spi.ActiveObjectsImportExportException: There was an error during import/export with <unknown plugin> (table AO_6B9F04_AIO_USER):Could not create prepared statement for SQL query, [INSERT INTO PUBLIC."AO_6B9F04_AIO_USER" ("DISPLAY_NAME", "EMAIL_ADDRESS", "ID", "LAST_LOGIN_DATE", "LOCALE", "LOGIN_DAYS_COUNT", "O_AUTH_TOKEN", "O_AUTH_TOKEN_SECRET", "TABLEAU_KEY", "TENANT_ID", "TIME_ZONE", "USERKEY", "USERNAME") VALUES (?, ?, ?, ?, ?, ?, ?, ?, ?, ?, ?, ?, ?)]The problem is that we deleted the table definition, but did not delete the data of this table. Let's find the data in this table in the activeobjects.xml file and delete it.
The data on the table starts with this tag:
<datatableName="AO_6B9F04_AIO_USER">And end with this tag:
</data>Let's remove these tags and everything between these tags, and try again to restore Jira from the backup.
We will get another error:
There was a problem restoring ActiveObjects data for the <unknown plugin> plugin. Caught exception with following message: Table "AO_6B9F04_AIO_USER" not found; SQL statement: ALTER TABLE PUBLIC.AO_6B9F04_AIO_REPORT ADD CONSTRAINT fk_ao_6b9f04_aio_report_owner_id FOREIGN KEY (OWNER_ID) REFERENCES PUBLIC.AO_6B9F04_AIO_USER(ID) [42102-185]. Please check the logfor details.This means that there are more tables in the plugin that reference this table, so we still need to delete all the tables that refer to the remote table. Then everything can go through the chain: it may be necessary to delete the tables of this plugin, which refer to the deleted tables.
Therefore, it will be much faster to delete all tables with the AO_6B9F04 prefix from the backup file programmatically.
Let's write a plugin that will remove the tables from the backup file by the given prefix. The plugin will consist of webwork, which will receive the name of the backup file (the backup file must be in JIRA_HOME / import) and the prefix.
The source code of the plugin can be found here .
Create a plugin
Open the terminal and execute the following command:
atlas-create-jira-pluginYou must answer the questions like this:
Define value for groupId: : ru.matveev.alexey.plugins.jira.cleanbackup
Define value for artifactId: : clean-backup
Define value for version:  1.0.0-SNAPSHOT: :
Define value for package:  ru.matveev.alexey.plugins.jira.cleanbackup: :
Confirm properties configuration:
groupId: ru.matveev.alexey.plugins.jira.cleanbackup
artifactId: clean-backup
version: 1.0.0-SNAPSHOT
package: ru.matveev.alexey.plugins.jira.cleanbackup
 Y: : Y
Editing POM.XML
The pom.xml file should look like this:
bitbucket.org/alex1mmm/clean-backup/src/master/pom.xml
We create WEBWORK, WEB SECTION and WEB ITEM
We open the terminal and execute:
atlas-create-jira-plugin-moduleYou need to answer the questions like this:
Choose a number (1/2/3/4/5/6/7/8/9/10/11/12/13/14/15/16/17/18/19/20/21/22/23/24/25/26/27/28/29/30/31/32/33/34): 31
Enter Plugin Module Name My Webwork Module: : cleanbackup
Show Advanced Setup? (Y/y/N/n) N: : y
Module Key cleanbackup: :
Module Description The cleanbackup Plugin: :
i18n Name Key cleanbackup.name: :
i18n Description Key cleanbackup.description: :
Enter Action Classname MyActionClass: : CleanBackup
Enter Package Name ru.matveev.alexey.plugins.jira.cleanbackup.jira.webwork: :
Enter Alias CleanBackup: : CleanBackup
Enter View Name success: : success
Enter Template Path /templates/cleanbackup/cleanbackup/success.vm: :
Add Another View? (Y/y/N/n) N: : N
Add Another Action? (Y/y/N/n) N: : N
Add Another Plugin Module? (Y/y/N/n) N: : Y
Choose a number (1/2/3/4/5/6/7/8/9/10/11/12/13/14/15/16/17/18/19/20/21/22/23/24/25/26/27/28/29/30/31/32/33/34): 30
Enter Plugin Module Name My Web Section: : CleanBackup
Enter Location (e.g. system.admin/mynewsection): admin_plugins_menu
Show Advanced Setup? (Y/y/N/n) N: : n
Add Another Plugin Module? (Y/y/N/n) N: : Y
Choose a number (1/2/3/4/5/6/7/8/9/10/11/12/13/14/15/16/17/18/19/20/21/22/23/24/25/26/27/28/29/30/31/32/33/34): 25
Enter Plugin Module Name My Web Item: : CleanAO
Enter Section (e.g. system.admin/globalsettings): admin_plugins_menu/clean-backup
Enter Link URL (e.g. /secure/CreateIssue!default.jspa): /secure/CleanBackup.jspa?
Show Advanced Setup? (Y/y/N/n) N: : Y
Module Key clean-ao: :
Module Description The CleanAO Plugin: :
i18n Name Key clean-ao.name: :
i18n Description Key clean-ao.description: :
Weight 1000: :
Link Id clean-ao-link: :
Enter Label Key clean-ao.label: : CleanBackup
Enter Label Value CleanAO: : CleanAO
Add Label Param? (Y/y/N/n) N: : n
Add Icon? (Y/y/N/n) N: : n
Add Tooltip? (Y/y/N/n) N: : n
Add Resource (Y/y/N/n) N: : n
Add Velocity Context Provider (Y/y/N/n) N: : n
Add Plugin Module Param? (Y/y/N/n) N: : n
Add Conditions? (Y/y/N/n) N: : n
Add Another Plugin Module? (Y/y/N/n) N: : n
Editing WEBWORK and SUCCESS.VM
Let's change our success.vm so that our webwork could take two parameters: the name of the backup and the prefix:
clean-backup / src / main / resources / templates / cleanbackup / cleanbackup / success.vm .
We will use SAX to work with xml files, so we will write a filter to delete the tables:
clean-backup / src / main / java / ru / matveev / alexey / plugins / jira / cleanbackup / jira / webwork / TableFilter.java .
Now we will make changes to webwork.
clean-backup / src / main / java / ru / matveev / alexey / plugins / jira / cleanbackup / jira / webwork / CleanBackup.java
We collect and run our plugin
Go to the plugin folder and execute:
atlas-runAfter Jira has started, put our backup file in JIRA_HOME / import and go to the browser at the following address:
localhost : 2990 / jira / secure / CleanBackup.jspa Enter the
name of the backup, prefix and click on the Clean button:
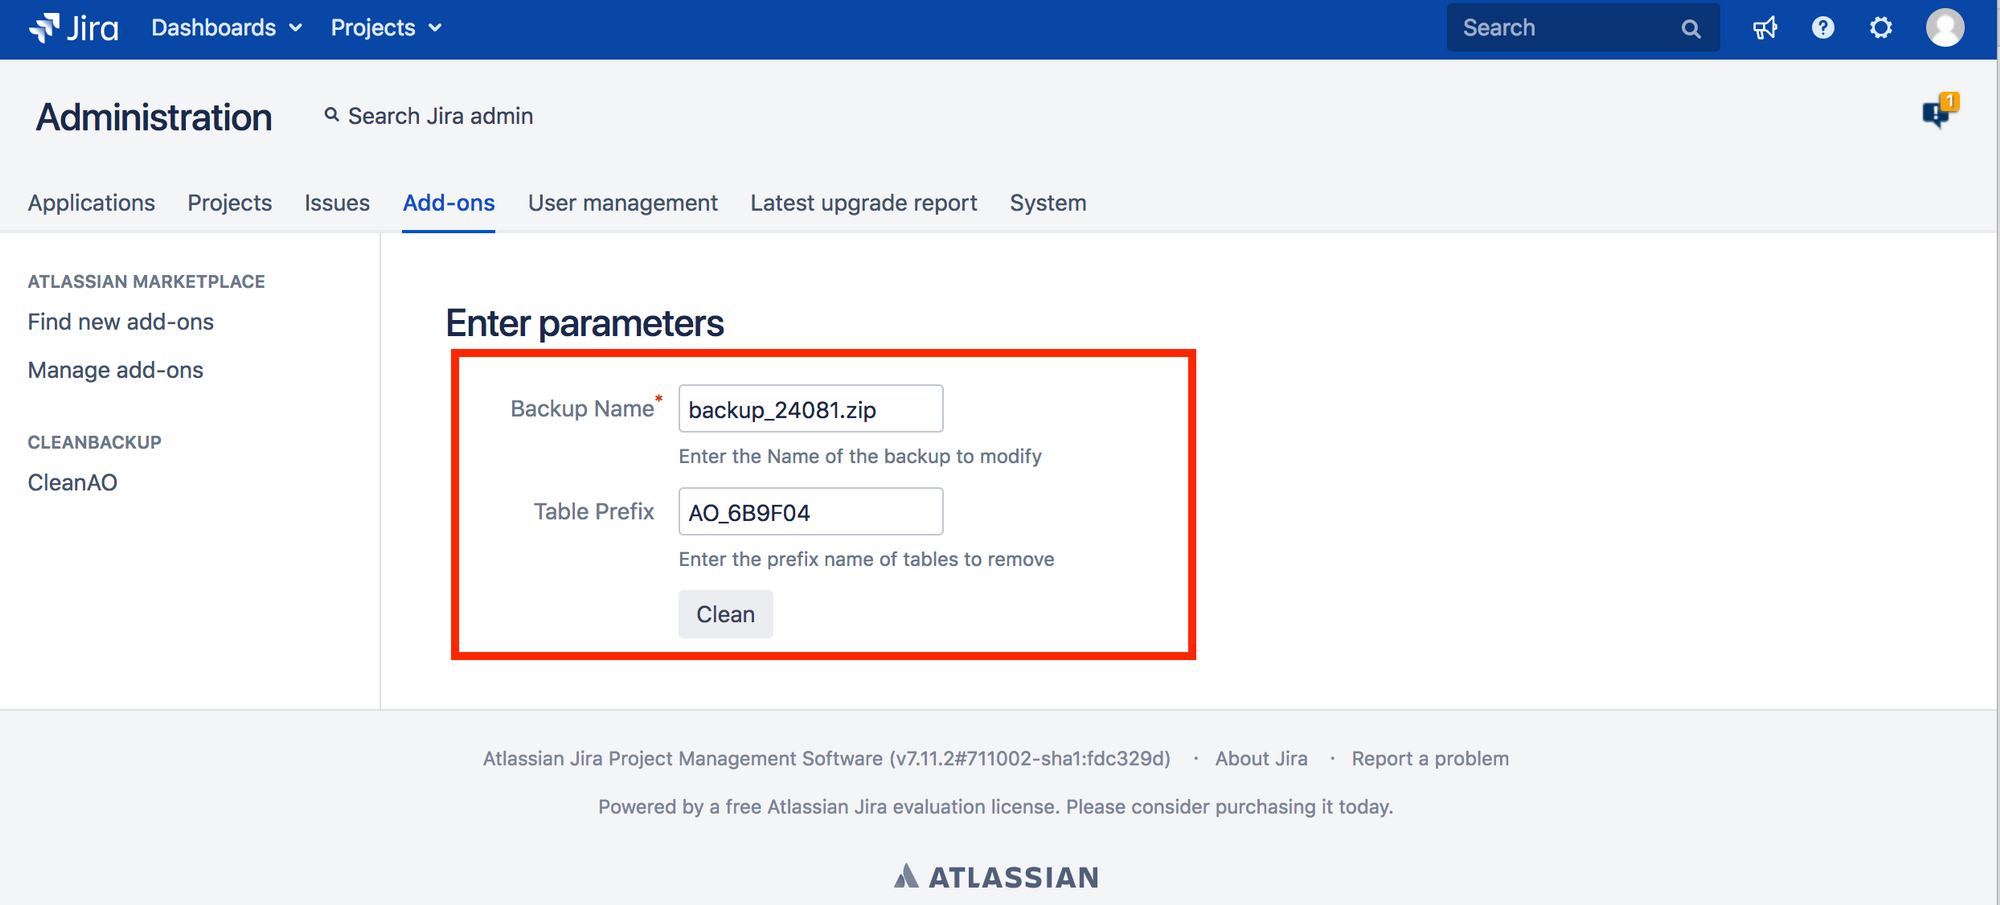
Tables, with a prefix, which we entered will be deleted from the backup and after that you can restore Jira.